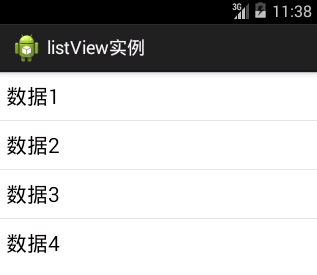
Listview是用来展示一些重复性的数据用的,比如一些列表集合数据展示到手机,需要适配器作为载体获取数据,最后将数据填充到布局。
ListView里面的每个子项Item可以使一个字符串,也可以是一个组合控件。而适配器就是 Item数组,动态数组有多少元素就生成多少个Item;
ArrayAdapter数组适配器比较简单,适合纯文字。布局文件可以自己写,也可以用系统的。
ArrayAdapter适配器实例:
归纳步骤:
1、准备数据源
2、新建适配器,绑定数据源
3、视图加载适配器
在布局文件中加入一个ListView控件:
<ListView android:id="@+id/list"
    android:layout_width="match_parent"
    android:layout_height="wrap_content"
    >
程序中:适配器的作用是数据和视图之间的桥梁
list = (ListView)findViewById(R.id.list);

//定义数据源作为ListView内容
String [] arr_data = {"数据1","数据2","数据3","数据4"};

//新建一个数组适配器ArrayAdapter绑定数据,参数(当前的Activity,布局文件,数据源)
arr_adapter = new ArrayAdapter<String>(this, android.R.layout.simple_list_item_1, arr_data);

//视图(ListView)加载适配器
list.setAdapter(arr_adapter);
预览效果:

也可以使用自定义布局:
把
android.R.layout.simple_list_item_1
改为:
R.layout.name 里面只放一个TextView
<?xml version="1.0" encoding="utf-8"?>
<TextView xmlns:android="http://schemas.android.com/apk/res/android"
         android:id="@android:id/text1"
        android:layout_width="match_parent"
        android:layout_height="wrap_content"
        android:textColor="#ff0000"
        />
SimpleAdapter适配器实例:
相比ArrayAdapter,SimpleAdapter则有很强的扩展性,可以自定义出各种效果。
归纳步骤:
1、准备数据源:指定由Map组成的List数据源
2、新建适配器,设置键值名和对应控件id,绑定数据
3、视图加载适配器
先看一下SimpleAdapter 的构造函数:
new SimpleAdapter(context, data, resource, from, to)
参数:
context ------SimpleAdapter关联的View的运行环境
data ---------一个Map组成的List。在列表中的每个条目对应列表中的一行,每一个map中应该包含所有在from参数中指定的键
resource ------ 一个定义列表项的布局文件的资源ID。布局文件将至少应包含那些在to中定义了的ID
from ---------- 一个将被添加到Map映射上的键名
to -------------将绑定数据的视图的ID,跟from参数对应
程序代码:
package com.example.testsimpleadapter;

import java.util.ArrayList;
import java.util.HashMap;
import java.util.Map;

import android.support.v7.app.ActionBarActivity;
import android.widget.ListView;
import android.widget.SimpleAdapter;
import android.os.Bundle;

public class MainActivity extends ActionBarActivity {
    private ListView mylist;
    private SimpleAdapter simp_ada;
    private ArrayList<Map<String, Object>> arr_data;

    @Override
    protected void onCreate(Bundle savedInstanceState) {
        super.onCreate(savedInstanceState);
        setContentView(R.layout.list);
        mylist = (ListView) findViewById(R.id.mylist);

        //每一行数据就是一个Map,指定由Map组成的List,
        arr_data = new ArrayList<Map<String, Object>>();

        // 新增数据
        for (int i = 0; i < 20; i++) {
            Map map = new HashMap<String, Object>();
            //map放入两个键值对,键名与from对应,
            map.put("pic", R.drawable.ic_launcher);
            map.put("text", "数据" + i);
            //往list添加数据
            arr_data.add(map);
        }

        // 新建适配器 ,绑定数据
        String[] from = { "pic", "text" };
        int[] to = { R.id.pic, R.id.text };
        simp_ada = new SimpleAdapter(this, arr_data, R.layout.listitem,from,to);

        // 加载适配器
        mylist.setAdapter(simp_ada);
    }

}
<?xml version="1.0" encoding="utf-8"?>
<LinearLayout xmlns:android="http://schemas.android.com/apk/res/android"
    android:layout_width="match_parent"
    android:layout_height="match_parent"
    android:orientation="horizontal"
    >

<ImageView
    android:id="@+id/pic"
    android:layout_marginLeft="6dp"
    android:layout_width="wrap_content"
    android:layout_height="wrap_content"
    android:src="@drawable/ic_launcher"

    />
<TextView
    android:id="@+id/text"
    android:layout_width="match_parent"
    android:layout_height="50dp"
    android:gravity="center_vertical"
    android:text="文字"
    />
</LinearLayout>