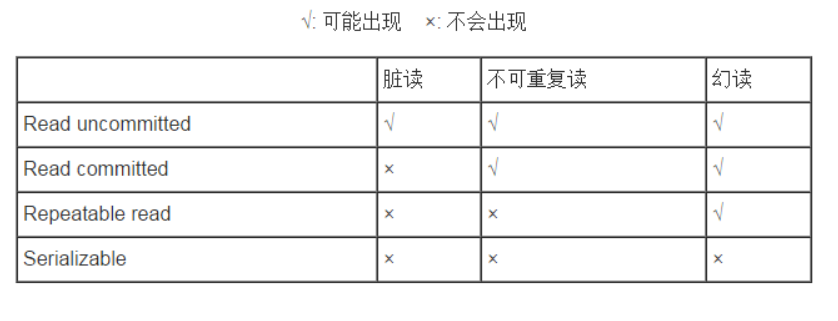
一、事物的四大隔离级别
1、ISOLATION_READ_UNCOMMITTED:读未提交
2、ISOLATION_READ_COMMITTED:读已提交
3、ISOLATION_REPEATABLE_READ:可重复读
4、ISOLATION_SERIALIZABLE:串行化
二、事物的七种传播行为
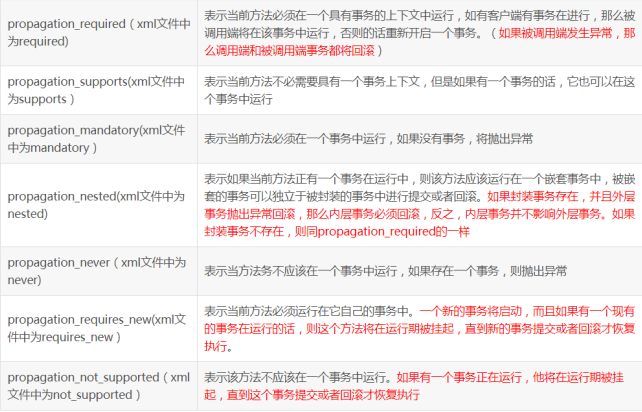
最常用的为前三种,第一种最常用
三、事物配置(使用注解方式)
1、创建实体类Account
package com.cmy.entity;

public class Account {
    private Integer accountid;  //用户id
    private String accountname; //用户姓名
    private double balance; //用户余额

    public Integer getAccountid() {
        return accountid;
    }

    public void setAccountid(Integer accountid) {
        this.accountid = accountid;
    }

    public String getAccountname() {
        return accountname;
    }

    public void setAccountname(String accountname) {
        this.accountname = accountname;
    }

    public double getBalance() {
        return balance;
    }

    public void setBalance(double balance) {
        this.balance = balance;
    }
}
2、创建Dao层(定义加钱的方法和减钱的方法)
package com.cmy.dao;

import com.cmy.entity.Account;

import java.util.List;

public interface AccountDao {//加钱的方法
    public  void addMoney(double money);

    //减钱的方法
    public void subMoney(double money);
}
3、创建Dao层的Impl的实现层(重写方法并实现)
@Repository
public class AccountDaoImpl implements AccountDao {
    //植入JDBC模板
    @Resource
    private JdbcTemplate jdbcTemplate;
 @Override
    public void addMoney(double money) {
        String sql="UPDATE accounts SET balance=balance+? WHERE accountname='小明'";
        jdbcTemplate.update(sql,money);
    }

    @Override
    public void subMoney(double money) {
        String sql="UPDATE accounts SET balance=balance-? WHERE accountname='小红'";
        jdbcTemplate.update(sql,money);
    }
}
4、创建Service层
package com.cmy.service;

import com.cmy.entity.Account;

import java.util.List;

public interface AccountService {
    //转钱的方法
    public void transferMoney();
}
5、创建Service的Impl实现层
@Service("accountService")
public class AccountServiceImpl implements AccountService {
    //植入Dao层对象
    @Resource
    private AccountDao dao;
 @Transactional
    @Override
    public void transferMoney() {
        //调用加钱的方法并给参数赋值
        dao.addMoney(1000);

        //模拟发生异常
        int errey=5/0;

        //调用加钱的方法并给参数赋值
        dao.subMoney(1000);
    }
}
6、配置applicationContext.xml文件
(1)方式一:使用AOP实现
<?xml version="1.0" encoding="UTF-8"?>
<beans xmlns="http://www.springframework.org/schema/beans"
       xmlns:xsi="http://www.w3.org/2001/XMLSchema-instance"
       xmlns:context="http://www.springframework.org/schema/context"
       xmlns:tx="http://www.springframework.org/schema/tx"
       xmlns:aop="http://www.springframework.org/schema/aop"
       xsi:schemaLocation="http://www.springframework.org/schema/beans http://www.springframework.org/schema/beans/spring-beans.xsd http://www.springframework.org/schema/context http://www.springframework.org/schema/context/spring-context.xsd http://www.springframework.org/schema/tx http://www.springframework.org/schema/tx/spring-tx.xsd http://www.springframework.org/schema/aop http://www.springframework.org/schema/aop/spring-aop.xsd">
 <!--加载配置文件-->
    <context:property-placeholder location="classpath:database.properties"/>
 <bean id="dataSource" class="org.springframework.jdbc.datasource.DriverManagerDataSource">
        <property value="${jdbc.driver}" name="driverClassName"/>
        <property value="${jdbc.url}" name="url"/>
        <property value="${jdbc.username}" name="username"/>
        <property value="${jdbc.password}" name="password"/>
    </bean>
 <!--扫描器->
    <context:component-scan base-package="com.cmy"/>
<!--AOP事务-->
    <tx:advice id="transactionAdvice" transaction-manager="transactionManager">
        <tx:attributes>
            <tx:method name="trans*" isolation="READ_COMMITTED" propagation="REQUIRED"/>
        </tx:attributes>
    </tx:advice>

    <aop:config>
        <!--配置切点-->
        <aop:pointcut id="pointcut" expression="execution(* *..service.impl.*.*(..))"/>
        <aop:advisor advice-ref="transactionAdvice" pointcut-ref="pointcut"></aop:advisor>
    </aop:config>
</beans>
(2)方式二:使用注解方式实现
<?xml version="1.0" encoding="UTF-8"?>
<beans xmlns="http://www.springframework.org/schema/beans"
       xmlns:xsi="http://www.w3.org/2001/XMLSchema-instance"
       xmlns:context="http://www.springframework.org/schema/context"
       xmlns:tx="http://www.springframework.org/schema/tx"
       xmlns:aop="http://www.springframework.org/schema/aop"
       xsi:schemaLocation="http://www.springframework.org/schema/beans http://www.springframework.org/schema/beans/spring-beans.xsd http://www.springframework.org/schema/context http://www.springframework.org/schema/context/spring-context.xsd http://www.springframework.org/schema/tx http://www.springframework.org/schema/tx/spring-tx.xsd http://www.springframework.org/schema/aop http://www.springframework.org/schema/aop/spring-aop.xsd">
 <!--加载配置文件-->
    <context:property-placeholder location="classpath:database.properties"/>
 <bean id="dataSource" class="org.springframework.jdbc.datasource.DriverManagerDataSource">
        <property value="${jdbc.driver}" name="driverClassName"/>
        <property value="${jdbc.url}" name="url"/>
        <property value="${jdbc.username}" name="username"/>
        <property value="${jdbc.password}" name="password"/>
    </bean>
 <!--扫描器->
    <context:component-scan base-package="com.cmy"/>
<tx:annotation-driven></tx:annotation-driven>
    <!--植入JDBCTemplate-->
    <bean id="jdbcTemplate" class="org.springframework.jdbc.core.JdbcTemplate">
        <property name="dataSource" ref="dataSource"></property>
    </bean>
</beans>
(3)方式三:使用事务代理工厂Bean
<?xml version="1.0" encoding="UTF-8"?>
<beans xmlns="http://www.springframework.org/schema/beans"
       xmlns:xsi="http://www.w3.org/2001/XMLSchema-instance"
       xmlns:context="http://www.springframework.org/schema/context"
       xmlns:tx="http://www.springframework.org/schema/tx"
       xmlns:aop="http://www.springframework.org/schema/aop"
       xsi:schemaLocation="http://www.springframework.org/schema/beans http://www.springframework.org/schema/beans/spring-beans.xsd http://www.springframework.org/schema/context http://www.springframework.org/schema/context/spring-context.xsd http://www.springframework.org/schema/tx http://www.springframework.org/schema/tx/spring-tx.xsd http://www.springframework.org/schema/aop http://www.springframework.org/schema/aop/spring-aop.xsd">
 <!--加载配置文件-->
    <context:property-placeholder location="classpath:database.properties"/>
 <bean id="dataSource" class="org.springframework.jdbc.datasource.DriverManagerDataSource">
        <property value="${jdbc.driver}" name="driverClassName"/>
        <property value="${jdbc.url}" name="url"/>
        <property value="${jdbc.username}" name="username"/>
        <property value="${jdbc.password}" name="password"/>
    </bean>
 <!--扫描器->
    <context:component-scan base-package="com.cmy"/>
 <!--事务代理工厂Bean-->
    <bean id="transactionProxy" class="org.springframework.transaction.interceptor.TransactionProxyFactoryBean">
        <!--事务管理器-->
        <property name="transactionManager" ref="transactionManager"></property>
        <!--目标对象-->
        <property name="target" ref="accountService"></property>
        <!--设置方法-->
        <property name="transactionAttributes">
            <props>
                <!--方法对应的隔离级别和传播行为-->
                <prop key="transfer">PROPAGATION_REQUIRED,ISOLATION_DEFAULT</prop>
            </props>
        </property>
     </bean>
</beans>