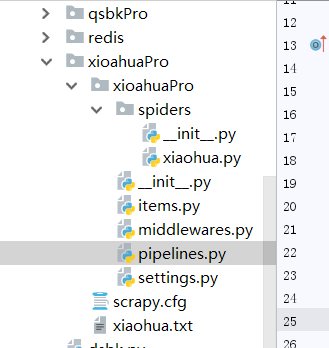
我们在pycharm上爬取
首先我们可以在本文件打开命令框或在Terminal下创建
scrapy startproject xiaohuaPro ------------创建文件

scrapy genspider xiaohua www.xxx.com ----------创建执行文件
一.首先我们要进行数据的爬取
import scrapy
from xioahuaPro.items import XioahuaproItem


class XiaohuaSpider(scrapy.Spider):
    name = 'xiaohua'
    start_urls=['http://www.521609.com/daxuemeinv/']
    #生成一个通用的url模板
    url = 'http://www.521609.com/daxuemeinv/list8%d.html'
    pageNum =1

    def parse(self, response):
        li_list=response.xpath('//div[@class="index_img list_center"]/ul/li')
        for li in li_list:
            name = li.xpath('./a[2]/text() | ./a[2]/b/text()').extract_first()
            img_url = 'http://www.521609.com'+li.xpath('./a[1]/img/@src').extract_first()
            #实例化一个item类型的对象
            item = XioahuaproItem()
            item['name'] = name
            item['img_url'] = img_url
            #item提交给管道
            yield item
        # 对其他页码的url进行手动i请求的发送
        if self.pageNum <= 24:   ------爬取的页数
            self.pageNum += 1
            new_url = format(self.url%self.pageNum)
            yield scrapy.Request(url=new_url,callback=self.parse)
之后再items.py文件下为item对象设置属性
将爬取到的所有信息全部设置为item的属性
# -*- coding: utf-8 -*-

# Define here the models for your scraped items
#
# See documentation in:
# https://doc.scrapy.org/en/latest/topics/items.html

import scrapy


class XioahuaproItem(scrapy.Item):
    # define the fields for your item here like:
    name = scrapy.Field()
    img_url = scrapy.Field()
二.写入pipelines.py内容
首先写入到自定义的文件里去
作用:将解析到的数据存储到某一个平台中。
import pymysql
from redis import Redis
class XioahuaproPipeline(object):
    fp = None
    def open_spider(self,spider):
        print('开始爬虫!')
        self.fp = open('./xiaohua.txt','w',encoding='utf-8')
    #作用:实现持久化存储的操作
    #该方法的item参数就可以接收爬虫文件提交过来的item对象
    #该方法每接收一个item就会被调用一次(调用多次)
    def process_item(self, item, spider):
        name = item['name']
        img_url = item['img_url']
        self.fp.write(name+':'+img_url+'
')
        #返回值的作用:就是将item传递给下一个即将被执行的管道类
        return item
#
    def close_spider(self,spider):
        print('结束爬虫!')
        self.fp.close()
#
写到数据库里面,我们要在数据库里面创建个表(将mysql和redis都启动)
class MysqlPipeline(object):
    conn = None
    cursor = None
    def open_spider(self, spider):
        #解决数据库字段无法存储中文处理:alter table tableName convert to charset utf8;
        self.conn = pymysql.Connect(host='127.0.0.1',port=3306,user='root',password='123',db='test',charset='utf8')
        print(self.conn)
    def process_item(self, item, spider):
        self.cursor = self.conn.cursor()
        try:
            self.cursor.execute('insert into xiaohua values ("%s","%s")'%(item['name'],item['img_url']))
            self.conn.commit()
        except Exception as e:
            print(e)
            self.conn.rollback()
        return item
    def close_spider(self, spider):
        self.cursor.close()
        self.conn.close()
在相同的文件下创建redis类写入数据
class RedisPipeline(object):
    conn = None
    def open_spider(self, spider):
        self.conn = Redis(host='127.0.0.1',port=6379)
        print(self.conn)
    def process_item(self, item, spider):
        dic = {
            'name':item['name'],
            'img_url':item['img_url']
        }
        print(str(dic))
        self.conn.lpush('xiaohua',str(dic))
        return item
    def close_spider(self, spider):
        pass
三.更改配置文件,在settings.py里面
#添加上这行代码
USER_AGENT = 'Mozilla/5.0 (Windows NT 6.1; Win64; x64) AppleWebKit/537.36 (KHTML, like Gecko) Chrome/73.0.3683.86 Safari/537.36'

# Obey robots.txt rules
ROBOTSTXT_OBEY = False       -----改成False
ITEM_PIPELINES = {
    'xioahuaPro.pipelines.XioahuaproPipeline': 300,  ---对应文件
    # 'xioahuaPro.pipelines.MysqlPipeline': 301,    ----对应数据库

    # 'xioahuaPro.pipelines.RedisPipeline': 302,    -----对应redis
}

LOG_LEVEL = 'ERROR'
            # CRITICAL --严重错误
            #ERROR    ---一般错误
            #WARNING ---警告信息
            #INFO  ---一般信息
            #DEBUG  --调试信息
然后我们在终端去指定爬虫程序
scrapy crawl 名字(name对应的值)