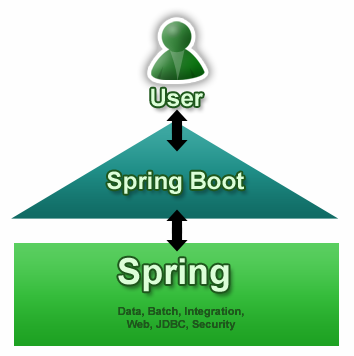
Spring 顶级项目,包含众多,我们重点学习一下,SpringCloud项目以及SpringBoot项目
————————————————————main————————————————————
一、SpringCloud项目简介
Spring Cloud:
微服务工具包,为开发者提供了在分布式系统的配置管理、服务发现、断路器、智能路由、微代理、控制总线等开发工具包。
Spring Boot:
旨在简化创建产品级的 Spring 应用和服务,简化了配置文件,使用嵌入式web服务器,含有诸多开箱即用微服务功能
可以和spring cloud联合部署。

二、SpringCloud子项目介绍
Spring Cloud Config:配置管理开发工具包,可以让你把配置放到远程服务器,目前支持本地存储、Git以及Subversion。
Spring Cloud Bus:事件、消息总线,用于在集群(例如,配置变化事件)中传播状态变化,可与Spring Cloud Config联合实现热部署。
Spring Cloud Netflix:针对多种Netflix组件提供的开发工具包,其中包括Eureka、Hystrix、Zuul、Archaius等。
Netflix Eureka:云端负载均衡,一个基于 REST 的服务,用于定位服务,以实现云端的负载均衡和中间层服务器的故障转移。
Netflix Hystrix:容错管理工具,旨在通过控制服务和第三方库的节点,从而对延迟和故障提供更强大的容错能力。
Netflix Zuul:边缘服务工具,是提供动态路由,监控,弹性,安全等的边缘服务。
Netflix Archaius:配置管理API,包含一系列配置管理API,提供动态类型化属性、线程安全配置操作、轮询框架、回调机制等功能。
Spring Cloud for Cloud Foundry:通过Oauth2协议绑定服务到CloudFoundry,CloudFoundry是VMware推出的开源PaaS云平台。
Spring Cloud Sleuth:日志收集工具包,封装了Dapper,Zipkin和HTrace操作。
Spring Cloud Data Flow:大数据操作工具,通过命令行方式操作数据流。
Spring Cloud Security:安全工具包,为你的应用程序添加安全控制,主要是指OAuth2。
Spring Cloud Consul:封装了Consul操作,consul是一个服务发现与配置工具,与Docker容器可以无缝集成。
Spring Cloud Zookeeper:操作Zookeeper的工具包,用于使用zookeeper方式的服务注册和发现。
Spring Cloud Stream:数据流操作开发包,封装了与Redis,Rabbit、Kafka等发送接收消息。
Spring Cloud CLI:基于 Spring Boot CLI,可以让你以命令行方式快速建立云组件。
三、微服务开发要素
1、Codebase:从一个代码库部署到多个环境。
2、Dependencies:使用显式的声明隔离依赖,即模块单独运行,并可以显式管理依赖。
3、Config:在系统外部存储配置信息。
4、Backing Services:把支持性服务看做是资源,支持性服务包括数据库、消息队列、缓冲服务器等。
5、Build, release, run:严格的划分编译、构建、运行阶段,每个阶段由工具进行管理。
6、Processes:应用作为无状态执行。
7、Port binding:经由端口绑定导出服务,优先选择 HTTP API 作为通用的集成框架。
8、Concurrency:并发性使用水平扩展实现,对于web就是水平扩展web应用实现。
9、Disposability:服务可处置性,任何服务可以随意终止或启动。
10、Dev/prod parity:开发和生产环境保持高度一致,一键式部署。
11、Logs:将日志看做是事件流来管理,所有参与的服务均使用该方式处理日志。
12、Admin processes:管理任务作为一次性的过程运行(使用脚本管理服务启动和停止)。
——————————————————————————————————————————
接下来,我们开始创建应用了····
那么...
四、使用spring boot创建第一个应用
4.1 前言
spring boot 的核心技术当然还是spring,是基于spring 4.x。
4.2 环境说明
IDE:Myeclipse 10
JDK:1.8
管理:mvn 3
服务器:tomcat
(关于环境搭建我们这里不多说了,需要的自行找度娘)
4.3 创建一个maven项目
先在pom.xml中加入依赖的包。
 1 <?xml version="1.0" encoding="UTF-8"?>
 2 <project xmlns="http://maven.apache.org/POM/4.0.0" xmlns:xsi="http://www.w3.org/2001/XMLSchema-instance"
 3     xsi:schemaLocation="http://maven.apache.org/POM/4.0.0 http://maven.apache.org/xsd/maven-4.0.0.xsd">
 4
 5     <modelVersion>4.0.0</modelVersion>
 6     <groupId>Cloud</groupId>
 7     <artifactId>hyh</artifactId>
 8     <version>0.0.1-SNAPSHOT</version>
 9
10     <parent>
11         <groupId>org.springframework.boot</groupId>
12         <artifactId>spring-boot-starter-parent</artifactId>
13         <version>1.3.0.RELEASE</version>
14     </parent>
15
16     <dependencies>
17         <dependency>
18             <groupId>org.springframework.boot</groupId>
19             <artifactId>spring-boot-starter-web</artifactId>
20         </dependency>
21
22     </dependencies>
23
24     <build>
25         <plugins>
26             <plugin>
27                 <groupId>org.springframework.boot</groupId>
28                 <artifactId>spring-boot-maven-plugin</artifactId>
29                 <dependencies>
30                     <dependency>
31                         <groupId>org.springframework</groupId>
32                         <artifactId>springloaded</artifactId>
33                         <version>1.2.5.RELEASE</version>
34                     </dependency>
35                 </dependencies>
36             </plugin>
37         </plugins>
38     </build>
39 </project>
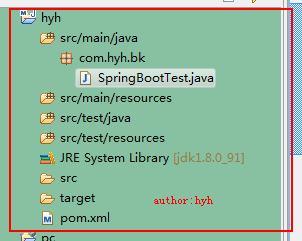
如图:

我们创建了一个类:SpringBootTest.java:
 1 package com.hyh.bk;
 2
 3 import org.springframework.boot.SpringApplication;
 4 import org.springframework.boot.autoconfigure.SpringBootApplication;
 5 import org.springframework.stereotype.Controller;
 6 import org.springframework.web.bind.annotation.RequestMapping;
 7 import org.springframework.web.bind.annotation.ResponseBody;
 8 @Controller
 9 @SpringBootApplication
10 public class SpringBootTest {
11
12     @ResponseBody
13     @RequestMapping(value="/")
14     String location(){
15         return "北京";
16     }
17     /**
18      * 主函数
19      *
20      */
21     public static void main(String[] args) {
22         System.out.println("-------------");
23         SpringApplication.run(SpringBootTest.class, args);
24     }
25 }
解释:
@SpringBootApplication=@Configuration + @EnableAutoConfiguration + @ComponentScan
@Configuration,@ComponentSca这俩注解语法是spring框架中的。起步于spring 3.x
@EnableAutoConfiguration是spring boot语法,表示自动配置。
原创 ,欢迎转载,请注明出处!
原文地址:http://www.cnblogs.com/hyhnet/p/5626421.html
交流wx请加: wixf150
