《Windows Azure Platform 系列文章目录》
今天遇到了这个需求,在这里记录一下。
Azure Blob Storage 可以通过NFS协议,提供给Azure AKS使用。笔者在这里使用的Azure File NFS 4协议。
整体部署的场景如下:
1.创建VNet环境,包含3个subnet
(1)子网aks-subnet,用来创建AKS集群
(2)子网vm-subnet,用来创建Linux VM
(3)子网nfs-subnet,用来创建nfs内网IP地址
2.创建Azure Blob Storage和Azure File Sharing
3.创建Private DNS Zone,对azure File增加内网DNS记录
1.Azure CLI创建Azure资源的脚本如下:
https://github.com/leizhang1984/K8S/blob/main/1.19/16.AzureNFS/azurenfs.txt
az cloud set -n AzureChinaCloud
az login

rgname=leiaks-rg2
vnetname=aks_vnet
location=chinaeast2

#create resource group
az group create -n $rgname -l $location

#create azure vnet,including 3 subnets
az network vnet create -g $rgname -n $vnetname \
  --address-prefixes 10.0.0.0/8 --subnet-name aks-subnet \
  --subnet-prefixes 10.240.0.0/16

#subnet for VM
az network vnet subnet create -g $rgname --vnet-name $vnetname \
  -n vm-subnet --address-prefixes 10.241.0.0/24

#subnet for nfs
az network vnet subnet create -g $rgname --vnet-name $vnetname \
  -n nfs-subnet --address-prefixes 10.241.1.0/24

#create storage account
storageaccountname=leiaksnfsstorage02
az storage account create \
  --name $storageaccountname \
  --resource-group $rgname \
  --location $location \
  --sku Premium_LRS \
  --kind FileStorage

#deny https only
az storage account update --https-only false \
  --name $storageaccountname --resource-group $rgname

#create azure file storage with 100GB quota
az storage share-rm create \
  --storage-account $storageaccountname \
  --enabled-protocol NFS \
  --root-squash RootSquash \
  --name "aksnfsshare" \
  --quota 100

#create private endpoint
subnetid=`az network vnet subnet show \
  --resource-group $rgname \
  --vnet-name $vnetname \
  --name nfs-subnet \
  --query "id" -o tsv `

storageaccountid=`az storage account show \
  --resource-group $rgname \
  --name $storageaccountname \
  --query "id" -o tsv `

az network vnet subnet update \
  --ids $subnetid \
  --disable-private-endpoint-network-policies

endpoint=`az network private-endpoint create \
  --resource-group $rgname \
  --name "$storageaccountname-privateendpoint" \
  --location $location \
  --subnet $subnetid \
  --private-connection-resource-id $storageaccountid \
  --group-id "file" \
  --connection-name "$storageaccountname-connection" \
  --query "id" -o tsv `

#create private dns zone
privatednszonename="privatelink.file.core.chinacloudapi.cn"

vnetid=`az network vnet show \
  --resource-group $rgname \
  --name $vnetname \
  --query "id" -o tsv`

dnszoneid=`az network private-dns zone create \
  --resource-group $rgname \
  --name $privatednszonename \
  --query "id" -o tsv`

az network private-dns link vnet create \
  --resource-group $rgname \
  --zone-name $privatednszonename \
  --name "$vnetname-dnslink" \
  --virtual-network $vnetid \
  --registration-enabled false

privateendpointnic=`az network private-endpoint show \
  --ids $endpoint \
  --query "networkInterfaces[0].id" -o tsv `

endpointip=`az network nic show \
  --ids $privateendpointnic \
  --query "ipConfigurations[0].privateIpAddress" -o tsv `

az network private-dns record-set a create \
        --resource-group $rgname \
        --zone-name $privatednszonename \
        --name $storageaccountname

az network private-dns record-set a add-record \
        --resource-group $rgname \
        --zone-name $privatednszonename  \
        --record-set-name $storageaccountname \
        --ipv4-address $endpointip
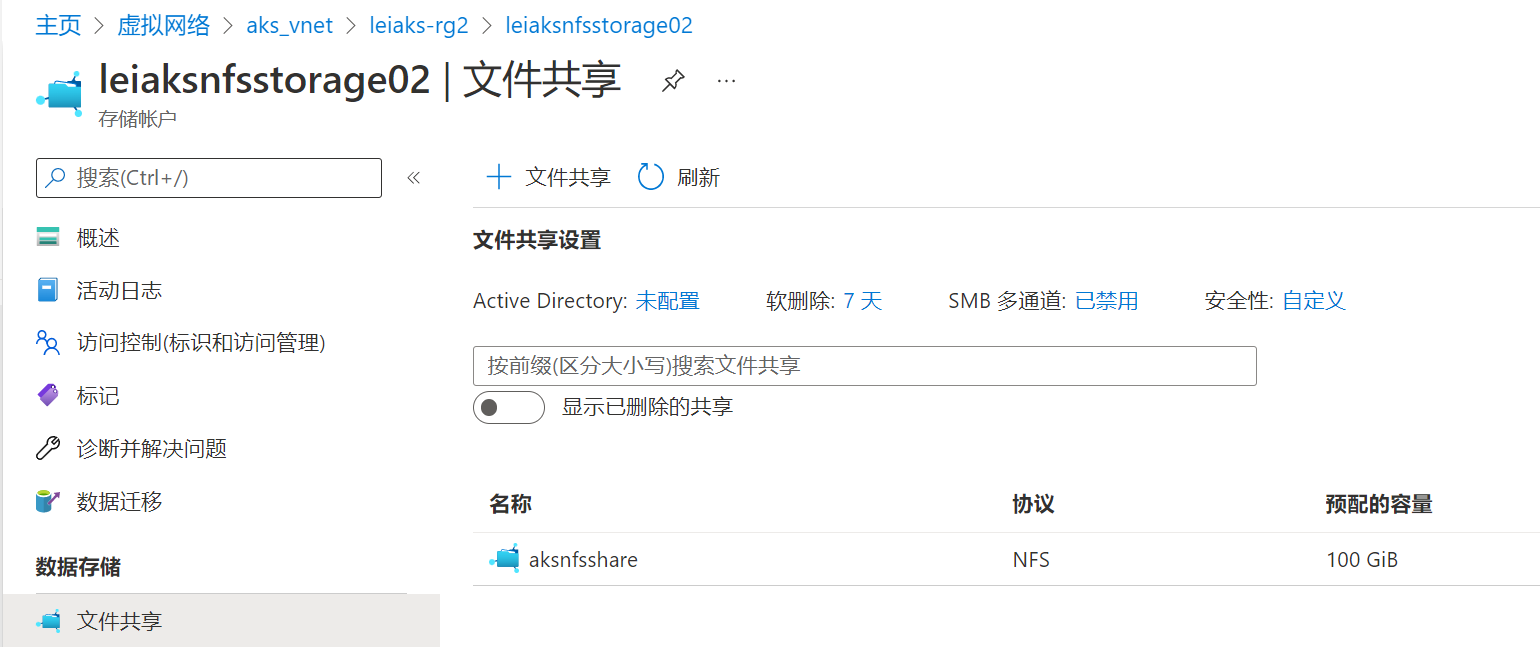
2.执行完毕后,Azure File截图如下:
3.接下来,在子网vm-subnet里,创建Cent OS VM,截图略。
SSH登录到Azure CentOS VM,执行下面的脚本。具体脚本可以参考Azure Portal截图:

4.VM挂载NFS成功后,截图如下:

注意修改Azure VM的/etc/fstab里面,挂载到把NFS的UUID写入到fstab里。
leiaksnfsstorage02.file.core.chinacloudapi.cn:/leiaksnfsstorage02/aksnfsshare /mount/leiaksnfsstorage02/aksnfsshare nfs defaults,vers=4,minorversion=1,sec=sys,proto=tcp 0 0
显示如下:

5.请注意,访问leiaksnfsstorage02.file.core.chinacloudapi.cn这个地址,是通过Private DNS Zone解析的,是内网IP地址

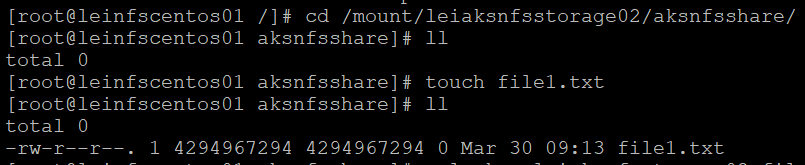
6.我们通过Azure VM,在这个NFS里手动创建1个文件,如下图:
7.随后我们在aks-subnet里,创建AKS,网络我这里设置为CNI网络,步骤略。
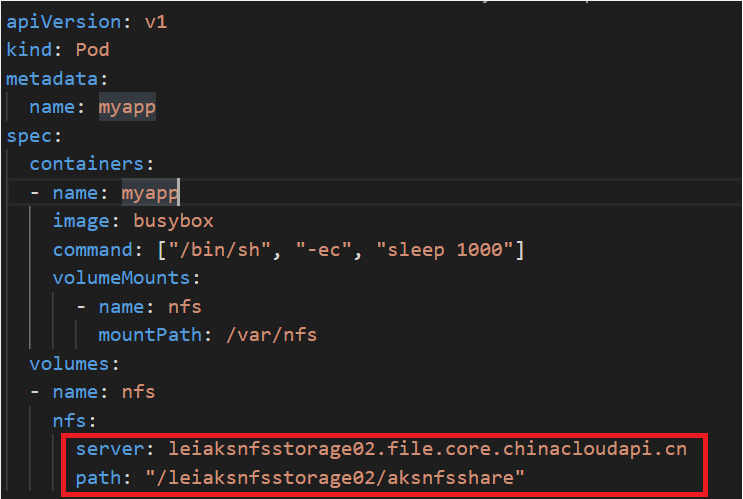
8.修改下面的yaml file,主要修改的内容为下图红色部分
修改完毕后,运行kubectl apply -f yaml。步骤略。
9.最后我们通过kubectl exec -it myapp – sh ,通过交互式命令访问这个pod
查看pod挂载的路径叫/var/nfs,可以查看到通过Linux vm创建的文件file1.txt。如下图:
![]()