Jmeter结构如图

目的:
需要在每个组织下面分别添加5个设备资源
思路:
1.先登录平台
2.进入系统配置页面
3.获取到每个区域的ID
4.在每个区域下面添加设备资源
重点及难点:
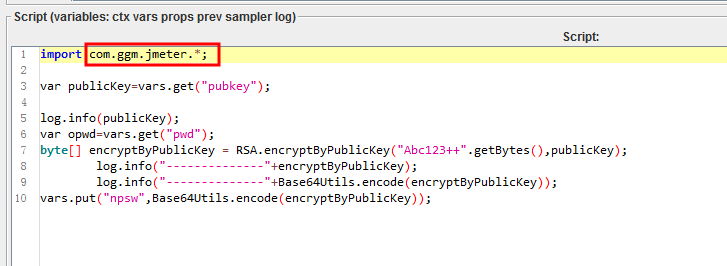
1.登录加密过程
2.数据库连接获取到多个参数如何提取
3.如何将获取到的数据写入文件中
------------------------------------------------------------------------------------------------
1.登录
经过与开发沟通了解到,登录过程使用的是前端js rsa加密。有两种实现加密的方式:前端js加密或者使用java方法进行加密
使用js加密还未调试通过,下面是用java方式加密的代码
在网上百度到相应算法之后,实现如下:
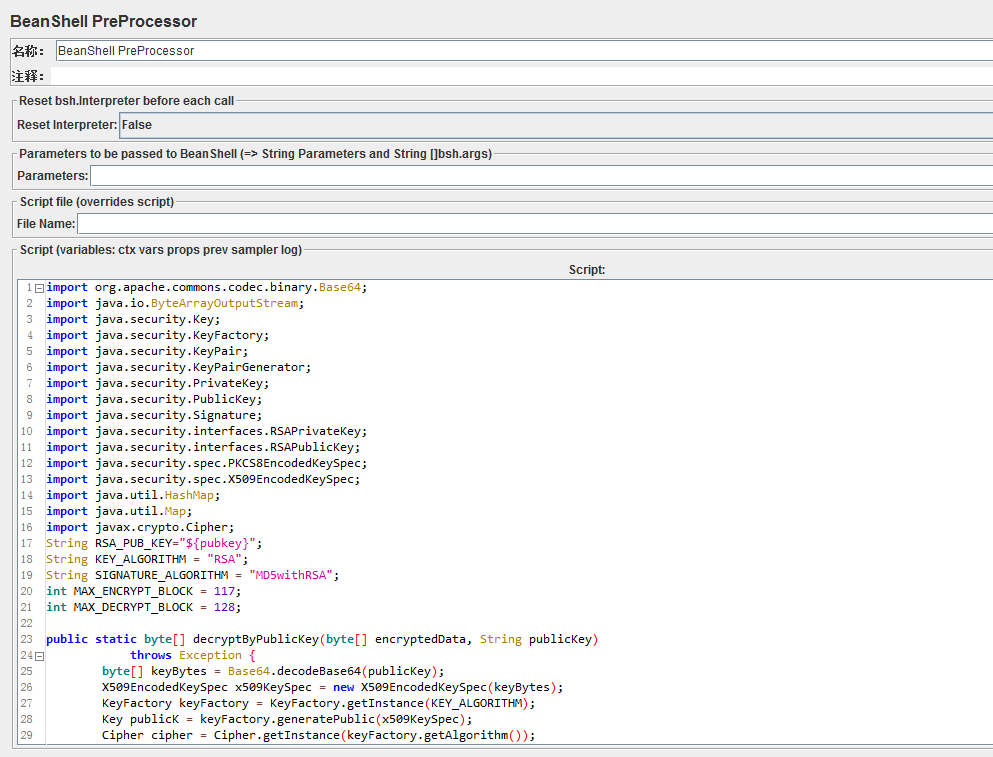
import org.apache.commons.codec.binary.Base64;
import java.io.ByteArrayOutputStream;
import java.security.Key;
import java.security.KeyFactory;
import java.security.KeyPair;
import java.security.KeyPairGenerator;
import java.security.PrivateKey;
import java.security.PublicKey;
import java.security.Signature;
import java.security.interfaces.RSAPrivateKey;
import java.security.interfaces.RSAPublicKey;
import java.security.spec.PKCS8EncodedKeySpec;
import java.security.spec.X509EncodedKeySpec;
import java.util.HashMap;
import java.util.Map;
import javax.crypto.Cipher;
String RSA_PUB_KEY="${pubkey}";
String KEY_ALGORITHM = "RSA";
String SIGNATURE_ALGORITHM = "MD5withRSA";
int MAX_ENCRYPT_BLOCK = 117;
int MAX_DECRYPT_BLOCK = 128;
public static byte[] decryptByPublicKey(byte[] encryptedData, String publicKey)
throws Exception {
byte[] keyBytes = Base64.decodeBase64(publicKey);
X509EncodedKeySpec x509KeySpec = new X509EncodedKeySpec(keyBytes);
KeyFactory keyFactory = KeyFactory.getInstance(KEY_ALGORITHM);
Key publicK = keyFactory.generatePublic(x509KeySpec);
Cipher cipher = Cipher.getInstance(keyFactory.getAlgorithm());
cipher.init(Cipher.DECRYPT_MODE, publicK);
int inputLen = encryptedData.length;
ByteArrayOutputStream out = new ByteArrayOutputStream();
int offSet = 0;
byte[] cache;
int i = 0;
// 对数据分段解密
while (inputLen - offSet > 0) {
if (inputLen - offSet > MAX_DECRYPT_BLOCK) {
cache = cipher.doFinal(encryptedData, offSet, MAX_DECRYPT_BLOCK);
} else {
cache = cipher.doFinal(encryptedData, offSet, inputLen - offSet);
}
out.write(cache, 0, cache.length);
i++;
offSet = i * MAX_DECRYPT_BLOCK;
}
byte[] decryptedData = out.toByteArray();
out.close();
return decryptedData;
}
public static byte[] encryptByPublicKey(byte[] data, String publicKey)
throws Exception {
byte[] keyBytes = Base64.decodeBase64(publicKey);
X509EncodedKeySpec x509KeySpec = new X509EncodedKeySpec(keyBytes);
KeyFactory keyFactory = KeyFactory.getInstance(KEY_ALGORITHM);
Key publicK = keyFactory.generatePublic(x509KeySpec);
// 对数据加密
Cipher cipher = Cipher.getInstance(keyFactory.getAlgorithm());
cipher.init(Cipher.ENCRYPT_MODE, publicK);
int inputLen = data.length;
ByteArrayOutputStream out = new ByteArrayOutputStream();
int offSet = 0;
byte[] cache;
int i = 0;
// 对数据分段加密
while (inputLen - offSet > 0) {
if (inputLen - offSet > MAX_ENCRYPT_BLOCK) {
cache = cipher.doFinal(data, offSet, MAX_ENCRYPT_BLOCK);
} else {
cache = cipher.doFinal(data, offSet, inputLen - offSet);
}
out.write(cache, 0, cache.length);
i++;
offSet = i * MAX_ENCRYPT_BLOCK;
}
byte[] encryptedData = out.toByteArray();
out.close();
return encryptedData;
}
String str = "${pwd}";
String result ="";
try {
result = Base64.encodeBase64String(encryptByPublicKey(str.getBytes(), RSA_PUB_KEY));
System.out.println(result);
} catch (Exception e) {
// TODO Auto-generated catch block
e.printStackTrace();
}
print(result);
vars.put("npsw",result);
return result;
注意:可以将代码封装为一个类,打包成jar包,放置于libext中
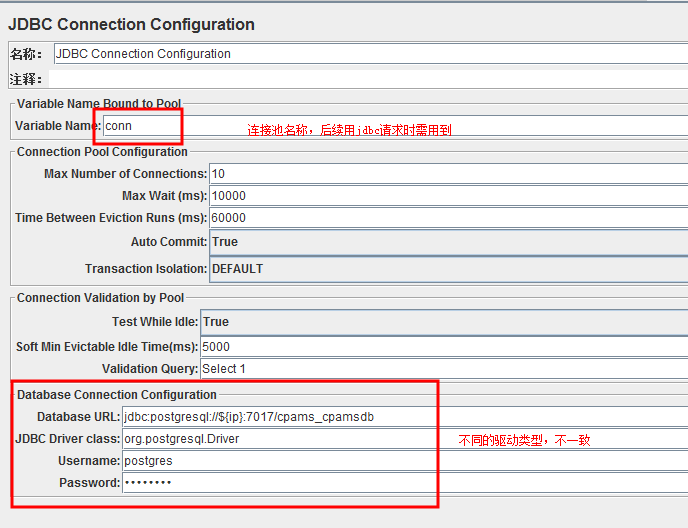
2.通过从数据库查询获取所有区域ID
2.1新建数据库连接
补充:
MySQL数据库:
1)驱动包:https://mvnrepository.com/artifact/mysql/mysql-connector-java(下载路径)
2)驱动类名:com.mysql.jdbc.Driver
3)JDBC的URL:jdbc:mysql://IP地址:端口号/数据库名字
注:端口号缺省为:3306
SQL server数据库:
1)驱动包:https://mvnrepository.com/artifact/com.microsoft.sqlserver/sqljdbc4(下载路径)
2)驱动类名:com.microsoft.jdbc.sqlserver.SQLServerDriver
3)JDBC的URL:jdbc:microsoft:sqlserver://IP地址:端口号;DatabaseName=数据库名
4)sqljdbc和sqljdbc4区别:https://blog.csdn.net/cainiao_M/article/details/53404222
注:端口号缺省为:1433
Oracle数据库:
1)驱动包:https://mvnrepository.com/artifact/com.oracle/ojdbc6(下载路径)
2)驱动类名:oracle.jdbc.driver.OracleDriver
3)JDBC的URL:jdbc:oracle:thin:@IP地址:端口号:数据库名
4)ojdbc6和ojdbc14的区别:ojdbc14.jar(适合java-1.4和1.5),ojdbc6(适合java-1.6)
注:端口号缺省为:1521 #
HSQLDB
#jdbc.driverClassName=org.hsqldb.jdbcDriver
#jdbc.url=jdbc:hsqldb:hsql://localhost:9001/bookstore
PostgreSQL
jdbc.driverClassName=org.postgresql.Driver
jdbc.url=jdbc:postgresql://localhost/bookstore
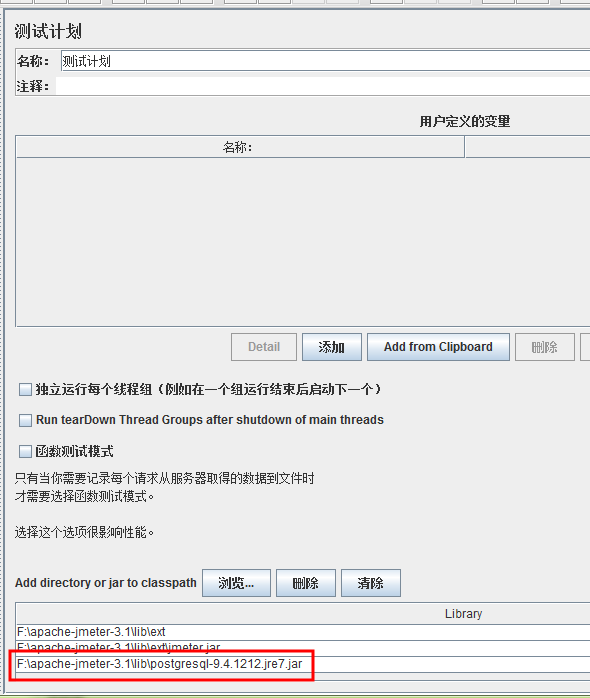
下载对应的驱动包,然后在测试计划中添加引用,如图
2.2新建jdbc请求
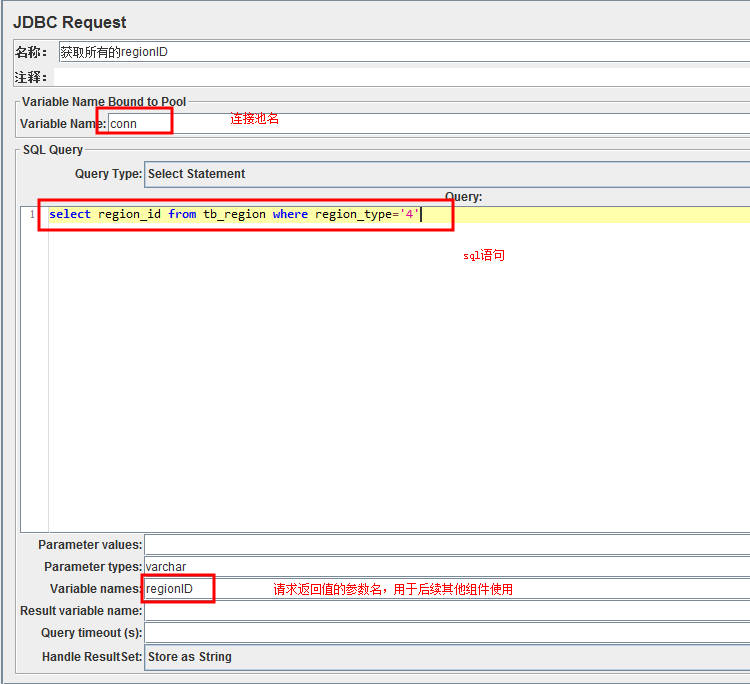
请求结果如下,需要获取所有的regionID,并且把它写入到文件中

代码如下:
遍历所有regionID代码如下:
String model_num =vars.get("sum_1");//sum是查出总共有多少个regionID
int num = Integer.parseInt(model_num);
for(int i=1;i<=num;i++){
String ss="regionID_"+i;
log.info(ss);
String regionid= vars.get(ss);
log.info(regionid);
}
2.3 将返回的regionID写入txt文件中(其中包括遍历获取到的所有regionID)
代码如图
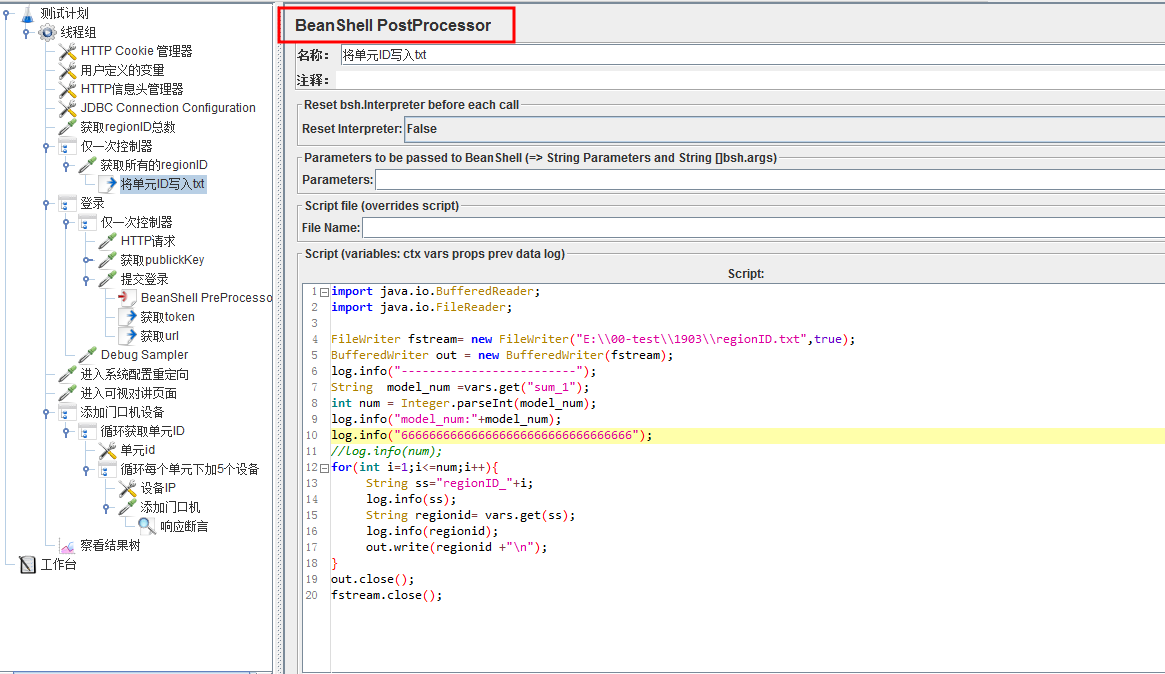
import java.io.BufferedReader;
import java.io.FileReader;
FileWriter fstream= new FileWriter("E:\00-test\1903\regionID.txt",true);
BufferedWriter out = new BufferedWriter(fstream);
log.info("-------------------------");
String model_num =vars.get("sum_1");
int num = Integer.parseInt(model_num);
log.info("model_num:"+model_num);
log.info("666666666666666666666666666666666");
//log.info(num);
for(int i=1;i<=num;i++){
String ss="regionID_"+i;
log.info(ss);
String regionid= vars.get(ss);
log.info(regionid);
out.write(regionid +"
");
}
out.close();
fstream.close();