每天进步一点点,关注我们哦,每天分享测试技术文章
本文章出自【码同学软件测试】
码同学公众号:自动化软件测试,领取资料可加:magetest
码同学抖音号:小码哥聊软件测试
01测试环境搭建
1.appium简介
Appium是一个开源的自动化测试框架 使用本机,混合动力 和移动web应用程序。它使iOS、Android和Windows应用程序使用WebDriver协议
官网:http://appium.io/
2.下载Appium
点击官网的Download Appium自动下载(最新版本)
其他版本:https://bitbucket.org/appium/appium.app/downloads/
百度盘下载:http://pan.baidu.com/s/1jGvAISu
3. 安装node.js
官网提示先装node.js,https://nodejs.org/en/下载node.js。选择的是Windows7(32位),下载后点击安装,默认安装就可以。
安装:

命令行安装:
-
npm install -g appium安装会比较慢,但是官方推荐使用这个
-
前面我们下载完appium的文件,可以直接安装
-
会提示缺少.NET Framework ,需要下载这个组件就可以,因为 Appium是由.NET 开发的,所以,它会依赖 .NET framework相关组件
-
下载.net framework ,点击下载安装就可以
4.启动 appium
appium客户端安装成功

使用 appium:
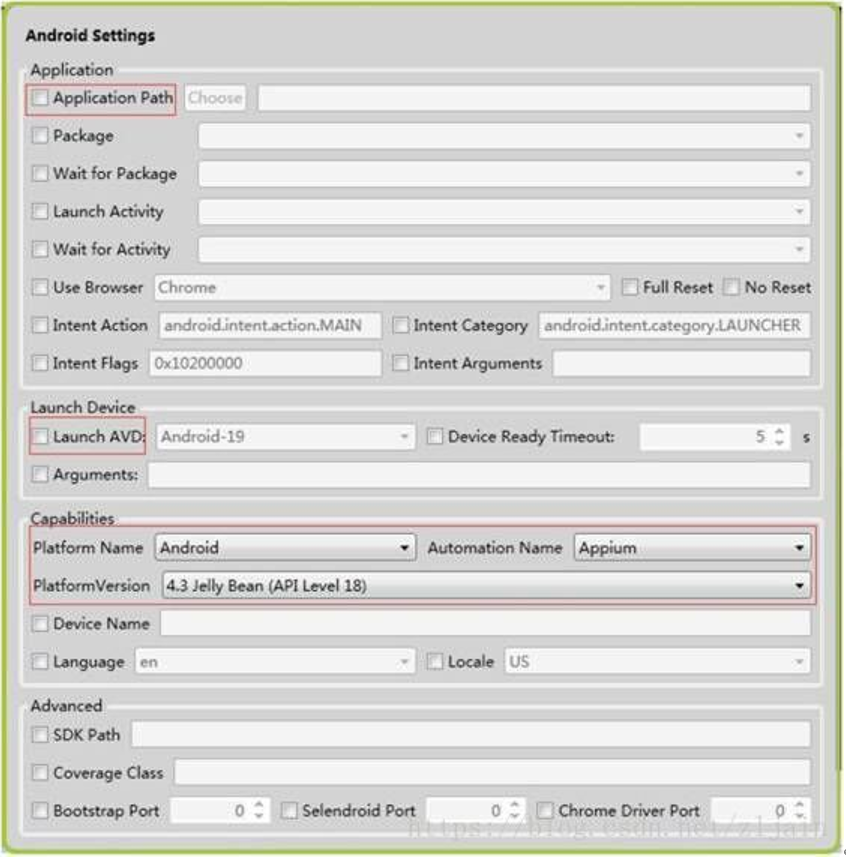
Android Settings点击左上角的第一个机器人图标
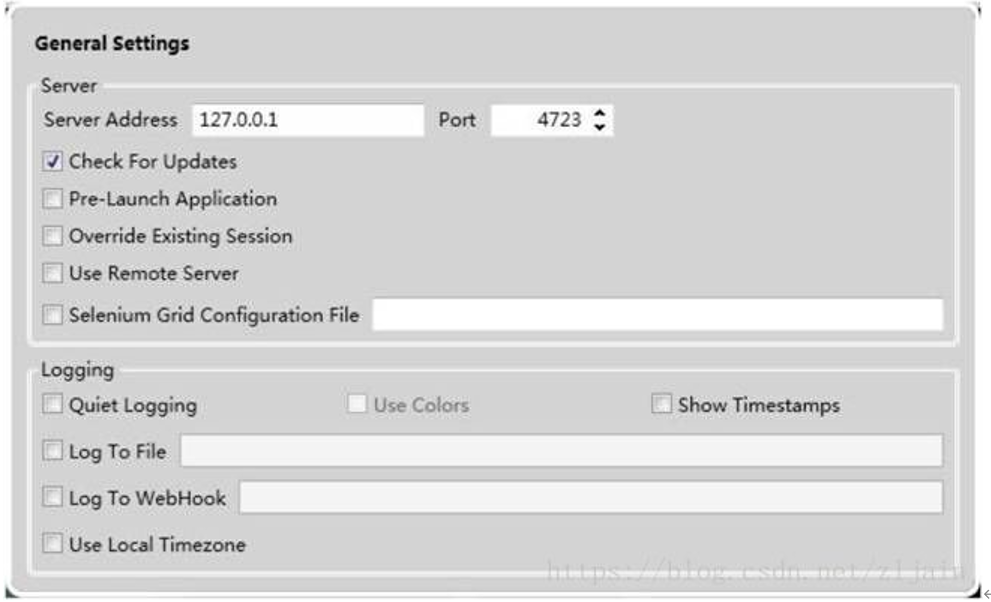
点击Appium左上角的第二个齿轮图标则弹出 General Settings 窗口
免费领取码同学软件测试课程笔记+超多学习资料+完整视频+面试题,可加微信:magetest
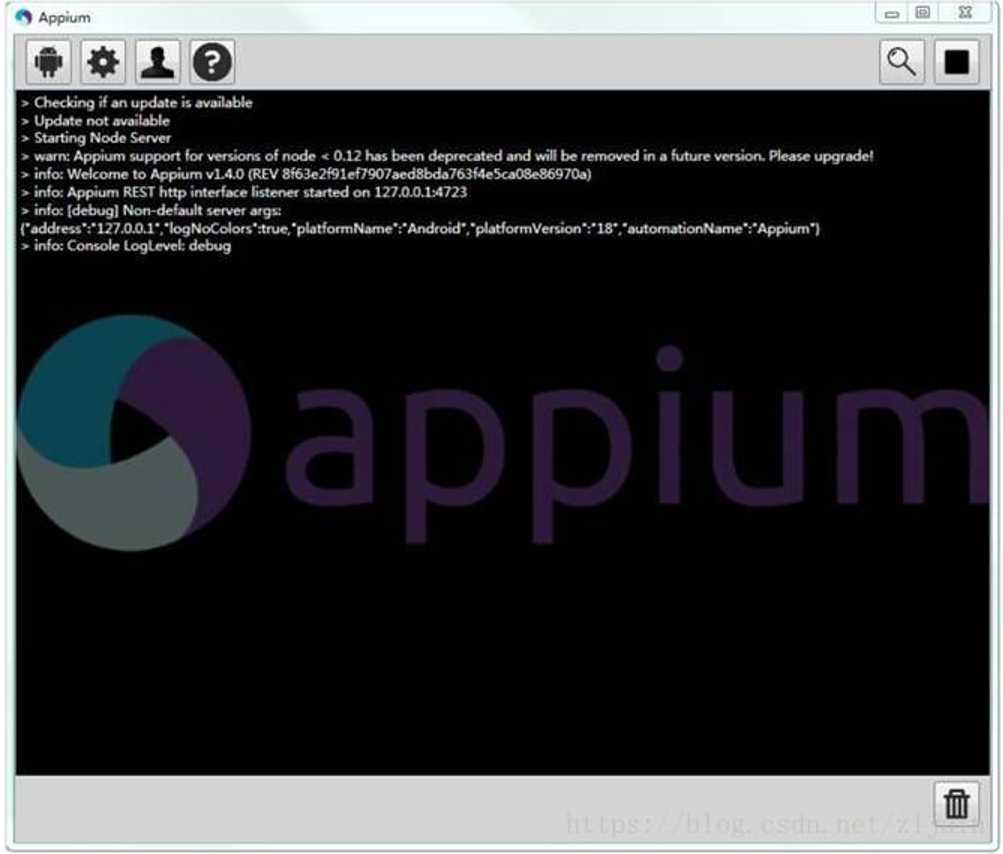
启动 appium服务
-
安装Android环境
-
安装android adt & SDK
-
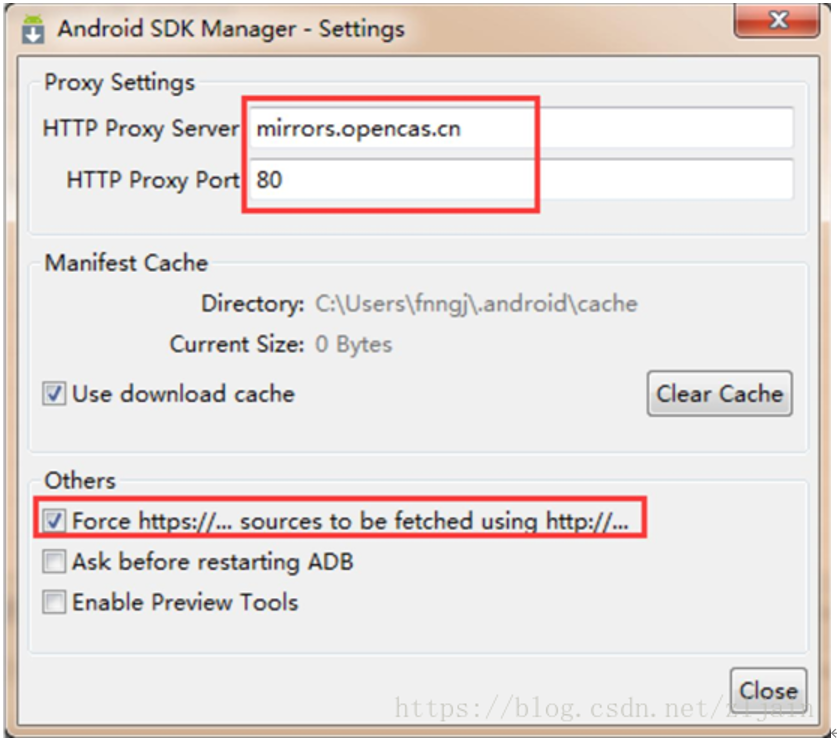
SDK Manager 安装模拟器
使用 Windows 命令行输入 adb 查看是否配置成功,成功后输入 appium-doctor,检查 Appium环境
如果出现“All Checks were successful”的提示,证明 appium环境配置成功。
-
安装 python3
下载自己想要的版本,笔者的是 python3.5的版本,默认安装就行,安装成功后,将 python加入环境变量,在命令行输入 python验证 python环境是否成功。
官网:https://www.python.org/downloads/
安装成功后,使用命令行安装:
pip install Appium-Python-Client安装python的Appium库。在文件使用 from appium import webdriver成功即安装成功。
-
下载 HTMLTestRunner.py(生成测试报告)
python3的版本:
http://download.csdn.net/detail/qq_26664581/9439036
或者 http://www.cnblogs.com/sunshishi/p/4569159.html
复制下来保存为 HTMLTestRunner.py,放在安装目录的 lib下
在文件使用 import HTMLTestRunner成功即配置成功。
python语言客户端库以及 api详解(Android)
github:https://github.com/appium/python-client
github 已经把使用方法告诉大家,但是是英文的,可以自己整理一下。
02元素定位(Android)
-
Uiautomatorview
-
hierarchyviewr
-
Inspector
Uiautomatorviewer是安卓 sdk自带,根据个人习惯,本人以 Uiautomatorviewer为例,使用方式差不多。
案例:在手机上点开一个应用(qq 为例):
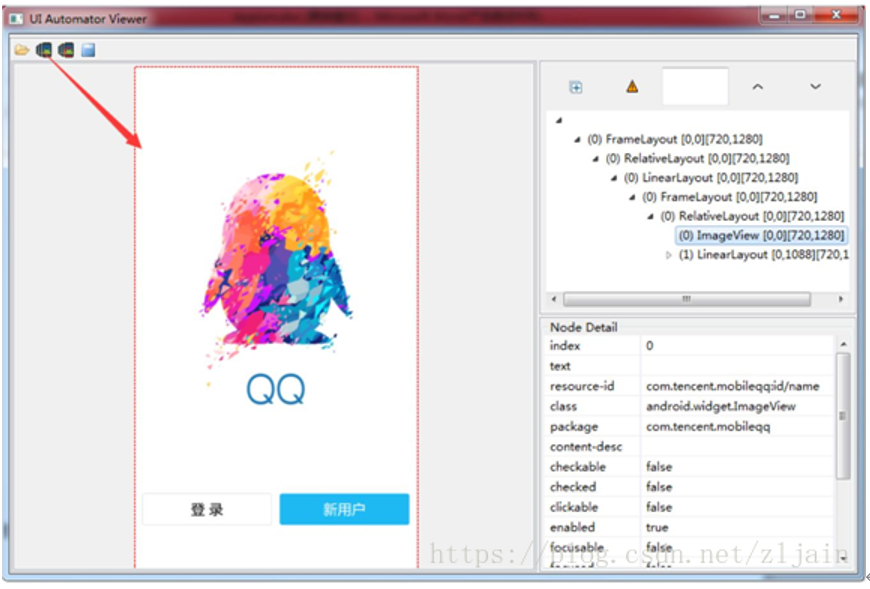
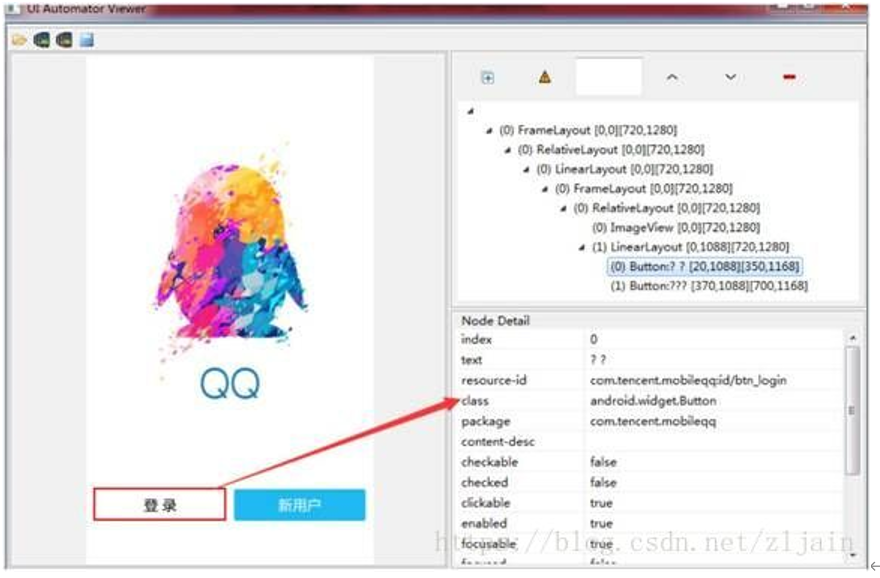
稍后点击界面上的登录后,就可以根据 Node Detail内容来定位元素
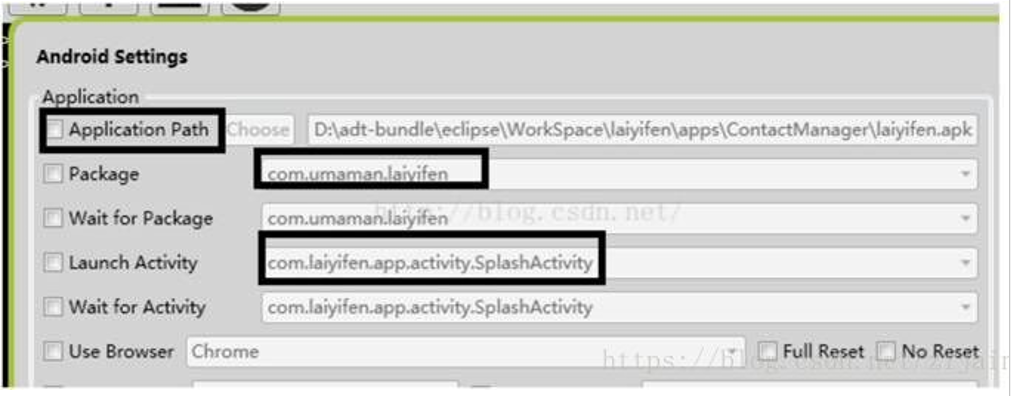
App包名:使用 APK helper查看Activiy 名称
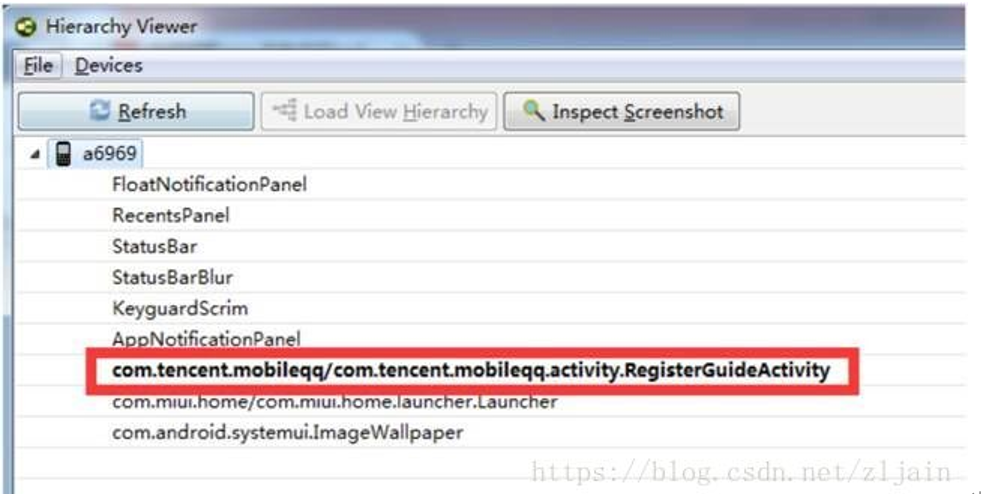
hierarchyviewer查看
那么到此,环境搭建,api,元素定位等都有所了解,那么我们接下来就是编写脚本。下面给大家看一个脚本
from appium import webdriver #导入webdriver
import time,unittest,HTMLTestRunner #导入库
class Testlogin(unittest.TestCase):
def setUp(self):#初始化
self.desired_caps={}
self.desired_caps['platformName'] = 'Android'
self.desired_caps['deviceName']='a6969'
self.desired_caps['preformVersion']='5.0.2'
self.desired_caps['appPackage'] ='com.tencent.mobileqq'
self.desired_caps['appActivity']='.activity.SplashActivity'
#启动 app
self.driver=webdriver.Remote('http://localhost:4723/wd/hub', self.desired_caps)
time.sleep(2)
def tearDown(self):#还原测试环境
self.driver.find_element_by_id('com.tencent.mobileqq:id/conversation_head').click()
self.driver.find_element_by_id('com.tencent.mobileqq:id/settings').click()
self.driver.find_element_by_id('com.tencent.mobileqq:id/account_switch').click()
self.driver.find_element_by_id('com.tencent.mobileqq:id/logoutBtn').click()
self.driver.find_element_by_id('com.tencent.mobileqq:id/dialogRightBtn').click()
self.driver.quit()
def testLogin1(self):#测试用例
#登录,定位方式 id
self.driver.find_element_by_id('com.tencent.mobileqq:id/btn_login').click()
time.sleep(2)
me=self.driver.find_element_by_android_uiautomator('new UiSelector().text("QQ号/手机号/邮箱")')#定位
输入 qq号,使用 uiautomator定位
me.clear()#输入框输入前最好先清空下
me.send_keys('319197149')
password=self.driver.find_element_by_id('com.tencent.mobileqq:id/password')
password.clear()
password.send_keys('lileilei.930423')
self.driver.find_element_by_id('com.tencent.mobileqq:id/login').click()#点击登录
m=self.driver.find_element_by_id('com.tencent.mobileqq:id/conversation_head')
if m is not None:
print('login is sucess')
else:
print('login is Flase')
print(self.driver.find_element_by_id('com.tencent.mobileqq:id/dialogText').text)
if __name__ == '__main__':
suiteTest = unittest.TestSuite()
suiteTest.addTest(Testlogin("testLogin1"))
now=time.strftime('%Y-%m%d',time.localtime(time.time()))
report_dir= r'%s.html'%now
re_open= open(report_dir,'wb')
runner=HTMLTestRunner.HTMLTestRunner(stream=re_open,
title='QQ测试',description='测试结果')
runner.run(suiteTest)
这是一个完整简单的测试脚本,最后生成测试报告。到此一个完整的测试就完成了
免费领取码同学软件测试课程笔记+超多学习资料+学习完整视频 ☞ 可加:magetest/关注码同学公众号:自动化软件测试
本文著作权归作者所有,任何形式的转载都请联系作者获得授权并注明出处。