当我们再次打开刚刚创建的movies主页,我们可以看到这个页面

注意这些红色框中的内容,我们之后会提到。我们先看看index页面的html
Edit这个超链接是用是Html.ActionLink这个方法生成的
@Html.ActionLink("Edit", "Edit", new { id=item.ID })

Html对象是System.Web.Mvc.WebViewPage这个基类提供给我们自动生成Html的对象。ActionLink是Html对象提供的生成链接的方法,就如提示信息显示的一样,第一个参数是显示在页面上的文字,第二个参数是对应控制器中的方法,第三个参数是一个匿名对象,它指定了route信息。
我们打开App_Start\RouteConfig.cs文件可以看到
public static void RegisterRoutes(RouteCollection routes)
{
routes.IgnoreRoute("{resource}.axd/{*pathInfo}");
routes.MapRoute(
name: "Default",
url: "{controller}/{action}/{id}",
defaults: new { controller = "Home", action = "Index", id = UrlParameter.Optional }
);
}
这里定义了url解析的方式,{controller}/{action}/{id},所以我们之前看到的edit链接http://localhost:xxxxx/Movies/Edit/1,Movies是控制器名,Edit是事件名,1是id。
当然我们也可以通过传递参数的方式来访问Edit页面。打开页面,输入http://localhost:xxxxx/Movies/Edit?ID=1,然后我们看到了页面

打开Movies控制器,你可以看到有两个Edit方法
//
// GET: /Movies/Edit/5
public ActionResult Edit(int id = 0)
{
Movie movie = db.Movies.Find(id);
if (movie == null)
{
return HttpNotFound();
}
return View(movie);
}
//
// POST: /Movies/Edit/5
[HttpPost]
public ActionResult Edit(Movie movie)
{
if (ModelState.IsValid)
{
db.Entry(movie).State = EntityState.Modified;
db.SaveChanges();
return RedirectToAction("Index");
}
return View(movie);
}
注意第二个Edit方法,它有一个HttpPost属性,这个属性表明这个Edit方法会被POST请求调用。我们也可以在第一个Edit方法上加上HttpGet属性,当然这不是必须的,因为这是默认的。
HttpGet Edit方法接受ID参数,然后访问数据库后返回数据结果给Edit视图。然后让我们来看看这个视图:
@model HelloWorld.Models.Movie
@{
ViewBag.Title = "Edit";
}
<h2>Edit</h2>
@using (Html.BeginForm()) {
@Html.ValidationSummary(true)
<fieldset>
<legend>Movie</legend>
@Html.HiddenFor(model => model.ID)
<div class="editor-label">
@Html.LabelFor(model => model.Title)
</div>
<div class="editor-field">
@Html.EditorFor(model => model.Title)
@Html.ValidationMessageFor(model => model.Title)
</div>
<div class="editor-label">
@Html.LabelFor(model => model.ReleaseDate)
</div>
<div class="editor-field">
@Html.EditorFor(model => model.ReleaseDate)
@Html.ValidationMessageFor(model => model.ReleaseDate)
</div>
<div class="editor-label">
@Html.LabelFor(model => model.Genre)
</div>
<div class="editor-field">
@Html.EditorFor(model => model.Genre)
@Html.ValidationMessageFor(model => model.Genre)
</div>
<div class="editor-label">
@Html.LabelFor(model => model.Price)
</div>
<div class="editor-field">
@Html.EditorFor(model => model.Price)
@Html.ValidationMessageFor(model => model.Price)
</div>
<p>
<input type="submit" value="Save" />
</p>
</fieldset>
}
<div>
@Html.ActionLink("Back to List", "Index")
</div>
@section Scripts {
@Scripts.Render("~/bundles/jqueryval")
}
和之前介绍的一样,在文件顶部,定义了一个@model HelloWorld.Models.Movie来访问控制器传递过来的对象。然后我们可以看到在html中用到了很多HTML方法,Html.LabelFor显示字段名,Html.EditorFor生成<input>标签。Html.ValidationMessageFor生成校验信息。
我们可以去看一下这个代码生成的HTML:
<form action="/Movies/Edit?ID=1" method="post"> <fieldset>
<legend>Movie</legend>
<input data-val="true" data-val-number="The field ID must be a number." data-val-required="The ID field is required." id="ID" name="ID" type="hidden" value="1" />
<div class="editor-label">
<label for="Title">Title</label>
</div>
<div class="editor-field">
<input class="text-box single-line" id="Title" name="Title" type="text" value="2012" />
<span class="field-validation-valid" data-valmsg-for="Title" data-valmsg-replace="true"></span>
</div>
<div class="editor-label">
<label for="ReleaseDate">ReleaseDate</label>
</div>
<div class="editor-field">
<input class="text-box single-line" data-val="true" data-val-date="The field ReleaseDate must be a date." data-val-required="The ReleaseDate field is required." id="ReleaseDate" name="ReleaseDate" type="datetime" value="2012/12/21 0:00:00" />
<span class="field-validation-valid" data-valmsg-for="ReleaseDate" data-valmsg-replace="true"></span>
</div>
<div class="editor-label">
<label for="Genre">Genre</label>
</div>
<div class="editor-field">
<input class="text-box single-line" id="Genre" name="Genre" type="text" value="Movie" />
<span class="field-validation-valid" data-valmsg-for="Genre" data-valmsg-replace="true"></span>
</div>
<div class="editor-label">
<label for="Price">Price</label>
</div>
<div class="editor-field">
<input class="text-box single-line" data-val="true" data-val-number="The field Price must be a number." data-val-required="The Price field is required." id="Price" name="Price" type="text" value="120.00" />
<span class="field-validation-valid" data-valmsg-for="Price" data-valmsg-replace="true"></span>
</div>
<p>
<input type="submit" value="Save" />
</p>
</fieldset>
</form>
所有的input标签都在form里,所有的更改都将在点击Edit按钮后发送到/Movies/Edit 这个地址。
接下来我们来看一下POST请求是怎样被处理的
[HttpPost]
public ActionResult Edit(Movie movie)
{
if (ModelState.IsValid)
{
db.Entry(movie).State = EntityState.Modified;
db.SaveChanges();
return RedirectToAction("Index");
}
return View(movie);
}
MVC接受从POST请求传递过来的Movie对象。ModelState.IsValid方法验证提交的表单是能被更新的Movie对象。如果数据时有效的,movie数据将被存入到Movies数据集中。然后调用MovieDBContext的SaveChanges方法将这些数据保存到数据库中。成功保存之后页面将被转到Index页面。
如果表单提交的数据时无效的,这些数据将再出现在表单里。Html.ValidationMessageFor将显示错误信息,如图示:

添加一个搜索功能
接下来我们运用我们前面分析的结果来创建一个新的页面SearchIndex,它的主要功能是搜索现有的Movie信息。我们先从MoviesController类开始,在代码中添加SearchIndex方法
public ActionResult SearchIndex(string searchString)

{

    var movies = from m in db.Movies

                 select m;


    if (!String.IsNullOrEmpty(searchString))

    {

        movies = movies.Where(s => s.Title.Contains(searchString));

    }


    return View(movies);

}
然后用之前运用的方法创建视图,运用以下图示的参数

当你点击Add按钮的时候SearchIndex.cshtml被自动创建了
@model IEnumerable<HelloWorld.Controllers.AccountController.ManageMessageId>
@{
ViewBag.Title = "SearchIndex";
}
<h2>SearchIndex</h2>
<p>
@Html.ActionLink("Create New", "Create")
</p>
<table>
<tr>
<th></th>
</tr>
@foreach (var item in Model) {
<tr>
<td>
@Html.ActionLink("Edit", "Edit", new { /* id=item.PrimaryKey */ }) |
@Html.ActionLink("Details", "Details", new { /* id=item.PrimaryKey */ }) |
@Html.ActionLink("Delete", "Delete", new { /* id=item.PrimaryKey */ })
</td>
</tr>
}
</table>
我们运行它,访问http://localhost:xxxxx/movies/searchindex?searchString=X,注意这边searchstring是区分大小写的,我们将得到一下页面

之后,正常的搜索页面应该允许用户再页面上进行操作,我们将在页面上加上搜索框
我们再@Html.ActionLink("Create New", "Create")之后加上下面的代码
        @using (Html.BeginForm()){

         <p> Title: @Html.TextBox("SearchString")<br />

         <input type="submit" value="Filter" /></p>

        }
运行页面我们将看到
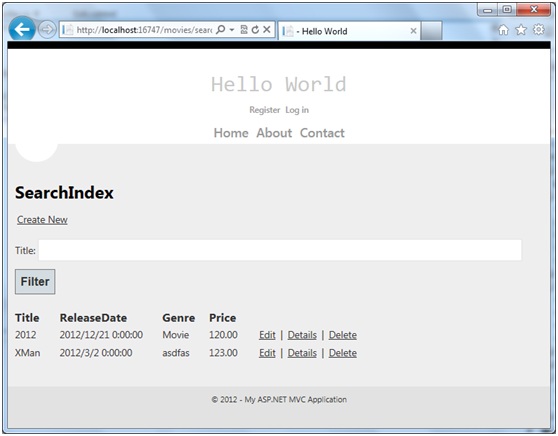
在这里Html.BeginForm会帮我们生成一个form标签,当我们点击Filter的时候页面会跳转到本身searchIndex,而且对于这个页面我们是不需要有POST方法的,因为这个页面只是通过url的改变去获得不同的数据。
当然,如果你想的话,也是可以添加一个POST方法的,尝试吧下面这段代码写入到程序里。
[HttpPost]

public string SearchIndex(FormCollection fc, string searchString)

{

    return "<h3> From [HttpPost]SearchIndex: " + searchString + "</h3>";

}
这是如果我们做相同的操作,得到的结果将是


当然你也可以通过添加BeginForm的参数强制指定调用Get方法。
@using (Html.BeginForm("SearchIndex","Movies",FormMethod.Get))

然后我们再用相同的方法添加另一个搜索条件,根据Genre进行搜索
我们先把控制器中的POST方法删除,然后重写我们的GET方法,添加一个新的参数叫movieGenre,让它看起来和下面的代码一样
public ActionResult SearchIndex(string movieGenre, string searchString)
{
var movies = (from m in db.Movies
select m).ToList();
if (!String.IsNullOrEmpty(searchString))
{
movies = (from m in movies
where m.Title.ToUpper().Contains(searchString.ToUpper())
select m).ToList();
}
if (!String.IsNullOrEmpty(movieGenre))
{
movies = (from m in movies
where m.Genre.ToUpper().Contains(movieGenre.ToUpper())
select m).ToList();
}
return View(movies);
}
然后在searchindex.cshtml中加入movieGenre文本框
@using (Html.BeginForm("SearchIndex","Movies",FormMethod.Get))
{
<p> Genre: @Html.TextBox("movieGenre")<br />
Title: @Html.TextBox("SearchString")<br />
<input type="submit" value="Filter" /></p>
}
然后运行网站就能看到以下页面
