一、Collection
Collection 接口定义了一些基本的方法:
- int size();
- boolean isEmpty();
- boolean add(E e);
- boolean addAll(Collection<? extend E> c);
- boolean remove(Object o);
- boolean removeAll(Collection<?> c);
- boolean removeIf(Predicate<? super E> filter) // 移除满足给定条件的元素
- boolean retainAll(Collection<?> c); // 移除不在集合 c 中的所有元素
- boolean contains(Object o);
- boolean containsAll(Collection<?> c);
- boolean equals(Object o);
- int hashCode();
- Iterator<E> iterator();
- Object[] toArray();
- T[] toArray(T[]); //返回任意类型的数组。如果传入数组的长度小于元素长度,则创建一个长度等于元素数量的新数组,并返回;反之传入数组长度足够,则将元素拷贝到所传入的数组中,并返回。
- void clear();
- Spliterator<E> spliterator(); // 并行遍历元素,
- Stream<E> stream(); // 将集合转换成流,
- Stream<E> parallelStream();
上面我们提到的 Spliterator 是一个并行遍历的迭代器(分成多份交给不同线程),而 Iterator 是一个顺序遍历迭代器,Spliterator 接口的基本方法如下:
- boolean tryAdvance(Consumer<? super T> action); // 给定一个执行动作,若还有剩余元素返回 true
- default void forEachRemaining(Consumer<? super T> action) // 循环调用了上述 tryAdvance 方法
- Spliterator<T> trySplit(); // 拆分当前要遍历的元素,返回一个新的 Spliterator 迭代器
- long estimateSize(); // 估算还有多少元素要遍历
- int characteristics(); //返回当前对象有哪些特征值
- default boolean hasCharacteristics(int characteristics) //是否具有当前特征值
- default long getExactSizeIfKnown() // 当迭代器拥有 SIZED 特征时,返回剩余元素个数;否则返回-1
- default Comparator<? super T> getComparator() //如果 Spliterator 的 list 是通过 Comparator 排序的,则返回Comparator; 如果 Spliterator 的 list 是自然排序的则返回 null
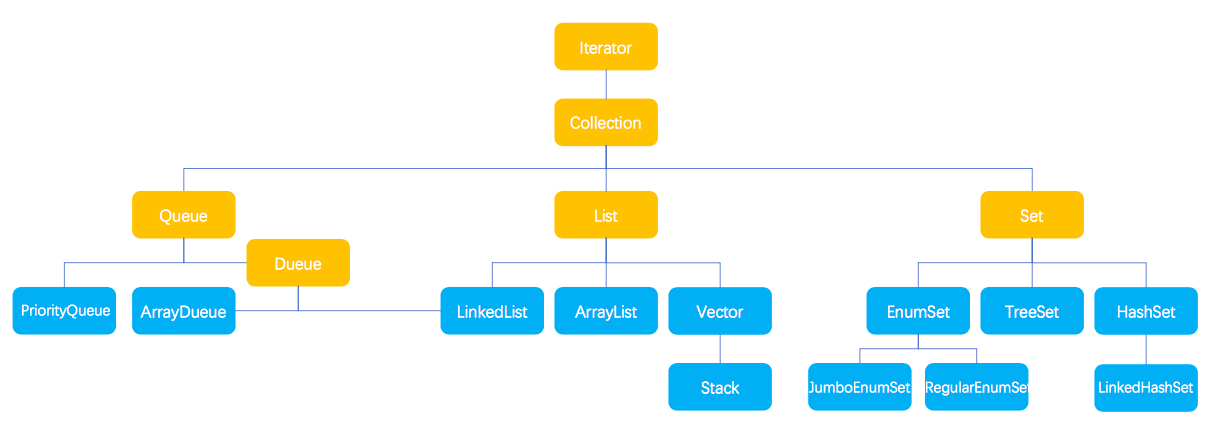
AbstractCollection 抽象类实现了 Collection 接口的部分方法,但是这些方法是基于 Iterator() 方法实现的,而 Iterator() 是由具体的实现类进行实现的,下面我们来看一下 Collection 的实现体系。
1 Queue 与 Deque
Queue 接口也是继承自 Collection 接口,增加了一些“队列”的操作方法。以下是 Queue 接口中的方法:
- boolean add(E e); // 将元素 e 放入队列,如果队列空间不足则抛出异常
- boolean offer(E e); // 将元素 e 放入队列
- E remove(); // 获取队首元素,并移除。与 poll() 的区别是,如果队列为空则抛异常
- E poll(); // 获取队首元素,并移除。队列为空则返回 null
- E element(); // 获取队首元素,但不移除。与 peek() 的区别是,如果队列为空则抛异常
- E peek(); // 获取队首元素,但不移除。队列为空则返回 null
Deque 接口继承自 Queue 接口,增加了一些“双端队列”和“栈”的操作方法,Deque 接口中相对 Queue 接口增加了如下方法:
- void addFirst(E e);
- void addLast(E e);
- boolean offerFirst(E e);
- boolean offerLast(E e);
- E removeFirst();
- E removeLast();
- E pollFirst();
- E pollLast();
- E getFirst();
- E getLast();
- E peekFirst();
- E peekLast();
- boolean removeFirstOccurrence(Object o); // 删除第一个 o 元素
- boolean removeLastOccurrence(Object o); // 删除最后一个 o 元素
- void push(E e); // 模拟栈的操作,将一个元素压入栈中
- E pop(); // 模拟栈的操作,弹出栈顶元素
1.1 PriorityQueue
PriorityQueue 是一种特殊的队列,每次出队的权值都是队列中最小的,因此可以使用它来排序,但是它只保证出队的元素有序的,不保证使用迭代器遍历的元素是有序的。权值大小的评判可以由元素本身,也可以由传入比较器来判断。PriorityQueue 之所以每次都能取出最小的权值,是利用 transient Object[] queue 数组(默认长度11)实现了小根堆,最小(大)堆是一棵完全二叉树,且父节点要小于(大于)子节点,每个节点的左孩子位置为2*i,右孩子为2*i+1。
我们来看一下向队列中插入 {5, 3, 4, 2, 1, 6} 这个序列时,堆的变化(以下操作过程是在数据结构可视化网址中进行的)
插入元素 5 到数组的第一个位置,如下图

插入元素 3 到数组第二个位置,然后与父节点(当前节点位置i,父节点位置i/2)比较大小,小于父节点则交换位置,如下图

插入元素 4 到数组第三个位置,然后与父节点比较大小......如下图

插入元素 2 到数组第四个位置,然后......与5交换.....与3交换......如下图
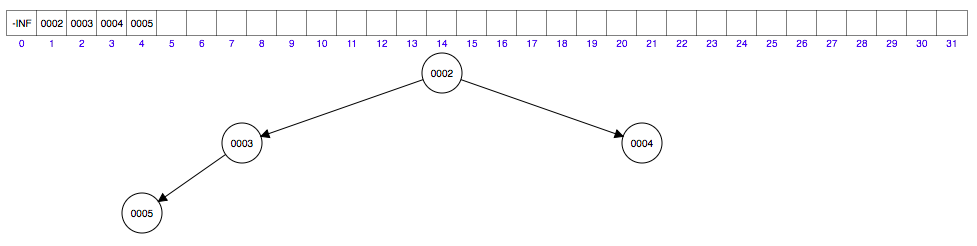
插入元素 1 到数组第五个位置,然后......与3交换.....与2交换......如下图
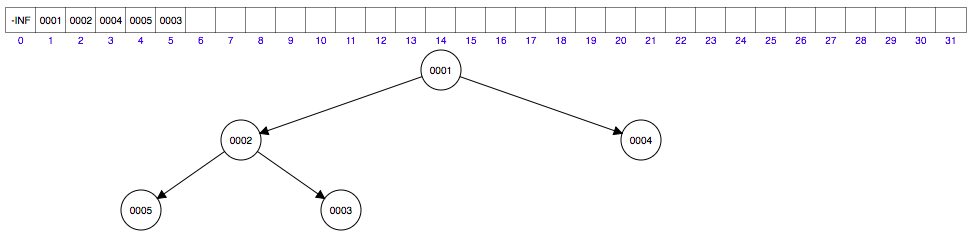
插入元素 6 到数组第六个位置......如下图

1) 入队操作


    public boolean add(E e) {
        return offer(e);
    }
    public boolean offer(E e) {
        if (e == null)
            throw new NullPointerException();
        modCount++;
        // 确是空间是否充足,防止溢出
        int i = size;
        if (i >= queue.length)
            grow(i + 1);
        size = i + 1;
        if (i == 0)
            queue[0] = e;
        else
            // 插入元素的实际操作,i 表示插入的是第几个元素
            siftUp(i, e);
        return true;
    }
    private void siftUp(int k, E x) {
        // 判断是否有比较器可用
        if (comparator != null)
            siftUpUsingComparator(k, x);
        else
            siftUpComparable(k, x);
    }
    // 使用默认方式来插入节点
    private void siftUpComparable(int k, E x) {
        Comparable<? super E> key = (Comparable<? super E>) x;
        while (k > 0) {
            // 找到父节点
            int parent = (k - 1) >>> 1;
            Object e = queue[parent];
            // 如果插入节点较大,则无需处理,否则与父节点交换位置
            if (key.compareTo((E) e) >= 0)
                break;
            // 交换父子节点位置,继续判断插入节点位置是否合适
            queue[k] = e;
            k = parent;
        }
        // 确定好插入节点位置,并放入
        queue[k] = key;
    }
    // 使用比较器来插入节点,同上只是比较方式不同
    private void siftUpUsingComparator(int k, E x) {
        while (k > 0) {
            int parent = (k - 1) >>> 1;
            Object e = queue[parent];
            if (comparator.compare(x, (E) e) >= 0)
                break;
            queue[k] = e;
            k = parent;
        }
        queue[k] = x;
    }
2) 出队操作
    // 这个方法在 AbstractQueue 中实现的
    public E remove() {
        E x = poll();
        if (x != null)
            return x;
        else
            throw new NoSuchElementException();
    }
    public E poll() {
        if (size == 0)
            return null;
        int s = --size;
        modCount++;
        // 获取队首元素,即堆顶元素
        E result = (E) queue[0];
        // 获取队尾元素,放置在堆顶,然后调整堆
        E x = (E) queue[s];
        queue[s] = null;
        if (s != 0)
            siftDown(0, x);
        return result;
    }
    // 判断是否有可用的比较器
    private void siftDown(int k, E x) {
        if (comparator != null)
            siftDownUsingComparator(k, x);
        else
            siftDownComparable(k, x);
    }
    // 使用默认方式调整堆
    private void siftDownComparable(int k, E x) {
        Comparable<? super E> key = (Comparable<? super E>)x;
        // 非叶子结点元素的最大位置
        int half = size >>> 1;        // loop while a non-leaf
        // 如果不是叶子结点,继续循环调整
        while (k < half) {
            // 得到k位置节点的左孩子,假设左孩子比右孩子小
            int child = (k << 1) + 1; // assume left child is least
            // 获取左孩子的值
            Object c = queue[child];
            // 获取右孩子位置
            int right = child + 1;
            // 获取左右孩子中较小的一个
            if (right < size &&
                ((Comparable<? super E>) c).compareTo((E) queue[right]) > 0)
                c = queue[child = right];
            // 如果当前节点比其孩子节点小,则不用调整了,否则交换两个节点位置
            if (key.compareTo((E) c) <= 0)
                break;
            // 交换两个节点位置,并继续判断位置是否合适
            queue[k] = c;
            k = child;
        }
        // 确定插入节点位置,并放入
        queue[k] = key;
    }
    // 使用比较器的方式调整堆,同上只是比较方式不同
    private void siftDownUsingComparator(int k, E x) {
        int half = size >>> 1;
        while (k < half) {
            int child = (k << 1) + 1;
            Object c = queue[child];
            int right = child + 1;
            if (right < size &&
                comparator.compare((E) c, (E) queue[right]) > 0)
                c = queue[child = right];
            if (comparator.compare(x, (E) c) <= 0)
                break;
            queue[k] = c;
            k = child;
        }
        queue[k] = x;
    }
1.2 ArrayDeque
ArrayDeque 利用 transient Object[] elements 数组实现的双端队列,默认长度为16,最小长度8。当有元素进队或出队时,数组中的元素不会移动,发生变化的只是 head 和 tail 两个属性。进队时就根据 tail 所指示将其放到队尾,出队时就将 head 所指示的元素出队,当 tail 追上 head 时,将数组容量扩大一倍。
1) 分配数组大小
    // 初始化数组空间
    private void allocateElements(int numElements) {
        int initialCapacity = MIN_INITIAL_CAPACITY;
        // 指定长度计算数组大小,始终为2的n次方
        // 当指定值为1-7时,数组大小为8
        // 当指定值为8-15时,数组大小为16
        // 当指定值为16-31时,数组大小为32
        if (numElements >= initialCapacity) {
            initialCapacity = numElements;
            initialCapacity |= (initialCapacity >>>  1);
            initialCapacity |= (initialCapacity >>>  2);
            initialCapacity |= (initialCapacity >>>  4);
            initialCapacity |= (initialCapacity >>>  8);
            initialCapacity |= (initialCapacity >>> 16);
            initialCapacity++;
            // 如果值太大溢出,需要缩小2倍
            if (initialCapacity < 0)   // Too many elements, must back off
                initialCapacity >>>= 1;// Good luck allocating 2 ^ 30 elements
        }
        elements = new Object[initialCapacity];
    }
    // 扩大数组空间
    private void doubleCapacity() {
        assert head == tail;
        int p = head;
        int n = elements.length;
        // 头指针右边长度
        int r = n - p; // number of elements to the right of p
        // 数组新的大小
        int newCapacity = n << 1;
        if (newCapacity < 0)
            throw new IllegalStateException("Sorry, deque too big");
        Object[] a = new Object[newCapacity];
        // 复制头指针左边的数据
        System.arraycopy(elements, p, a, 0, r);
        // 复制头指针右边的数据
        System.arraycopy(elements, 0, a, r, p);
        elements = a;
        // 初始化首尾指针
        head = 0;
        tail = n;
    }
2) 判断大小
    public int size() {
        // 若 elements.length=16, tail=2, head=1,则 tail - head = -11
        // 换算二进制   11111111111111111111111111110101
        // 进行与运算 & 00000000000000000000000000001111
        // 得实际长度 = 00000000000000000000000000000101 即得到长度为 5
        return (tail - head) & (elements.length - 1);
    }
3) 入队操作
    public void addFirst(E e) {
        if (e == null)
            throw new NullPointerException();
        elements[head = (head - 1) & (elements.length - 1)] = e;
        if (head == tail)
            doubleCapacity();
    }
    public void addLast(E e) {
        if (e == null)
            throw new NullPointerException();
        elements[tail] = e;
        if ( (tail = (tail + 1) & (elements.length - 1)) == head)
            doubleCapacity();
    }
4) 出队操作
    public E pollFirst() {
        int h = head;
        @SuppressWarnings("unchecked")
        E result = (E) elements[h];
        // Element is null if deque empty
        if (result == null)
            return null;
        elements[h] = null;     // Must null out slot
        head = (h + 1) & (elements.length - 1);
        return result;
    }

    public E pollLast() {
        int t = (tail - 1) & (elements.length - 1);
        @SuppressWarnings("unchecked")
        E result = (E) elements[t];
        if (result == null)
            return null;
        elements[t] = null;
        tail = t;
        return result;
    }
2 List
List 接口继承于 Collection 接口,是有序可重复集合,可以精确控制元素的插入、删除。以下是与 Collection 接口相比增加的方法:
- void replaceAll(UnaryOperator<E> operator); // 根据 operator 进行替换,待研究
- void sort(Comparator<? super E> c); // 根据 Comparator 指定规则进行排序
- void add(int index, E e); // 精确的在 index 位置上插入元素 e,其后元素后移
- boolean addAll(int, Collection<? extend E>); // 将集合插入到 index 位置,其后元素后移
- E get(int index);
- E set(int index, E e); // 用 e 替换在 index 位置上的原有元素,并将其返回
- E remove(int index);
- int indexOf(Object o); // 从前往后遍历查找
- int lastIndexOf(Object o); // 从后往前遍历查找
- ListIterator<E> listIterator();
- ListIterator<E> listIterator(int index); // 从指定位置返回 ListIterator
- List<E> subList(int fromIndex, int toIndex);
AbstractList 抽象类实现了 List 接口的部分方法,这些方法都是基于 listIterator() 方法遍历实现的,如 indexOf() 和 lastIndexOf() 分别是向后和向前遍历比较;clear() 是遍历移除;equals() 是先判断是否相等,然后遍历比较。
在 AbstractList 中还有两个内部类( listIterator() 方法就是利用其中一个内部类 ListItr 的实例实现的):
- Itr (implements Iterator<E>),有基本的迭代方法 hasNext()、next()、remove(),其中 next() 是利用 get() 实现,get() 需要被其子类实现才可用;remove() 是利用 AbstractList.this.remove() 方法,remove() 同样需要被子类实现才可用。
- ListItr (extends Itr implements ListIterator<E>),继承自 Itr,增加了向前迭代方法和 add()、set()方法,方式与 Itr 类似,其实现仍依赖于实现类。
以上是 List 接口和 AbstractList 抽象类的内容,下面我们来看一下 List 的实现类
2.1 ArrayList
ArrayList 利用一个数组(transient Object[] elementData)实现的,初始化大小为 10。ArrayList 的部分方法如下:
1) 添加元素
    public boolean add(E e) {
        // 根据所需大小计算
        ensureCapacityInternal(size + 1);  // Increments modCount!!
        elementData[size++] = e;
        return true;
    }
    public void add(int index, E element) {
        // 判断 index 是否合法
        rangeCheckForAdd(index);
        // 根据所需大小计算
        ensureCapacityInternal(size + 1);  // Increments modCount!!
        // 调整元素位置,将要插入的位置空出
        System.arraycopy(elementData, index, elementData, index + 1, size - index);
        elementData[index] = element;
        size++;
    }
    private void ensureCapacityInternal(int minCapacity) {
        // 如果数组为空,取默认大小和所需大小两者中较大的值
        if (elementData == DEFAULTCAPACITY_EMPTY_ELEMENTDATA) {
            minCapacity = Math.max(DEFAULT_CAPACITY, minCapacity);
        }
        ensureExplicitCapacity(minCapacity);
    }
    private void ensureExplicitCapacity(int minCapacity) {
        // 修改次数+1
        modCount++;
        // 判断是否需要扩充数组
        if (minCapacity - elementData.length > 0)
            grow(minCapacity);
    }
    private void grow(int minCapacity) {
        // overflow-conscious code
        int oldCapacity = elementData.length;
        // 将数组容量扩大1.5倍
        int newCapacity = oldCapacity + (oldCapacity >> 1);
        // 若仍然不足,则按最需求容量
        if (newCapacity - minCapacity < 0)
            newCapacity = minCapacity;
        // 如果超出最大限制
        if (newCapacity - MAX_ARRAY_SIZE > 0)
            newCapacity = hugeCapacity(minCapacity);
        // 扩充数组
        elementData = Arrays.copyOf(elementData, newCapacity);
    }
    private static int hugeCapacity(int minCapacity) {
        // 小于0表示整型溢出
        if (minCapacity < 0) // overflow
            throw new OutOfMemoryError();
        return (minCapacity > MAX_ARRAY_SIZE) ? Integer.MAX_VALUE : MAX_ARRAY_SIZE;
    }
2) 移除元素
    // 移除某个位置上的元素
    public E remove(int index) {
        // 检查删除位置是否合法
        rangeCheck(index);
        // 修改次数+1
        modCount++;
        E oldValue = elementData(index);
        // 要移动元素的数量
        int numMoved = size - index - 1;
        if (numMoved > 0)
            // 调整元素位置
            System.arraycopy(elementData, index+1, elementData, index, numMoved);
        elementData[--size] = null; // clear to let GC do its work
        return oldValue;
    }
    // 移除某个元素
    public boolean remove(Object o) {
        if (o == null) {
            // 从头开始遍历查找
            for (int index = 0; index < size; index++)
                if (elementData[index] == null) {
                    // 移除操作
                    fastRemove(index);
                    return true;
                }
        } else {
            for (int index = 0; index < size; index++)
                if (o.equals(elementData[index])) {
                    fastRemove(index);
                    return true;
                }
        }
        return false;
    }
    private void fastRemove(int index) {
        modCount++;
        int numMoved = size - index - 1;
        if (numMoved > 0)
            System.arraycopy(elementData, index+1, elementData, index, numMoved);
        elementData[--size] = null; // clear to let GC do its work
    }
在 ArrayList 中的几个内部类:
- Itr (implements Iterator<E>),Itr 类优化了 AbstractList.Itr 类,不再依赖于 get() 方法,而是直接操作 ArrayList 内部的数组来实现迭代功能。
- ListItr (extends Itr implements ListIterator<E>),ListItr 类优化了 AbstractList.ListItr 类,同样也不在依赖于 get() 方法,直接操作 ArrayList 内部的数组来实现。
- SubList (extends AbstractList<E> implements RandomAccess)
- static ArrayListSpliterator (implements Spliterator<E>)
2.2 LinkedList
LinkedList 利用一个双向链表实现的。LinkedList 除了实现 List 接口外,还实现了 Deque 接口,所以 LinkedList 也包含一些“队列”、“双端队列”和“栈”的方法,LinkedList 部分方法如下:
1) 添加元素、进队、进栈
    // 元素入栈
    public void push(E e) {
        addFirst(e);
    }
    // 元素入队
    public boolean offer(E e) {
        return offerLast(e);
    }
    // 元素从头部入队
    public boolean offerFirst(E e) {
        addFirst(e);
        return true;
    }
    // 元素从尾部入队
    public boolean offerLast(E e) {
        addLast(e);
        return true;
    }
    // 添加元素
    public boolean add(E e) {
        linkLast(e);
        return true;
    }
    // 添加元素到头部
    public void addFirst(E e) {
        linkFirst(e);
    }
    // 添加元素到尾部
    public void addLast(E e) {
        linkLast(e);
    }
    private void linkFirst(E e) {
        // 头节点
        final Node<E> f = first;
        // 创建新节点
        final Node<E> newNode = new Node<>(null, e, f);
        // 将新节点设为头节点
        first = newNode;
        if (f == null)
            last = newNode;
        else
            f.prev = newNode;
        size++;
        modCount++;
    }
    void linkLast(E e) {
        final Node<E> l = last;
        final Node<E> newNode = new Node<>(l, e, null);
        last = newNode;
        if (l == null)
            first = newNode;
        else
            l.next = newNode;
        size++;
        modCount++;
    }
    // 添加集合c
    public boolean addAll(Collection<? extends E> c) {
        return addAll(size, c);
    }
    // 添加集合c到指定位置
    public boolean addAll(int index, Collection<? extends E> c) {
        checkPositionIndex(index);
        Object[] a = c.toArray();
        int numNew = a.length;
        if (numNew == 0)
            return false;
        Node<E> pred, succ;
        if (index == size) {
            succ = null;
            pred = last;
        } else {
            // 找到第index节点
            succ = node(index);
            pred = succ.prev;
        }
        // 遍历集合,将其插入链表
        for (Object o : a) {
            @SuppressWarnings("unchecked") E e = (E) o;
            Node<E> newNode = new Node<>(pred, e, null);
            if (pred == null)
                first = newNode;
            else
                pred.next = newNode;
            pred = newNode;
        }
        if (succ == null) {
            last = pred;
        } else {
            pred.next = succ;
            succ.prev = pred;
        }
        size += numNew;
        modCount++;
        return true;
    }
    // 查找第 index 个节点
    Node<E> node(int index) {
        // assert isElementIndex(index);
        // 判断从前往后找,还是从后往前找
        if (index < (size >> 1)) {
            Node<E> x = first;
            for (int i = 0; i < index; i++)
                x = x.next;
            return x;
        } else {
            Node<E> x = last;
            for (int i = size - 1; i > index; i--)
                x = x.prev;
            return x;
        }
    }
在 LinkedList 中的几个内部类:
- ListItr (extends Itr implements ListIterator<E>),ListItr 类优化了 AbstractList.ListItr 类,迭代不再依赖于 get() 方法,而是直接遍历节点。
- static Node<E> ,链表节点的数据结构。
- DescendingIterator (implements Iterator<E>)
- static LLSpliterator (implements Spliterator<E>)
2.3 Vector
Vector 在 Java0 时就已经出现,和 ArrayList 的区别是 Vector 是线程安全的(方法中全都有 synchronized 关键字)。在 Java2 之后 Vector也实现自 List 接口,所以两者的用法和内部的实现方式基本一样,另外 Vector 还保留了原有的元素操作方法,如 setElementAt(E, int)、insertElement(E, int)、addElement(E)、removeElement(Object)等。Vector 还提供了中 Enumeration 元素遍历方式,与 Iterator 类似,只不过 Iterator 多了遍历是删除元素的方法。另外当空间不足时 Vector 会增加100%,ArrayList 只会增加50%+1。
由于 Vector 和 ArrayList 类似且不常用,就不做讨论。
2.4 Stack
Stack 是继承自 Vector,且也是在 Java0 时就已经存在。Stack 是模拟了栈的操作,在 Vector 基础上扩展了 5 个方法:push(E)、pop()、peek()、empty()、search(Object)。在使用上应该优先使用 Dueue,这里就不对 Stack 做讨论
3 Set
Set 接口继承于 Collection 接口,在 Set 接口中并没有增加任何方法。
3.1 TreeSet
TreeSet 的实现完全依赖于 TreeMap,其内部定义了一个 transient NavigableMap<E,Object> m,但实际上在构造方法中是创建的 TreeMap对象,我们来看一下它的方法
1) 构造方法
    TreeSet(NavigableMap<E,Object> m) {
        this.m = m;
    }
    public TreeSet() {
        this(new TreeMap<E,Object>());
    }
    public TreeSet(Comparator<? super E> comparator) {
        this(new TreeMap<>(comparator));
    }
    public TreeSet(Collection<? extends E> c) {
        this();
        addAll(c);
    }
    public TreeSet(SortedSet<E> s) {
        this(s.comparator());
        addAll(s);
    }
2) 添加元素
    public boolean add(E e) {
        return m.put(e, PRESENT)==null;
    }
    public  boolean addAll(Collection<? extends E> c) {
        // Use linear-time version if applicable
        if (m.size()==0 && c.size() > 0 &&
            c instanceof SortedSet &&
            m instanceof TreeMap) {
            SortedSet<? extends E> set = (SortedSet<? extends E>) c;
            TreeMap<E,Object> map = (TreeMap<E, Object>) m;
            Comparator<?> cc = set.comparator();
            Comparator<? super E> mc = map.comparator();
            if (cc==mc || (cc != null && cc.equals(mc))) {
                map.addAllForTreeSet(set, PRESENT);
                return true;
            }
        }
        return super.addAll(c);
    }
3.2 HashSet
HashSet 的实现完全依赖于 HashMap,其内部定义了一个 transient HashMap<E,Object> map,利用了 HashMap 的 key 来保存元素,我们来看一下它的方法
1) 构造方法
    public HashSet() {
        map = new HashMap<>();
    }
    public HashSet(Collection<? extends E> c) {
        map = new HashMap<>(Math.max((int) (c.size()/.75f) + 1, 16));
        addAll(c);
    }
    public HashSet(int initialCapacity, float loadFactor) {
        map = new HashMap<>(initialCapacity, loadFactor);
    }
    public HashSet(int initialCapacity) {
        map = new HashMap<>(initialCapacity);
    }
    HashSet(int initialCapacity, float loadFactor, boolean dummy) {
        map = new LinkedHashMap<>(initialCapacity, loadFactor);
    }
2) 添加元素
    public boolean add(E e) {
        return map.put(e, PRESENT)==null;
    }
3) 移除元素
    public boolean remove(Object o) {
        return map.remove(o)==PRESENT;
    }
4) 迭代元素
    public Iterator<E> iterator() {
        return map.keySet().iterator();
    }
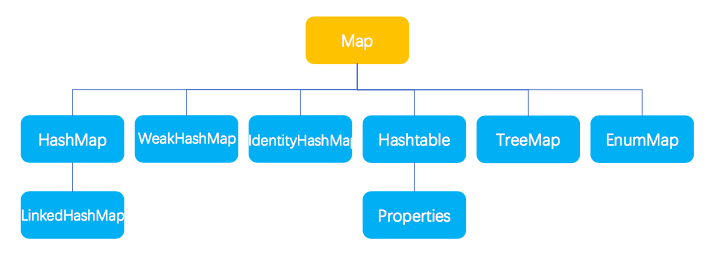
二、Map
以下是 Map 接口中定义的一些基本的方法:
- int size();
- boolean isEmpty();
- boolean containsKey(Object key);
- boolean containsValue(Object value);
- V get(Object key);
- V put(K key, V value);
- V remove(Object key);
- void putAll(Map<? extends K, ? extends V> m); // 添加 m 中的所有元素
- void clear();
- Set<K> keySet(); // 性能不如 entrySet()
- Collection<V> values();
- Set<Map.Entry<K, V>> entrySet(); // 可理解为将 Map 放在了 Set 中,这样就可以通过 Iterator 进行遍历,效率要高于 keySet()。
- boolean equals(Object o);
- int hashCode();
- default V getOrDefault(Object key, V defaultValue) // key 的值存在则将其返回,否则返回 defaultValue。
- default void forEach(BiConsumer action) // 遍历 Map 的每个元素时调用 action.accept(k, v) 方法执行该操作。
- default void replaceAll(BiFunction function) // 遍历 Map 的每个元素时调用 function.apply(k, v) 更新 value。
- default V putIfAbsent(K key, V value) // key 的值为空则将其设置为 value 并返回空,否则返回其值。
- default boolean remove(Object key, Object value) // 删除能同时匹配 key 和 value 的元素。
- default boolean replace(K key, V oldValue, V newValue) // 替换能同时匹配 key 和 oldValue 的元素的值为 newValue。
- default V replace(K key, V value) // key 的值不为空,才将其替换。
- default V computeIfAbsent(K key, Function mapping) // key 的值为空,则 mapping.apply(key) 计算新值。
- default V computeIfPresent(K key, BiFunction remapping) // key 的值不空,则 remapping.apply(key,old) 计算新值。
- default V compute(K key, BiFunction remapping) // 利用 remapping.apply(key,oldValue) 计算新值。
- default V merge(K key, V value, BiFunction remapping) // key 的值为空则赋为 value,否则与 value 计算确定新值。
另外在 Map 接口的内部还定义了一个 Map.Entry<K,V> 接口,它表示 Map 中的一个实体(一个key-value对),在这个接口内有一些基本的操作方法:
- K getKey();
- V getValue();
- V setValue(V value);
- boolean equals(Object o);
- int hashCode();
- Comparator<Map.Entry<K,V>> comparingByKey()
- Comparator<Map.Entry<K,V>> comparingByValue()
- comparingByKey(Comparator<? super K> cmp)
- comparingByValue(Comparator<? super V> cmp)
1.1 TreeMap
TreeMap 是利用红黑树实现,红黑树是在二叉排序树的基础上增加了以下要求:
- 每个节点只能是红的或黑的。
- 根节点是黑的。
- 叶节点(指空节点)是黑的。
- 如果一个节点是红的,则它的子节点是黑的,即红色节点不能相邻。
- 从任一节点到每个叶子节点的路径都包含相同数目的黑色节点。
我们先来看一个红黑树的图,明白叔叔节点及兄弟节点的概念

在上图中,以节点 10 为例,节点 100 为它的叔叔节点,节点 30 为它的兄弟节点。
我们再来了解下左旋和右旋,如下图
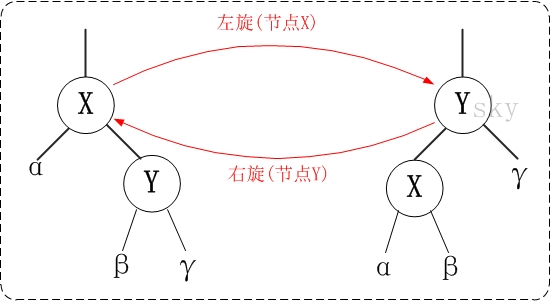
即左旋的时候,X 的原位置交给了 Y,Y 的左节点(如果有)变成了 X 的右节点;右旋的时候,Y 的原位置交给了 X,X 的右节点(如果有)变成了 Y 的左节点。无论是左旋还是右旋,在旋转前后都是一颗二叉排序树。左旋与右旋的代码如下:
    private void rotateLeft(Entry<K,V> p) {
        if (p != null) {
            Entry<K,V> r = p.right;
            p.right = r.left;
            if (r.left != null)
                r.left.parent = p;
            r.parent = p.parent;
            if (p.parent == null)
                root = r;
            else if (p.parent.left == p)
                p.parent.left = r;
            else
                p.parent.right = r;
            r.left = p;
            p.parent = r;
        }
    }
    private void rotateRight(Entry<K,V> p) {
        if (p != null) {
            Entry<K,V> l = p.left;
            p.left = l.right;
            if (l.right != null) l.right.parent = p;
            l.parent = p.parent;
            if (p.parent == null)
                root = l;
            else if (p.parent.right == p)
                p.parent.right = l;
            else p.parent.left = l;
            l.right = p;
            p.parent = l;
        }
    }
1)红黑树元素的插入
向红黑树插入元素时,将其当作一颗二叉排序树进行插入,将插入节点设为红色,因为这样要处理的情况最少。这样可能会违反的是“如果一个节点是红的,则它的子节点是黑的”这条规则。我们来分析下插入一个节点的着色情况:
- 插入节点是根节点:直接设置为黑的
- 插入节点的父节点是黑的:不需要做处理
- 插入节点的父节点是红的:
- 叔叔节点是红的:将父节点、叔叔节点设为黑的,将祖父节点设为红的,将祖父节点看做插入节点继续操作。
- 叔叔节点是黑的:
- 父节点是左孩子:以父节点为支点左旋(如果当前节点是右孩子),设置父节点为黑的、祖父节点为红的,以祖父节点为支点右旋。
- 父节点是右孩子:以父节点为支点右旋(如果当前节点是左孩子),设置父节点为黑的、祖父节点为红的,以祖父节点为支点左旋。
上述情况是在 HashMap 源码中得到的结论,因为查看过一些讲解红黑树的博客,对于情况讨论的都不怎么理想,干脆就直接从源码中找答案,下面是 HashMap 中关于红黑树插入新节点后的着色代码:
    private void fixAfterInsertion(Entry<K,V> x) {
        x.color = RED;

        while (x != null && x != root && x.parent.color == RED) {
            if (parentOf(x) == leftOf(parentOf(parentOf(x)))) {
                Entry<K,V> y = rightOf(parentOf(parentOf(x)));
                if (colorOf(y) == RED) {
                    setColor(parentOf(x), BLACK);
                    setColor(y, BLACK);
                    setColor(parentOf(parentOf(x)), RED);
                    x = parentOf(parentOf(x));
                } else {
                    if (x == rightOf(parentOf(x))) {
                        x = parentOf(x);
                        rotateLeft(x);
                    }
                    setColor(parentOf(x), BLACK);
                    setColor(parentOf(parentOf(x)), RED);
                    rotateRight(parentOf(parentOf(x)));
                }
            } else {
                Entry<K,V> y = leftOf(parentOf(parentOf(x)));
                if (colorOf(y) == RED) {
                    setColor(parentOf(x), BLACK);
                    setColor(y, BLACK);
                    setColor(parentOf(parentOf(x)), RED);
                    x = parentOf(parentOf(x));
                } else {
                    if (x == leftOf(parentOf(x))) {
                        x = parentOf(x);
                        rotateRight(x);
                    }
                    setColor(parentOf(x), BLACK);
                    setColor(parentOf(parentOf(x)), RED);
                    rotateLeft(parentOf(parentOf(x)));
                }
            }
        }
        root.color = BLACK;
    }
我们来看一下插入操作的过程
- 当父节点是红的、叔叔节点是黑的,父节点是左孩子时,过程如下

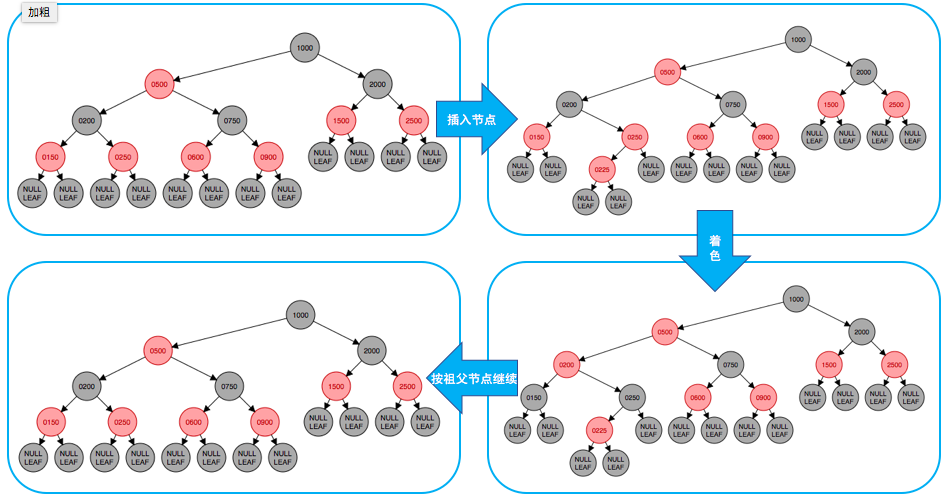
- 当父节点是红的、叔叔节点也是红的时,过程如下
2)红黑树元素的删除
从红黑树中删除元素时,先将其按二叉排序树的方式删除节点,然后将红黑树重新着色,我们来分析一下着色情况:
- 当前节点是根节点:直接设为黑的
- 当前节点是左孩子:
- 如果兄弟节点是红的:将兄弟节点设为黑的,将父节点设为红的,以父节点为支点左旋,获取新的兄弟节点继续判断。
- 如果兄弟节点的孩子节点都是黑的:将兄弟节点设为红的,将父节点看做当前节点,继续判断。
- 如果兄弟节点的孩子节点有红的:如果左孩子是红的,则将其设为黑的,并将兄弟节点设为红的,以兄弟节点为支点右旋,获取新的兄弟节点。将兄弟节点设为与父节点同样的颜色,将父节点设为黑的,将兄弟节点的右孩子设为黑的,以父节点为支点左旋。
- 当前节点是右孩子:
注:以上操作过程是在数据结构可视化网址中进行的。
TreeMap 中利用 transient Entry<K,V> root 作为红黑树的根,TreeMap 的部分方法如下:
1) 放入元素
    public V put(K key, V value) {
        Entry<K,V> t = root;
        // 如果此时TreeMap中没有元素,则将这个元素设为根节点
        if (t == null) {
            compare(key, key); // type (and possibly null) check
            root = new Entry<>(key, value, null);
            size = 1;
            modCount++;
            return null;
        }
        int cmp;
        Entry<K,V> parent;
        // split comparator and comparable paths
        Comparator<? super K> cpr = comparator;
        // 如果有比较器就使用比较器,然后按照二叉排序树将其插入
        if (cpr != null) {
            do {
                parent = t;
                // 与当前节点比较
                cmp = cpr.compare(key, t.key);
                if (cmp < 0)
                    t = t.left;
                else if (cmp > 0)
                    t = t.right;
                else
                    // 将元素放入,替换旧值并返回
                    return t.setValue(value);
            } while (t != null);
        }
        else {
            if (key == null)
                throw new NullPointerException();
            @SuppressWarnings("unchecked")
                Comparable<? super K> k = (Comparable<? super K>) key;
            do {
                parent = t;
                cmp = k.compareTo(t.key);
                if (cmp < 0)
                    t = t.left;
                else if (cmp > 0)
                    t = t.right;
                else
                    return t.setValue(value);
            } while (t != null);
        }
        // 能执行到这,说明是要插入新元素,而不是去替换旧元素
        Entry<K,V> e = new Entry<>(key, value, parent);
        if (cmp < 0)
            parent.left = e;
        else
            parent.right = e;
        // 根据红黑树的规则,进行调整
        fixAfterInsertion(e);
        size++;
        modCount++;
        return null;
    }
2) 获取元素
    public V get(Object key) {
        Entry<K,V> p = getEntry(key);
        return (p==null ? null : p.value);
    }
    final Entry<K,V> getEntry(Object key) {
        // Offload comparator-based version for sake of performance
        // 出于性能考虑,卸载基于比较的版本
        if (comparator != null)
            return getEntryUsingComparator(key);
        if (key == null)
            throw new NullPointerException();
        @SuppressWarnings("unchecked")
            Comparable<? super K> k = (Comparable<? super K>) key;
        Entry<K,V> p = root;
        // 按二叉排序树的方式查找
        while (p != null) {
            int cmp = k.compareTo(p.key);
            if (cmp < 0)
                p = p.left;
            else if (cmp > 0)
                p = p.right;
            else
                return p;
        }
        return null;
    }
    final Entry<K,V> getEntryUsingComparator(Object key) {
        @SuppressWarnings("unchecked")
            K k = (K) key;
        Comparator<? super K> cpr = comparator;
        if (cpr != null) {
            Entry<K,V> p = root;
            while (p != null) {
                int cmp = cpr.compare(k, p.key);
                if (cmp < 0)
                    p = p.left;
                else if (cmp > 0)
                    p = p.right;
                else
                    return p;
            }
        }
        return null;
    }
3) 移除元素
    public V remove(Object key) {
        Entry<K,V> p = getEntry(key);
        if (p == null)
            return null;
        V oldValue = p.value;
        deleteEntry(p);
        return oldValue;
    }
    // 按照二叉排序树的方式删除,然后再重新着色
    private void deleteEntry(Entry<K,V> p) {
        modCount++;
        size--;
        // If strictly internal, copy successor's element to p and then make p
        // point to successor.
        // 有两个孩子节点
        if (p.left != null && p.right != null) {
            // 找出当前节点的后继节点
            Entry<K,V> s = successor(p);
            // 将后继节点值赋给当前节点
            p.key = s.key;
            p.value = s.value;
            // 将后继节点看做当前节点处理
            p = s;
        }
        // Start fixup at replacement node, if it exists.
        Entry<K,V> replacement = (p.left != null ? p.left : p.right);
        // 有一个孩子节点
        if (replacement != null) {
            // 将孩子节点放到当前位置
            replacement.parent = p.parent;
            if (p.parent == null)
                root = replacement;
            else if (p == p.parent.left)
                p.parent.left  = replacement;
            else
                p.parent.right = replacement;
            // 置空,以便垃圾回收
            p.left = p.right = p.parent = null;
            // 如果被删除的节点是黑色,需要将树重新着色
            if (p.color == BLACK)
                fixAfterDeletion(replacement);
        //没有孩子节点,也没有父节点
        } else if (p.parent == null) { // return if we are the only node.
            // 置空,以便垃圾回收
            root = null;
        //没有孩子节点,但有父节点
        } else { //  No children. Use self as phantom replacement and unlink.
            // 如果要删除节点是黑的,需要将树重新着色
            if (p.color == BLACK)
                fixAfterDeletion(p);
            // 如果存在父节点,则将引用置空,以便垃圾回收
            if (p.parent != null) {
                if (p == p.parent.left)
                    p.parent.left = null;
                else if (p == p.parent.right)
                    p.parent.right = null;
                p.parent = null;
            }
        }
    }
在 TreeMap 中还有几个内部类:
2.2 HashMap
HashMap 利用哈希表,综合了链表(寻址容易)和数组(插入删除容易)的优点。哈希表有不同实现方式(数组+数组、数组+链表、单个数组等),最常用的一种是链表+数组的方式。
那哈希值是如何计算的呢?哈希表也称作散列表,常用的散列方式有:
- 除法散列法
- 平方散列法
- 斐波那契散列法
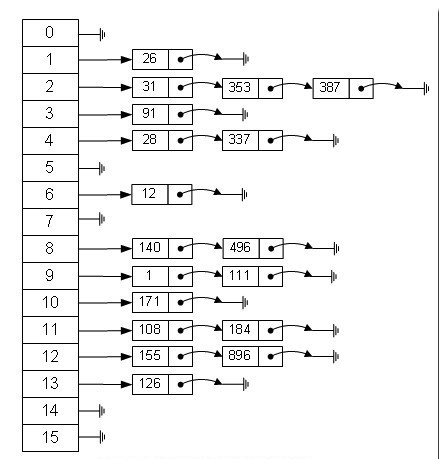
HashMap 中定义了一个内部类 Node 来作为链表的节点,利用 transient Node<K,V>[] table 存储元素,默认的数组长度为16,默认的负载因子(loadFactor)为0.75。当 HashMap 存储的元素越来越多时,hash 冲突的机率也越来越高,为了提高查询效率,就要对数组进行扩容(扩容要重新计算元素在数组中的位置,消耗很大)。那么什么时候扩容呢?这就要看负载因子了,当元素个数超过数组大小 * loadFactor 时就会扩容。为什么负载因子为0.75呢?因为这是一个对空间和时间的折中取值,负载因子越大,散列表中越集中,空间利用越高,查找效率越低;负载因子越小,散列表中越稀疏,查找效率越高,空间利用越低。HashMap 的部分方法如下:
1) 调整hash表大小
    // 调整hash表大小
    final Node<K,V>[] resize() {
        Node<K,V>[] oldTab = table;
        int oldCap = (oldTab == null) ? 0 : oldTab.length;
        int oldThr = threshold;
        int newCap, newThr = 0;
        if (oldCap > 0) {
            if (oldCap >= MAXIMUM_CAPACITY) {
                threshold = Integer.MAX_VALUE;
                return oldTab;
            }
            else if ((newCap = oldCap << 1) < MAXIMUM_CAPACITY && oldCap >= DEFAULT_INITIAL_CAPACITY)
                newThr = oldThr << 1; // double threshold
        }
        else if (oldThr > 0) // initial capacity was placed in threshold
            newCap = oldThr;
        else {               // zero initial threshold signifies using defaults
            newCap = DEFAULT_INITIAL_CAPACITY;
            newThr = (int)(DEFAULT_LOAD_FACTOR * DEFAULT_INITIAL_CAPACITY);
        }
        if (newThr == 0) {
            float ft = (float)newCap * loadFactor;
            newThr = (newCap < MAXIMUM_CAPACITY && ft < (float)MAXIMUM_CAPACITY ? (int)ft : Integer.MAX_VALUE);
        }
        threshold = newThr;
        @SuppressWarnings({"rawtypes","unchecked"})
            Node<K,V>[] newTab = (Node<K,V>[])new Node[newCap];
        table = newTab;
        if (oldTab != null) {
            for (int j = 0; j < oldCap; ++j) {
                Node<K,V> e;
                if ((e = oldTab[j]) != null) {
                    oldTab[j] = null;
                    if (e.next == null)
                        newTab[e.hash & (newCap - 1)] = e;
                    else if (e instanceof TreeNode)
                        ((TreeNode<K,V>)e).split(this, newTab, j, oldCap);
                    else { // preserve order
                        Node<K,V> loHead = null, loTail = null;
                        Node<K,V> hiHead = null, hiTail = null;
                        Node<K,V> next;
                        do {
                            next = e.next;
                            if ((e.hash & oldCap) == 0) {
                                if (loTail == null)
                                    loHead = e;
                                else
                                    loTail.next = e;
                                loTail = e;
                            }
                            else {
                                if (hiTail == null)
                                    hiHead = e;
                                else
                                    hiTail.next = e;
                                hiTail = e;
                            }
                        } while ((e = next) != null);
                        if (loTail != null) {
                            loTail.next = null;
                            newTab[j] = loHead;
                        }
                        if (hiTail != null) {
                            hiTail.next = null;
                            newTab[j + oldCap] = hiHead;
                        }
                    }
                }
            }
        }
        return newTab;
    }
2) 放入元素
    public V put(K key, V value) {
        return putVal(hash(key), key, value, false, true);
    }
    final V putVal(int hash, K key, V value, boolean onlyIfAbsent, boolean evict) {
        // tab用来暂存hash表,n为hash表长度,i为插入hash表的位置,p是i位置的头节点
        Node<K,V>[] tab; Node<K,V> p; int n, i;
        if ((tab = table) == null || (n = tab.length) == 0)
            // 调整hash表大小,获取其大小
            n = (tab = resize()).length;
        if ((p = tab[i = (n - 1) & hash]) == null)
            // 当 i 位置上头节点为空时,创建一个新节点将元素放入
            tab[i] = newNode(hash, key, value, null);
        else {
            // e是元素应放入的节点
            Node<K,V> e; K k;
            // 如果hash相等,key值也相等,则头节点p就是元素应放入的节点
            if (p.hash == hash && ((k = p.key) == key || (key != null && key.equals(k))))
                e = p;
            //
            else if (p instanceof TreeNode)
                e = ((TreeNode<K,V>)p).putTreeVal(this, tab, hash, key, value);
            // 从头节点开始遍历比较
            else {
                for (int binCount = 0; ; ++binCount) {
                    // 如果已经是最后一个节点,那将元素插入到新节点
                    if ((e = p.next) == null) {
                        p.next = newNode(hash, key, value, null);
                        // 链表长度大于8时,将结构转为红黑树
                        if (binCount >= TREEIFY_THRESHOLD - 1) // -1 for 1st
                            treeifyBin(tab, hash);
                        break;
                    }
                    // 如果hash相等,key值也相等,则p就是元素应放入的节点
                    if (e.hash == hash &&
                        ((k = e.key) == key || (key != null && key.equals(k))))
                        break;
                    // 将e看做当前节点,继续遍历
                    p = e;
                }
            }
            // 如果是覆盖了旧值,则将其返回
            if (e != null) { // existing mapping for key
                V oldValue = e.value;
                if (!onlyIfAbsent || oldValue == null)
                    e.value = value;
                afterNodeAccess(e);
                return oldValue;
            }
        }
        ++modCount;
        if (++size > threshold)
            // 调整hash表大小
            resize();
        afterNodeInsertion(evict);
        return null;
    }
    // 创建一个新节点
    Node<K,V> newNode(int hash, K key, V value, Node<K,V> next) {
        return new Node<>(hash, key, value, next);
    }
3) 获取元素
    public V get(Object key) {
        Node<K,V> e;
        return (e = getNode(hash(key), key)) == null ? null : e.value;
    }
    final Node<K,V> getNode(int hash, Object key) {
        Node<K,V>[] tab; Node<K,V> first, e; int n; K k;
        // 根据hash计算出元素所在链表的头节点
        if ((tab = table) != null && (n = tab.length) > 0 &&
            (first = tab[(n - 1) & hash]) != null) {
            // 判断头节点是否是所查找元素
            if (first.hash == hash && // always check first node
                ((k = first.key) == key || (key != null && key.equals(k))))
                return first;
            // 从头节点开始遍历查找元素
            if ((e = first.next) != null) {
                if (first instanceof TreeNode)
                    return ((TreeNode<K,V>)first).getTreeNode(hash, key);
                do {
                    if (e.hash == hash &&
                        ((k = e.key) == key || (key != null && key.equals(k))))
                        return e;
                } while ((e = e.next) != null);
            }
        }
        return null;
    }
4) 移除元素
    public V remove(Object key) {
        Node<K,V> e;
        return (e = removeNode(hash(key), key, null, false, true)) == null ?
            null : e.value;
    }
    final Node<K,V> removeNode(int hash, Object key, Object value,
                               boolean matchValue, boolean movable) {
        Node<K,V>[] tab; Node<K,V> p; int n, index;
        // 根据hash获取元素所在链表的头节点
        if ((tab = table) != null && (n = tab.length) > 0 &&
            (p = tab[index = (n - 1) & hash]) != null) {
            Node<K,V> node = null, e; K k; V v;
            // 如果头节点就是要移除的元素
            if (p.hash == hash &&
                ((k = p.key) == key || (key != null && key.equals(k))))
                node = p;
            // 遍历查找要移除的元素
            else if ((e = p.next) != null) {
                if (p instanceof TreeNode)
                    node = ((TreeNode<K,V>)p).getTreeNode(hash, key);
                else {
                    do {
                        if (e.hash == hash &&
                            ((k = e.key) == key ||
                             (key != null && key.equals(k)))) {
                            node = e;
                            break;
                        }
                        p = e;
                    } while ((e = e.next) != null);
                }
            }
            // 将获取到的元素移除
            if (node != null && (!matchValue || (v = node.value) == value ||
                                 (value != null && value.equals(v)))) {
                if (node instanceof TreeNode)
                    ((TreeNode<K,V>)node).removeTreeNode(this, tab, movable);
                else if (node == p)
                    tab[index] = node.next;
                else
                    p.next = node.next;
                ++modCount;
                --size;
                afterNodeRemoval(node);
                return node;
            }
        }
        return null;
    }
在 HashMap 内还有几个内部类:
1) Node
Node 是哈希表中链表一个节点,即 Map 中的一个实体(一个key-value对)。
2) TreeNode
TreeNode 是红黑树的节点,当哈希表内的链表长度大于8时,HashMap 会将链表转换为红黑树。
3) KeySet
当要遍历 HashMap 所有的 key 时,可以通过这个类的对象进行遍历。
4) Values
当要遍历 HashMap 所有的 value 时,可以通过这个类的对象进行遍历。
5) EntrySet
用这个类的到的是 Map.Entry<K,V> 类型的 Set 集合。