目录
源码包概述
# 什么是源码包
源码包指的是开发编写好的程序源代码,但并没有将其编译为一个能正常使用的工具
# 为什么学习源码包
1.部分软件,官方只提供源码包,需要自行编译安装
2.运维需要规范时,我们想把所有的软件全都安装到同一个目录下
PS:咱们使用windows时,强迫症,我装的QQ,微信,游戏等...全都要放到D盘的某一个目录下
3.有些软件,官方刚发布,还没来得及制作成RPM包,那么我们可以自行编译安装
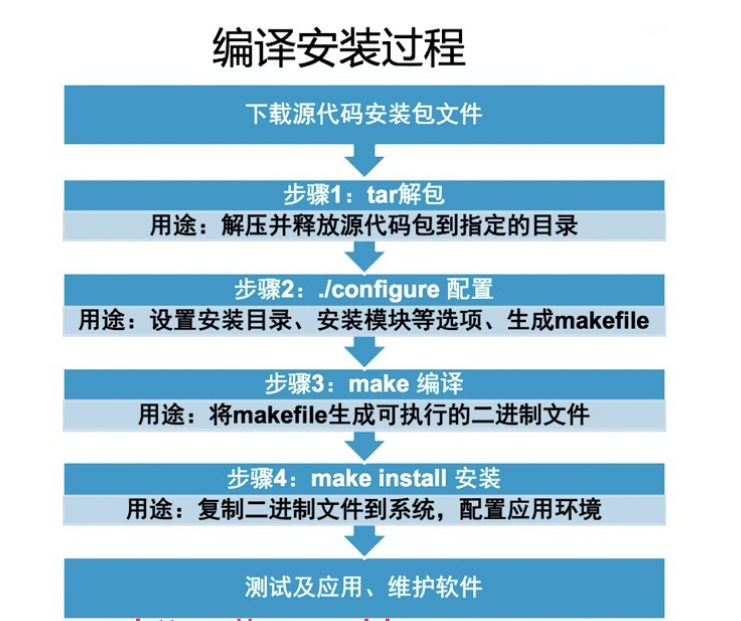
# 源码包安装步骤
安装源码包,必须要经历4个步骤
1.解压 tar
2.生成 ./configure cmake
3.编译 make
4.安装 make install
自制RPM包--10.0.0.100--nginx服务器
编译安装nginx
## 源码安装nginx
# 0.安装依赖
[root@qls nginx-1.16.1]# yum install -y gcc gcc-c++ glibc zlib-devel pcre-devel openssl-devel
# 1.下载nginx源码包
[root@qls ~]# wget http://nginx.org/download/nginx-1.16.1.tar.gz
# 2.解压
[root@qls ~]# tar xf nginx-1.16.1.tar.gz
[root@qls ~]# cd nginx-1.16.1
# 3.生成
[root@qls ~]# mkdir /app
[root@qls nginx-1.16.1]# useradd nginx -s /sbin/nologin -M
[root@qls nginx-1.16.1]# ./configure --prefix=/app/nginx-1.16.1 --user=nginx --group=nginx

  --help                             print this message
  --prefix=PATH                      set installation prefix
  --sbin-path=PATH                   set nginx binary pathname
  --modules-path=PATH                set modules path
  --conf-path=PATH                   set nginx.conf pathname
  --error-log-path=PATH              set error log pathname
  --pid-path=PATH                    set nginx.pid pathname
  --lock-path=PATH                   set nginx.lock pathname

#后面的内容省略了,使用 ./configure --help 命令查看可以使用的选项。
#一般常用的有 --prefix=PREFIX 这个选项的意思是定义软件包安装到哪里。
#建议,源码包都是安装在/soft/目录下。


# 4.编译
[root@qls nginx-1.16.1]# make
# 5.安装
[root@qls nginx-1.16.1]# make install
# 6.检测配置文件有没有语法错误
[root@qls sbin]# /app/nginx-1.16.1/sbin/nginx -t
nginx: the configuration file /app/nginx-1.16.1/conf/nginx.conf syntax is ok
nginx: configuration file /app/nginx-1.16.1/conf/nginx.conf test is successful
# 7.启动nginx
[root@qls sbin]# /app/nginx-1.16.1/sbin/nginx
# 8.检测80端口
[root@qls sbin]# netstat -lntup|grep 80
tcp        0      0 0.0.0.0:80              0.0.0.0:*               LISTEN      13468/nginx: master
# 9.做软连接
[root@qls nginx-1.16.1]# ln -s /app/nginx-1.16.1 /app/nginx
修改默认index.html页面
## 自定义
# 修改默认页面
[root@qls html]# vim /app/nginx-1.16.1/html/index.html
<!DOCTYPE html>
<html>
<head>
<meta charset="UTF-8"/>
<title>欢迎来到曾老湿的nginx页面</title>
<style>
    body {
         35em;
        margin: 0 auto;
        font-family: Tahoma, Verdana, Arial, sans-serif;
    }
</style>
</head>
<body>
<h1>欢迎来到曾老湿nginx的web页面</h1>
<a href="http://www.driverzeng.com">我的博客地址</a>.<br/>
<p><em>Thank you for using nginx.</em></p>
</body>
</html>
制作rpm包
#  制作rpm包过程
· 下载fpm包,可从阿里源中的 [TP]( https://developer.aliyun.com/mirror/rubygems?spm=a2c6h.13651102.0.0.3e221b112nz9sk)获取
· 解压fpm包,目录会有.gem文件
· gem文件服务器无法识别,需安装ruby rubygems ruby-devel可使用命令gem
· 更换gem的默认国外源为阿里源
· 使用命令gem安装fpm里面的所有.gem结尾的文件
· fpm命令安装成功,即可对nginx进行打包成rpm包
-----------------------------------------------
## 制作rpm包
[root@qls ~]# mkdir fpm
[root@qls ~]# mv fpm-1.3.3.x86_64.tar.gz fpm
[root@qls fpm]# cd /root/fpm/

# 1. 解压
[root@qls fpm]# tar xf fpm-1.3.3.x86_64.tar.gz
# 2.安装ruby
[root@qls fpm]# yum -y install ruby rubygems ruby-devel rpm-build
# 3.查看gem的源
[root@qls fpm]# gem sources --list
*** CURRENT SOURCES ***

https://rubygems.org/

# 4.更换阿里云的源 先移除国外源
[root@qls fpm]# gem sources --remove https://rubygems.org/

# 5.更换阿里云的源, 添加阿里云的源
[root@qls fpm]# gem sources -a https://mirrors.aliyun.com/rubygems/

# 6.使用gem命令安装当前目录下所有的.gem文件
[root@qls fpm]# gem install *.gem

# 7.写出安装rpm之后要执行的脚本,创建nginx用户也可以在安装服务后创建
[root@qls ~]# vim /root/nginx.sh
#!/bin/bash
useradd nginx -s /sbin/nologin -M
ln -s /app/nginx-1.16.1 /app/nginx

# 8.使用fpm打包
[root@qls fpm]# fpm -s dir -t rpm -n nginx -v 1.16.1 -d 'zlib-devel,gcc,gcc-c++,glibc,pcre-devel,openssl-devel' --post-install /root/nginx.sh -f /app/nginx-1.16.1/

fpm:打rpm包命令
-s:dir     # 打目录
-t:rpm     # 把目录打成rpm包
-n:nginx   # 软件名字叫nginx
-v:1.16.1  # 软件的版本号
-d:        # 指定nginx的依赖包
-f:        # 指定要达成rpm包的目录路径
--post-install # 指定rpm包安装完成之后要执行的脚本
--pre-install  # 指定rpm包安装之前,要执行的脚本
搭建ftp共享目录--10.0.0.88--vsfptd服务器
# 创建流程
· 安装并启动ftp服务
· 将10.0.0.100服务器中做好的nginx包copy到ftp共享目录
· 开启/etc/yum.conf文件中的keepcache缓存为1,并修改缓存路径为/cp
· 安装nginx依赖包,将/tcy目录中下载的依赖包cp到共享目录中
· 安装使用命令createrepo创建yum仓库
-----------------------------------------

# 安装fpt服务
[root@tcy pub]# yum install -y vsftpd

# 启动ftp服务
[root@tcy pub]# systemctl start vsftpd

# 检测ftp服务端口是否启动
[root@tcy pub]# netstat -lntup|grep 21

# 修改文件,生成缓存
[root@tcy pub]# cat /etc/yum.conf
[main]
cachedir=/vvv								# 下载路径修改为自定义路径
keepcache=1									# 为1开启,安装同时下载文件
debuglevel=2
logfile=/var/log/yum.log
exactarch=1
obsoletes=1
gpgcheck=1
plugins=1
installonly_limit=5
bugtracker_url=http://bugs.centos.org/set_project.php?project_id=23&ref=http://bugs.centos.org/bug_report_page.php?category=yum
distroverpkg=centos-release

# 安装依赖包
[root@tcy pub]# yum install -y gcc gcc-c++ glibc zlib-devel pcre-devel openssl-devel

# 将缓存路径文件cp到ftp共享目录
[root@tcy packages]# cp -a /vvv/base/packages /var/ftp/pub
[root@tcy packages]# cp -a /vvv/updates/packages /var/ftp/pub

# 安装createrepo命令
[root@tcy packages]# yum install -y createrepo

# 创建repodate目录
[root@tcy packages]# createrepo /var/ftp/pub
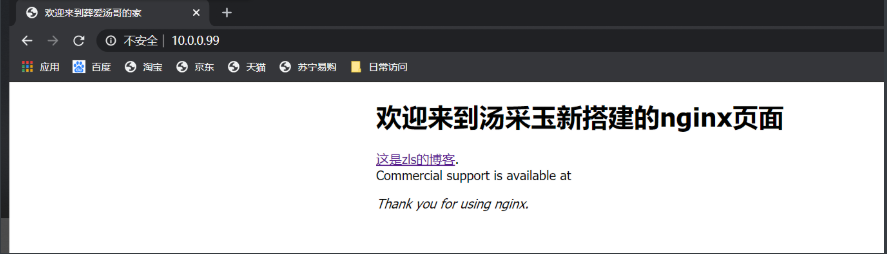
客户端安装nginx--10.0.0.99
# 流程
· 重写yum源文件
· 安装nginx
-------------------------------------

# 重写yum源文件
[root@oldboy yum.repos.d]# cat yum.repo
[yum]
name='yum_filename'
baseurl=ftp://10.0.0.88/pub					# 路径更改为ftp共享路径
gpgcheck=0
enabled=1

# 检查yum源
[root@oldboy yum.repos.d]# yum repolist

# 直接yum安装nginx
[root@oldboy yum.repos.d]# yum install -y nginx

# 检查nginx配置文件
[root@oldboy yum.repos.d]# /app/nginx/sbin/nginx -t

# 启动nginx服务
[root@oldboy yum.repos.d]# /app/nginx/sbin/nginx

# 检查端口是否启动
[root@oldboy app]# netstat -lntup |grep 80
浏览器访问客户端ip
修改环境变量,systemctl启动nginx
## 针对下面的文件,可使用yum安装nginx的方法,将配置文件cp一份使用,但需要结合本地路径进行修改
[root@localhost logs]# vi /usr/lib/systemd/system/nginx.service

[Unit]
Description=The nginx HTTP and reverse proxy server
After=network.target remote-fs.target nss-lookup.target

[Service]
Type=forking
PIDFile=/app/nginx/logs/nginx.pid
# Nginx will fail to start if /run/nginx.pid already exists but has the wrong
# SELinux context. This might happen when running `nginx -t` from the cmdline.
# https://bugzilla.redhat.com/show_bug.cgi?id=1268621
ExecStartPre=/usr/bin/rm -f /app/nginx/logs/nginx.pid
ExecStartPre=/app/nginx/sbin/nginx -t
ExecStart=/app/nginx/sbin/nginx
ExecReload=/bin/kill -s HUP $MAINPID
KillSignal=SIGQUIT
TimeoutStopSec=5
KillMode=process
PrivateTmp=true

[Install]
WantedBy=multi-user.target
nginx -t命令直接使用方式
## 可在环境变量文件/etc/profile.d/中随意命名如nginx.sh文件,添加如下内容
export PATH="/app/nginx/sbin:$PATH"