先附上一张号称“一篇程序覆盖Python基础的代码”,基本的结构都涉及到了
源代码下载: learnpython-zh.py
Python 由 Guido Van Rossum 在90年代初创建。 它现在是最流行的语言之一 我喜爱python是因为它有极为清晰的语法,甚至可以说,它就是可以执行的伪代码
注意: 这篇文章针对的版本是Python 2.7,但大多也可使用于其他Python 2的版本 如果是Python 3,请看下一篇文章
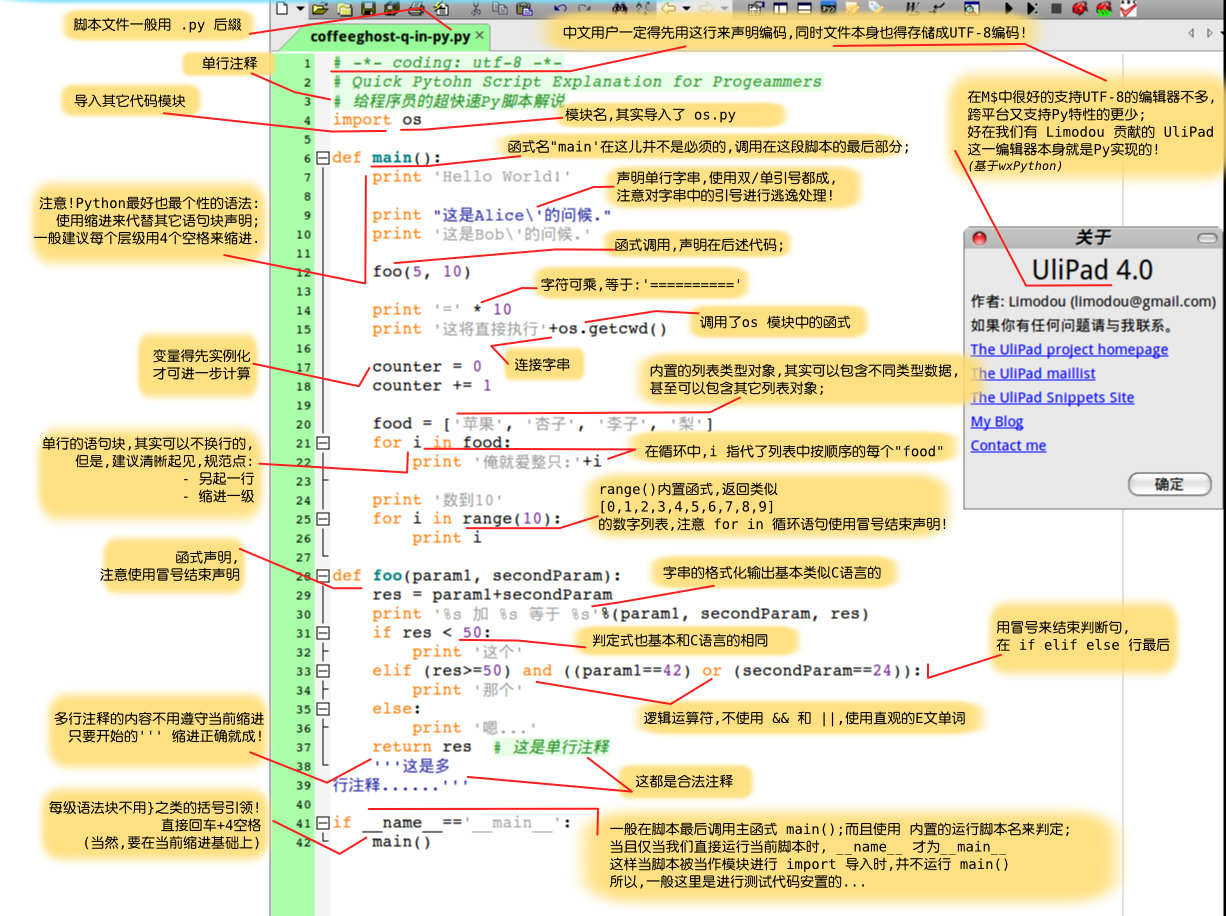
# 单行注释
""" 多行字符串可以用
    三个引号包裹,不过这也可以被当做
    多行注释
"""

####################################################
## 1. 原始数据类型和操作符
####################################################

# 数字类型
3  # => 3

# 简单的算数
1 + 1  # => 2
8 - 1  # => 7
10 * 2  # => 20
35 / 5  # => 7

# 整数的除法会自动取整
5 / 2  # => 2

# 要做精确的除法,我们需要引入浮点数
2.0     # 浮点数
11.0 / 4.0  # => 2.75 精确多了

# 括号具有最高优先级
(1 + 3) * 2  # => 8

# 布尔值也是基本的数据类型
True
False

# 用 not 来取非
not True  # => False
not False  # => True

# 相等
1 == 1  # => True
2 == 1  # => False

# 不等
1 != 1  # => False
2 != 1  # => True

# 更多的比较操作符
1 < 10  # => True
1 > 10  # => False
2 <= 2  # => True
2 >= 2  # => True

# 比较运算可以连起来写!
1 < 2 < 3  # => True
2 < 3 < 2  # => False

# 字符串通过 " 或 ' 括起来
"This is a string."
'This is also a string.'

# 字符串通过加号拼接
"Hello " + "world!"  # => "Hello world!"

# 字符串可以被视为字符的列表
"This is a string"[0]  # => 'T'

# % 可以用来格式化字符串
"%s can be %s" % ("strings", "interpolated")

# 也可以用 format 方法来格式化字符串
# 推荐使用这个方法
"{0} can be {1}".format("strings", "formatted")
# 也可以用变量名代替数字
"{name} wants to eat {food}".format(name="Bob", food="lasagna")

# None 是对象
None  # => None

# 不要用相等 `==` 符号来和None进行比较
# 要用 `is`
"etc" is None  # => False
None is None  # => True

# 'is' 可以用来比较对象的相等性
# 这个操作符在比较原始数据时没多少用,但是比较对象时必不可少

# None, 0, 和空字符串都被算作 False
# 其他的均为 True
0 == False  # => True
"" == False  # => True

####################################################
## 2. 变量和集合
####################################################

# 很方便的输出
print "I'm Python. Nice to meet you!"

# 给变量赋值前不需要事先声明
some_var = 5    # 一般建议使用小写字母和下划线组合来做为变量名
some_var  # => 5

# 访问未赋值的变量会抛出异常
# 可以查看控制流程一节来了解如何异常处理
some_other_var  # 抛出 NameError

# if 语句可以作为表达式来使用
"yahoo!" if 3 > 2 else 2  # => "yahoo!"

# 列表用来保存序列
li = []
# 可以直接初始化列表
other_li = [4, 5, 6]

# 在列表末尾添加元素
li.append(1)    # li 现在是 [1]
li.append(2)    # li 现在是 [1, 2]
li.append(4)    # li 现在是 [1, 2, 4]
li.append(3)    # li 现在是 [1, 2, 4, 3]
# 移除列表末尾元素
li.pop()        # => 3 li 现在是 [1, 2, 4]
# 重新加进去
li.append(3)    # li is now [1, 2, 4, 3] again.

# 像其他语言访问数组一样访问列表
li[0]  # => 1
# 访问最后一个元素
li[-1]  # => 3

# 越界会抛出异常
li[4]  # 抛出越界异常

# 切片语法需要用到列表的索引访问
# 可以看做数学之中左闭右开区间
li[1:3]  # => [2, 4]
# 省略开头的元素
li[2:]  # => [4, 3]
# 省略末尾的元素
li[:3]  # => [1, 2, 4]

# 删除特定元素
del li[2]  # li 现在是 [1, 2, 3]

# 合并列表
li + other_li  # => [1, 2, 3, 4, 5, 6] - 并不会不改变这两个列表

# 通过拼接来合并列表
li.extend(other_li)  # li 是 [1, 2, 3, 4, 5, 6]

# 用 in 来返回元素是否在列表中
1 in li  # => True

# 返回列表长度
len(li)  # => 6

# 元组类似于列表,但它是不可改变的
tup = (1, 2, 3)
tup[0]  # => 1
tup[0] = 3  # 类型错误

# 对于大多数的列表操作,也适用于元组
len(tup)  # => 3
tup + (4, 5, 6)  # => (1, 2, 3, 4, 5, 6)
tup[:2]  # => (1, 2)
2 in tup  # => True

# 你可以将元组解包赋给多个变量
a, b, c = (1, 2, 3)     # a 是 1,b 是 2,c 是 3
# 如果不加括号,将会被自动视为元组
d, e, f = 4, 5, 6
# 现在我们可以看看交换两个数字是多么容易的事
e, d = d, e     # d 是 5,e 是 4

# 字典用来储存映射关系
empty_dict = {}
# 字典初始化
filled_dict = {"one": 1, "two": 2, "three": 3}

# 字典也用中括号访问元素
filled_dict["one"]  # => 1

# 把所有的键保存在列表中
filled_dict.keys()  # => ["three", "two", "one"]
# 键的顺序并不是唯一的,得到的不一定是这个顺序

# 把所有的值保存在列表中
filled_dict.values()  # => [3, 2, 1]
# 和键的顺序相同

# 判断一个键是否存在
"one" in filled_dict  # => True
1 in filled_dict  # => False

# 查询一个不存在的键会抛出 KeyError
filled_dict["four"]  # KeyError

# 用 get 方法来避免 KeyError
filled_dict.get("one")  # => 1
filled_dict.get("four")  # => None
# get 方法支持在不存在的时候返回一个默认值
filled_dict.get("one", 4)  # => 1
filled_dict.get("four", 4)  # => 4

# setdefault 是一个更安全的添加字典元素的方法
filled_dict.setdefault("five", 5)  # filled_dict["five"] 的值为 5
filled_dict.setdefault("five", 6)  # filled_dict["five"] 的值仍然是 5

# 集合储存无顺序的元素
empty_set = set()
# 初始化一个集合
some_set = set([1, 2, 2, 3, 4])  # some_set 现在是 set([1, 2, 3, 4])

# Python 2.7 之后,大括号可以用来表示集合
filled_set = {1, 2, 2, 3, 4}  # => {1 2 3 4}

# 向集合添加元素
filled_set.add(5)  # filled_set 现在是 {1, 2, 3, 4, 5}

# 用 & 来计算集合的交
other_set = {3, 4, 5, 6}
filled_set & other_set  # => {3, 4, 5}

# 用 | 来计算集合的并
filled_set | other_set  # => {1, 2, 3, 4, 5, 6}

# 用 - 来计算集合的差
{1, 2, 3, 4} - {2, 3, 5}  # => {1, 4}

# 用 in 来判断元素是否存在于集合中
2 in filled_set  # => True
10 in filled_set  # => False

####################################################
## 3. 控制流程
####################################################

# 新建一个变量
some_var = 5

# 这是个 if 语句,在 python 中缩进是很重要的。
# 下面的代码片段将会输出 "some var is smaller than 10"
if some_var > 10:
    print "some_var is totally bigger than 10."
elif some_var < 10:    # 这个 elif 语句是不必须的
    print "some_var is smaller than 10."
else:           # 这个 else 也不是必须的
    print "some_var is indeed 10."

"""
用for循环遍历列表
输出:
    dog is a mammal
    cat is a mammal
    mouse is a mammal
"""
for animal in ["dog", "cat", "mouse"]:
    # 你可以用 % 来格式化字符串
    print "%s is a mammal" % animal

"""
`range(number)` 返回从0到给定数字的列表
输出:
    0
    1
    2
    3
"""
for i in range(4):
    print i

"""
while 循环
输出:
    0
    1
    2
    3
"""
x = 0
while x < 4:
    print x
    x += 1  #  x = x + 1 的简写

# 用 try/except 块来处理异常

# Python 2.6 及以上适用:
try:
    # 用 raise 来抛出异常
    raise IndexError("This is an index error")
except IndexError as e:
    pass    # pass 就是什么都不做,不过通常这里会做一些恢复工作

####################################################
## 4. 函数
####################################################

# 用 def 来新建函数
def add(x, y):
    print "x is %s and y is %s" % (x, y)
    return x + y    # 通过 return 来返回值

# 调用带参数的函数
add(5, 6)  # => 输出 "x is 5 and y is 6" 返回 11

# 通过关键字赋值来调用函数
add(y=6, x=5)   # 顺序是无所谓的

# 我们也可以定义接受多个变量的函数,这些变量是按照顺序排列的
def varargs(*args):
    return args

varargs(1, 2, 3)  # => (1,2,3)

# 我们也可以定义接受多个变量的函数,这些变量是按照关键字排列的
def keyword_args(**kwargs):
    return kwargs

# 实际效果:
keyword_args(big="foot", loch="ness")  # => {"big": "foot", "loch": "ness"}

# 你也可以同时将一个函数定义成两种形式
def all_the_args(*args, **kwargs):
    print args
    print kwargs
"""
all_the_args(1, 2, a=3, b=4) prints:
    (1, 2)
    {"a": 3, "b": 4}
"""

# 当调用函数的时候,我们也可以进行相反的操作,把元组和字典展开为参数
args = (1, 2, 3, 4)
kwargs = {"a": 3, "b": 4}
all_the_args(*args)  # 等价于 foo(1, 2, 3, 4)
all_the_args(**kwargs)  # 等价于 foo(a=3, b=4)
all_the_args(*args, **kwargs)  # 等价于 foo(1, 2, 3, 4, a=3, b=4)

# 函数在 python 中是一等公民
def create_adder(x):
    def adder(y):
        return x + y
    return adder

add_10 = create_adder(10)
add_10(3)  # => 13

# 匿名函数
(lambda x: x > 2)(3)  # => True

# 内置高阶函数
map(add_10, [1, 2, 3])  # => [11, 12, 13]
filter(lambda x: x > 5, [3, 4, 5, 6, 7])  # => [6, 7]

# 可以用列表方法来对高阶函数进行更巧妙的引用
[add_10(i) for i in [1, 2, 3]]  # => [11, 12, 13]
[x for x in [3, 4, 5, 6, 7] if x > 5]  # => [6, 7]

####################################################
## 5. 类
####################################################

# 我们新建的类是从 object 类中继承的
class Human(object):

     # 类属性,由所有类的对象共享
    species = "H. sapiens"

    # 基本构造函数
    def __init__(self, name):
        # 将参数赋给对象成员属性
        self.name = name

    # 成员方法,参数要有 self
    def say(self, msg):
        return "%s: %s" % (self.name, msg)

    # 类方法由所有类的对象共享
    # 这类方法在调用时,会把类本身传给第一个参数
    @classmethod
    def get_species(cls):
        return cls.species

    # 静态方法是不需要类和对象的引用就可以调用的方法
    @staticmethod
    def grunt():
        return "*grunt*"

# 实例化一个类
i = Human(name="Ian")
print i.say("hi")     # 输出 "Ian: hi"

j = Human("Joel")
print j.say("hello")  # 输出 "Joel: hello"

# 访问类的方法
i.get_species()  # => "H. sapiens"

# 改变共享属性
Human.species = "H. neanderthalensis"
i.get_species()  # => "H. neanderthalensis"
j.get_species()  # => "H. neanderthalensis"

# 访问静态变量
Human.grunt()  # => "*grunt*"

####################################################
## 6. 模块
####################################################

# 我们可以导入其他模块
import math
print math.sqrt(16)  # => 4

# 我们也可以从一个模块中导入特定的函数
from math import ceil, floor
print ceil(3.7)   # => 4.0
print floor(3.7)  # => 3.0

# 从模块中导入所有的函数
# 警告:不推荐使用
from math import *

# 简写模块名
import math as m
math.sqrt(16) == m.sqrt(16)  # => True

# Python的模块其实只是普通的python文件
# 你也可以创建自己的模块,并且导入它们
# 模块的名字就和文件的名字相同

# 也可以通过下面的方法查看模块中有什么属性和方法
import math
dir(math)
参考链接:https://www.kancloud.cn/kancloud/learnxinyminutes/5894