安装ActiveMQ
官网地址:http://activemq.apache.org/
解压后基本目录结构:
- bin存放的是脚本文件
- conf存放的是基本配置文件
- data存放的是日志文件
- docs存放的是说明文档
- examples存放的是简单的实例
- lib存放的是activemq所需jar包
- webapps用于存放项目的目录
进入 bin 目录:
./activemq star # 启动activeMQ服务
./activemq stop # 关闭activeMQ服务
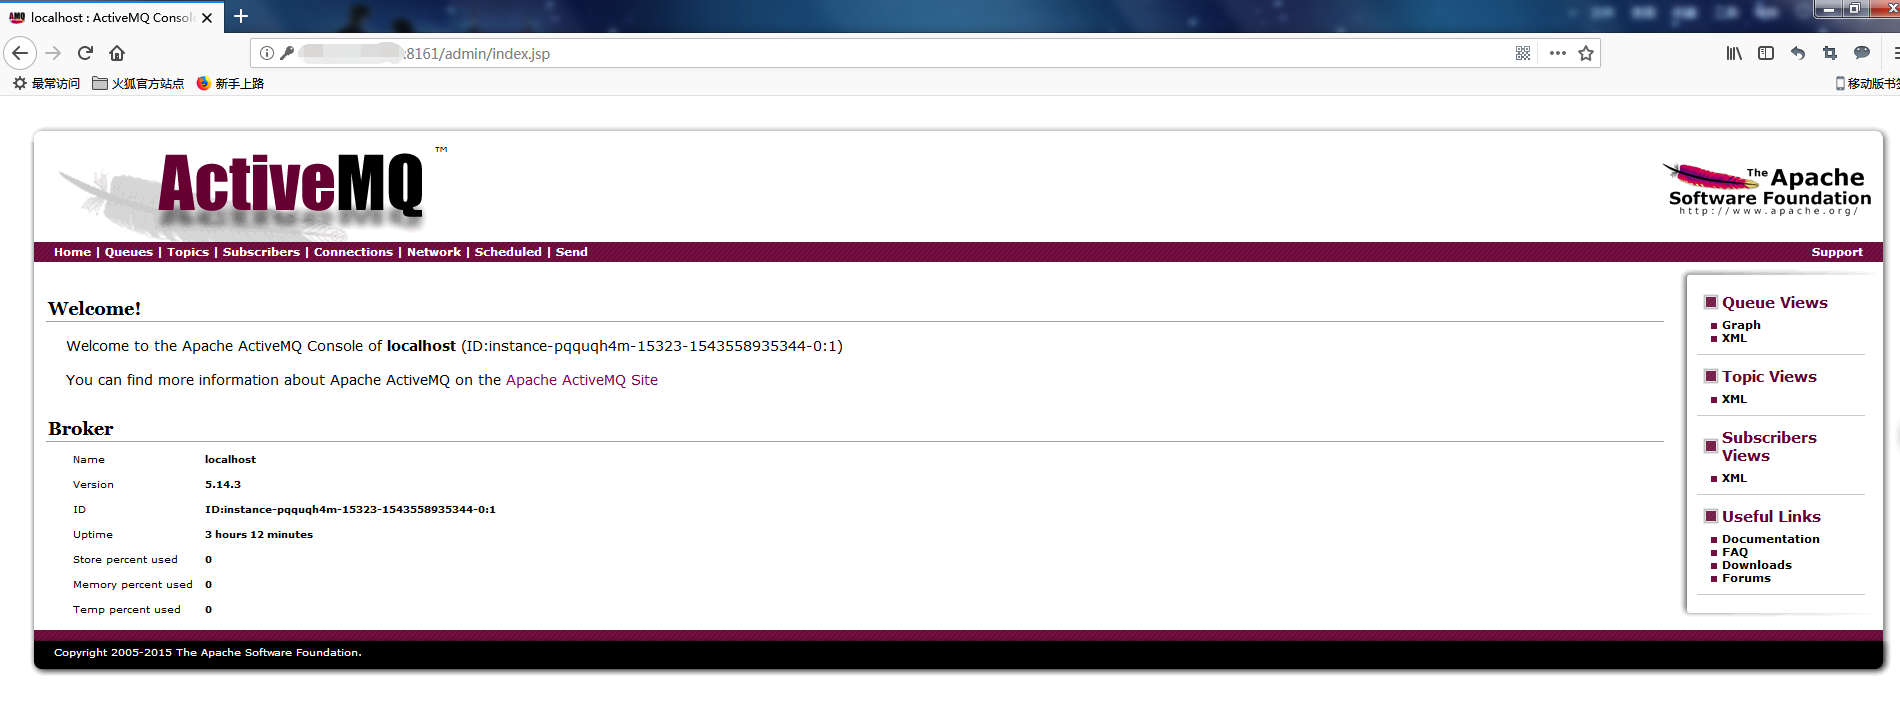
ActiveMQ 默认启动时,启动了内置的 jetty 服务器,提供一个用于监控 ActiveMQ 的 admin 应用(默认端口为8161,默认账号密码都是admin):
PHP通过STOMP协议连接ActiveMQ
STOMP 是一个简单的可互操作的协议,被用于通过中间服务器在客户端之间进行异步消息传递。它定义了一种在客户端与服务端进行消息传递的文本格式。
STOMP 是基于帧的协议。以 command 字符串开始,以 EOL 结束,command 下面是0个或多个 <key>:<value> 格式的 header 条目。每个条目由 EOL 结束。一个空白行(即额外EOL)表示 header 结束和 body 开始。body 连接着 NULL 字节(ASCII 中用 ctrl+@表示,看起来是 ^@)。
大概的协议格式:
CONNECT
accept-version:1.0,1.1,2.0
host:www.jtthink.com

^@
STOMP 1.2规范:https://stomp.github.io/stomp-specification-1.2.html
PHP扩展——STOMP安装
下载地址:http://pecl.php.net/package/stomp
$ wget http://pecl.php.net/get/stomp-2.0.2.tgz
$ tar zxf stomp-2.0.2.tgz
$ cd stomp-2.0.2
$ phpize
$ ./configure --enable-stomp --with-php-config=/usr/local/php/bin/php-config
$ make && make install
完成后可以在结果中看见 extension 安装路径,在 php.ini 中添加节点:
[stomp]
extension=/usr/local/php/lib/php/extensions/no-debug-non-zts-20170718/stomp.so
验证安装结果:
php -m | grep Stomp
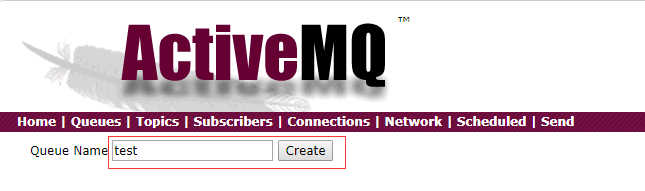
手动创建一个测试队列
进入管理后台,创建一个新的 Queue:test
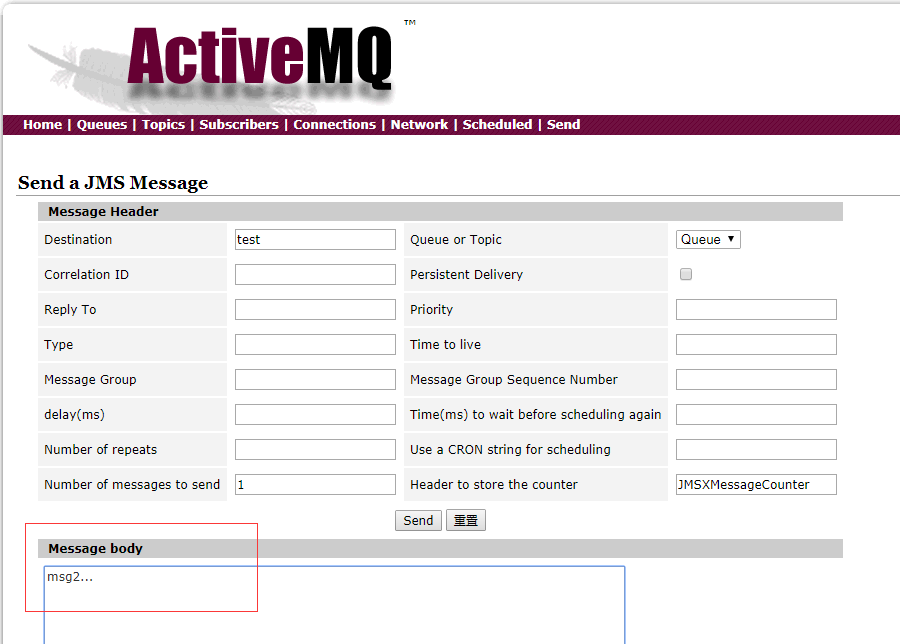
并在该 test 队列中发送几条消息
PHP连接并获取消息
<?php
//61613是STOMP连接默认的端口,在ActiveMQ目录conf/activemq.xml文件可修改
$broker = 'tcp://ActiveMQ服务IP:61613';
$queue  = '/queue/test';

try {
    $stomp = new Stomp($broker);
    $stomp->subscribe($queue);

    while($stomp->hasFrame()) {
    //订阅一个消息队列
        $frame = $stomp->readFrame();
    //输出消息体内容
        echo $frame->body.PHP_EOL;
    }
} catch(StompException $e) {
    echo $e->getMessage();
}
运行上面的代码:

PHP+ActiveMQ 多步骤业务流程处理
以最简单的用户注册为例,当用户提交注册时,分别向部署好的多个 ActiveMQ 中间站发送消息,来处理不同的业务流程(如信息入库、验证短信发送等)。
前端注册页面:
<?php if(isset($_POST["username"])) { $broker = 'tcp://ActiveMQ服务IP:61613'; $queue1 = '/queue/userreg'; // 用户数据入库队列 $queue2 = '/queue/usersmsg'; // 用户短信发送队列 // 模拟数据 $userID = rand(50,500); $user = new stdClass(); $user->userID = $userID; $user->userName = $_POST["username"]; $user->userPass = $_POST["userpass"]; $user->regDate = date('Y-m-d h:i:s'); $msg = new stdClass(); $msg->userID = $userID; // 开启事务发送消息 $stomp = new Stomp($broker,"txl"); $stomp->begin('userReg'); if($stomp->send($queue1, json_encode($user), array('transaction'=>'userReg')) && $stomp->send($queue2, json_encode($msg), array('transaction'=>'userReg'))) { $stomp->commit('userReg'); // 提交事务 } unset($stomp); } ?> <html> <head> <style> .container{margin:50px auto;width:500px;} .container div{line-height:21pt;margin-top:30px} .container .text{width:150px;height:25px;} </style> </head> <body> <div class="container"> <form method="post"> <h3>用户注册演示界面</h3> <div> 用户名:<input type="text" class="text" name="username"/> </div> <div> 密 码:<input type="text" class="text" name="userpass"/> </div> <div> <input type="submit" value="提交注册"> </div> </form> </div> </body> </html>
用户信息入库中间站:
<?php
$broker = 'tcp://ActiveMQ服务IP:61613';
$queue  = '/queue/userreg';

try {
    $stomp = new Stomp($broker,'txl');
    // 订阅 userreg 队列
    $stomp->subscribe($queue);

    while(true) {
        if($stomp->hasFrame()) {
            $frame = $stomp->readFrame();
            $userObj = json_decode($frame->body);

            // 这里调用用户数据入库接口

            echo $frame->body.' user reg is done...'.PHP_EOL;
            $stomp->ack($frame);    // 该条记录已处理完毕
        }
    }
} catch(StompException $e) {
    echo $e->getMessage();
}
用户短信发送中间站:
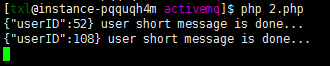
<?php
$broker = 'tcp://ActiveMQ服务IP:61613';
$queue = '/queue/usersmsg';

try {
    $stomp = new Stomp($broker,'txl');
    // 订阅 short message 队列
    $stomp->subscribe($queue);

    while(true) {
        if($stomp->hasFrame()) {
            $frame = $stomp->readFrame();
            $userObj = json_decode($frame->body);

            // 这里调用用户短信发送接口

            echo $frame->body.' user short message is done...'.PHP_EOL;
            $stomp->ack($frame);    // 该条记录已处理完毕

        }
    }
} catch(StompException $e) {
    echo $e->getMessage();
}
测试结果:

ActiveMQ 中 queue、topic 的区别
- queue(点对点):一个消息生产者发送的消息,只能有一个订阅者接收。如果发布一条消息没有消费者阅读,消息会保存起来,直至有消费者订阅。
- topic(发布/订阅):一对多发布,一条消息可以多个消费者订阅。没有订阅的,就没法接收之前的消息 。