在实际开发中,碰上CPU密集且执行时间非常耗时的任务,通常我们会选择将该任务进行分割,以多线程方式同时执行若干个子任务,等这些子任务都执行完后再将所得的结果进行合并。这正是著名的map-reduce思想,不过map-reduce通常被用在分布式计算的语境下,这里举这个例子只是为了说明对多线程并发执行流程进行控制的重要性,比如某些线程必须等其他线程执行完后才能开始它的工作。使用jdk中的内置锁或者重入锁配合等待通知机制可以实现这个需求,但是会比较麻烦。因为不管是内置还是重入锁,它们关注的重点在于如何协调多线程对共享资源的访问,而不是协调特定线程的执行次序,完成复杂的并发流程控制。好在JDK在并发包下提供了CountDownLatch,CyclicBarrier,Semaphore等并发工具,可以让我们站在更高的角度思考并解决这个问题。
2. 闭锁CountDownLatch
2.1 CountDownLatch功能简介
CountDownLatch通常称之为闭锁。它可以使一个或一批线程在闭锁上等待,等到其他线程执行完相应操作后,闭锁打开,这些等待的线程才可以继续执行。确切的说,闭锁在内部维护了一个倒计数器。通过该计数器的值来决定闭锁的状态,从而决定是否允许等待的线程继续执行。该计数器的初始值由用户在创建闭锁对象时通过传入的构造参数决定,如下所示
/**
 * Constructs a {@code CountDownLatch} initialized with the given count.
 *
 * @param count the number of times {@link #countDown} must be invoked
 *        before threads can pass through {@link #await}
 * @throws IllegalArgumentException if {@code count} is negative
 */
public CountDownLatch(int count) {
    if (count < 0) throw new IllegalArgumentException("count < 0");
    this.sync = new Sync(count);
}
默认计数器初始值不能小于0,否则将抛出异常。
当计数器的值大于0时,该闭锁处于关闭状态,调用闭锁的await()方法将导致当前线程在闭锁上等待。
public void await() throws InterruptedException {
    sync.acquireSharedInterruptibly(1);
}
但是我们可以通过调用闭锁的countDown()方法来使闭锁的计数值减少
public void countDown() {
    sync.releaseShared(1);
}
每调用一次countDown()方法都会使闭锁的计数值减少1,所以闭锁的计数器准确来说是个倒计数器。当计数值减少到0时,阻塞在闭锁上的线程将被唤醒从而继续执行。下面以一个类似map-reduce的例子来对CountDownLatch的用法做讲解。
2.2 使用CountDownLatch
为了计算一个CPU密集型的大任务,将该任务分割成10个子任务,交由开启的10个子线程去执行。当所有子任务执行完毕后,主线程再执行后续的工作。任务的执行时间以线程休眠进行模拟,整个流程以日志方式进行记录。完整代码如下
/**
 * @author: takumiCX
 * @create: 2018-09-17
 **/
class CountDownLatchTest {

    static CountDownLatch countDownLatch;

    public static void main(String[] args) throws InterruptedException {

        int count=10;
        //初始化计数器值为10
        countDownLatch=new CountDownLatch(count);
        //开启10个子线程执行子任务
        for(int i=0;i<count;i++){
            Thread thread = new Thread(new CountDownThread(countDownLatch,i));
            thread.start();
        }
        //主线程等待,直到所有子任务完成
        countDownLatch.await();
        //模拟主线程执行后续工作
        TimeUnit.SECONDS.sleep(1);
        System.out.println("任务执行完毕!");

    }


    private static class CountDownThread implements Runnable{
        CountDownLatch countDownLatch;
        //子任务序号
        int taskNum;
        public CountDownThread(CountDownLatch countDownLatch, int taskNum) {
            this.countDownLatch = countDownLatch;
            this.taskNum = taskNum;
        }
        @Override
        public void run() {
            try {
                //模拟子任务的执行
                TimeUnit.MILLISECONDS.sleep(30);
            } catch (InterruptedException e) {
                e.printStackTrace();
            }
            //任务执行完毕,则调用countDown方法使计数器值减少1
            countDownLatch.countDown();
            System.out.println("子任务:"+taskNum+" 执行完毕!");
        }
    }
}
结果如下所示
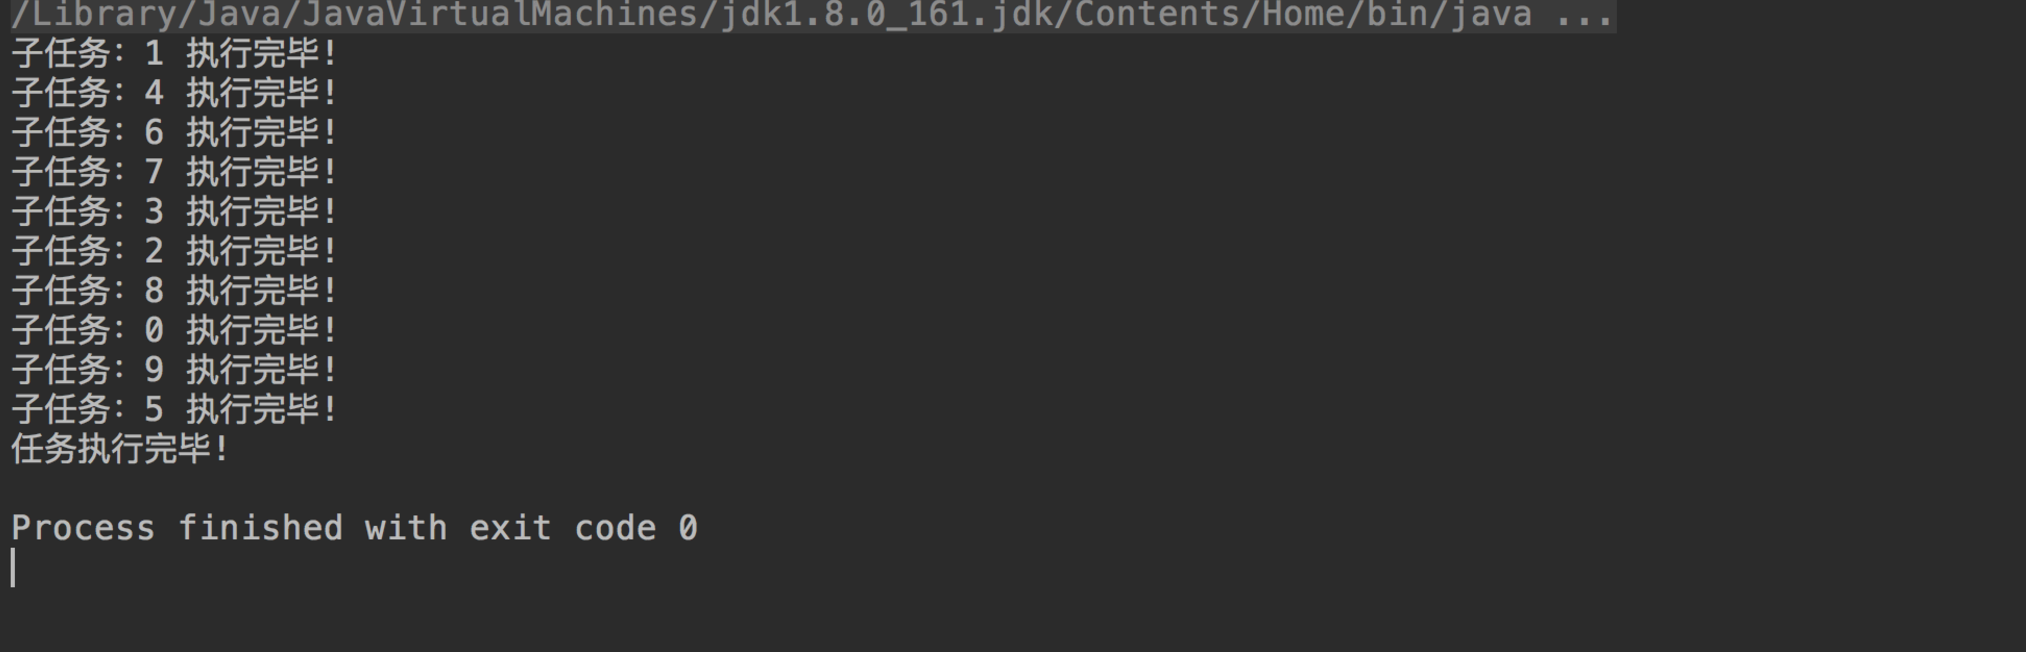
可以看到主线程在所有子任务执行完前必须在闭锁上等待。当最后一个子任务完成后,它将被唤醒,从而可以继续之后的工作。
2.3 CountDownLatch原理浅析
CountDownLatch底层也是通过AQS实现的。和ReentrentLock以独占的方式获取和释放同步状态不同,CountDownLatch是以共享的方式获取和释放同步状态的。独占式和共享式的区别主要有以下几点:
- 1.独占式一次只允许一个线程获取同步状态,而共享式一次允许多个线程同时获取同步状态。
- 2.当在同步队列等待的线程被唤醒然后成功获取同步状态时,它还必须唤醒后续结点中的线程,并将这个过程传递下去,使得多个线程可以同时获取到同步状态。
同步状态依旧使用AQS中的state值进行表示,在CountDownLatch的语境下表示计数器的值,且只有在state=0时线程才能成功获取到同步状态,尽管有些奇怪,不过考虑到CountDownLatch中的计数器是个倒计数器,这么设定也并非不可理解。为了更好的理解CountDownLatch的源码,从释放同步状态的方法countDown()开始讲起
public void countDown() {
    sync.releaseShared(1);
}
正确找到sync的实现类后跟进源码
public final boolean releaseShared(int arg) {
    if (tryReleaseShared(arg)) { //尝试在共享模式下释放同步状态
        doReleaseShared();
        return true;
    }
    return false;
}
tryReleaseShared()尝试在共享模式下释放同步状态,该方法是在AQS中定义的钩子方法,必须由AQS的实现类自己实现,方法内容如下
protected boolean tryReleaseShared(int releases) {
    // Decrement count; signal when transition to zero
    for (;;) {
        int c = getState(); //获取同步状态值
        if (c == 0)
            return false;
        int nextc = c-1;
        if (compareAndSetState(c, nextc)) //以CAS方式更新同步状态值
            return nextc == 0;
    }
}
使用死循环+CAS方式将计数值state减少1。仅当更新操作成功且state值被更新为0时返回true,表示在共享模式下释放同步状态成功,接着便会继续执行doReleaseShared()方法,方法内容如下
private void doReleaseShared() {
    /*
     * Ensure that a release propagates, even if there are other
     * in-progress acquires/releases.  This proceeds in the usual
     * way of trying to unparkSuccessor of head if it needs
     * signal. But if it does not, status is set to PROPAGATE to
     * ensure that upon release, propagation continues.
     * Additionally, we must loop in case a new node is added
     * while we are doing this. Also, unlike other uses of
     * unparkSuccessor, we need to know if CAS to reset status
     * fails, if so rechecking.
     */
    for (;;) {
        Node h = head;
        if (h != null && h != tail) {
            int ws = h.waitStatus;
            if (ws == Node.SIGNAL) {
                if (!compareAndSetWaitStatus(h, Node.SIGNAL, 0))
                    continue;            // loop to recheck cases
                unparkSuccessor(h); //唤醒后继结点中的线程
            }
            else if (ws == 0 &&
                     !compareAndSetWaitStatus(h, 0, Node.PROPAGATE))
                continue;                // loop on failed CAS
        }
        if (h == head)                   // loop if head changed
            break;
    }
}
该方法主要完成的工作是唤醒头结点之后的结点中的线程。那么其他在同步队列中等待的线程使如何被唤醒的?别急,我们可以在await()方法中找到答案。
public void await() throws InterruptedException {
    sync.acquireSharedInterruptibly(1);
}
找到sync正确的实现类后跟进源码
public final void acquireSharedInterruptibly(int arg)
        throws InterruptedException {
    if (Thread.interrupted())
        throw new InterruptedException();
    if (tryAcquireShared(arg) < 0)
        doAcquireSharedInterruptibly(arg);
}
tryAcquireShared()是在共享模式下尝试获取同步状态,
protected int tryAcquireShared(int acquires) {
    return (getState() == 0) ? 1 : -1;
}
当同步状态值state=0时返回1,表示获取同步状态成功,否则返回-1表示获取同步状态失败。获取同步状态失败的线程显然应该加入同步等待队列并在队列中等待,这部分逻辑我们在解读ReentrentLock的源码时应该已经看过了,不过在共享模式下细节方面有些不同
/**
 * Acquires in shared interruptible mode.
 * @param arg the acquire argument
 */
private void doAcquireSharedInterruptibly(int arg)
    throws InterruptedException {
    final Node node = addWaiter(Node.SHARED);//构造结点并加入同步队列
    boolean failed = true;
    try {
        for (;;) {
            final Node p = node.predecessor();
            if (p == head) {
                int r = tryAcquireShared(arg);//当前驱结点是头结点时获取同步状态
                if (r >= 0) {
                    setHeadAndPropagate(node, r);
                    p.next = null; // help GC
                    failed = false;
                    return;
                }
            }
            if (shouldParkAfterFailedAcquire(p, node) &&
                parkAndCheckInterrupt())
                throw new InterruptedException();
        }
    } finally {
        if (failed)
            cancelAcquire(node);
    }
}
第一步自然是构造结点并加入同步队列尾部,这部分逻辑在addWaiter()方法中,注意结点类型为共享类型。之后的逻辑和独占模式类似,检查前驱结点是否是队列的头结点,是则尝试获取同步状态,成功则将当前结点设置为队列头结点,失败则阻塞当前线程并等待唤醒并重新执行以上流程。不过在共享模式下,当前线程在成功获取同步状态并设置自身为头结点后,还必须做些额外的工作:当后继结点为共享类型时,唤醒后继结点中的线程。
private void setHeadAndPropagate(Node node, int propagate) {
    Node h = head; // Record old head for check below
    setHead(node); //设置当前结点为队列头结点
    /*
     * Try to signal next queued node if:
     *   Propagation was indicated by caller,
     *     or was recorded (as h.waitStatus either before
     *     or after setHead) by a previous operation
     *     (note: this uses sign-check of waitStatus because
     *      PROPAGATE status may transition to SIGNAL.)
     * and
     *   The next node is waiting in shared mode,
     *     or we don't know, because it appears null
     *
     * The conservatism in both of these checks may cause
     * unnecessary wake-ups, but only when there are multiple
     * racing acquires/releases, so most need signals now or soon
     * anyway.
     */
    if (propagate > 0 || h == null || h.waitStatus < 0 ||
        (h = head) == null || h.waitStatus < 0) {
        Node s = node.next;
        if (s == null || s.isShared())
            doReleaseShared(); //唤醒后继结点的线程
    }
}
至此,CountDownLatch的原理就搞明白了,它是以AQS的共享模式来实现复杂的并发流程控制的。当其内部的计数器不为0时,调用其await方法将导致线程加入同步队列并阻塞。当调用countDown方法使计数器的值为0时,会唤醒队列中第一个等待的线程,之后由该线程唤醒后面的线程,以此类推,直到阻塞在闭锁上的线程都被成功唤醒。
3.循环屏障CyclicBarrier
3.1 CyclicBarrier功能简介
CyclicBarrier通常称为循环屏障。它和CountDownLatch很相似,都可以使线程先等待然后再执行。不过CountDownLatch是使一批线程等待另一批线程执行完后再执行;而CyclicBarrier只是使等待的线程达到一定数目后再让它们继续执行。故而CyclicBarrier内部也有一个计数器,计数器的初始值在创建对象时通过构造参数指定,如下所示
public CyclicBarrier(int parties) {
    this(parties, null);
}
每调用一次await()方法都将使阻塞的线程数+1,只有阻塞的线程数达到设定值时屏障才会打开,允许阻塞的所有线程继续执行。除此之外,CyclicBarrier还有几点需要注意的地方:
-
1.CyclicBarrier的计数器可以重置而CountDownLatch不行,这意味着CyclicBarrier实例可以被重复使用而CountDownLatch只能被使用一次。而这也是循环屏障循环二字的语义所在。
-
2.CyclicBarrier允许用户自定义barrierAction操作,这是个可选操作,可以在创建CyclicBarrier对象时指定
public CyclicBarrier(int parties, Runnable barrierAction) {
    if (parties <= 0) throw new IllegalArgumentException();
    this.parties = parties;
    this.count = parties;
    this.barrierCommand = barrierAction;
}
一旦用户在创建CyclicBarrier对象时设置了barrierAction参数,则在阻塞线程数达到设定值屏障打开前,会调用barrierAction的run()方法完成用户自定义的操作。
3.2 使用CyclicBarrier
还是以多线程分割大任务并发执行的例子来进行讲解,不过这次情况要稍微复杂些。线程在执行完分配给它的子任务后不能立即退出,必须等待所有任务都完成后再执行释放资源的操作。而主线程在所有子任务都执行完毕后也要执行特定的操作,且该操作在线程释放资源前。所有操作都以打印日志的方式进行模拟。代码如下:
/**
 * @author: takumiCX
 * @create: 2018-09-18
 **/
public class CyclicBarrierTest {

    static CyclicBarrier cyclicBarrier;

    public static void main(String[] args) {
        int count = 10;
        //当所有子任务都执行完毕时,barrierAction的run方法会被调用
        cyclicBarrier = new CyclicBarrier(count, () ->
                System.out.println("执行barrierAction操作!"));
        //开启多个线程执行子任务
        for(int i=0;i<count;i++){
            new Thread(new CyclicBarrierThread(cyclicBarrier,i)).start();
        }

    }

    private static class CyclicBarrierThread implements Runnable {

        public CyclicBarrier cyclicBarrier;

        //任务序号
        public int taskNum;

        public CyclicBarrierThread(CyclicBarrier cyclicBarrier, int taskNum) {
            this.cyclicBarrier = cyclicBarrier;
            this.taskNum = taskNum;
        }

        @Override
        public void run() {
            //执行子任务
            System.out.println("子任务:"+taskNum+" 执行完毕!");
            try {
                //等待所有子任务执行完成
                cyclicBarrier.await();

            } catch (Exception e) {
                e.printStackTrace();
            }
            //释放资源
            System.out.println("线程:"+taskNum+" 释放资源!");

        }
    }
}
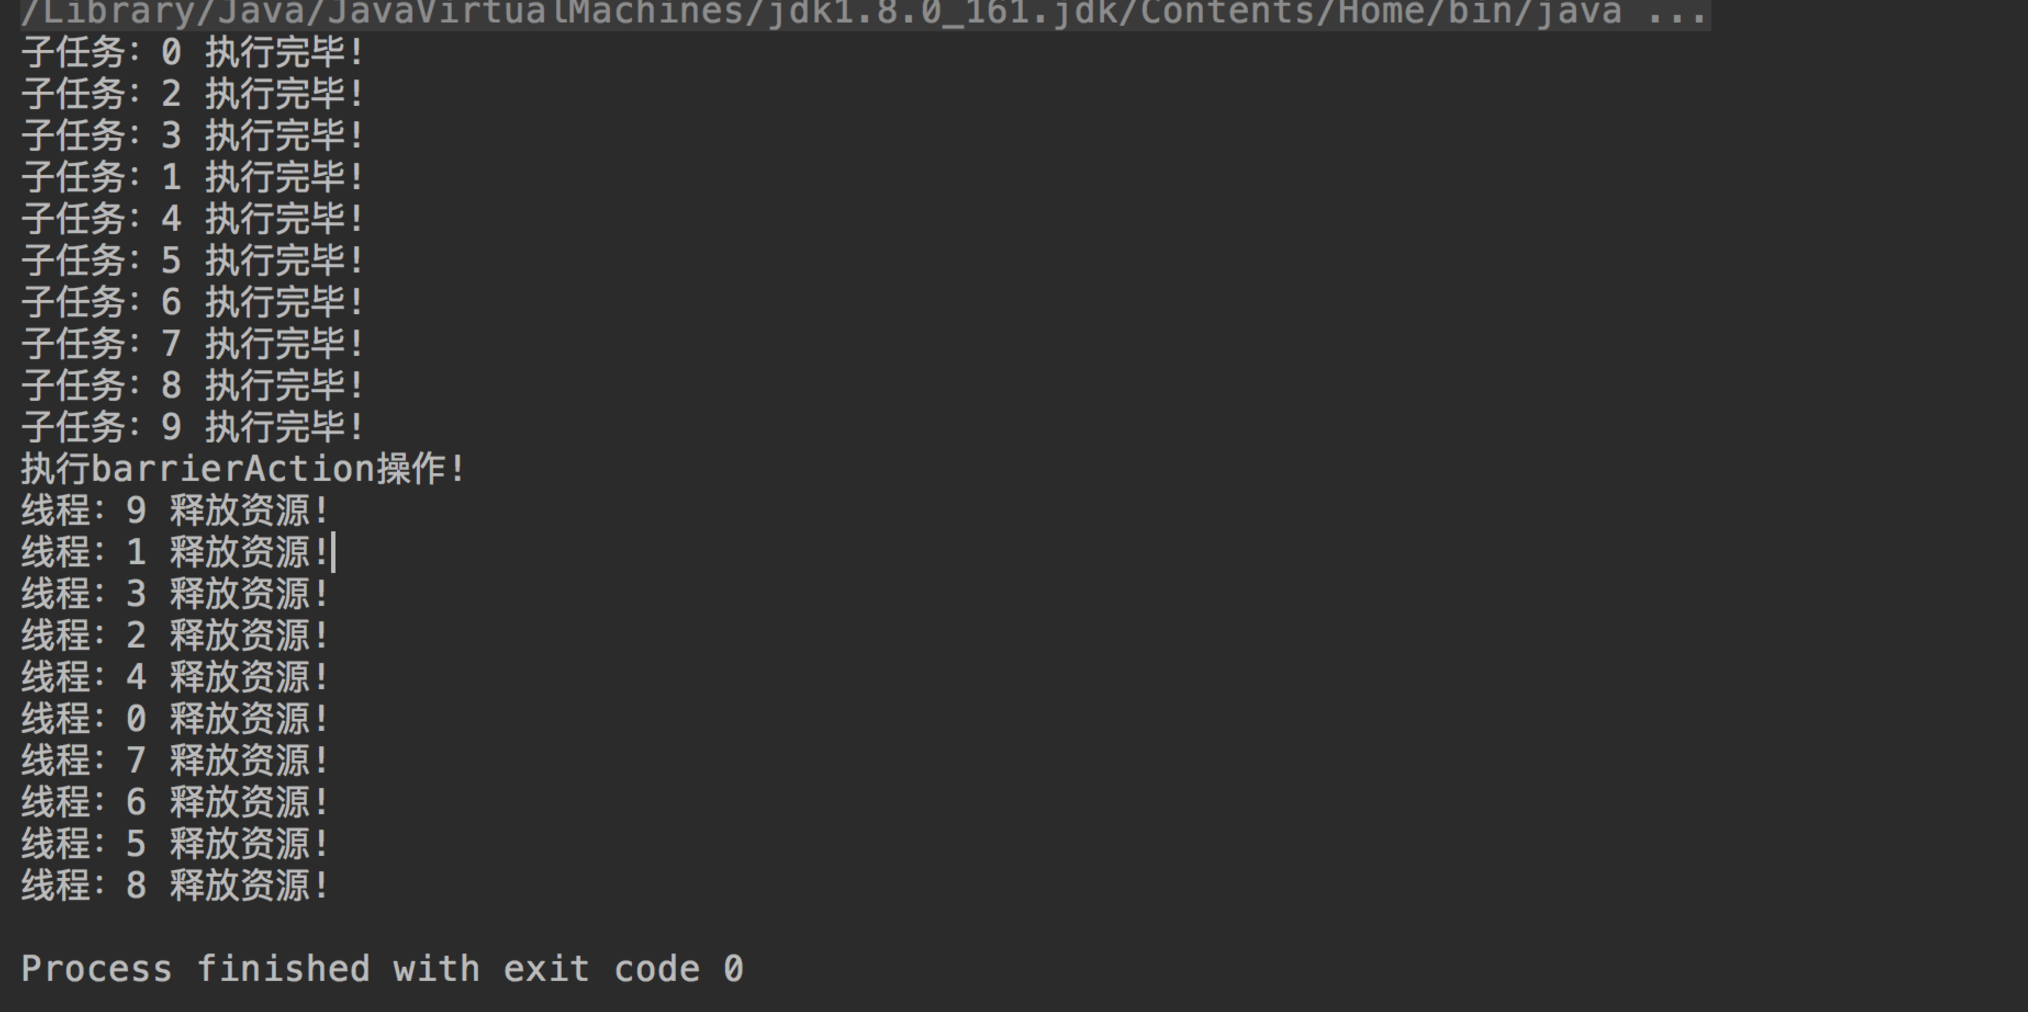
开启10个线程执行子任务,每个线程执行完子任务后在CyclicBarrier上等待。等到所有子任务完成后,用户设置自定义的barrierAction操作即被执行,之后屏障正式打开,阻塞的所有线程将完成释放资源的操作。
结果如下图所示
3.3 CyclicBarrier原理浅析
CyclicBarrier内部使用ReentrentLock来实现线程同步,而通过Condition来实现线程的阻塞和唤醒。当计数器值为0时,首先会执行用户自定义的barrierAction操作。
int index = --count;  //计数器值
if (index == 0) {  // tripped
    boolean ranAction = false;
    try {
        final Runnable command = barrierCommand;  //用户自定义的barrierAction
        if (command != null)
            command.run();
        ranAction = true;
        nextGeneration();
        return 0;
    } finally {
        if (!ranAction)
            breakBarrier();
    }
}
之后再进行阻塞线程的唤醒,以及将计数器重置为初始值。这部分代码在nextGeneration()中
private void nextGeneration() {
    // signal completion of last generation
    trip.signalAll();  //唤醒所有的阻塞线程
    // set up next generation
    count = parties;   //计数器重置为初始值
    generation = new Generation();
}
4. 信号量Semaphore
4.1 Semaphore功能简介
如果学过操作系统的话,对信号量Semaphore应该不陌生。操作系统中的信号量是这么一个机构:它维护了一定数目的资源,进程向其请求资源将导致Semaphore中资源数量减少,当资源数量小于0时将会导致当前线程阻塞;而进程释放资源将导致Semaphore中资源数量增加,当资源数量大于0时会唤醒阻塞的进程。操作系统中使用信号量可以轻松实现进程间的互斥和同步。java在语言层面也支持信号量机制,其工作原理和操作系统中的信号量类似,可以通过调用
public void acquire(int permits)
或者```
public boolean tryAcquire(int permits)
请求信号量中的许可(资源)。不过后者在信号量中许可数量不够时不会阻塞而是立即返回一个失败结果。当然,也可以通过```
public void release()
向信号量归还资源。
信号量在创建时必须为其指定可以用的许可总数,如下所示
public Semaphore(int permits) {
    sync = new NonfairSync(permits);
}
当创建信号量时指定许可总数为1,则可以起到独占锁的作用,不过它是不允许线程重入的。同时,它还有公平和非公平模式之分,通过在创建对象时传入参数进行指定
public Semaphore(int permits, boolean fair) {
    sync = fair ? new FairSync(permits) : new NonfairSync(permits);
}
和ReentrentLock一样默认是非公平模式。
4.2 使用Semaphore进行最大并发数的控制
假设服务器上有一种资源可以同时供多个用户进行访问,出于系统稳定性考虑需要限制同时访问的用户的数量,整个过程可以模拟如下
/**
 * @author: takumiCX
 * @create: 2018-09-24
 **/
public class SemaphoreTest {

    public static void main(String[] args) throws InterruptedException {

        //信号量控制并发数最多为3
        Semaphore semaphore = new Semaphore(3);

        //同时开启10个线程
        for(int i=1;i<=10;i++){
            new Thread(new ReaderThread(semaphore,i)).start();
        }

    }


    static class ReaderThread implements Runnable{

        Semaphore semaphore;

        //用户序号
        int userIndex;

        public ReaderThread(Semaphore semaphore, int userIndex) {
            this.semaphore = semaphore;
            this.userIndex = userIndex;
        }

        @Override
        public void run() {

            try {
                //获取许可
                semaphore.acquire(1);
                //模拟访问资源所用的时间
                TimeUnit.SECONDS.sleep(1);

                System.out.println("用户 "+userIndex+" 访问资源,时间:"+System.currentTimeMillis());

                //释放许可
                semaphore.release();

            } catch (InterruptedException e) {
                e.printStackTrace();
            }

        }
    }
}
使用信号量限制同时并发访问的线程数为3,然后开启10个线程模拟用户访问。得到的结果如下
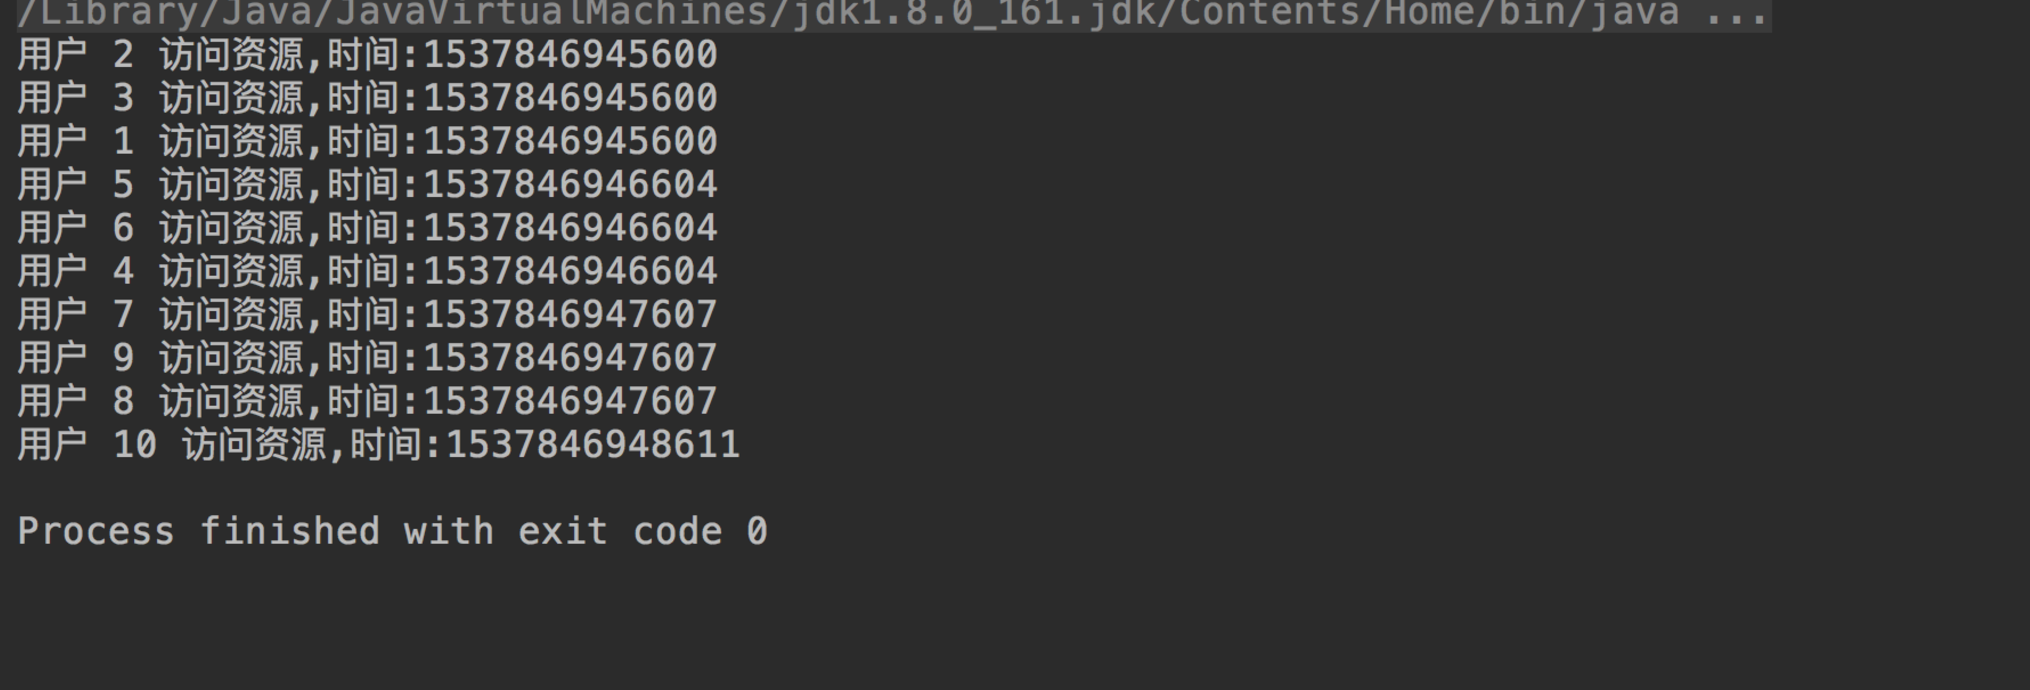
从结果上可以清晰的看到,每次最多允许3个用户同时访问资源,信号量很好的起到了限流作用。
4.3 Semaphore原理浅析
和CountDownLatch类似,Semaphore底层也是通过AQS的共享模式实现的。它和CountDownLatch的区别只是对于AQS共享模式的钩子方法```
tryAcquireShared()
和```
tryReleaseShared()
的实现不同。
以Semaphore的非公平模式为例,其尝试释放同步状态的逻辑如下
final int nonfairTryAcquireShared(int acquires) {
    for (;;) {
        int available = getState();  //获取可用许可数
        int remaining = available - acquires; //计算被消耗后剩余的许可数
        if (remaining < 0 ||
            compareAndSetState(available, remaining))
            return remaining;
    }
}
首先会获取当前可用的许可值(state),根据请求数量计算出剩余的许可值,若剩余许可数小于0则直接返回剩余值表示该操作失败;否则以CAS方式将state值更新为计算后的剩余值,并返回一个大于等于0的数表示成功。通过该方法的返回值可以知道尝试获取同步状态的操作是否成功,返回值小于0表示没有足够的许可,线程将会加入同步队列并等待;返回值大于等于0则表示许可足够,则整个获取许可的流程就结束了。
tryReleaseShared()的实现也很简单,
protected final boolean tryReleaseShared(int releases) {
    for (;;) {
        int current = getState();  //获取当前许可数
        int next = current + releases; //计算释放后的许可总数
        if (next < current) // overflow
            throw new Error("Maximum permit count exceeded");
        if (compareAndSetState(current, next)) //cas更新许可值
            return true;
    }
}
计算释放后的许可总数并以CAS方式对state值进行更新。之后将返回上层继续执行
doReleaseShared()
唤醒头结点后面结点中的线程,被唤醒的线程将执行tryAcquireShared()重新尝试获取同步状态,获取失败则继续阻塞,获取成功将设置当前结点为队列头结点并继续唤醒后续结点中的线程。