本文将介绍通过完全手动定制内核,在此基础上添加 busybox ,并实现远程登陆,使裁剪的 linux 能够运行 nginx 。
在此之前介绍一下 linux 系统的启动流程。
linux系统启动流程
POST-->BIOS(BOOT Sequence)-->MBR(bootloader,446个字节)-->kernel-->initrd(initramfs)-->(ROORFS)/sbin/init(/etc/inittab)
注:以上linux启动流程只是针对于centos6系列基于upstart流程的2.6内核,centos7使用了stytemd和此稍有不同。
关于启动流程详情参考另外一片文章:http://www.cnblogs.com/sysk/p/4778976.html
开始:
为虚拟机准备一块 1G (大小自定)的硬盘 为新的硬盘分区
/dev/sdb1=50M 剩余的容量全部给 /dev/sdb2
echo -e "n
 p
 1

 +50M
 n
 p
 2


 w
" |fdisk /dev/sdb
查看结果:
Device Boot           Start         End      Blocks   Id  System

/dev/sdb1               1           7       56196   83  Linux

/dev/sdb2               8         130      987997+  83  Linux
格式化分区
mke2fs  -t ext4 /dev/sdb1

mke2fs  -t ext4 /dev/sdb2
安装 grub 引导程序
mkdir /mnt/boot

mkdir /mnt/sysroot
挂载 /dev/sdb1 到 /mnt/boot
mount /dev/sdb1 /mnt/boot

grub-install --root-directory=/mnt /dev/sdb
执行结果如下
[root@localhost ~]# grub-install --root-directory=/mnt /dev/sdb

Probing devices to guess BIOS drives. This may take a long time.

Installation finished. No error reported.

This is the contents of the device map /mnt/boot/grub/device.map.

Check if this is correct or not. If any of the lines is incorrect,

fix it and re-run the script `grub-install'.

(fd0) /dev/fd0

(hd0) /dev/sda

(hd1) /dev/sdb
查看是否安装成功
[root@localhost ~]# ls /mnt/boot/grub/

device.map fat_stage1_5 iso9660_stage1_5 minix_stage1_5 stage1ufs2_stage1_5    xfs_stage1_5

e2fs_stage1_5  ffs_stage1_5  jfs_stage1_5      reiserfs_stage1_5  stage2  vstafs_stage1_5
查看自己的硬件类型(我是基于VM10的)
[root@localhost ~]# lspci

00:00.0 Host bridge: Intel Corporation 440FX - 82441FX PMC [Natoma] (rev 02)

00:01.0 ISA bridge: Intel Corporation 82371SB PIIX3 ISA [Natoma/Triton II]

00:01.1 IDE interface: Intel Corporation 82371AB/EB/MB PIIX4 IDE (rev 01)

00:02.0 VGA compatible controller: InnoTek Systemberatung GmbH VirtualBox Graphics Adapter

00:03.0 Ethernet controller: Intel Corporation 82540EM Gigabit Ethernet Controller (rev 02)

00:04.0 System peripheral: InnoTek Systemberatung GmbH VirtualBox Guest Service

00:05.0 Multimedia audio controller: Intel Corporation 82801AA AC'97 Audio Controller (rev 01)

00:06.0 USB controller: Apple Inc. KeyLargo/Intrepid USB

00:07.0 Bridge: Intel Corporation 82371AB/EB/MB PIIX4 ACPI (rev 08)

00:14.0 SCSI storage controller: LSI Logic / Symbios Logic 53c1030 PCI-X Fusion-MPT Dual Ultra320 SCSI
编译内核:
安装必要的开发工具和依赖包:
yum install perl
yum install bc
yum insatll gcc-c++
yum install ncurses-devel
yum groupinstall "Development Libraries" " Development Tools"
下载内核源码后开始:
[root@localhost ~]# ln -sv /usr/src/linux-3.12.26/ /usr/src/linux

`/usr/src/linux' -> `/usr/src/linux-3.12.26/'

[root@localhost ~]# cd /usr/src/linux

[root@localhost linux]# ls

arch   COPYING  crypto  drivers   fs       init  Kbuild   kernel  MAINTAINERS  mm   README   samples  security  tools  virt

block  CREDITS  Documentation  firmware  include  ipc   Kconfig  lib     Makefile     net  REPORTING-BUGS  scripts  sound  usr

[root@localhost linux]# make allnoconfig

HOSTCC  scripts/basic/fixdep

HOSTCC  scripts/kconfig/conf.o

SHIPPED scripts/kconfig/zconf.tab.c

SHIPPED scripts/kconfig/zconf.lex.c

SHIPPED scripts/kconfig/zconf.hash.c

HOSTCC  scripts/kconfig/zconf.tab.o

HOSTLD  scripts/kconfig/conf

scripts/kconfig/conf --allnoconfig Kconfig

#

# configuration written to .config

#
[root@localhost linux]# make menuconfig

下面开始配置所有功能直接编译进内核

进入 General setup 选项

返回首界面进入 Processor type and features

进入 Processor family (Generic-x86-64) 选择 cpu 类型 默认即可
返回首界面进入 Bus options (PCI etc.)

返回首界面进入 Executable file formats / Emulations

返回首界面进入 Networking support ---> Networking options

返回首界面进入 Device Drivers --->Generic Driver Options

返回上级界面

进入scsi device support

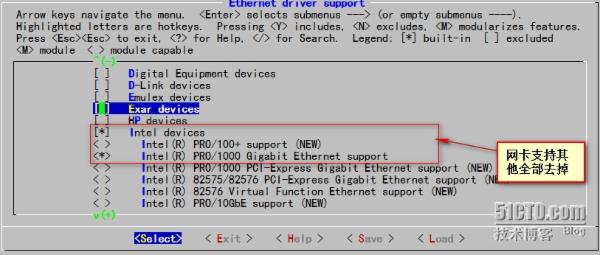
返回上级进入 Network device support---> Ethernet driver support (NEW)
返回到 Network device support 此界面下选择 Input device suppor t

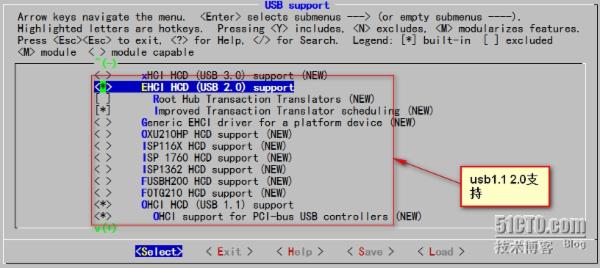
返回上级添加 usb 支持 USB support
返回首界面 File systems

退出保存配置
[root@localhost linux]# make

[root@localhost linux]# make bzImage

make[1]: Nothing to be done for `all'.

make[1]: Nothing to be done for `relocs'.

CHK     include/config/kernel.release

CHK     include/generated/uapi/linux/version.h

CHK     include/generated/utsrelease.h

CALL    scripts/checksyscalls.sh

CHK     include/generated/compile.h

make[3]: `arch/x86/realmode/rm/realmode.bin' is up to date.

Kernel: arch/x86/boot/bzImage is ready  (#1)

[root@localhost linux]# cp ./arch/x86/boot/bzImage /mnt/boot

[root@localhost linux]# ls /mnt/boot/

bzImage  grub  lost+found
为新系统添加 rootfs 及 二进制程序 由 busybox 提供
[root@localhost ~]# tar -xf busybox-1.22.1.tar.bz2 -C /usr/src/

[root@localhost ~]# ls /usr/src/

busybox-1.22.1  linux  linux-3.12.26

busybox-1.22.1.tar.bz2  glibc-static-2.12-1.132.el6.x86_64.rpm  mariadb-5.5.36-linux-x86_64.tar.gz

[root@localhost ~]# cd /usr/src/busybox-1.22.1/

[root@localhost busybox-1.22.1]# ls

applets     configs        editors    libbb       Makefile.custom  printutils  shell
编译 busybox
[root@localhost linux-3.12.26]# make menuconfig

进入 Busybox Settings ---->Build Options
此处需要选择
Busybox Settings --> Build Options --> Build BusyBox as a static binary (no shared libs)
安装glibc静态支持
yum install glibc-static
[root@localhost busybox-1.22.1]# make

[root@localhost busybox-1.22.1]# make install
此时会在当前目录生成 _install 目录
[root@localhost busybox-1.22.1]# ls _install/

bin  linuxrc  sbin  usr
挂载 /dev/sdb2 到 /mnt/sysroot
[root@localhost busybox-1.22.1]# mount /dev/sdb2 /mnt/sysroot/

[root@localhost busybox-1.22.1]# cp -a ./_install/*  /mnt/sysroot/

[root@localhost busybox-1.22.1]# ls /mnt/sysroot/

bin  linuxrc  lost+found  sbin  usr

[root@localhostbusybox-1.22.1]#mkdir -pv /mnt/sysroot/{etc,root,mnt,media,proc,sys,dev,home,lib,lib64,var,tmp}
由于 busybox 启动时默认的 init 程序为 /etc/init.d/rcS
[root@localhost busybox-1.22.1]# mkdir -pv /mnt/sysroot/etc/init.d

mkdir: created directory `/mnt/sysroot/etc/init.d'

[root@localhost busybox-1.22.1]# vim /mnt/sysroot/etc/init.d/rcS

#!/bin/sh

mount -n -t ext4 -o remount,rw /dev/sda2 /

mount -n -t ext4 /dev/sda1 /boot

mount -n -t tmpfs none /dev

mount -n -t proc proc  /proc

mount -n -t sysfs sysfs /sys

mkdir /dev/pts/

mount -n -t devpts devpys /dev/pts

[ -r /etc/sysconfig/network ]&&source /etc/sysconfig/network

if [ ! -z $HOSTNAME ];then

/bin/hostname $HOSTNAME

else

/bin/hostname localhost

fi
[root@localhost busybox-1.22.1]# vim /mnt/sysroot/etc/profile

export PS1="[u@h w]$"

[root@localhost linux]# mkdir -pv /mnt/sysroot/etc/sysconfig

mkdir: created directory `/mnt/sysroot/etc/sysconfig'

[root@localhost linux]# vim /mnt/sysroot/etc/sysconfig/network

HOSTNAME=www.mylinux.com
编辑 grub 配置文件
[root@localhost busybox-1.22.1]# vim /mnt/boot/grub/grub.conf

default=0

timeout=5

title busy-box-1.0

root(hd0,0)

kernel /bzImage ro root=/dev/sda2
先测试下看能否启动

下面使其能够以用户名密码进行登录
[root@localhost ~]# vim /mnt/sysroot/etc/inittab

::sysinit:/etc/init.d/rcS

tty1::respawn:/sbin/getty 19200 tty1

tty2::respawn:/sbin/getty 19200 tty2
为其提供 /etc/passwd /etc/shadow /etc/group /etc/gshadow
直接从当前系统复制
[root@localhost ~]# cp -p /etc/passwd /mnt/sysroot/etc/

[root@localhost ~]# cp -p /etc/shadow /mnt/sysroot/etc/

[root@localhost ~]# cp -p /etc/group /mnt/sysroot/etc/

[root@localhost ~]# cp -p /etc/gshadow /mnt/sysroot/etc/
也可以将上面四个文件分别用grep复制过去 如果嫌弃本机这些文件里面太多东西的话
grep "^root" /etc/shadow > mnt/sysroot/etc/shadow
编辑 /mnt/sysroot/etc/passwd 将登录 shell 改为 /bin/sh
测试是否成功

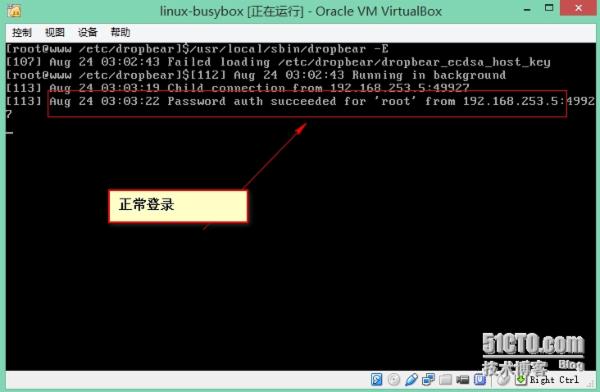
正常登录
下面为其提供远程连接功能
编译安装 dropbear ( ssh )
为了进行登录名解析需要 linss 库文件和 /etc/nsswitch.conf
启用网络功能
[root@localhost ~]# cd dropbear-2014.65

./configure

make PROGRAMS="dropbear dbclient dropbearkey dropbearconvert scp"

[root@localhost dropbear-2014.65]# make install
默认安装在 /usr/local/{bin,sbin }
将此应用移植到目标系统移植脚本如下
#!/bin/bash
#

MntDIR1="/mnt/boot"

MntDIR2="/mnt/sysroot"

PORAPP ()

{

  read -p "Plz input the app: " APPLI

  until [ "$APPLI" == quit ];do

        while true;do

            if  which --skip-alias $APPLI ;then

                WHERE=$(which --skip-alias $APPLI)

                DIRAPP=$(dirname $WHERE)

                [ -d ${MntDIR2}${DIRAPP} ]||mkdir -p ${MntDIR2}${DIRAPP}

                [ -e ${MntDIR2}${WHERE} ]||cp $WHERE ${MntDIR2}${DIRAPP}

                LIBS=$(ldd $WHERE|grep -oE "(/[[:alnum:]]*/[^[:space:]]*[[:space:]])")

                for i in $LIBS;do

                    DIRLIB=$(dirname $i)

                    [ -d ${MntDIR2}$DIRLIB ]||mkdir -p ${MntDIR2}$DIRLIB

                    cp $i ${MntDIR2}$i

                done

               read -p "Do you want to another app? or quit: " APPLI

               continue 2

            else

                read -p "Input is not app!! Plz input again or quit: " APPLI

                continue 2

            fi

          done

 done

}

##################MAIN##################

MAIN ()

{
 PORAPP

}

MAIN
运行脚本
[root@localhost dropbear-2014.65]# bash 123.sh

bash: 123.sh: No such file or directory

[root@localhost dropbear-2014.65]# bash /root/123.sh

Plz input the app: /usr/local/bin/dbclient

/usr/local/bin/dbclient

Do you want to another app? or quit: /usr/local/bin/dropbearkey

/usr/local/bin/dropbearkey

Do you want to another app? or quit: /usr/local/bin/dropbearconvert

/usr/local/bin/dropbearconvert

Do you want to another app? or quit: /usr/local/sbin/dropbear

/usr/local/sbin/dropbear

Do you want to another app? or quit: quit
查看移植结果
[root@localhost dropbear-2014.65]# ls /mnt/sysroot/usr/local/{bin,sbin}

/mnt/sysroot/usr/local/bin:

dbclient  dropbearconvert  dropbearkey

/mnt/sysroot/usr/local/sbin:

dropbear

[root@localhost dropbear-2014.65]# ls /mnt/sysroot/lib64/

ld-linux-x86-64.so.2  libcrypt.so.1  libc.so.6  libdl.so.2  libfreebl3.so  libutil.so.1  libz.so.1
创建主机密钥
[root@localhost dropbear-2014.65]# mkdir /mnt/sysroot/etc/dropbear

[root@localhostdropbear-2014.65]#

dropbearkey-t dss -f /mnt/sysroot/etc/dropbear/dropbear_dss__host_key

[root@localhost dropbear-2014.65]#

dropbearkey -t rsa -f /mnt/sysroot/etc/dropbear/dropbear_rsa__host_key
移植 linss 库
[root@localhost dropbear-2014.65]# find  /lib64/libnss* -exec cp {} /mnt/sysroot/lib64/ ;

[root@localhost dropbear-2014.65]# find  /usr/lib64/libnss* -exec cp {} /mnt/sysroot/usr/lib64/ ;
创建 /etc/nsswitch.conf
passwd:     files

shadow:     files

group:      files
编辑 /etc/init.d/rcS 添加如下内容
ifconfig eth0 192.168.253.22 netmask 255.255.255.0 up

ifconfig lo  127.0.0.0      netmask 255.0.0.0
/usr/local/sbin/dropbear -E 验证
移植 nginx 到目标机
编译安装
./confgiure --prefix=/usr/local/nginx --without-httpd_rewrite_module

make && make install
运行移植脚本输入 /usr/local/nginx/sbin/nginx
cp -a -r /usr/local/nginx/* /mn t/sysroot/usr/local/nginx/
完成测试

客户端访问测试

整个过程完毕
遇到的问题:
在做完整个系统之后重启出现了这个报错
VFS: Cannot open root device "sda2" or unknown-block(0,0)
Please append a correct "root=" boot option;here are the available partition 0b00   1048575 sr0 driver: sr
kernal panic - not syncing: VFS: Unable to mount root fs on unknown-block(0,0)
搞了好几天最后终于找到原因:
找到虚拟机配置文件的“.vmx",vmware默认的是LSI Logic,找到 ".vmx" 文件 里的scsi0.virtualDev = "lsilogic"
改为 scsi0.virtualDev = "buslogic“
详情参照一下摘抄:
这两天一直在安装lfs6.2,安装到最后编译完内核,修改完fstab,最后安装grub后,启动lfs报错提示
VFS:Cannot open root device "sda" or unknow-block(0,0)
Please append a correct "root=" boot option
kernel panic:VFS:Unable to mount root fs on unknown-block(0,0)
看到这个错误的时候,我快崩溃了,我等了这么久,到最后一步出现了这个错误。大概意思是没有把root文件系统所在的硬盘控制器的驱动编译到内核中去,编译的时候我选择了scsi驱动了很奇怪,于是开始goole,baidu得到结果,大多都是集中在:
Device Drivers--->SCSI device support--->SCSI disk support
Device Drivers--->SCSI device support--->SCSI low-level drivers--->BusLogic SCSI support


一、磁盘(!!!)
        在选择模块前,要先弄清楚VMware虚拟机的硬件类型,下面这个表是VMware6中自定义虚拟机配置时给出的配置,不难发现当您使用 VMware推荐向导给出的配置时,实际使用的是SCSI类型设备中的LSI Logic设备。这里要注意的一个地方是,既然有两个SCSI设备能够供其选择,那么该如何判断呢?很简单,因为他是通过内核主版本号来划分的。感兴趣的 朋友能够通过新建虚拟机Custom-Linux下Version列表中Other Linux2.6.X kernel 和 Other Linux2.4.X kernel来比较。2.4内核之前使用BusLogic,2.6内核使用的是  LSI Logic 。
       VMware 6.0:
            I/O ADapter Types
                IDE adapter: ATAPI
              SCSI adapter: BusLogic
                                 LSI Logic
这是Other Linux2.6.X kernel配置系统信息
00:10.0 SCSI storage controller: LSI Logic / Symbios Logic 53c1030 PCI-X Fusion-MPT Dual Ultra320 SCSI (rev 01)

这是Other Linux2.4.X kernel配置系统信息
00:10.0 SCSI storage controller: BusLogic BT-946C (BA80C30) [MultiMaster 10] (rev 01)
    现在分别介绍模块选择路径
    这个是SCSI磁盘设备模块,必须选择。
    Linux Kernel Configuration
        -> Device Drivers
            -> SCSI device support
                - > SCSI disk support
    这个是BusLogic设备驱动模块。使用这个设备的的朋友需要选取。
    Linux Kernel Configuration
        -> Device Drivers
            -> SCSI device support
              -> SCSI low-level drivers
                 -> BusLogic SCSI support    (这里一定要选上)
    这个是LSI Logic设备驱动模块。使用这个设备的的朋友需要选取。
    Linux Kernel Configuration
       -> Device Drivers
           -> Fusion MPT device support
                -> Fusion MPT (base + ScsiHost) drivers

我的内核是kernel-2.6.16.27,但是安装了上面提示的Fusion MPT (base + ScsiHost) drivers。问题依旧存在.所以我修改虚拟机的“.vmx",vmware默认的是LSI Logic,找到 ".vmx" 文件 里的scsi0.virtualDev = "lsilogic"
改为 scsi0.virtualDev = "buslogic
从新编译内核,启动系统`终于跳过了
另一个问题是关于网卡的:

  这个设备和内核版本没有关系,下面是系统信息参考:

02:00.0 Ethernet controller: Advanced Micro Devices [AMD] 79c970 [PCnet32 LANCE] (rev 10)

  Linux Kernel Configuration
  -> Device Drivers
    -> Networking support
       -> Ethernet (10 or 100Mbit)

             -> [*] EISA, VLB, PCI and on board controllers
              ->   <*> AMD PCnet32 PCI support

              ->   <*> AMD 8111 (new PCI lance) support


VMWare 所支持的网卡类型
它默认是虚拟的AMD PCNet AM79C970A网卡,但也可以改变网卡配置,虚拟出Intel(R) PRO/1000和VMware PCI Ethernet Adapter网卡。

如果在.vmx文件中用如下语句指定:

ethernet0.virtualDev = "e1000"

其值为e1000指定网卡类型为Intel(R) PRO/1000

其值为vlance指定网卡类型为AMD PCNet AM79C970A(默认为此项)

其值为vmxnet指定网卡类型为VMware PCI Ethernet Adapter
我的网卡就是没有识别,在vm配置文件中加上
ethernet0.virtualDev = "e1000"
就可以识别到网卡了。