• Nginx架构的企业级应用


    Nginx架构的企业级应用

    ====================================================

    实现HA高可用集群

    实现LB负载均衡集群

    Nginx实现反向代理

    Nginx实现动静分离

    ==================================================

    205744159.png

    需求:

    客户端访问静态的请求,由nginx反向代理给后端的Apache服务器;

    客户端访问动态的请求,由nginx反向代理给后端的php-fpm(fastCGI)服务器,而且做负载均衡,如果需要访问数据库,则由php-fpm连接mysql

    如果nginx主服务器宕机之后,nginx备服务器马上顶替主服务器,提供服务;

    服务器IP规划和所需软件安装:


    IP地址

    软件

    nginx

    172.16.22.1 (VIP 172.16.22.10)

    nginx+heartbeat

    nginx

    172.16.22.2 (VIP 172.16.22.10)

    nginx+heartbeat

    Apache

    172.16.22.3

    httpd

    php-fpm1

    172.16.22.4

    php(提供fastCGI服务器)

    php-fpm2

    172.16.22.5

    php(提供fastCGI服务器)

    mysql

    172.16.22.6

    mysql

    heartbeat软件包,已经以附件的形式上传了nginx、php、mysql的软件包在网上都很好下载


    需解决的问题:

    1)、怎么实现HA高可用集群

    思路:安装heartbeat软件,把nginx主服务器和nginx备服务器这两个节点都加入到heartbeat中,用heartbeat的crm管理资源,定义高可用集群

    2)、怎么实现LB负载均衡集群

    思路:利用nginx的upstream模块,配置实现应用层的负载均衡

    3)、nginx怎么把客户的静态请求提交给后端的Apache服务器联系

    思路:利用nginx的反向代理给后端的Apache服务器

    4)、nginx怎么把客户的动态请求提交给后端的php-fpm服务器联系

    思路:首先nginx支持fastCGI,然后利用nginx的反向代理给php-fpm服务器

    5)、php-fpm服务器怎么和mysql服务器联系

    思路:mysql授权能让php-fpm服务器连接数据库

    一、先安装每个服务器所需的软件

    nginx主服务器的配置:


    1)、编译安装nginx

    1
    2
    3
    4
    5
    6
    7
    8
    9
    10
    11
    12
    13
    14
    15
    16
    17
    18
    19
    20
    21
    22
    23
    24
    25
    26
    27
    28
    29
    [root@jie1 ~]# ifconfig | grep "inet addr" | grep -v "127.0.0.1" | awk -F: '{print $2}' | cut -d' ' -f1   查看ip地址
    172.16.22.1
    [root@jie1 ~]#tar xf nginx-1.4.2.tar.gz
    [root@jie1 ~]# yum -y groupinstall "Development tools" "Server Platform Development"   安装开发包
    [root@jie1 ~]#yum -y install pcre-devel  安装依赖性包
    [root@jie1 ~]# cd nginx-1.4.2
    [root@jie1 nginx-1.4.2]# groupadd nginx
    [root@jie1 nginx-1.4.2]# useradd -r -g nginx nginx
    [root@jie1 nginx-1.4.2]#./configure
      --prefix=/usr 
      --sbin-path=/usr/sbin/nginx 
      --conf-path=/etc/nginx/nginx.conf
      --error-log-path=/var/log/nginx/error.log
      --http-log-path=/var/log/nginx/access.log
      --pid-path=/var/run/nginx/nginx.pid 
      --lock-path=/var/lock/nginx.lock
      --user=nginx
      --group=nginx
      --with-http_ssl_module
      --with-http_flv_module
      --with-http_stub_status_module
      --with-http_gzip_static_module
      --http-client-body-temp-path=/var/tmp/nginx/client/ 
      --http-proxy-temp-path=/var/tmp/nginx/proxy/ 
      --http-fastcgi-temp-path=/var/tmp/nginx/fcgi/ 
      --http-uwsgi-temp-path=/var/tmp/nginx/uwsgi 
      --http-scgi-temp-path=/var/tmp/nginx/scgi 
      --with-pcre
    [root@jie1 nginx-1.4.2]# make && make install

    2)、提供System V脚本

    1
    2
    3
    4
    5
    6
    7
    8
    9
    10
    11
    12
    13
    14
    15
    16
    17
    18
    19
    20
    21
    22
    23
    24
    25
    26
    27
    28
    29
    30
    31
    32
    33
    34
    35
    36
    37
    38
    39
    40
    41
    42
    43
    44
    45
    46
    47
    48
    49
    50
    51
    52
    53
    54
    55
    56
    57
    58
    59
    60
    61
    62
    63
    64
    65
    66
    67
    68
    69
    70
    71
    72
    73
    74
    75
    76
    77
    78
    79
    80
    81
    82
    83
    84
    85
    86
    87
    88
    89
    90
    91
    92
    93
    94
    95
    96
    97
    98
    99
    100
    101
    102
    103
    104
    105
    106
    107
    108
    109
    110
    111
    112
    113
    114
    115
    116
    117
    118
    119
    120
    121
    122
    123
    124
    125
    126
    127
    128
    129
    130
    131
    [root@jie1 nginx-1.4.2]# vim /etc/rc.d/init.d/nginx
     #!/bin/sh
    #
    # nginx - this script starts and stops the nginx daemon
    #
    # chkconfig:   - 85 15
    # description:  Nginx is an HTTP(S) server, HTTP(S) reverse
    #               proxy and IMAP/POP3 proxy server
    # processname: nginx
    # config:      /etc/nginx/nginx.conf
    # config:      /etc/sysconfig/nginx
    # pidfile:     /var/run/nginx.pid
                                                                                                                                                                                                                                                                                                                                                                                                                                                                                                                                                                                                                                                                                                                                                                                                                                                                                                                                                                                                                                                                                                                                                                                                                                                                                                                                                        
    # Source function library.
    /etc/rc.d/init.d/functions
                                                                                                                                                                                                                                                                                                                                                                                                                                                                                                                                                                                                                                                                                                                                                                                                                                                                                                                                                                                                                                                                                                                                                                                                                                                                                                                                                        
    # Source networking configuration.
    /etc/sysconfig/network
                                                                                                                                                                                                                                                                                                                                                                                                                                                                                                                                                                                                                                                                                                                                                                                                                                                                                                                                                                                                                                                                                                                                                                                                                                                                                                                                                        
    # Check that networking is up.
    "$NETWORKING" "no" ] && exit 0
                                                                                                                                                                                                                                                                                                                                                                                                                                                                                                                                                                                                                                                                                                                                                                                                                                                                                                                                                                                                                                                                                                                                                                                                                                                                                                                                                        
    nginx="/usr/sbin/nginx"
    prog=$(basename $nginx)
                                                                                                                                                                                                                                                                                                                                                                                                                                                                                                                                                                                                                                                                                                                                                                                                                                                                                                                                                                                                                                                                                                                                                                                                                                                                                                                                                        
    NGINX_CONF_FILE="/etc/nginx/nginx.conf"
                                                                                                                                                                                                                                                                                                                                                                                                                                                                                                                                                                                                                                                                                                                                                                                                                                                                                                                                                                                                                                                                                                                                                                                                                                                                                                                                                        
    [ -f /etc/sysconfig/nginx ] && . /etc/sysconfig/nginx
                                                                                                                                                                                                                                                                                                                                                                                                                                                                                                                                                                                                                                                                                                                                                                                                                                                                                                                                                                                                                                                                                                                                                                                                                                                                                                                                                        
    lockfile=/var/lock/subsys/nginx
                                                                                                                                                                                                                                                                                                                                                                                                                                                                                                                                                                                                                                                                                                                                                                                                                                                                                                                                                                                                                                                                                                                                                                                                                                                                                                                                                        
    make_dirs() {
       # make required directories
       user=`nginx -V 2>&1 | grep "configure arguments:" sed 's/[^*]*--user=([^ ]*).*/1/g' -`
       options=`$nginx -V 2>&1 | grep 'configure arguments:'`
       for opt in $options; do
           if [ `echo $opt | grep '.*-temp-path'` ]; then
               value=`echo $opt | cut -d "=" -f 2`
               if [ ! -d "$value" ]; then
                   # echo "creating" $value
                   mkdir -p $value && chown -R $user $value
               fi
           fi
       done
    }
                                                                                                                                                                                                                                                                                                                                                                                                                                                                                                                                                                                                                                                                                                                                                                                                                                                                                                                                                                                                                                                                                                                                                                                                                                                                                                                                                        
    start() {
        [ -x $nginx ] || exit 5
        [ -f $NGINX_CONF_FILE ] || exit 6
        make_dirs
        echo -n $"Starting $prog: "
        daemon $nginx -c $NGINX_CONF_FILE
        retval=$?
        echo
        [ $retval -eq 0 ] && touch $lockfile
        return $retval
    }
                                                                                                                                                                                                                                                                                                                                                                                                                                                                                                                                                                                                                                                                                                                                                                                                                                                                                                                                                                                                                                                                                                                                                                                                                                                                                                                                                        
    stop() {
        echo -n $"Stopping $prog: "
        killproc $prog -QUIT
        retval=$?
        echo
        [ $retval -eq 0 ] && rm -f $lockfile
        return $retval
    }
                                                                                                                                                                                                                                                                                                                                                                                                                                                                                                                                                                                                                                                                                                                                                                                                                                                                                                                                                                                                                                                                                                                                                                                                                                                                                                                                                        
    restart() {
        configtest || return $?
        stop
        sleep 1
        start
    }
                                                                                                                                                                                                                                                                                                                                                                                                                                                                                                                                                                                                                                                                                                                                                                                                                                                                                                                                                                                                                                                                                                                                                                                                                                                                                                                                                        
    reload() {
        configtest || return $?
        echo -n $"Reloading $prog: "
        killproc $nginx -HUP
        RETVAL=$?
        echo
    }
                                                                                                                                                                                                                                                                                                                                                                                                                                                                                                                                                                                                                                                                                                                                                                                                                                                                                                                                                                                                                                                                                                                                                                                                                                                                                                                                                        
    force_reload() {
        restart
    }
                                                                                                                                                                                                                                                                                                                                                                                                                                                                                                                                                                                                                                                                                                                                                                                                                                                                                                                                                                                                                                                                                                                                                                                                                                                                                                                                                        
    configtest() {
      $nginx -t -c $NGINX_CONF_FILE
    }
                                                                                                                                                                                                                                                                                                                                                                                                                                                                                                                                                                                                                                                                                                                                                                                                                                                                                                                                                                                                                                                                                                                                                                                                                                                                                                                                                        
    rh_status() {
        status $prog
    }
                                                                                                                                                                                                                                                                                                                                                                                                                                                                                                                                                                                                                                                                                                                                                                                                                                                                                                                                                                                                                                                                                                                                                                                                                                                                                                                                                        
    rh_status_q() {
        rh_status >/dev/null 2>&1
    }
                                                                                                                                                                                                                                                                                                                                                                                                                                                                                                                                                                                                                                                                                                                                                                                                                                                                                                                                                                                                                                                                                                                                                                                                                                                                                                                                                        
    case "$1" in
        start)
            rh_status_q && exit 0
            $1
            ;;
        stop)
            rh_status_q || exit 0
            $1
            ;;
        restart|configtest)
            $1
            ;;
        reload)
            rh_status_q || exit 7
            $1
            ;;
        force-reload)
            force_reload
            ;;
        status)
            rh_status
            ;;
        condrestart|try-restart)
            rh_status_q || exit 0
                ;;
        *)
            echo $"Usage: $0 {start|stop|status|restart|condrestart|try-restart|reload|force-reload|configtest}"
            exit 2
    esac
    [root@jie1 nginx-1.4.2]# chmod +x /etc/rc.d/init.d/nginx
    [root@jie1 nginx-1.4.2]# service nginx start
    Starting nginx:                                            [  OK  ]
    [root@jie1 nginx-1.4.2]#

    3)、编译安装src格式的heartbeat的源码包

    1
    2
    3
    4
    5
    6
    7
    8
    9
    10
    11
    12
    13
    14
    15
    16
    17
    18
    19
    20
    21
    22
    23
    24
    25
    26
    27
    [root@jie1 ~]#  useradd mockbuild  创建此用户用于编译src的源码包
    [root@jie1 ~]# rpm -ivh heartbeat-2.1.4-12.el6.src.rpm
       1:heartbeat              ################################### [100%]
    [root@jie1 ~]# yum -y install rpm-build
    [root@jie1 ~]#cd rpmbuild/
    [root@jie1 rpmbuild]# cd SPECS/
    [root@jie1 rpmbuild]# yum -y install glib2-devel libnet-devel libtool-ltdl-devel net-snmp-devel openhpi-libs gnutls-devel python-devel
    [root@jie1 rpmbuild]# rpmbuild -ba heartbeat.spec
    [root@jie1 x86_64# pwd
    /root/rpmbuild/RPMS/x86_64
    [root@jie1 x86_64#ls      生成的所有软件包
    heartbeat-2.1.4-12.el6.x86_64.rpm            heartbeat-ldirectord-2.1.4-12.el6.x86_64.rpm
    heartbeat-debuginfo-2.1.4-12.el6.x86_64.rpm  heartbeat-pils-2.1.4-12.el6.x86_64.rpm
    heartbeat-devel-2.1.4-12.el6.x86_64.rpm      heartbeat-stonith-2.1.4-12.el6.x86_64.rpm
    heartbeat-gui-2.1.4-12.el6.x86_64.rpm
    [root@jie1 x86_64]#mv  heartbeat-debuginfo-2.1.4-12.el6.x86_64.rpm heartbeat-ldirectord-2.1.4-12.el6.x86_64.rpm heartbeat-devel-2.1.4-12.el6.x86_64.rpm  /root   有些软件包不必安装,所以移动到别的目录下
    [root@jie1 x86_64]#ls
    heartbeat-2.1.4-12.el6.x86_64.rpm      heartbeat-pils-2.1.4-12.el6.x86_64.rpm
    heartbeat-gui-2.1.4-12.el6.x86_64.rpm  heartbeat-stonith-2.1.4-12.el6.x86_64.rpm
    [root@jie1 x86_64]#yum -y install PyXML   安装依赖性包
    [root@jie1 x86_64]# rpm -ivh *.rpm   直接安装此目录下的所有rpm包
    Preparing...                ################################# [100%]
       1:heartbeat-pils         ################################# [ 25%]
       2:heartbeat-stonith      ################################# [ 50%]
       3:heartbeat              ################################# [ 75%]
       4:heartbeat-gui          ################################# [100%]
    [root@jie1 x86_64]#

    4)、创建heartbeat的配置文件和认证文件,以及修改hosts文件,使HA的节点能用主机名进行通信

    1
    2
    3
    4
    5
    [root@jie1 ~]# cd /usr/share/doc/heartbeat-2.1.4/
    [root@jie1 heartbeat-2.1.4]# cp authkeys ha.cf /etc/ha.d/
    [root@jie1 heartbeat-2.1.4]# vim /etc/hosts
    172.16.22.1 jie1.com jie1
    172.16.22.2 jie2.com jie2

    5)、修改heartbeat的配置文件和认证文件

    1
    2
    3
    4
    5
    6
    7
    8
    9
    10
    11
    12
    13
    14
    15
    16
    17
    18
    19
    20
    21
    [root@jie1 heartbeat-2.1.4]# cd /etc/ha.d/
    [root@jie1 ha.d]# openssl rand -hex 8 #生成随机数
    29c59aeaf3109993
    [root@jie1 ha.d]# sed -e '/^#/d' authkeys
    auth 3
    3 md5 29c59aeaf3109993   #把生成的随机数
    [root@jie1 ha.d]# chmod 600 authkeys
    [root@jie1 ha.d]# grep -v "^#" ha.cf | grep -v "^$"
    logfile /var/log/ha-log        #日志存放位置
    keepalive 2                    #心跳的时间间隔,默认时间单位为秒
    deadtime 3                    # 超出该时间间隔未收到对方节点的心跳,则认    为对方已经死亡
    warntime 10                   #超出该时间间隔未收到对方节点的心跳,则发出警告并记录到日志中,但此时不会切换
    initdead 60     #在某些系统上,系统启动或重启之后需要经过一段时间网络才能正常工作,该选项用于解决这种情况产生的时间间隔。
    udpport 694                #设置广播通信使用的端口,694为默认使用的端口号
    mcast eth0 225.23.32.1 694 1 0  #多播地址
    auto_failback on   #用于定义当主节点恢复后,是否将服务自动切回
    node jie1.com     #必须写hostname显示的主机名,节点一的主机名
    node jie2.com
    ping 172.16.0.1   #用ping网关,来验证节点是否宕机
    crm on
    [root@jie1 ha.d]#

    6)、把nginx的服务脚本加入到heartbeat的资源目录下,让heartbeat的crm(资源管理层)来管理nginx服务。

    1
    2
    3
    4
    5
    6
    [root@jie1 heartbeat-2.1.4]# cd /etc/ha.d/
    [root@jie1 ha.d]# cd resource.d/
    [root@jie1 resource.d]# cp /etc/rc.d/init.d/nginx ./
    [root@jie1 resource.d]# service nginx stop 关闭nginx服务,让heartbeat来管理
    Stopping nginx:                                            [  OK  ]
    [root@jie1 resource.d]#passwd hacluster  为hacluster用户创建密码


    nginx备服务器的配置:

    1)、编译安装nginx

    1
    2
    3
    4
    5
    6
    7
    8
    9
    10
    11
    12
    13
    14
    15
    16
    17
    18
    19
    20
    21
    22
    23
    24
    25
    26
    27
    28
    29
    [root@jie2 ~]# ifconfig | grep "inet addr" | grep -v "127.0.0.1" | awk -F: '{print $2}' | cut -d' ' -f1   查看ip地址
    172.16.22.2
    [root@jie2 ~]#tar xf nginx-1.4.2.tar.gz
    [root@jie2 ~]# yum -y groupinstall "Development tools" "Server Platform Development"   安装开发包
    [root@jie2 ~]#yum -y install pcre-devel  安装依赖性包
    [root@jie2 ~]# cd nginx-1.4.2
    [root@jie2 nginx-1.4.2]# groupadd nginx
    [root@jie2 nginx-1.4.2]# useradd -r -g nginx nginx
    [root@jie2 nginx-1.4.2]#./configure
    --prefix=/usr
    --sbin-path=/usr/sbin/nginx
    --conf-path=/etc/nginx/nginx.conf
    --error-log-path=/var/log/nginx/error.log
    --http-log-path=/var/log/nginx/access.log
    --pid-path=/var/run/nginx/nginx.pid 
    --lock-path=/var/lock/nginx.lock
    --user=nginx
    --group=nginx
    --with-http_ssl_module
    --with-http_flv_module
    --with-http_stub_status_module
    --with-http_gzip_static_module
    --http-client-body-temp-path=/var/tmp/nginx/client/
    --http-proxy-temp-path=/var/tmp/nginx/proxy/
    --http-fastcgi-temp-path=/var/tmp/nginx/fcgi/
    --http-uwsgi-temp-path=/var/tmp/nginx/uwsgi
    --http-scgi-temp-path=/var/tmp/nginx/scgi
    --with-pcre
    [root@jie2 nginx-1.4.2]# make && make install

    2)、复制nginx主服务器的System V脚本文件和heartbeat所需的软件包

    1
    2
    3
    4
    5
    6
    7
    8
    9
    [root@jie2 ~]# scp 172.16.22.1:/etc/rc.d/init.d/nginx  /etc/rc.d/init.d/
    [root@jie2 ~]#scp 172.16.22.1:/root/rpmbuild/RPMS/x86_64/*  /root
    [root@jie2 ~]# ls
    anaconda-ks.cfg                            install.log
    heartbeat-2.1.4-12.el6.x86_64.rpm          install.log.syslog
    heartbeat-gui-2.1.4-12.el6.x86_64.rpm
    heartbeat-pils-2.1.4-12.el6.x86_64.rpm
    heartbeat-stonith-2.1.4-12.el6.x86_64.rpm
    [root@jie2 ~]#

    3)、安装从nginx主服务器copy过来的heartbeat软件

    1
    2
    3
    4
    5
    6
    7
    8
    [root@jie2 ~]# yum -y install PyXML libnet-devel net-snmp-libs
    [root@jie2 ~]# rpm -ivh *.rpm
    Preparing...                ################################### [100%]
       1:heartbeat-pils         ################################### [ 25%]
       2:heartbeat-stonith      ################################### [ 50%]
       3:heartbeat              ################################### [ 75%]
       4:heartbeat-gui          ################################### [100%]
    [root@jie2 ~]#

    4)、由于是HA集群,HA集群必须保证节点的配置文件完全一样,在这里我们直接把nginx主服务器的heartbeat的配置文件copy过来。

    1
    2
    3
    4
    5
    6
    7
    8
    [root@jie2 ~] scp  172.16.22.1:/etc/ha.d/{ha.cf,authkeys}  /etc/ha.d/
    root@172.16.22.1's password:
    ha.cf                             100%   10KB  10.3KB/s   00:00
    root@172.16.22.1's password:
    authkeys                          100%  653     0.6KB/s   00:00
    [root@jie2 ~] scp  172.16.22.1:/etc/hosts /etc/
    root@172.16.22.1's password:
    hosts                             100%  250     0.2KB/s   00:00

    5)、把nginx的服务脚本加入到heartbeat的资源目录下,让heartbeat的crm(资源管理层)来管理nginx服务。

    1
    2
    3
    4
    5
    6
    [root@jie2 ~]# cd /etc/ha.d/
    [root@jie2 ha.d]# cd resource.d/
    [root@jie2 resource.d]# cp /etc/rc.d/init.d/nginx ./
    [root@jie2 resource.d]# service nginx stop 关闭nginx服务,让heartbeat来管理
    Stopping nginx:                                            [  OK  ]
    [root@jie2 resource.d]#passwd hacluster  为hacluster用户创建密码


    Apache服务器的配置:

    apache博主采用rpm包安装,各位博友可以采用源码包编译安装

    1
    2
    3
    4
    [root@jie3 ~]# ifconfig | grep "inet addr" | grep -v "127.0.0.1" | awk -F: '{print $2}' | cut -d' ' -f1   查看ip地址
    172.16.22.3
    [root@jie3 ~]# yum -y install httpd
    [root@jie3 ~]# service httpd start

    php-fpm1服务器的配置:

    1)、安装php,编译支持fpm

    1
    2
    3
    4
    5
    6
    7
    8
    9
    10
    11
    [root@jie4 ~]# ifconfig | grep "inet addr" | grep -v "127.0.0.1" | awk -F: '{print $2}' | cut -d' ' -f1   查看ip地址
    172.16.22.4
    [root@jie4 ~]# tar xf php-5.4.19.tar.bz2
    [root@jie4 ~]# yum -y groupinstall "Development tools" "Server Platform Development"  安装开发包组
    [root@jie4 ~]# yum -y install libmcrypt-devel mhash-devel bzip2-devel  libxml2-devel  安装依赖性包
    [root@jie4 ~]# cd php-5.4.19
    [root@jie4 php-5.4.19]# ./configure --prefix=/usr/local/php  --enable-fpm --with-openssl --enable-mbstring
    --with-freetype-dir --with-jpeg-dir --with-png-dir --with-zlib --with-libxml-dir=/usr --enable-xml 
    --enable-sockets  --with-mcrypt  --with-bz2 --with-config-file-path=/etc --with-config-file-scan-dir=/etc/php.d 
    --with-mysql=mysqlnd --with-pdo-mysql=mysqlnd --with-mysqli=mysqlnd
    [root@jie4 php-5.4.19]# make && make install

    2)、提供php的配置文件,php-fpm的System V脚本和php-fpm的配置文件,启动php-fpm服务

    1
    2
    3
    4
    5
    6
    7
    8
    9
    10
    [root@jie4 php-5.4.19]# cp php.ini-production /etc/php.ini
    [root@jie4 php-5.4.19]# cp sapi/fpm/init.d.php-fpm  /etc/rc.d/init.d/php-fpm
    [root@jie4 php-5.4.19]# chmod +x /etc/rc.d/init.d/php-fpm
    [root@jie4 php-5.4.19]# chkconfig --add php-fpm
    [root@jie4 php-5.4.19]# chkconfig php-fpm on
    [root@jie4 php-5.4.19]# cd /usr/local/php/etc/
    [root@jie4 etc]# cp php-fpm.conf.default php-fpm.conf
    [root@jie4 etc]# vim php-fpm.conf
    listen = 172.16.22.4:9000   #把监听的127.0.0.1改成本机网卡的IP
    [root@jie4 etc]# service php-fpm start


    php-fpm2服务器的配置(和php-fpm1服务器的安装配置一样):

    1)、安装php,编译支持fpm

    1
    2
    3
    4
    5
    6
    7
    8
    9
    10
    11
    [root@jie5 ~]# ifconfig | grep "inet addr" | grep -v "127.0.0.1" | awk -F: '{print $2}' | cut -d' ' -f1   查看ip地址
    172.16.22.5
    [root@jie5 ~]# tar xf php-5.4.19.tar.bz2
    [root@jie5 ~]# yum -y groupinstall "Development tools" "Server Platform Development"  安装开发包组
    [root@jie5 ~]# yum -y install libmcrypt-devel mhash-devel bzip2-devel  libxml2-devel  安装依赖性包
    [root@jie5 ~]# cd php-5.4.19
    [root@jie5 php-5.4.19]# ./configure --prefix=/usr/local/php  --enable-fpm --with-openssl --enable-mbstring
    --with-freetype-dir--with-jpeg-dir--with-png-dir--with-zlib --with-libxml-dir=/usr--enable-xml  
    --enable-sockets  --with-mcrypt  --with-bz2 --with-config-file-path=/etc--with-config-file-scan-dir=/etc/php.d 
    --with-mysql=mysqlnd --with-pdo-mysql=mysqlnd --with-mysqli=mysqlnd
    [root@jie5 php-5.4.19]# make && make install

    2)、提供php的配置文件,php-fpm的System V脚本和php-fpm的配置文件,启动php-fpm服务

    1
    2
    3
    4
    5
    6
    7
    8
    9
    10
    [root@jie5 php-5.4.19]# cp php.ini-production /etc/php.ini
    [root@jie5 php-5.4.19]# cp sapi/fpm/init.d.php-fpm  /etc/rc.d/init.d/php-fpm
    [root@jie5 php-5.4.19]# chmod +x /etc/rc.d/init.d/php-fpm
    [root@jie5 php-5.4.19]# chkconfig --add php-fpm
    [root@jie5 php-5.4.19]# chkconfig php-fpm on
    [root@jie5 php-5.4.19]# cd /usr/local/php/etc/
    [root@jie5 etc]# cp php-fpm.conf.default php-fpm.conf
    [root@jie5 etc]# vim php-fpm.conf
    listen = 172.16.22.5:9000   #把监听的127.0.0.1改成本机网卡的IP
    [root@jie5 etc]# service php-fpm start

    mysql服务器的配置:

    1)、编译安装mysql的源码包

    1
    2
    3
    4
    5
    6
    7
    8
    9
    10
    11
    12
    13
    [root@jie6 ~]# ifconfig | grep "inet addr" | grep -v "127.0.0.1" | awk -F: '{print $2}' | cut -d' ' -f1   查看ip地址
    172.16.22.6
    [root@jie6 ~]# tar xf mysql-5.5.33.tar.gz
    [root@jie6 ~]# yum -y groupinstall "Development tools" "Server Platform Development"
    [root@jie6 ~]# cd mysql-5.5.33
    [root@jie6 mysql-5.5.33]# yum -y install cmake
    [root@jie6 mysql-5.5.33]# cmake . -DCMAKE_INSTALL_PREFIX=/usr/local/mysql
    -DMYSQL_DATADIR=/mydata/data  -DSYSCONFDIR=/etc 
    -DWITH_INNOBASE_STORAGE_ENGINE=1 -DWITH_ARCHIVE_STORAGE_ENGINE=1
    -DWITH_BLACKHOLE_STORAGE_ENGINE=1 -DWITH_READLINE=1 -DWITH_SSL=system
    -DWITH_ZLIB=system -DWITH_LIBWRAP=0 -DMYSQL_UNIX_ADDR=/tmp/mysql.sock
    -DDEFAULT_CHARSET=utf8 -DDEFAULT_COLLATION=utf8_general_ci
    [root@jie6 mysql-5.5.33]# make && make install

    2)、提供mysql的配置文件和system V脚本,初始化数据库

    1
    2
    3
    4
    5
    6
    7
    8
    9
    10
    11
    12
    13
    14
    15
    16
    [root@jie6 mysql-5.5.33]# cp /usr/local/mysql/support-files/my-large.cnf /etc/my.cnf
    [root@jie6 mysql-5.5.33]# cp /usr/local/mysql/support-files/mysql.server  /etc/rc.d/init.d/mysqld
    [root@jie6 mysql-5.5.33]# cd /usr/local/mysql/
    [root@jie6 mysql]# useradd -r mysql
    [root@jie6 mysql]# chown -R root:mysql ./*
    [root@jie6 mysql]# mkdir -pv /mydata/data  创建存放数据库的路径,企业一般放在做raid磁盘阵列的LVM上
    mkdir: created directory `/mydata'
    mkdir: created directory `/mydata/data'
    [root@jie6 mysql]# chown -R mysql:mysql /mydata/data/
    [root@jie6 mysql]# vim /etc/my.cnf
    vim /etc/my.cnf
        thread_concurrency = 4
        datadir = /mydata/data    修改数据库存放的路径
    [root@jie6 mysql]# /usr/local/mysql/scripts/mysql_install_db --user=mysql --datadir=/mydata/data/  --basedir=/usr/local/mysql   初始化数据库,datadir是指定数据库的存放路径,basedir是指定数据库安装的路径
    [root@jie6 mysql]# service mysqld start
    Starting MySQL........                                     [  OK  ]

    3)、把源码包安装mysql的PATH变量、库文件、头文件,关联到系统识别的路径下

    1
    2
    3
    4
    5
    [root@jie6 mysql]#echo "PATH=/usr/local/mysql/bin:$PATH" >/etc/profile.d/mysqld.sh
    [root@jie6 mysql]#source /etc/profile.d/mysqld.sh
    [root@jie6 mysql]#echo "/usr/local/mysql/lib" >/etc/ld.so.conf.d/mysqld.conf
    [root@jie6 mysql]#ldconfig -v | grep mysql
    [root@jie6 mysql]#ln -sv /usr/local/mysql/include/ /usr/local/mysqld

    自此所有服务器的软件已经安装完成,且能成功启动

    二、配置HA高可用集群

    heartbeat的配置文件必须存放在两边的节点上,且完全保持一致

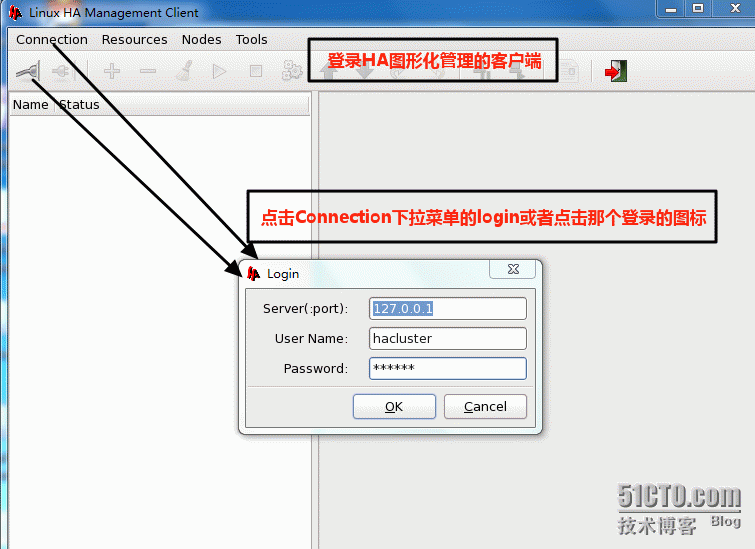
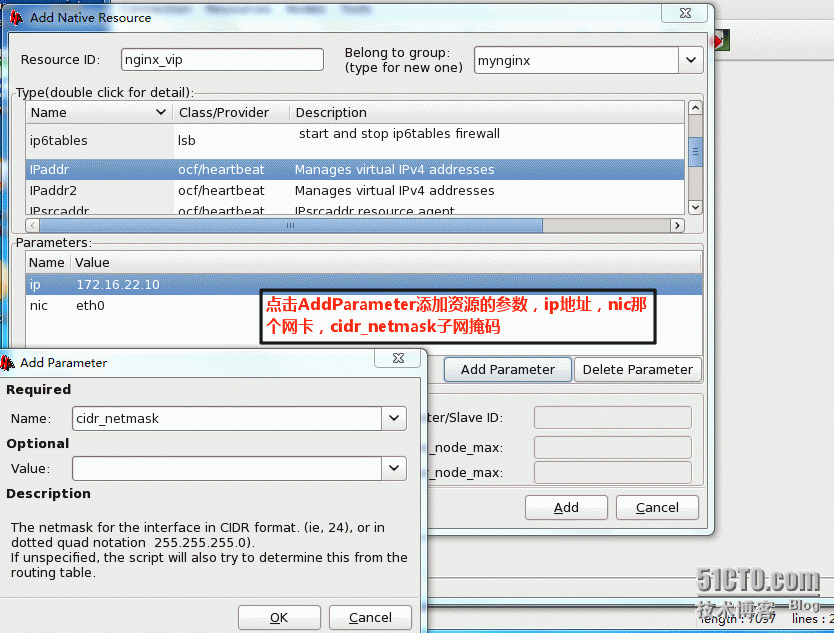
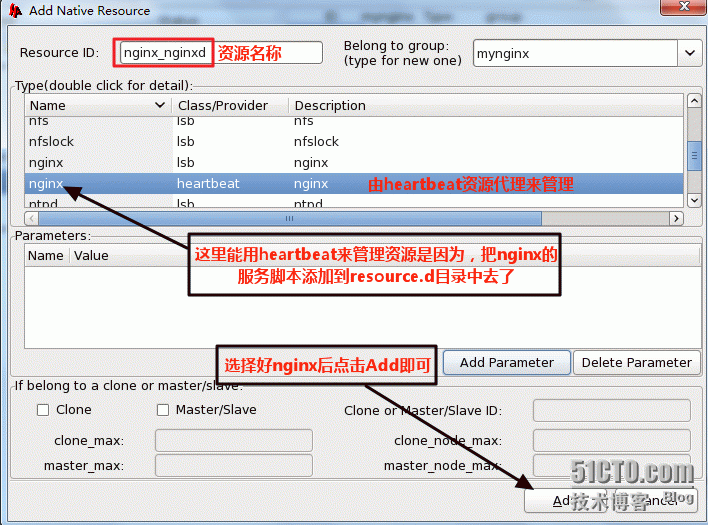
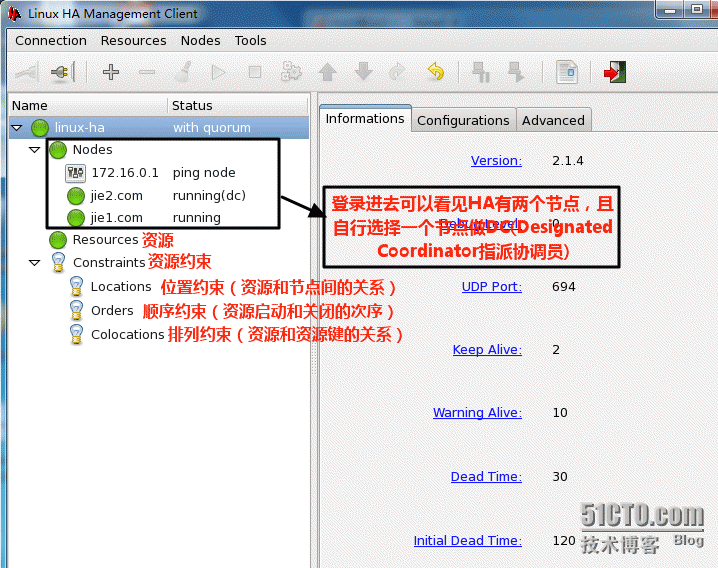
    利用图形化界面的crm配置heartbeat的资源

    [root@jie1 resource.d]#hb_gui & 运行图形化界面

    105846256.png

    105903633.png

    105921122.png

    105937207.png

    105951360.png

    110018164.png

    110035365.png

    110050177.png

    110105569.png

    110134852.png

    110153714.png

    110211159.png

    自此heartbeat实现了nginx的高可用

    三、配置LB负载均衡集群

    四、配置反向代理

    五、配置动静分离

    由于三四五都只需要在nginx的配置文件中实现,博主在此直接全部配置好

    1)、让nginx支持fastCGI,修改fastcgi_param文件为以下内

    1
    2
    3
    4
    5
    6
    7
    8
    9
    10
    11
    12
    13
    14
    15
    16
    17
    18
    19
    [root@jie1 /]# cd /etc/nginx/
    [root@jie1 nginx]# vim fastcgi_params
    fastcgi_param  GATEWAY_INTERFACE  CGI/1.1;
    fastcgi_param  SERVER_SOFTWARE    nginx;
    fastcgi_param  QUERY_STRING       $query_string;
    fastcgi_param  REQUEST_METHOD     $request_method;
    fastcgi_param  CONTENT_TYPE       $content_type;
    fastcgi_param  CONTENT_LENGTH     $content_length;
    fastcgi_param  SCRIPT_FILENAME    $document_root$fastcgi_script_name;
    fastcgi_param  SCRIPT_NAME        $fastcgi_script_name;
    fastcgi_param  REQUEST_URI        $request_uri;
    fastcgi_param  DOCUMENT_URI       $document_uri;
    fastcgi_param  DOCUMENT_ROOT      $document_root;
    fastcgi_param  SERVER_PROTOCOL    $server_protocol;
    fastcgi_param  REMOTE_ADDR        $remote_addr;
    fastcgi_param  REMOTE_PORT        $remote_port;
    fastcgi_param  SERVER_ADDR        $server_addr;
    fastcgi_param  SERVER_PORT        $server_port;
    fastcgi_param  SERVER_NAME        $server_name;

    2)、修改nginx的配置文件

    1
    2
    3
    4
    5
    6
    7
    8
    9
    10
    11
    12
    13
    14
    15
    16
    17
    18
    19
    20
    21
    22
    23
    24
    25
    26
    27
    28
    29
    30
    31
    32
    33
    34
    35
    36
    37
    38
    39
    [root@jie1 ~]# cd /etc/nginx/
    [root@jie1 nginx]# grep -v "#" nginx.conf| grep -v "^$"
    worker_processes  1;
    events {
        worker_connections  1024;
    }
    http {
        include       mime.types;
        default_type  application/octet-stream;
        sendfile        on;
        keepalive_timeout  65;
        upstream webphpfpm {
            server 172.16.22.4:9000;
            server 172.16.22.5:9000;
         }  #upstream模块定义负载均衡,此定义php-fpm的负载均衡
        server {
            listen       80;
            server_name  localhost;
            location / {
                root   /web;
                index  index.php  index.html index.htm;
            }
            error_page   500 502 503 504  /50x.html;
            location = /50x.html {
                root   html;
            }
            location ~ .(html|htm|gif|jpg|jpeg|bmp|png|ico|txt|js|css)$ {
                  proxy_pass  http://172.16.22.3;
            }  #proxy_pass定义静态请求的反向代理
            location ~ .(php|css|jsp)$ {
                root      /webphp;  #此处定义后端php-fpm服务器的网页存放路
                                     径,后端此服务器必须有此目录
                fastcgi_pass   webphpfpm;
                fastcgi_index  index.php;
                fastcgi_param  SCRIPT_FILENAME  /scripts$fastcgi_script_name;
                include        fastcgi_params;
            #动态请求提交给后端的php-fpm服务器,webphpfpm为此前定义负载均衡的名称
        }
    }

    3)、复制nginx主服务器的配置文件和支持fastcgi的文件到nginx备服务器上

    1
    2
    [root@jie1 nginx]# scp nginx.conf  172.16.22.2:/etc/nginx/
    [root@jie1 nginx]# scp fastcgi_params 172.16.22.2:/etc/nginx/

    六、测试

    测试文件的准备

    Apache服务器上面建立网页文件

    1
    2
    3
    4
    5
    6
    7
    [root@jie3 html]# pwd
    /var/www/html
    [root@jie3 html]# ls
    1.jpeg  index.html   在网页根目录下存放一个测试文件和一张图片用于测试
    [root@jie3 html]# cat index.html
    <h1>this is Apache server</h1>
    [root@jie3 html]#

    所有的php-fpm服务器上面建立网页文件,在生产环境中必须保持一样

    php-fpm1服务器的测试页面

    1
    2
    3
    4
    5
    6
    7
    8
    9
    10
    11
    12
    13
    14
    15
    16
    17
    18
    19
    20
    [root@jie4 webphp]# pwd
    /webphp    #此文件夹是存放网页文件的根目录,是在nginx里面指定的目录
    [root@jie4 webphp]# ls
    index.php  testdb.php  test.php
    [root@jie4 webphp]# cat index.php   测试页面
    <h1> this is php-fpm1 server </h1>
    [root@jie4 webphp]# cat test.php   测试phpinfo页面
    <h1>php-fpm1</h1>
    <?php
    phpinfo();
    ?>
    [root@jie4 webphp]# cat testdb.php   测试连接数据库的页面
    <h1>php-fpm1</h1>
    <?php
    $link=mysql_connect('172.16.22.6','root','mypass');
    if ($link) echo  "mysql test success!!";
    else echo "mysql test failed!!!";
    mysql_close();
    ?>
    [root@jie4 webphp]#

    php-fpm2服务器的测试页面

    1
    2
    3
    4
    5
    6
    7
    8
    9
    10
    11
    12
    13
    14
    15
    16
    17
    18
    19
    20
    [root@jie5 webphp]# pwd
    /webphp
    [root@jie5 webphp]# ls
    index.php  testdb.php  test.php
    [root@jie5 webphp]# cat index.php
    <h1> this is php-fpm2 server </h1>
    [root@jie5 webphp]# cat test.php
    <h1>php-fpm2</h1>
    <?php
    phpinfo();
    ?>
    [root@jie5 webphp]# cat testdb.php
    <h1>php-fpm2</h1>
    <?php
    $link=mysql_connect('172.16.22.6','root','mypass');
    if ($link) echo  "mysql test success!!";
    else echo "mysql test failed!!!";
    mysql_close();
    ?>
    [root@jie5 webphp]#


    1)测试动静分离

    访问的是vip的地址,静态网页文件和图片都会被nginx代理到Apache服务器上,

    115155595.png

    115805770.png

    测试动态的网页文件,被nginx代理到php-fpm服务器上

    115725818.png

    2)测试负载均衡

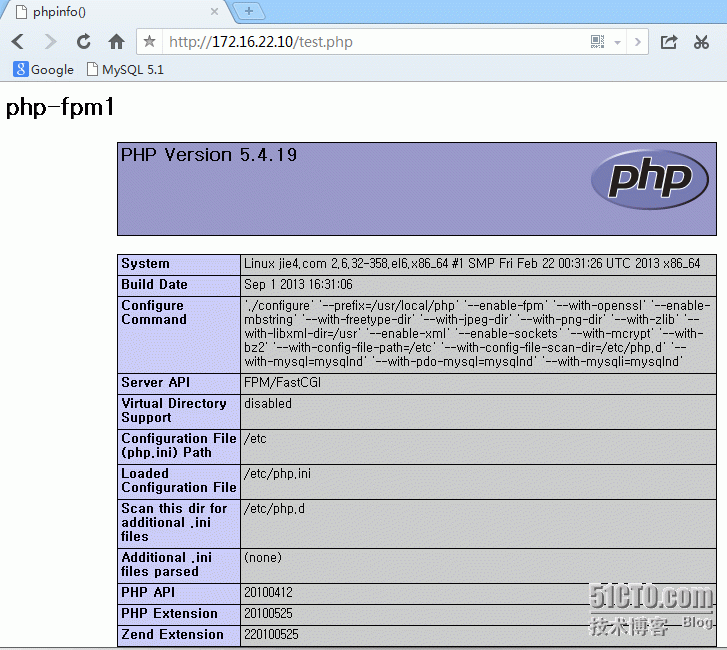
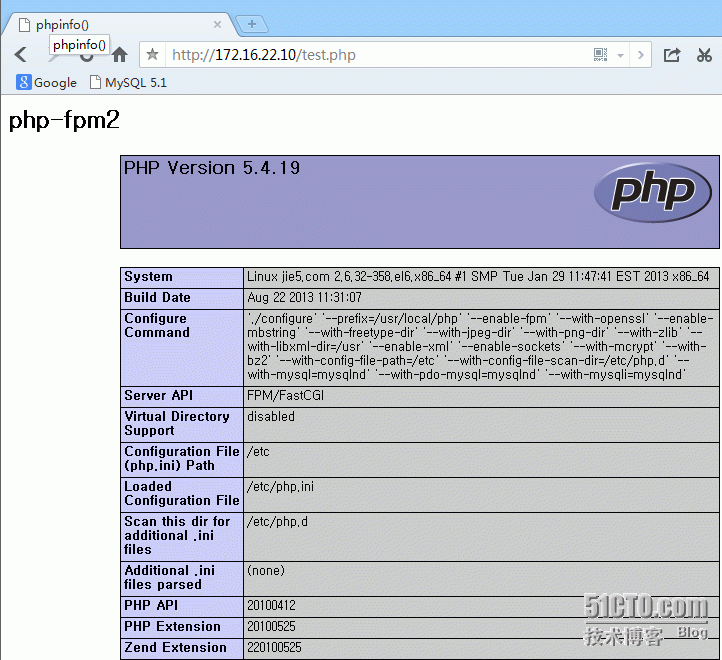
    测试phpinfo文件,多测试几次看看是不是负载到不同的php-fpm服务器上

    120037701.png

    120057202.png


    3)测试mysql

    测试是否可以连接mysql的测试文件

    120249664.png

    120306382.png

    4)测试高可用

    用heartbeat宕到nginx主服务器,看nginx备服务器是否继续提供服务

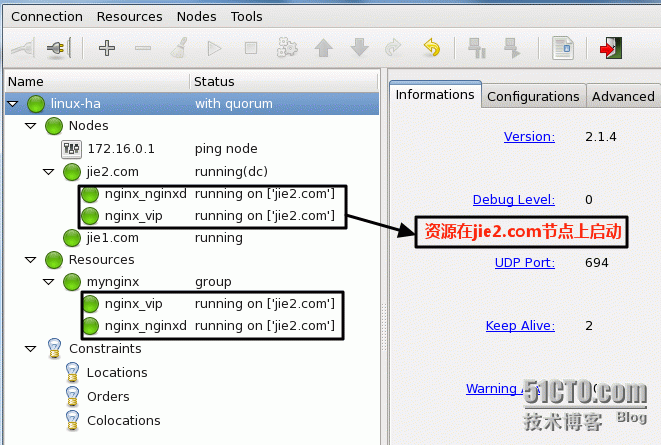
    现在看见资源都运行nginx主服务器上

    120913982.png

    停掉nginx主服务器的heartbeat,看资源是否在nginx备服务器上自动启动

    1
    2
    3
    4
    5
    6
    [root@jie1 nginx]# service heartbeat status
    heartbeat OK [pid 4294 et al] is running on jie1.com [jie1.com]...
    [root@jie1 nginx]# service heartbeat stop
    Stopping High-Availability services:
    Done.
    [root@jie1 nginx]#

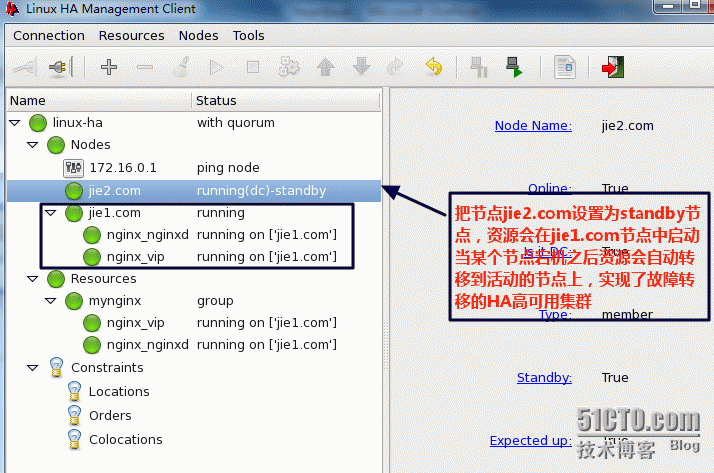
    可以看见nginx主服务器jie1.com节点宕机之后nginx备服务器自行启动并抢占资源

    122159369.png

    自此heartbeat+nginx实现HA的高可用和LB负载均衡已经完成
  • 相关阅读:
    【Solr】新建core后,启动服务访问web报错 HTTP Status 503
    【Tomcat】tomcat报连接超时错误
    【Tomcat】tomcat报错 removeGeneratedClassFiles failed
    【MongoDB】MongoDb的“not master and slaveok=false”错误及解决方法
    【Solr】 solr对拼音搜索和拼音首字母搜索的支持
    【Junit】The import org.junit.Test conflicts with a type defined in the same file报错
    maven的pom.xml文件报错问题
    ubuntu卸载virtualbox
    ClassNotFoundException: INameEnvironment
    详解为什么32位系统只能用4G内存.
  • 原文地址:https://www.cnblogs.com/sysk/p/4878083.html
Copyright © 2020-2023  润新知