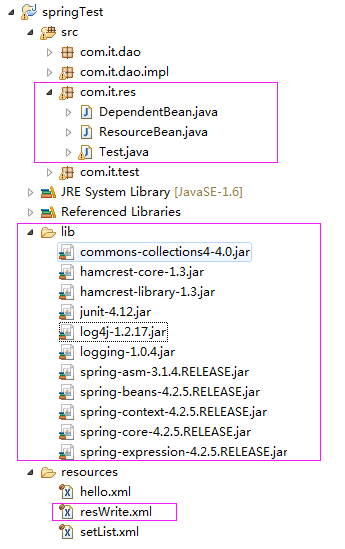
项目结构如下:

ResourceBean.java代码:

 1 package com.it.res;
 2
 3 import java.io.File;
 4 import java.io.FileNotFoundException;
 5 import java.io.FileOutputStream;
 6 import java.io.IOException;
 7
 8 public class ResourceBean {
 9
10     private FileOutputStream out;
11     private File file;
12
13     public void init(){
14         System.out.println("初始化的方法!!!!!--->加载资源");
15         try {
16             this.out = new FileOutputStream(file);
17
18         } catch (FileNotFoundException e) {
19             e.printStackTrace();
20         }
21     }
22
23
24     public void destroy(){
25         System.out.println("销毁的方法!!!--->清理内存");
26         try {
27             out.close();
28         } catch (IOException e) {
29             e.printStackTrace();
30         }
31     }
32
33     public FileOutputStream getOut(){
34         return out;
35     }
36
37     public void setFile(File file){
38         this.file=file;
39     }
40 }
DependentBean.java代码:

 1 package com.it.res;
 2
 3 import java.io.IOException;
 4
 5 public class DependentBean {
 6     ResourceBean bean;
 7     public void write(String ss){
 8         System.out.println("写入资源");
 9         try {
10             bean.getOut().write(ss.getBytes());
11         } catch (IOException e) {
12             e.printStackTrace();
13         }
14     }
15
16     public void init(){
17         System.out.println("depen--->初始化");
18         try {
19             bean.getOut().write("depen---->初始化".getBytes());
20         } catch (IOException e) {
21             e.printStackTrace();
22         }
23     }
24
25     public void destroy(){
26         System.out.println("depen--->销毁");
27         try {
28             bean.getOut().write("depen--->销毁".getBytes());
29         } catch (IOException e) {
30             e.printStackTrace();
31         }
32     }
33
34     public ResourceBean getBean() {
35         return bean;
36     }
37
38     //设置注入
39     public void setBean(ResourceBean bean) {
40         this.bean = bean;
41     }
42
43
44
45 }
resWrite.xml代码:

 1 <?xml version="1.0" encoding="UTF-8"?>
 2 <beans
 3 xmlns="http://www.springframework.org/schema/beans"
 4 xmlns:xsi="http://www.w3.org/2001/XMLSchema-instance"
 5 xmlns:context="http://www.springframework.org/schema/context"
 6 xsi:schemaLocation="
 7 http://www.springframework.org/schema/beans        http://www.springframework.org/schema/beans/spring-beans-3.0.xsd
 8 http://www.springframework.org/schema/context                http://www.springframework.org/schema/context/spring-context-3.0.xsd">
 9
10
11     <!-- init-method  指定初始化方法,在构造器注入和setter注入完毕后执行。    destroy-method   只有“singleton”作用域能销毁,“prototype”作用域的一定不能,其他作用域不一定能    lazy-init="true"表示懒加载,不提前初始化Bean,而是只有在真正使用时才创建及初始化Bean-->
12      <bean id="resourceBean" class="com.it.res.ResourceBean" init-method="init" destroy-method="destroy" lazy-init="true">
13          <property name="file" value="F:/test/a.txt"> </property><!-- Spring容器能自动把字符串转换为java.io.File   -->
14      </bean>
15
16     <!-- 指定depends-on  则resourceBean会在dependentBean之前初始化,在dependentBean销毁之后销毁-->
17     <bean id="dependentBean" class="com.it.res.DependentBean" init-method="init" destroy-method="destroy" depends-on="resourceBean">
18         <property name="bean" ref="resourceBean"></property>
19     </bean>
20
21 </beans>
测试类Test.java代码:

 1 package com.it.res;
 2
 3 import org.springframework.context.support.FileSystemXmlApplicationContext;
 4
 5 public class Test {
 6
 7     @org.junit.Test
 8     public void testDepen(){
 9         FileSystemXmlApplicationContext app = new FileSystemXmlApplicationContext("resources/resWrite.xml");
10         //一定要注册销毁回调,否则我们定义的销毁方法不执行
11         app.registerShutdownHook();
12         DependentBean bean = (DependentBean) app.getBean("dependentBean");
13         bean.write("
德玛西亚
");
14     }
15 }
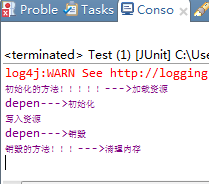
测试完成,控制打印如下:

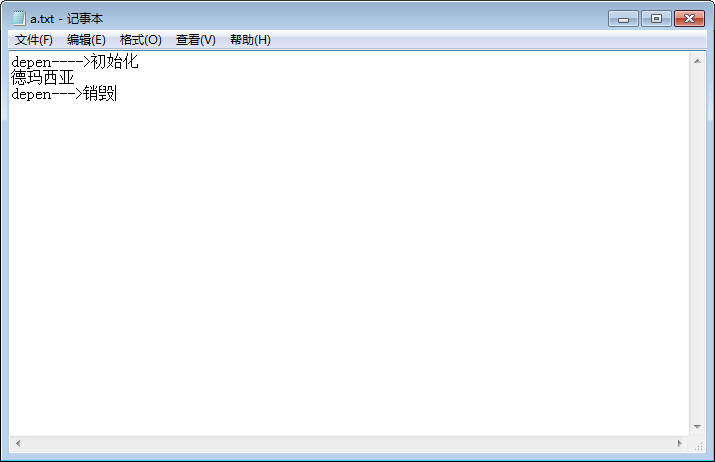
文件写入:

