Babel 转译器 这是react自带的一个编译器
props和states一个是组件外部的,一个是组件内部的
组件 & Props
组件可以将UI切分成一些的独立的、可复用的部件,这样你就只需专注于构建每一个单独的部件。
组件从概念上看就像是函数,它可以接收任意的输入值(称之为“props”),并返回一个需要在页面上展示的React元素。
函数定义/类定义组件
定义一个组件最简单的方式是使用JavaScript函数:
function Welcome(props) {
  return <h1>Hello, {props.name}</h1>;
}
该函数是一个有效的React组件,它接收一个单一的“props”对象并返回了一个React元素。我们之所以称这种类型的组件为函数定义组件,是因为从字面上来看,它就是一个JavaScript函数。
你也可以使用 ES6 class 来定义一个组件:
class Welcome extends React.Component {
  render() {
    return <h1>Hello, {this.props.name}</h1>;
  }
}
上面两个组件在React中是相同的。
我们将在下一节讨论类的一些额外特性。在那之前,我们都将使用较为简洁的函数定义组件。
组件渲染
在前面,我们遇到的React元素都只是DOM标签:
const element = <div />;
然而,React元素也可以是用户自定义的组件:
const element = <Welcome name="Sara" />;
当React遇到的元素是用户自定义的组件,它会将JSX属性作为单个对象传递给该组件,这个对象称之为“props”。
例如,这段代码会在页面上渲染出”Hello,Sara”:
function Welcome(props) {
  return <h1>Hello, {props.name}</h1>;
}

const element = <Welcome name="Sara" />;
ReactDOM.render(
  element,
  document.getElementById('root')
);
我们来回顾一下在这个例子中发生了什么:
- 我们对
<Welcome name="Sara" />元素调用了ReactDOM.render()方法。 - React将
{name: 'Sara'}作为props传入并调用Welcome组件。 Welcome组件将<h1>Hello, Sara</h1>元素作为结果返回。- React DOM将DOM更新为
<h1>Hello, Sara</h1>。
警告:
组件名称必须以大写字母开头。
例如,
<div />表示一个DOM标签,但<Welcome />表示一个组件,并且在使用该组件时你必须定义或引入它。
组合组件
组件可以在它的输出中引用其它组件,这就可以让我们用同一组件来抽象出任意层次的细节。在React应用中,按钮、表单、对话框、整个屏幕的内容等,这些通常都被表示为组件。
例如,我们可以创建一个App组件,用来多次渲染Welcome组件:
function Welcome(props) {
  return <h1>Hello, {props.name}</h1>;
}

function App() {
  return (
    <div>
      <Welcome name="Sara" />
      <Welcome name="Cahal" />
      <Welcome name="Edite" />
    </div>
  );
}

ReactDOM.render(
  <App />,
  document.getElementById('root')
);
通常,一个新的React应用程序的顶部是一个App组件。但是,如果要将React集成到现有应用程序中,则可以从下而上使用像Button这样的小组件作为开始,并逐渐运用到视图层的顶部。
警告:
组件的返回值只能有一个根元素。这也是我们要用一个
<div>来包裹所有<Welcome />元素的原因。
提取组件
你可以将组件切分为更小的组件,这没什么好担心的。
例如,来看看这个Comment组件:
function Comment(props) {
  return (
    <div className="Comment">
      <div className="UserInfo">
        <img className="Avatar"
          src={props.author.avatarUrl}
          alt={props.author.name}
        />
        <div className="UserInfo-name">
          {props.author.name}
        </div>
      </div>
      <div className="Comment-text">
        {props.text}
      </div>
      <div className="Comment-date">
        {formatDate(props.date)}
      </div>
    </div>
  );
}
这个组件接收author(对象)、text(字符串)、以及date(Date对象)作为props,用来描述一个社交媒体网站上的评论。
这个组件由于嵌套,变得难以被修改,可复用的部分也难以被复用。所以让我们从这个组件中提取出一些小组件。
首先,我们来提取Avatar组件:
function Avatar(props) {
  return (
    <img className="Avatar"
      src={props.user.avatarUrl}
      alt={props.user.name}
    />
  );
}
Avatar作为Comment的内部组件,不需要知道是否被渲染。因此我们将author改为一个更通用的名字user。
我们建议从组件自身的角度来命名props,而不是根据使用组件的上下文命名。
现在我们可以对Comment组件做一些小小的调整:
function Comment(props) {
  return (
    <div className="Comment">
      <div className="UserInfo">
        <Avatar user={props.author} />
        <div className="UserInfo-name">
          {props.author.name}
        </div>
      </div>
      <div className="Comment-text">
        {props.text}
      </div>
      <div className="Comment-date">
        {formatDate(props.date)}
      </div>
    </div>
  );
}
接下里,我们要提取一个UserInfo组件,用来渲染Avatar旁边的用户名:
function UserInfo(props) {
  return (
    <div className="UserInfo">
      <Avatar user={props.user} />
      <div className="UserInfo-name">
        {props.user.name}
      </div>
    </div>
  );
}
这可以让我们进一步简化Comment组件:
function Comment(props) {
  return (
    <div className="Comment">
      <UserInfo user={props.author} />
      <div className="Comment-text">
        {props.text}
      </div>
      <div className="Comment-date">
        {formatDate(props.date)}
      </div>
    </div>
  );
}
提取组件一开始看起来像是一项单调乏味的工作,但是在大型应用中,构建可复用的组件完全是值得的。当你的UI中有一部分重复使用了好几次(比如,Button、Panel、Avatar),或者其自身就足够复杂(比如,App、FeedStory、Comment),类似这些都是抽象成一个可复用组件的绝佳选择,这也是一个比较好的做法。
Props的只读性
无论是使用函数或是类来声明一个组件,它决不能修改它自己的props。来看这个sum函数:
function sum(a, b) {
  return a + b;
}
类似于上面的这种函数称为“纯函数”,它没有改变它自己的输入值,当传入的值相同时,总是会返回相同的结果。
与之相对的是非纯函数,它会改变它自身的输入值:
function withdraw(account, amount) {
  account.total -= amount;
}
React是非常灵活的,但它也有一个严格的规则:
所有的React组件必须像纯函数那样使用它们的props。
当然,应用的界面是随时间动态变化的,我们将在下一节介绍一种称为“state”的新概念,State可以在不违反上述规则的情况下,根据用户操作、网络响应、或者其他状态变化,使组件动态的响应并改变组件的输出。
this.props.children
this.props 对象的属性与组件的属性一一对应,但是有一个例外,就是 this.props.children 属性。它表示组件的所有子节点(查看 demo05)。
var NotesList = React.createClass({
  render: function() {
    return (
      <ol>
      {
        React.Children.map(this.props.children, function (child) {
          return <li>{child}</li>;
        })
      }
      </ol>
    );
  }
});

ReactDOM.render(
  <NotesList>
    <span>hello</span>
    <span>world</span>
  </NotesList>,
  document.body
);
上面代码的 NoteList 组件有两个 span 子节点,它们都可以通过 this.props.children 读取,运行结果如下。

这里需要注意, this.props.children 的值有三种可能:如果当前组件没有子节点,它就是 undefined ;如果有一个子节点,数据类型是 object ;如果有多个子节点,数据类型就是 array 。所以,处理 this.props.children 的时候要小心。
React 提供一个工具方法 React.Children 来处理 this.props.children 。我们可以用 React.Children.map 来遍历子节点,而不用担心 this.props.children 的数据类型是 undefined 还是 object。更多的 React.Children 的方法,请参考官方文档。
jsx代表objects.
Hello.js
import React from 'react';

export default ({ name }) => <h1>Hello {name}!</h1>;
<div id="root"></div>
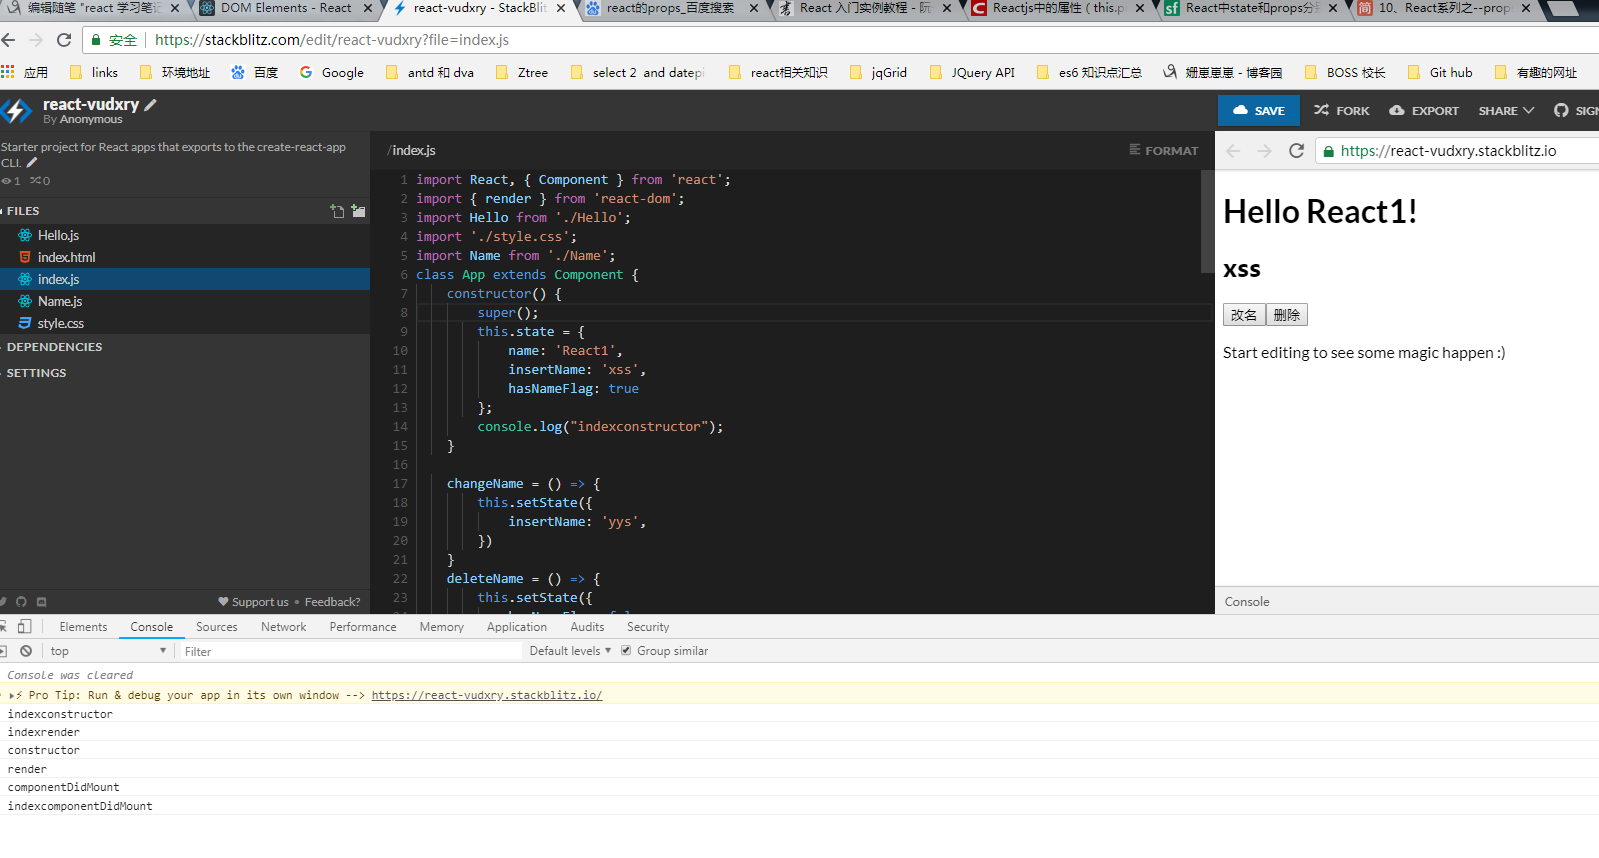
import React, { Component } from 'react';
import { render } from 'react-dom';
import Hello from './Hello';
import './style.css';
import Name from './Name';
class App extends Component {
    constructor() {
        super();
        this.state = {
            name: 'React1',
            insertName: 'xss',
            hasNameFlag: true
        };
        console.log("indexconstructor");
    }

    changeName = () => {
        this.setState({
            insertName: 'yys',
        })
    }
    deleteName = () => {
        this.setState({
            hasNameFlag: false
        })

    }
    compomentwillMount() {
        console.log("indexcompomentwillMount");//dom放进去之前,只执行一次
    }

    componentDidMount() {
        console.log("indexcomponentDidMount");//dom放进去之后,只执行一次
    }
    componentWillReceiveProps(nextProps) {//有改变就执行,修改states的时候用到

        console.log("indexcomponentWillReceiveProps");
    }
    componentwillupDate() {//dom更新之前
        console.log("indexcomponentwillupDate");
    }
    componentDidUpdate() {
        console.log("indexcomponentDidUpdate");//dom更新之后
    }

    componentWillUnmount() {
        console.log("indexcomponentWillUnmount");// dom组件被移除之前被调用,可以用于做一些清理工作

    }
    render() {
        console.log("indexrender");
        const { insertName, hasNameFlag } = this.state;
        const a = (
            <h1 className={"greeting"} title="yys">
                Hello, world!
      </h1>
        );
        let name = null;
        if (hasNameFlag) {
            name = <Name name={insertName} >

                <span>world</span></Name>;
        }
        return (
            <div>
                <Hello name={this.state.name} />
                {name}
                <button onClick={this.changeName}>改名</button>
                <button onClick={this.deleteName}>删除</button>
                <p>
                    Start editing to see some magic happen :)
        </p>
            </div>
        );
    }
}

render(<App />, document.getElementById('root'));
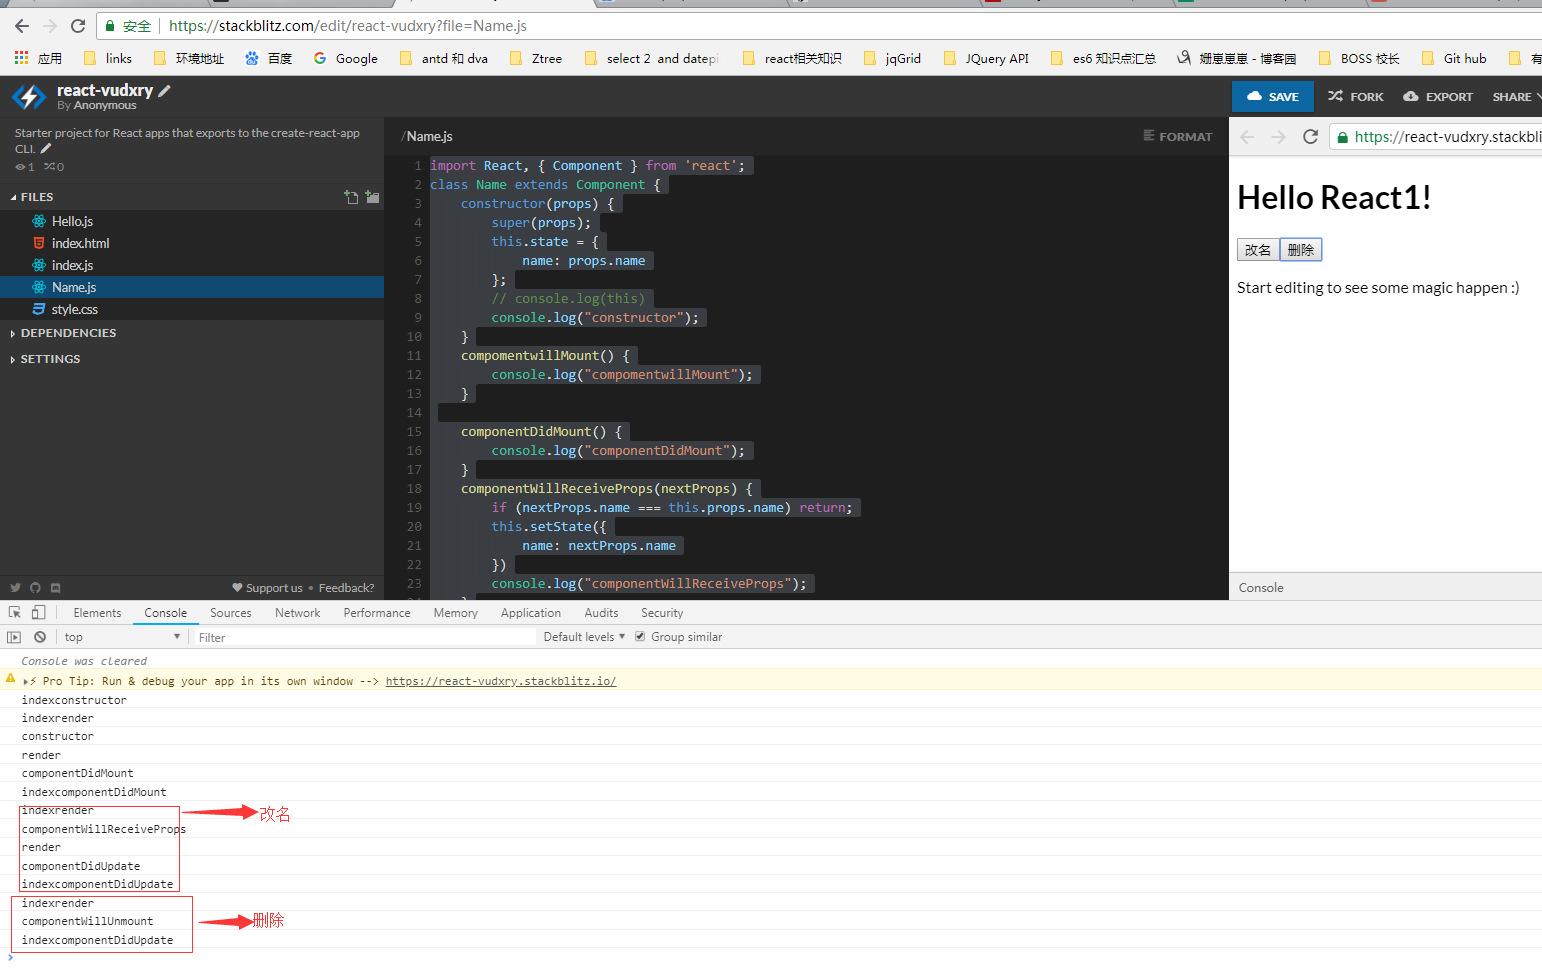
Name.js
import React, { Component } from 'react';
class Name extends Component {
    constructor(props) {
        super(props);
        this.state = {
            name: props.name
        };
        // console.log(this)
        console.log("constructor");
    }
    compomentwillMount() {
        console.log("compomentwillMount");
    }

    componentDidMount() {
        console.log("componentDidMount");
    }
    componentWillReceiveProps(nextProps) {
        if (nextProps.name === this.props.name) return;
        this.setState({
            name: nextProps.name
        })
        console.log("componentWillReceiveProps");
    }
    componentwillupDate() {
        console.log("componentwillupDate");
    }
    componentDidUpdate() {
        console.log("componentDidUpdate");
    }

    componentWillUnmount() {
        console.log("componentWillUnmount");

    }
    render() {
        console.log("render");
        const { name } = this.state;
        return <h2>{name}</h2>;
    }
}

export default Name;
第一次刷新进入时:
点击修改时

点击删除时:
constructor 1 只执行一次
compomentwillMount 1 dom放进去之前,也是只执行一次
componentDidMount 1 dom放进去之后,也是只执行一次
componentwillReceIveProps 有改变就执行,修改states的时候用到
componentwillupDate dom更新之前
componentDidupDate dom更新之后
OK. so here goes. If you have a simple structure with a parent and 2 children like this:
<Parent>
  <Child/>
  <Child/>
</Parent>
Then the sequence of events firing will be:
<Parent> componentWillMount()<Parent> render(), which starts to render children<Child> componentWillMount()of the first child<Child> render()of the first child<Child> componentWillMount()of the second child<Child> render()of the second child<Child> componentDidMount()of the first child (these will start only after the last render in the tree has run)<Child> componentDidMount()of the second child<Parent> componentDidMount()(this one will run only after its last child has runcomponentDidMount)