Vue实现数据双向绑定的原理:Object.defineProperty()
vue实现数据双向绑定主要是:采用数据劫持结合发布者-订阅者模式的方式,通过Object.defineProperty()来劫持各个属性的setter,getter,在数据变动时发布消息给订阅者,触发相应监听回调。当把一个普通 Javascript 对象传给 Vue 实例来作为它的 data 选项时,Vue 将遍历它的属性,用 Object.defineProperty 将它们转为 getter/setter。用户看不到 getter/setter,但是在内部它们让 Vue 追踪依赖,在属性被访问和修改时通知变化。
vue的数据双向绑定 将MVVM作为数据绑定的入口,整合Observer,Compile和Watcher三者,通过Observer来监听自己的model的数据变化,通过Compile来解析编译模板指令(vue中是用来解析 {{}}),最终利用watcher搭起observer和Compile之间的通信桥梁,达到数据变化 —>视图更新;视图交互变化(input)—>数据model变更双向绑定效果。
<!DOCTYPE html>
<html>
    <head>
        <meta charset="UTF-8">
        <title></title>
    </head>
    <body>


        <body>
    <div id="app">
    <input type="text" id="txt">
    <p id="show"></p>
</div>
</body>
<script type="text/javascript">
    var obj = {}
    Object.defineProperty(obj, 'txt', {
        get: function () {
            return obj
        },
        set: function (newValue) {
            document.getElementById('txt').value = newValue
            document.getElementById('show').innerHTML = newValue
        }
    })
    document.addEventListener('keyup', function (e) {
        obj.txt = e.target.value
    })
</script>
    </body>
</html>
Vue的生命周期
beforeCreate(创建前) 在数据观测和初始化事件还未开始
created(创建后) 完成数据观测,属性和方法的运算,初始化事件,$el属性还没有显示出来
beforeMount(载入前) 在挂载开始之前被调用,相关的render函数首次被调用。实例已完成以下的配置:编译模板,把data里面的数据和模板生成html。注意此时还没有挂载html到页面上。
mounted(载入后) 在el 被新创建的 vm.$el 替换,并挂载到实例上去之后调用。实例已完成以下的配置:用上面编译好的html内容替换el属性指向的DOM对象。完成模板中的html渲染到html页面中。此过程中进行ajax交互。
beforeUpdate(更新前) 在数据更新之前调用,发生在虚拟DOM重新渲染和打补丁之前。可以在该钩子中进一步地更改状态,不会触发附加的重渲染过程。
updated(更新后) 在由于数据更改导致的虚拟DOM重新渲染和打补丁之后调用。调用时,组件DOM已经更新,所以可以执行依赖于DOM的操作。然而在大多数情况下,应该避免在此期间更改状态,因为这可能会导致更新无限循环。该钩子在服务器端渲染期间不被调用。
beforeDestroy(销毁前) 在实例销毁之前调用。实例仍然完全可用。
destroyed(销毁后) 在实例销毁之后调用。调用后,所有的事件监听器会被移除,所有的子实例也会被销毁。该钩子在服务器端渲染期间不被调用。
父子 组件的加载顺序
同步:
import Page from '@/components/page' // 同步方式引入
父子组件的执行顺序为,
父组件beforeCreated
父组件created
父组件beforeMounted
子组件beforeCreated
子组件created
子组件beforeMounted
孙组件beforeCreated
孙组件created
孙组件beforeMounted
孙组件mounted
子组件mounted
父组件mounted
异步:
const Page = () => import ('@/components/page') // 异步引入
父组件beforeCreated
父组件created
父组件beforeMounted
父组件mounted
子组件beforeCreated
子组件created
子组件beforeMounted
子组件mounted
孙组件beforeCreated
孙组件created
孙组件beforeMounted
孙组件mounted
父子 组件的销毁顺序
beforeDestroy钩子函数在实例销毁之前调用。在这一步,实例仍然完全可用。
destroyed钩子函数在Vue 实例销毁后调用。调用后,Vue 实例指示的所有东西都会解绑定,所有的事件监听器会被移除,所有的子实例也会被销毁(也就是说子组件也会触发相应的函数)。这里的销毁并不指代'抹去',而是表示'解绑'。
销毁时beforeDestory函数的传递顺序为由父到子,destory的传递顺序为由子到父。
.第一次页面加载会触发哪几个钩子?
答:会触发 下面这几个beforeCreate, created, beforeMount, mounted 。
.vue.js的两个核心是什么?
答:数据驱动、组件系统
vue3 proxy的优缺点
性能优化 内存减少
兼容低,没错,IE11都不支持Proxy
vue3的整个数据监听系统都进行了重构,由es5的Object.defineProperty改为了es6的proxy。尤大说,这个新的数据监听系统带来了初始化速度加倍同时内存占用减半的效果。
Vue 2.x里,是通过 递归 + 遍历 data对象来实现对数据的监控的,
Vue 3.x 使用Proxy。
这里面有两点需要强调下:
1、Object.defineProperty需要遍历所有的属性,这就造成了如果vue对象的data/computed/props中的数据规模庞大,那么遍历起来就会慢很多。
2、同样,如果vue对象的data/computed/props中的数据规模庞大,那么Object.defineProperty需要监听所有的属性的变化,那么占用内存就会很大。
Object.defineProperty VS Proxy
Object.definePropety的缺点
除了上面讲,在数据量庞大的情况下Object.defineProperty的两个缺点外,Object.defineProperty还有以下缺点。
1、无法监听es6的Set、WeakSet、Map、WeakMap的变化;
2、无法监听Class类型的数据;
3、属性的新加或者删除也无法监听;
4、数组元素的增加和删除也无法监听 (性能考虑,所以无法监听 )
Proxy应运而生
针对Object.defineProperty的缺点,Proxy都能够完美得解决,它唯一的缺点就是,对IE不友好,所以vue3在检测到如果是使用IE的情况下(没错,IE11都不支持Proxy),会自动降级为Object.defineProperty的数据监听系统。所以如果是IE用户,那么就享受不到速度加倍,内存减半的体验了。
Object.defineProperty初始化
const data = {}
for(let i = 0; i <= 100000; i++) {
  data['pro' + i] = i
}

function defineReactive(data, property) {
  let value = data[property]
  Object.defineProperty(data, property, {
    get() {
      // console.log(`读取${property}的值为${value}`)
      return value
    },
    set(newVal) {
      // console.log(`更新${property}的值为${newVal}`)
    }
  })
}

for(let property in data) {
  defineReactive(data, property)
}
Proxy初始化
const data = {}
for(let i = 0; i <= 100000; i++) {
  data['pro' + i] = i
}
var proxyData = new Proxy(data, {
  get(target, property, receiver) {
    // console.log(`读取${property}的值为${target[property]}`)
    return Reflect.get(target, property, receiver);
  },
  set(target, property, value, receiver) {
   //  console.log(`更新${property}的值为${value}`)
    return Reflect.set(target, property, value, receiver);
  }
})
ES6 原生提供的 Proxy 语法很简单,用法如下:
let proxy = new Proxy(target, handler);
let obj = {
        a : 1
    }
    let proxyObj = new Proxy(obj,{
        get : function (target,prop) {
            return prop in target ? target[prop] : 0
        },
        set : function (target,prop,value) {
            target[prop] = 888;
        }
    })

    console.log(proxyObj.a);        // 1
    console.log(proxyObj.b);        // 0

    proxyObj.a = 666;
    console.log(proxyObj.a)         // 888
下面的例子 给予proxy的vue demo
<!DOCTYPE html>
<html lang="en">
<head>
	<meta charset="UTF-8">
	<meta name="viewport" content="width=device-width, initial-scale=1.0">
	<meta http-equiv="X-UA-Compatible" content="ie=edge">
	<title>简单版mvvm</title>
</head>
<body>
	<div id="app">
		<h1>开发语言:{{language}}</h1>
		<h2>组成部分:</h2>
		<ul>
			<li>{{makeUp.one}}</li>
			<li>{{makeUp.two}}</li>
			<li>{{makeUp.three}}</li>
		</ul>
		<h2>描述:</h2>
    <p>{{describe}}</p>
    <p>计算属性:{{sum}}</p>
    <input placeholder="123" v-module="language" />
	</div>
<script>
	function Mvvm(options = {}) {
		this.$options = options
		let data = this._data = this.$options.data
    let vm = initVm.call(this)
    initObserve.call(this, data)
    initComputed.call(this)
		new Compile(this.$options.el, vm)
		mounted.call(this._vm)
		return this._vm
	}

	function initVm () {
		this._vm = new Proxy(this, {
      get: (target, key, receiver) => {
        return this[key] || this._data[key] || this._computed[key]
      },
      set: (target, key, value) => {
        return Reflect.set(this._data, key, value)
      }
    })
    return this._vm
	}

	function initObserve(data) {
		this._data = observe(data)
	}

	function observe(data) {
		if (!data || typeof data !== 'object') return data
		return new Observe(data)
	}

  class Observe {
    constructor(data) {
      this.dep = new Dep()
      for (let key in data) {
        data[key] = observe(data[key])
      }
      return this.proxy(data)
    }
    proxy(data) {
      let dep = this.dep
      return new Proxy(data, {
        get: (target, prop, receiver) => {
          if (Dep.target) {
            dep.addSub(Dep.target)
          }
          return Reflect.get(target, prop, receiver)
        },
        set: (target, prop, value) => {
          const result = Reflect.set(target, prop, observe(value))
          dep.notify()
          return result
        }
      })
    }
  }

  class Compile{
    constructor (el, vm) {
      this.vm = vm
      this.element = document.querySelector(el)
      this.fragment = document.createDocumentFragment()
      this.init()
    }
    init() {
      let element = this.element
      this.fragment.append(element)
      this.replace(this.fragment)
      document.body.appendChild(this.fragment)
    }
    replace(frag) {
      let vm = this.vm
      Array.from(frag.childNodes).forEach(node => {
				let txt = node.textContent
        let reg = /{{(.*?)}}/g
        if (node.nodeType === 1) {
					let nodeAttr = node.attributes;
					Array.from(nodeAttr).forEach(attr => {
							let name = attr.name
							let exp = attr.value
							if (name.includes('v-')){
                node.value = vm[exp]
                node.addEventListener('input', e => {
                  let newVal = e.target.value
                  // 相当于给this.a赋了一个新值
                  // 而值的改变会调用set,set中又会调用notify,notify中调用watcher的update方法实现了更新
                  vm[exp] = newVal
                })
							}
					});
        } else if (node.nodeType === 3 && reg.test(txt)) {
					replaceTxt()
					function replaceTxt() {
						node.textContent = txt.replace(reg, (matched, placeholder) => {
							new Watcher(vm, placeholder, replaceTxt);   // 监听变化,进行匹配替换内容
							return placeholder.split('.').reduce((val, key) => {
								return val[key]
							}, vm)
						})
					}
				}
				if (node.childNodes && node.childNodes.length) {
					this.replace(node)
				}
			})
    }
  }

  class Dep {
    constructor() {
      this.subs = []
    }
    addSub(sub) {
			this.subs.push(sub)
		}
		notify() {
			this.subs.filter(item => typeof item !== 'string').forEach(sub => sub.update())
		}
  }

  class Watcher {
    constructor (vm, exp, fn) {
      this.fn = fn
      this.vm = vm
      this.exp = exp
      Dep.exp = exp
      Dep.target = this
      let arr = exp.split('.')
      let val = vm
      arr.forEach(key => {
        val = val[key]
      })
      Dep.target = null
    }
    update() {
      let exp = this.exp
			let arr = exp.split('.')
			let val = this.vm
			arr.forEach(key => {
				val = val[key]
			})
			this.fn(val)
		}
  }

	function initComputed() {
		let vm = this
		let computed = this.$options.computed
    vm._computed = {}
    if (!computed) return
		Object.keys(computed).forEach(key => {
      this._computed[key] = computed[key].call(this._vm)
      new Watcher(this._vm, key, val => {
        this._computed[key] = computed[key].call(this._vm)
      })
		})
	}

	function mounted() {
		let mounted = this.$options.mounted
		mounted && mounted.call(this)
	}

	// 写法和Vue一样
	let mvvm = new Mvvm({
		el: '#app',
		data: {
			language: 'Javascript',
			makeUp: {
				one: 'ECMAScript',
				two: '文档对象模型(DOM)',
				three: '浏览器对象模型(BOM)'
			},
			describe: '没什么产品是写不了的',
			a: 1,
			b: 2
		},
    computed: {
      sum() {
        return this.a + this.b
      }
		},
		mounted() {
			console.log('i am mounted', this.a)
		}
	})
</script>
</body>
</html>
参考 https://segmentfault.com/a/1190000015460479
Vue的路由实现:hash模式 和 history模式
hash模式:在浏览器中符号“#”,#以及#后面的字符称之为hash,用window.location.hash读取;
特点:hash虽然在URL中,但不被包括在HTTP请求中;用来指导浏览器动作,对服务端安全无用,hash不会重加载页面。
hash 模式下,仅 hash 符号之前的内容会被包含在请求中,如 http://www.xxx.com,因此对于后端来说,即使没有做到对路由的全覆盖,也不会返回 404 错误。
history模式:history采用HTML5的新特性;且提供了两个新方法:pushState(),replaceState()可以对浏览器历史记录栈进行修改,以及popState事件的监听到状态变更。
history 模式下,前端的 URL 必须和实际向后端发起请求的 URL 一致,如 http://www.xxx.com/items/id。后端如果缺少对 /items/id 的路由处理,将返回 404 错误。Vue-Router 官网里如此描述:“不过这种模式要玩好,还需要后台配置支持……所以呢,你要在服务端增加一个覆盖所有情况的候选资源:如果 URL 匹配不到任何静态资源,则应该返回同一个 index.html 页面,这个页面就是你 app 依赖的页面。”
Vuex和全局变量的概念区别
每一个 Vuex 应用的核心就是 store(仓库)。“store”基本上就是一个容器,它包含着你的应用中大部分的状态 (state)。Vuex 和单纯的全局对象有以下两点不同:1、Vuex 的状态存储是响应式的。当 Vue 组件从 store 中读取状态的时候,若 store 中的状态发生变化,那么相应的组件也会相应地得到高效更新。
2、Vuex和全局变量的概念区别
每一个 Vuex 应用的核心就是 store(仓库)。“store”基本上就是一个容器,它包含着你的应用中大部分的状态 (state)。Vuex 和单纯的全局对象有以下两点不同:
1、Vuex 的状态存储是响应式的。当 Vue 组件从 store 中读取状态的时候,若 store 中的状态发生变化,那么相应的组件也会相应地得到高效更新。
2、你不能直接改变 store 中的状态。改变 store 中的状态的唯一途径就是显式地提交 (commit) mutation。这样使得我们可以方便地跟踪每一个状态的变化,从而让我们能够实现一些工具帮助我们更好地了解我们的应用。、你不能直接改变 store 中的状态。改变 store 中的状态的唯一途径就是显式地提交 (commit) mutation。这样使得我们可以方便地跟踪每一个状态的变化,从而让我们能够实现一些工具帮助我们更好地了解我们的应用。

vue常用的修饰符?
答:.prevent: 提交事件不再重载页面;.stop: 阻止单击事件冒泡;.self: 当事件发生在该元素本身而不是子元素的时候会触发;.capture: 事件侦听,事件发生的时候会调用
vue等单页面应用及其优缺点
答:优点:Vue 的目标是通过尽可能简单的 API 实现响应的数据绑定和组合的视图组件,核心是一个响应的数据绑定系统。MVVM、数据驱动、组件化、轻量、简洁、高效、快速、模块友好。
缺点:不支持低版本的浏览器,最低只支持到IE9;不利于SEO的优化(如果要支持SEO,建议通过服务端来进行渲染组件);第一次加载首页耗时相对长一些;不可以使用浏览器的导航按钮需要自行实现前进、后退。
vue props 参数类型
props: {
  // 基础类型检测 (`null` 意思是任何类型都可以)
  propA: Number,
  // 多种类型
  propB: [String, Number],
  // 必传且是字符串
  propC: {
   type: String,
   required: true
  },
  // 数字,有默认值
  propD: {
   type: Number,
   default: 100
  },
  // 数组/对象的默认值应当由一个工厂函数返回
  propE: {
   type: Object,
   default: function () {
    return { message: 'hello' }
   }
  },
  // 自定义验证函数
  propF: {
   validator: function (value) {
    return value > 10
   }
  }
 }
refAge: {
type: Number,
default: 0
},
refName: {
type: String,
default: ''
},
hotDataLoading: {
type: Boolean,
default: false
},
hotData: {
type: Array,
default: () => {
return []
}
},
getParams: {
type: Function,
default: () => () => {}
},
meta: {
type: Object,
default: () => ({})
}
vue router
组件内的导航钩子主要有这三种:beforeRouteEnter、beforeRouteUpdate、beforeRouteLeave。他们是直接在路由组件内部直接进行定义的
const File = {
    template: `<div>This is file</div>`,
    beforeRouteEnter(to, from, next) {
        // do someting
        // 在渲染该组件的对应路由被 confirm 前调用
    },
    beforeRouteUpdate(to, from, next) {
        // do someting
        // 在当前路由改变,但是依然渲染该组件是调用
    },
    beforeRouteLeave(to, from ,next) {
        // do someting
        // 导航离开该组件的对应路由时被调用
    }
}
beforeRouteEnter 不能获取组件实例 this,因为当守卫执行前,组件实例被没有被创建出来,剩下两个钩子则可以正常获取组件实例 this
vue父组件如何动态注册子组件
少数情况,我们不知道要 加载那些组件,随着业务动态添加,比如 接口动态加载,根据需要加载组件
<button @click="asdfn">切换组件</button>
挂载的元素地方
<div ref="xxx"></div>
注册组件脚本
      registerComponent(templateName,yourNeedEl){
       var self=this;
           return import(`@/components/${templateName}.vue`).then((component) => {
           	console.log("component",component)
           	 const cpt = Vue.extend(component.default);
			    new cpt({
			      el: yourNeedEl
			    });

         });

},
组件调用
asdfn(){
    console.log("tabContent2");
    var ele=this.$refs.xxx;
     this.registerComponent("tabContent2",ele)
},
记得引入
import Vue from 'vue'
vue中methods、watch、computed之间的差别对比以及适用场景
一、computer
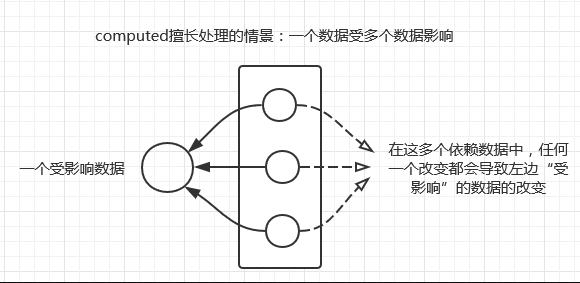
当页面中有某些数据依赖其他数据进行变动的时候,可以使用计算属性。
<p id="app">  {{fullName}}  </p>

<script>
    var vm = new Vue({
        el: '#app',
        data: {
            firstName: 'Foo',
            lastName: 'Bar',
        },
        computed: {
            fullName: function () {
                return this.firstName + ' ' + this.lastName
            }
        }
    })
</script>
需要注意的是,就算在data中没有直接声明出要计算的变量,也可以直接在computed中写入。
计算属性默认只有getter,可以在需要的时候自己设定setter:
// ...
    computed: {
        fullName: {
            // getter
            get: function () {
                return this.firstName + ' ' + this.lastName
            },
            // setter
            set: function (newValue) {
                var names = newValue.split(' ')
                this.firstName = names[0]
                this.lastName = names[names.length - 1]
            }
        }
    }
这个时候在控制台直接运行vm.fullName = ‘bibi wang’,相应的firstName和lastName也会改变。
适用场景:

二、watch
watch和computed很相似,watch用于观察和监听页面上的vue实例,当然在大部分情况下我们都会使用computed,但如果要在数据变化的同时进行异步操作或者是比较大的开销,那么watch为最佳选择。watch为一个对象,键是需要观察的表达式,值是对应回调函数。值也可以是方法名,或者包含选项的对象。直接引用文档例子
var vm = new Vue({
        el: '#app',
        data: {
            firstName: 'Foo',
            lastName: 'Bar',
            fullName: 'Foo Bar'
        },
        watch: {
            firstName: function (val) {
                this.fullName = val + ' ' + this.lastName
            },
            lastName: function (val) {
                this.fullName = this.firstName + ' ' + val
            }
        }
    })
如果在data中没有相应的属性的话,是不能watch的,这点和computed不一样。
适用场景

三、methods
方法,跟前面的都不一样,我们通常在这里面写入方法,只要调用就会重新执行一次,相应的有一些触发条件,在某些时候methods和computed看不出来具体的差别,但是一旦在运算量比较复杂的页面中,就会体现出不一样。
需要注意的是,computed是具有缓存的,这就意味着只要计算属性的依赖没有进行相应的数据更新,那么computed会直接从缓存中获取值,多次访问都会返回之前的计算结果。
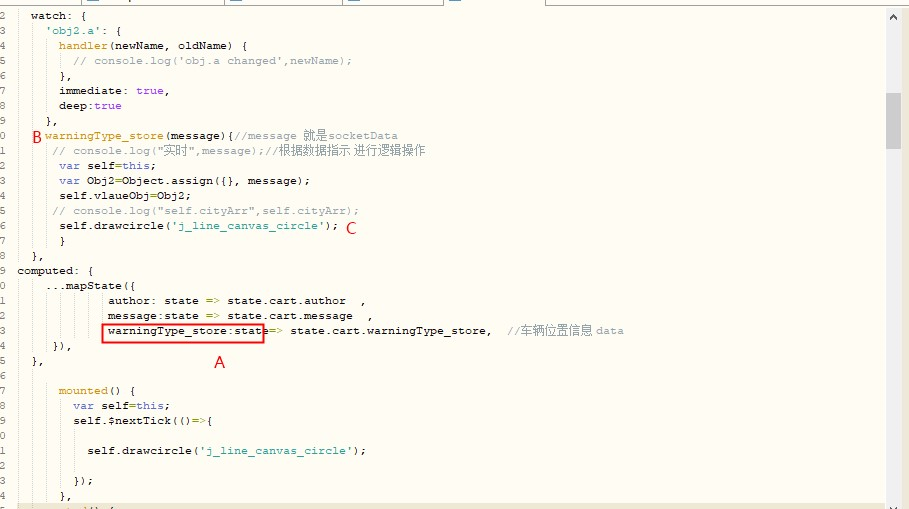
vuex --> computed-->watch-->回调方法
vue 页面插入了非虚拟dom的处理,例如地图的气泡 点击事件的绑定
var MyComponent = Vue.extend({
	      data: function() {
                    return {
                        message: '快速录入信息',
                        taskUrl: '',
                        message2: '查看详情>>',
                        telPhone:'拨打电话',
                    }
         },
       // props:['data'],
         props:['myname'],
        template: '<a @click="show(message)">{{message  }}</a>',
         methods: {
            show(message) {


                 var self=this;
                //  console.log('地图气泡 哈哈哈',message,this.message2,this.myProps,this.myType);
                // this.$router.push({path: '/detail', query:defaults });

                //快速录入信息点
                // this.myRouter.push({ path: '/PositioningAndPublishing', query: { 'testId': this.props.id } })
                if(this.myType=="go_addEvent"){
                	 var highwayId=this.myProps.highwayId;//K1289+820
                	 var highwayDirectionId=this.myProps.highwayDirectionId;//
                	 var positionCode=this.myProps.positionCode;//
                	 var cache=+new	Date;
                       self.bus.$emit('upPositionNumber', positionCode) // 触发事件sh
                	 //this.$emit("upDataPoint",this.myProps)

                	   var path='/PositioningAndPublishing';
                	   var query={
                	   	"testId": self.myProps.id ,
                	   	"highwayId": highwayId ,
                	   	"highwayDirectionId": highwayDirectionId ,
                	   	"positionCode": positionCode,
                	   	"cache": cache
                	   }
                	    console.log(path,"0myProps",query);

                	 self.myRouter.push({ path: path, replace: true, query:query })

                }

                //查看详情
                // this.myRouter.push({ path: '/evnetWork', query: { 'testId': this.props.id } })
               // evnetWork?testId='+id+'"
               if(this.myType=="go_Detail"){
                     var cache=+new	Date;

                	   this.myRouter.push({ path: '/evnetWork',replace: true, query: { 'testId': this.myProps.id ,'cache': cache }})
                }

            },
        },
         created(){
              //this.message=this.message2;

        	     	if(this.myType=="go_addEvent"){
                	this.message="快速录入信息"
                }

                //查看详情
                // this.myRouter.push({ path: '/evnetWork', query: { 'testId': this.props.id } })
               // evnetWork?testId='+id+'"
               if(this.myType=="go_Detail"){
                		this.message="查看详情>>"
                }

        	 	//console.log("cre33ated",this,this.message);
          },
         mounted() {
        	 	    //console.log("TextIconOverlay",new BMapLib.TextIconOverlay());
         },

        beforeDestroy () {
               this.bus.$off('upPositionNumber');
               this.bus.$off('upTestId'); // 触发事件sh
         },

    });
调用
var component = new MyComponent().$mount();
infoBox =new BMapLib.InfoBox(map,content,opts);
     infoBox.enableAutoPan();
	    infoBox.addEventListener('open',function(type, target, point){ //窗口打开是,隐藏自带的关闭按钮
                    //console.log(type,target,point);

             document.querySelectorAll('.boxClass')[0].clientLeft;
             document.querySelectorAll('.boxClass')[0].classList.add("myps1sss");


            setTimeout(()=>{
             // console.log("component go_addEvent",component)
             console.log("dat222a2",data2.positionCode);
            	component.myProps=data2;
            	component.myRouter=self.$router;
            	component.myType="go_addEvent";
            	component.message="快速录入信息";
            document.querySelectorAll('.luxx')[0].appendChild(component.$el);
            },100)

      })
或者直接dom 绑定
 self.lookTimeer=setTimeout(()=>{


                    if(document.querySelector('.jshows')){
                         document.querySelector('.jshows').removeEventListener("click",looksss);
                     document.querySelector('.jshows').addEventListener("click",looksss)
                  }

    },200)
