一、什么是SpringBoot :
Spring 应用需要进行大量的配置,各种 XML 配置和注解配置让人眼花缭乱,且极容易出错,因此 Spring 一度被称为“配置地狱”。Pivotal 团队为了简化 Spring 项目的搭建及开发过程,在 Spring 基础上提供了一套全新的开源的框架,它就是 Spring Boot。其次 Spring 能做的 SpringBoot 它也行,而且更为简化,功能丰富,性能稳定等。SpringBoot 应用提供了大量的自动配置,使得 SpringBoot 应用只需要很少量的配置甚至无配置,就可以运行起来。SpringBoot 会根据 pom.xml里面配置自动导入相关默认 jar 包。
二、Maven创建Springboot案例:
2.1)创建:
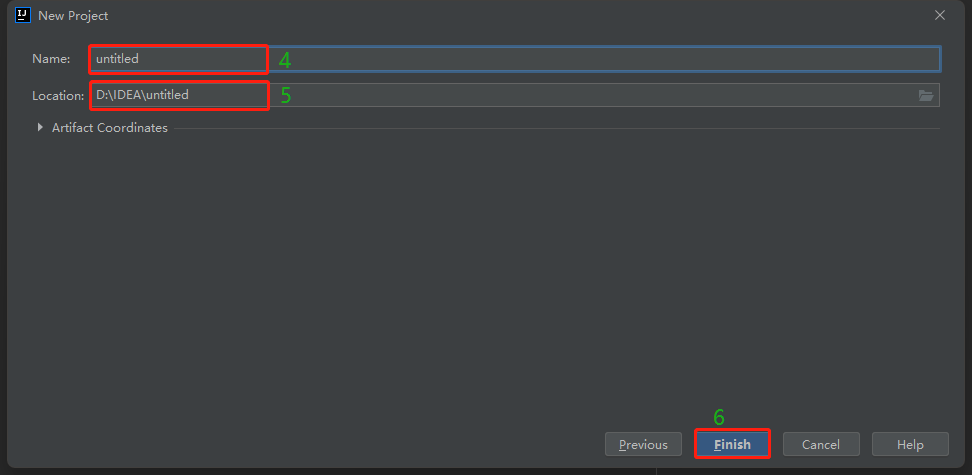
1.点击选择 Maven -> 2.选择JDK -> 3.点击Next -> 4.填写名称 -> 5.选择路径 -> 6.Finish

2.2)Demo案例代码:
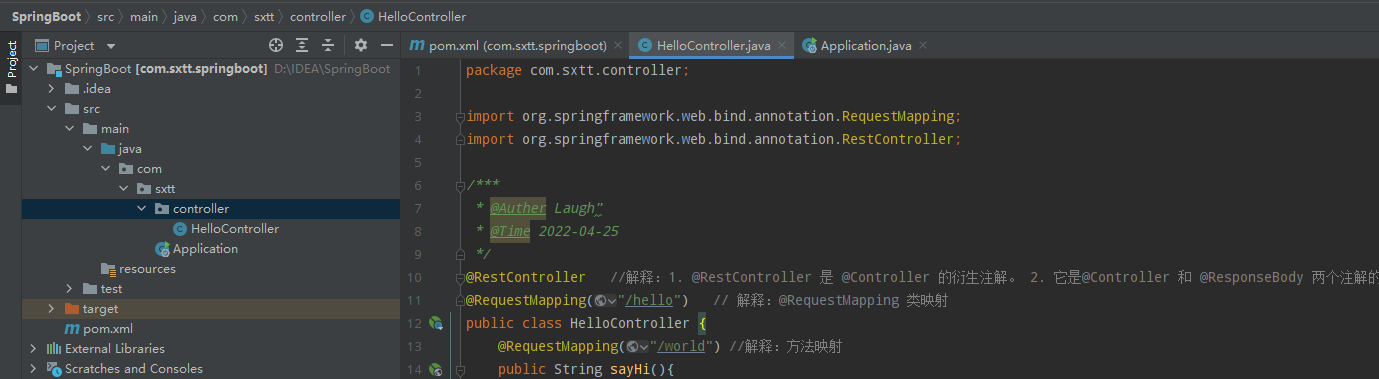
目录结构:
pom.xml:
<?xml version="1.0" encoding="UTF-8"?>
<project xmlns="http://maven.apache.org/POM/4.0.0"
         xmlns:xsi="http://www.w3.org/2001/XMLSchema-instance"
         xsi:schemaLocation="http://maven.apache.org/POM/4.0.0 http://maven.apache.org/xsd/maven-4.0.0.xsd">
    <modelVersion>4.0.0</modelVersion>

    <groupId>org.example</groupId>
    <artifactId>com.sxtt.springboot</artifactId>
    <version>1.0-SNAPSHOT</version>

    <properties>
        <maven.compiler.source>8</maven.compiler.source>
        <maven.compiler.target>8</maven.compiler.target>
    </properties>

    <!-- 解释:在这块配置后 项目会自动导入所要的“默认”jar包 -->

    <!--加入下方这个 parent 才会标记这个项目为 SpringBoot 项目 -->
    <parent>
        <groupId>org.springframework.boot</groupId>
        <artifactId>spring-boot-starter-parent</artifactId>
        <version>2.4.5</version>
        <relativePath/> <!-- lookup parent from repository -->
    </parent>


    <dependencies>
        <!-- 标记此为 Web 项目 -->
        <dependency>
            <groupId>org.springframework.boot</groupId>
            <artifactId>spring-boot-starter-web</artifactId>
        </dependency>
        <!-- 刚开始可以不用,添加这个是“单元测试”用的  -->
        <dependency>
            <groupId>org.springframework.boot</groupId>
            <artifactId>spring-boot-starter-test</artifactId>
            <scope>test</scope>
        </dependency>

    </dependencies>

    <!-- 项目打包需要使用  -->
    <build>
        <plugins>
            <plugin>
                <groupId>org.springframework.boot</groupId>
                <artifactId>spring-boot-maven-plugin</artifactId>
            </plugin>
        </plugins>
    </build>

</project>
HelloController.java:
package com.sxtt.controller;

import org.springframework.web.bind.annotation.RequestMapping;
import org.springframework.web.bind.annotation.RestController;

/***
 * @Auther Laugh"
 * @Time 2022-04-25
 */
@RestController   //解释:1. @RestController 是 @Controller 的衍生注解。 2. 它是@Controller 和 @ResponseBody 两个注解的结合体。
@RequestMapping("/hello")   // 解释:@RequestMapping 类映射
public class HelloController {
    @RequestMapping("/world") //解释:方法映射
    public String sayHi(){
        return "Hello World !";
    }

}
Application.java:
package com.sxtt;

import org.springframework.boot.SpringApplication;
import org.springframework.boot.autoconfigure.SpringBootApplication;

/***
 * @Auther Laugh"
 * @Time 2022-04-25
 */
@SpringBootApplication  //解释:标记为 SpringBoot 项目的启动类,入口
public class Application {
    //有且只有一个
    public static void main(String[] args) {
        SpringApplication.run(Application.class,args);
    }
}
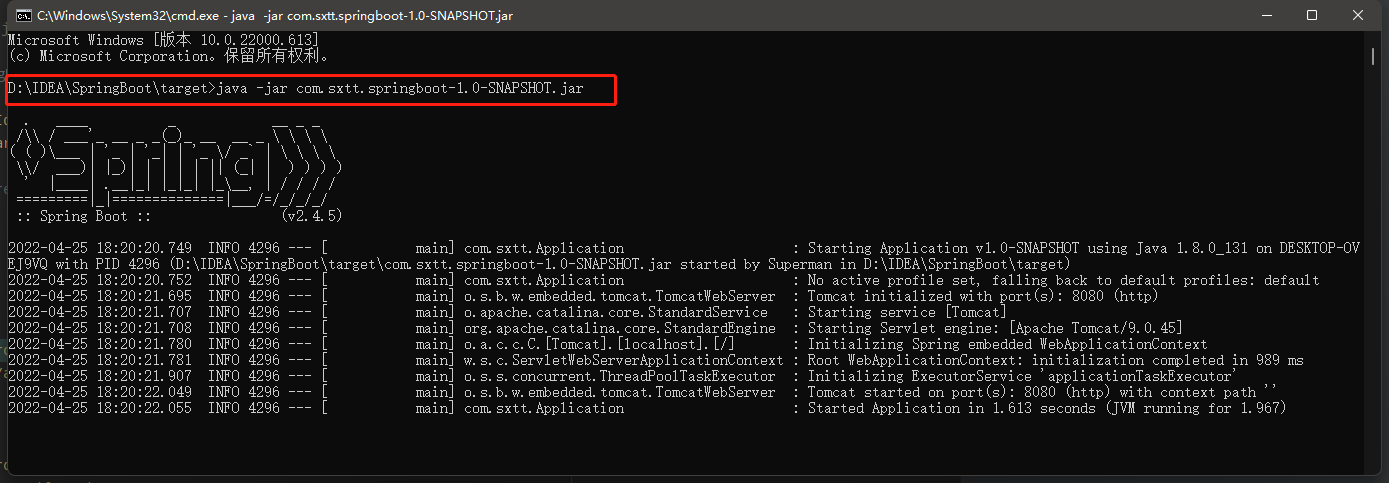
2.3)效果图:启动项目
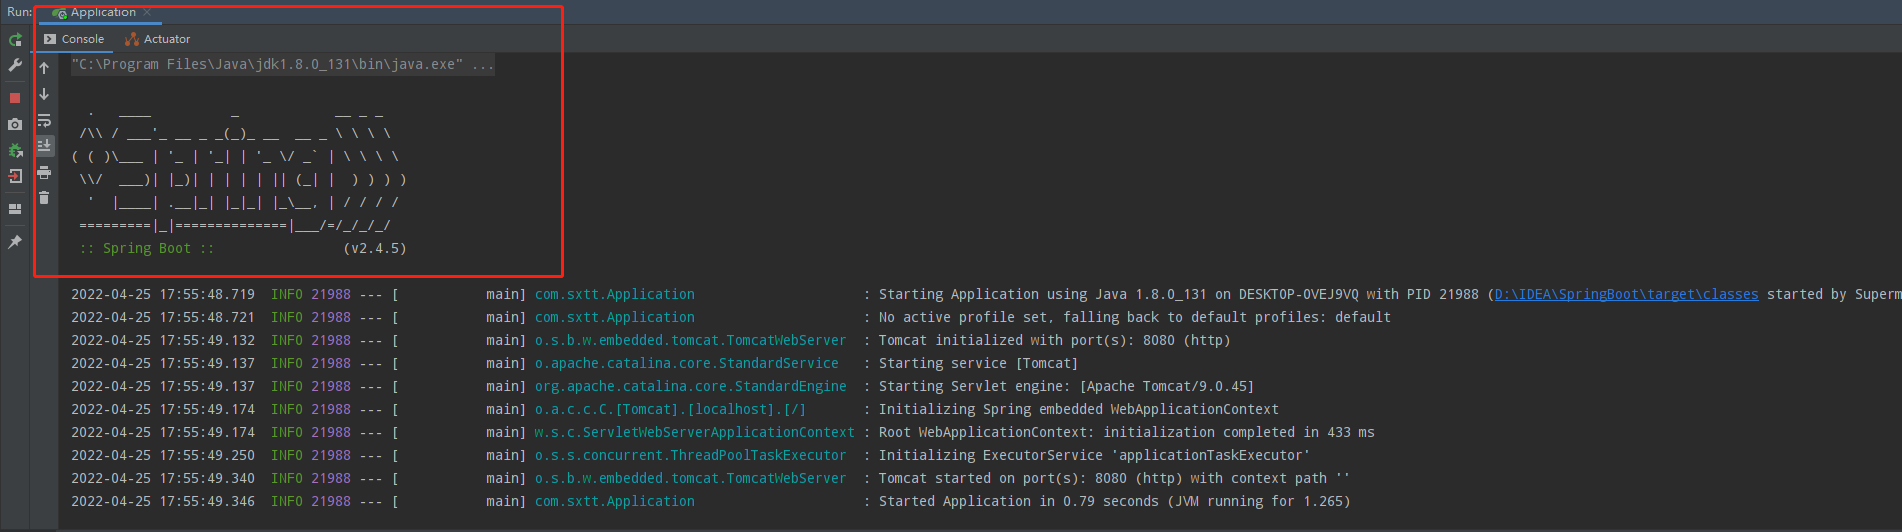

项目启动完成!
三、补充(项目打包 放服务器):
3.1)pom.xml 需要配置:
<!-- 项目打包需要使用  -->
    <build>
        <plugins>
            <plugin>
                <groupId>org.springframework.boot</groupId>
                <artifactId>spring-boot-maven-plugin</artifactId>
            </plugin>
        </plugins>
    </build>
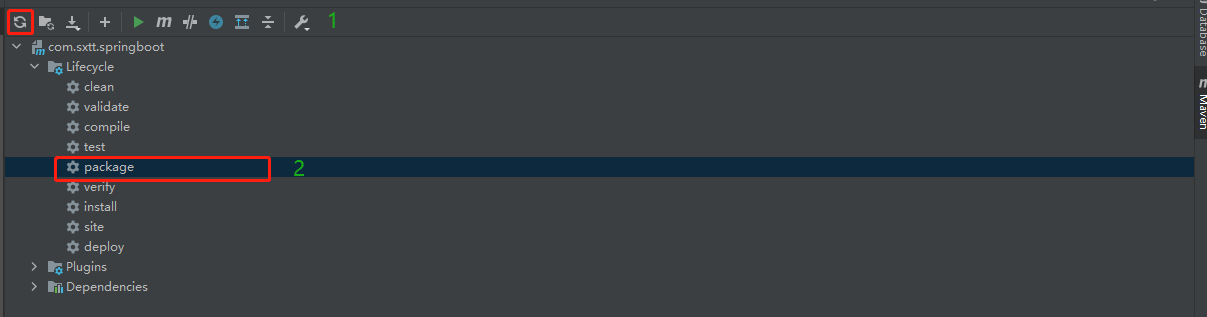
3.2)如何打包:
1.pom.xml 配置完成过点击右侧 Maven 展开后,点击刷新按钮确保配置成功 -> 2.双击 package 运行结束后打包成功!
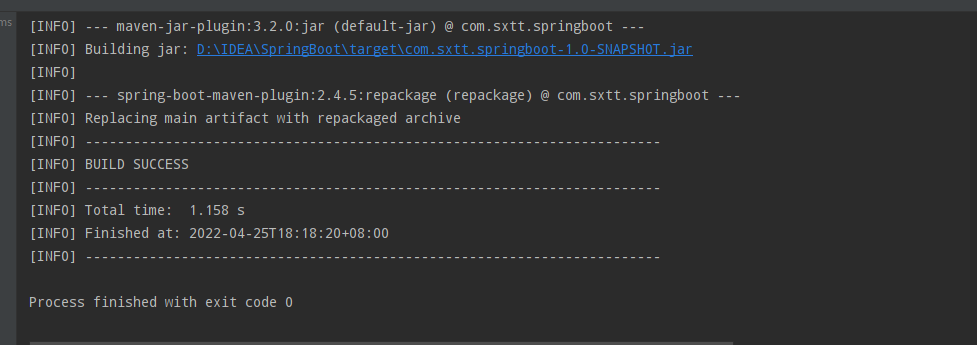
3.3)找打包文件路径(项目存放路径):

运行成功!
四、端口占用处理:
4.1):resources 文件下 创建 application.properties 文件:约定大于配置哦,文件名字必须叫 application.properties 这个哦!
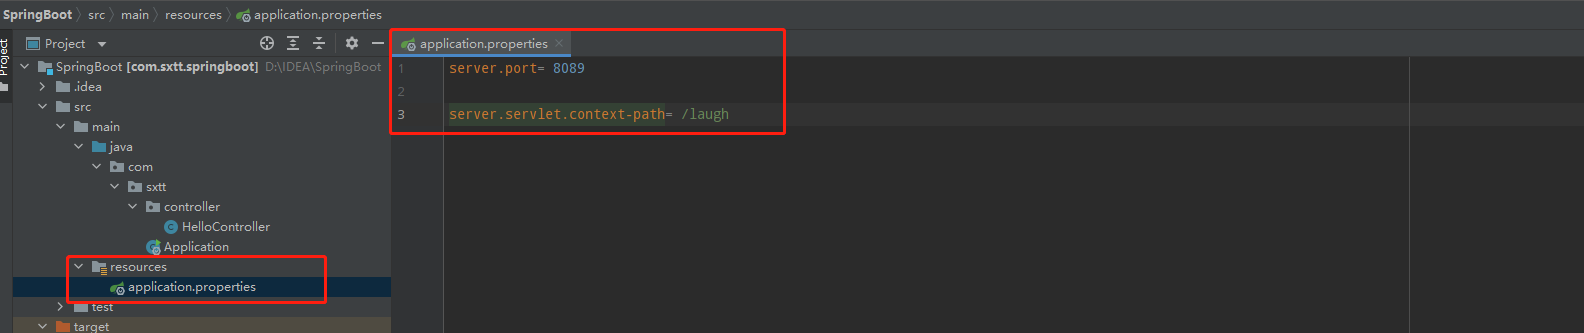
4.2)配置端口号:
# 解释:# 在此文件中为注释

#设置端口号
server.port = 8089
#再此项目中 可以不写下方这段代码
server.servlet.context-path = /laugh
server.port = 8089

server.servlet.context-path = /laugh
注意:/laugh 不要加双引哦!
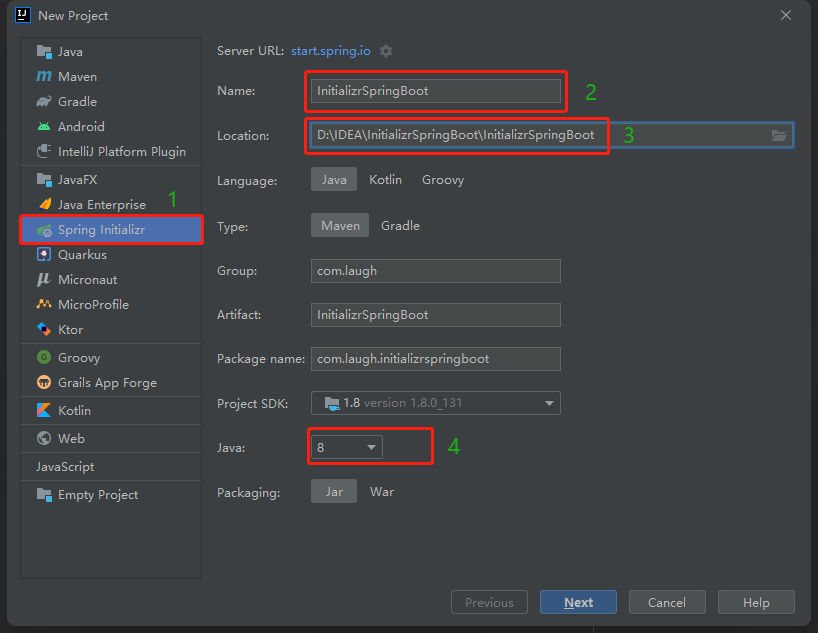
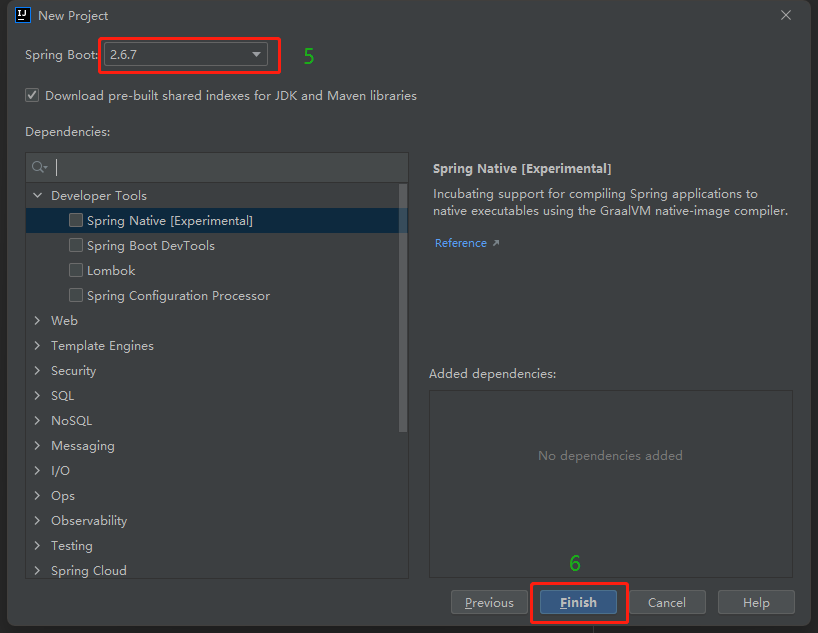
五、Spring Initializr创建SpringBoot案例:
5.1)创建父项目:
1. 先择 Spring Initializr -> 2. 填写项目名称 -> 3. 设置这个项目的代码存放路径 -> 4. Java选择8 -> 5. SpringBoot IDEA会默认选择(可更改) -> 6. Finish
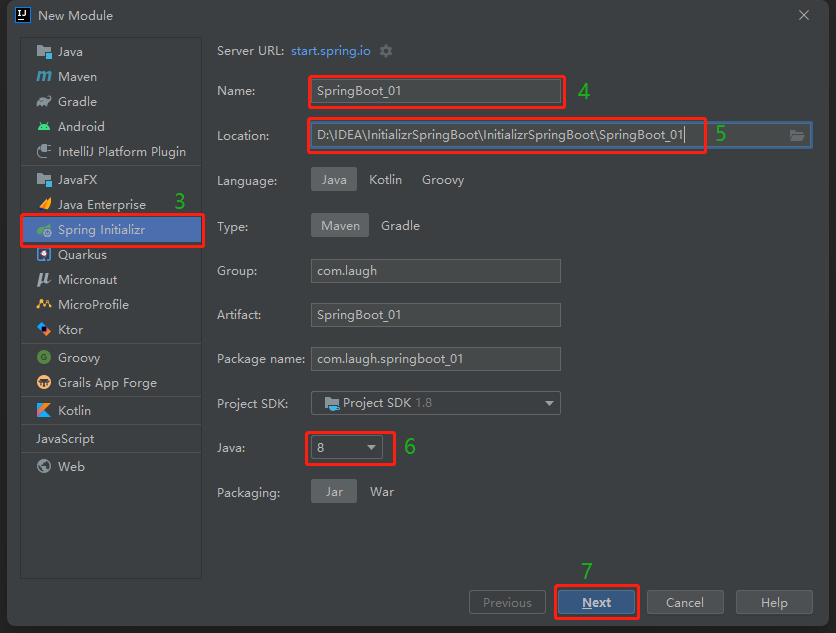
5.2)创建子项目:
1. 右击父项目名称 -> 2. 选择Module -> 3. 先择 Spring Initializr -> 4. 填写项目名称 -> 5. 设置这个项目的代码存放路径 -> 6. Java选择8 -> 7. Next -> 8. SpringBoot IDEA会默认选择(可更改) -> 9. 选择Web里面的Spring Web(咱们写的是Web项目哦) -> 10. Finish


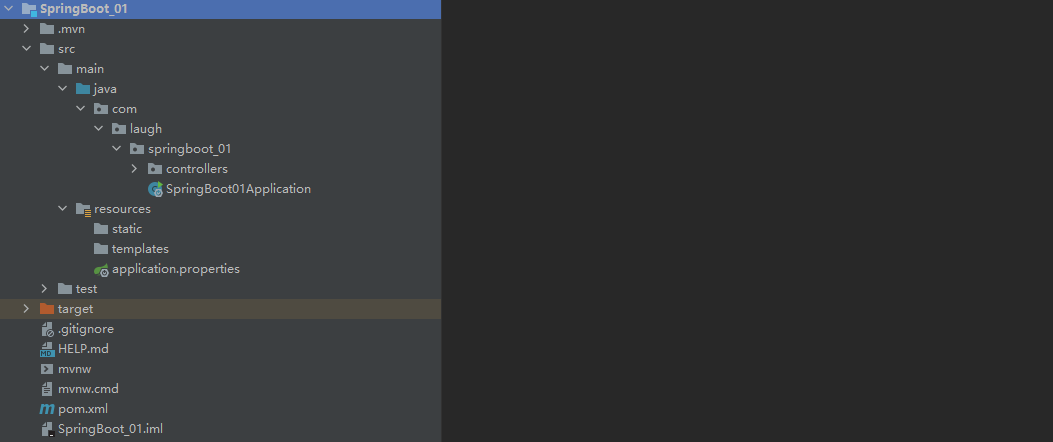
5.3)目录结构(父子项目创建OK):

5.4)配置父项目的pom.xml:
<?xml version="1.0" encoding="UTF-8"?>
<project xmlns="http://maven.apache.org/POM/4.0.0" xmlns:xsi="http://www.w3.org/2001/XMLSchema-instance"
         xsi:schemaLocation="http://maven.apache.org/POM/4.0.0 https://maven.apache.org/xsd/maven-4.0.0.xsd">
    <modelVersion>4.0.0</modelVersion>
    <parent>
        <groupId>org.springframework.boot</groupId>
        <artifactId>spring-boot-starter-parent</artifactId>
        <version>2.6.7</version>
        <relativePath/> <!-- lookup parent from repository -->
    </parent>

    <groupId>com.laugh</groupId>
    <artifactId>InitializrSpringBoot</artifactId>
    <version>0.0.1-SNAPSHOT</version>
    <name>InitializrSpringBoot</name>
    <description>InitializrSpringBoot</description>

    <properties>
        <java.version>1.8</java.version>
    </properties>

    <dependencies>

        <dependency>
            <groupId>org.springframework.boot</groupId>
            <artifactId>spring-boot-starter</artifactId>
        </dependency>

        <dependency>
            <groupId>org.springframework.boot</groupId>
            <artifactId>spring-boot-starter-web</artifactId>
        </dependency>

        <dependency>
            <groupId>org.springframework.boot</groupId>
            <artifactId>spring-boot-starter-test</artifactId>
            <scope>test</scope>
        </dependency>

    </dependencies>

    <build>
        <plugins>
            <plugin>
                <groupId>org.springframework.boot</groupId>
                <artifactId>spring-boot-maven-plugin</artifactId>
            </plugin>
        </plugins>
    </build>

</project>
5.5)配置子项目的pom.xml:注意:子项目的 parent 需要复制 父项目的 groupid / artifactid / version
<?xml version="1.0" encoding="UTF-8"?>
<project xmlns="http://maven.apache.org/POM/4.0.0" xmlns:xsi="http://www.w3.org/2001/XMLSchema-instance"
         xsi:schemaLocation="http://maven.apache.org/POM/4.0.0 https://maven.apache.org/xsd/maven-4.0.0.xsd">
    <modelVersion>4.0.0</modelVersion>

    <parent>
        <groupId>com.laugh</groupId>
        <artifactId>InitializrSpringBoot</artifactId>
        <version>0.0.1-SNAPSHOT</version>
    </parent>

    <groupId>com.laugh</groupId>
    <artifactId>SpringBoot_01</artifactId>
    <version>0.0.1-SNAPSHOT</version>
    <name>SpringBoot_01</name>
    <description>SpringBoot_01</description>

    <properties>
        <java.version>1.8</java.version>
    </properties>

    <dependencies>

        <dependency>
            <groupId>org.springframework.boot</groupId>
            <artifactId>spring-boot-starter-web</artifactId>
        </dependency>

        <dependency>
            <groupId>org.springframework.boot</groupId>
            <artifactId>spring-boot-starter-test</artifactId>
            <scope>test</scope>
        </dependency>

    </dependencies>

    <build>
        <plugins>
            <plugin>
                <groupId>org.springframework.boot</groupId>
                <artifactId>spring-boot-maven-plugin</artifactId>
            </plugin>
        </plugins>
    </build>

</project>
5.6)SpringBoot01Application.java:
package com.laugh.springboot_01;

import org.springframework.boot.SpringApplication;
import org.springframework.boot.autoconfigure.SpringBootApplication;

@SpringBootApplication
public class SpringBoot01Application {

    public static void main(String[] args) {
        SpringApplication.run(SpringBoot01Application.class, args);
    }

}
5.7)Hello.java:
package com.laugh.springboot_01.controllers;

import org.springframework.web.bind.annotation.RequestMapping;
import org.springframework.web.bind.annotation.RestController;

@RestController
@RequestMapping("/hello")
public class Hello {
    @RequestMapping("/world")
    public String sayHi(){
        return "你好,Laugh“ ";
    }

    public Hello(){
        System.out.println("看我懒加载...");
    }
}
5.8)application.properties:
#懒加载 在访问后 bean 才会加载(下方代码我注释了,如果要试试也可以试试)
# spring.main.lazy-initialization=true
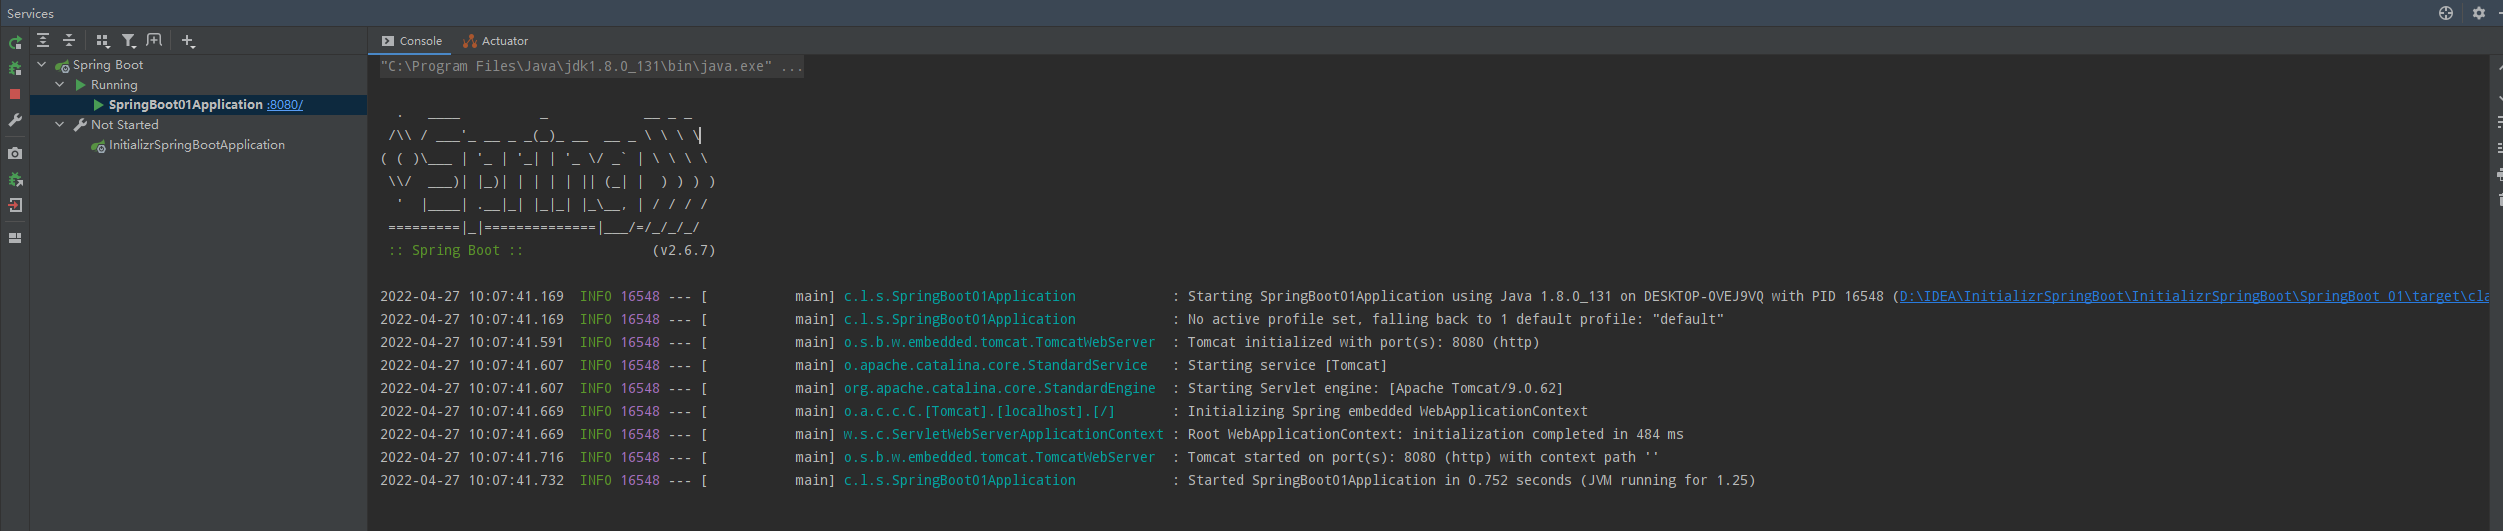
5.9)运行结果(未运行 application.properties ):

5.10)运行结果(未运行 application.properties ):
启动项目:
5.11)运行 application.properties 访问页面后(懒加载生效喽~):
#懒加载 在访问 bean 才会加载
spring.main.lazy-initialization=true
