The last few days, I have spent some time playing around with Docker’s <none>:<none> images. I’m writing this post to explain how they work, and how they affect docker users. This article will try to address questions like:
- What are
<none>:<none>images ? - What are dangling images ?
- Why do I see a lot of
<none>:<none>images when I dodocker images -a? - What is the difference between
docker imagesanddocker images -a?
Before I start answering these questions, let’s take a moment to remember that there are two kinds of <none>:<none> images, the good and the bad.
The Good <none>:<none>
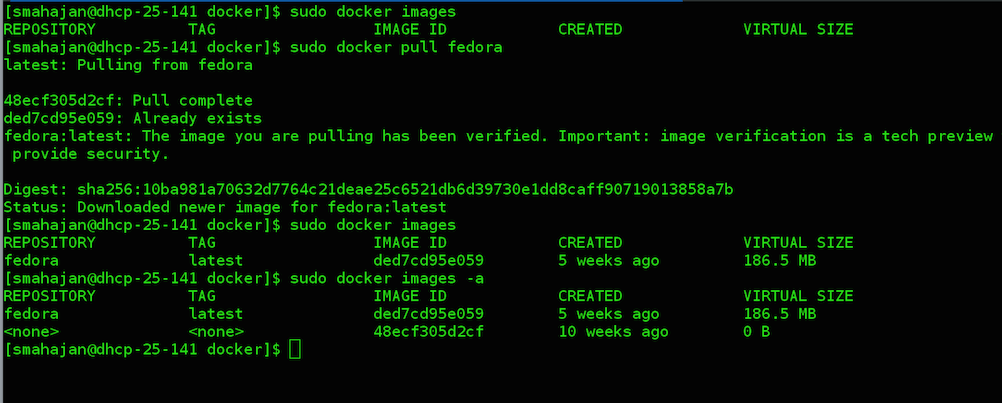
To understand this, we need to understand how Docker’s image file system works, and how the image layers are organized. For the purpose of this article we will be using a Fedora image as an example. The Docker daemon is running on my laptop, and I am going to pull a fedora image from docker hub.

As you can see in the above screenshot, docker images just shows fedora:latest however docker images -a shows two images fedora:latest and <none>:<none>. As a Docker user you’ll observe that these <none>:<none> images grow exponentially with the numbers of images we download.
What do these <none>:<none> images stand for? To understand that let’s dive into how Docker’s file system layers are organized. Each docker image is composed of layers, with these layers having a parent-child hierarchical relationship with each other. All docker file system layers are by default stored at /var/lib/docker/graph. Docker calls it the graph database. In this example fedora:latest is composed of 2 layers which we can find at /var/lib/docker/graph.

As you can see the IMAGE ID corresponds to the layers in the /var/lib/docker/graph directory. When I did docker pull fedora, the image was downloaded one layer at a time. First docker downloaded the layer 48ecf305d2cf and named it <none>:<none> since this is only one of the layers of the complete image fedora:latest. Docker calls this an intermediate image hence the flag -a.
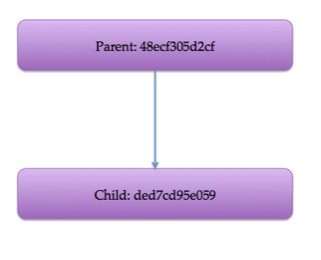
Next it downloaded the layer ded7cd95e059 and named it fedora:latest. The fedora:latest image is composed of both these layers, forming a parent child hierarchical relationship as shown below.

Just to double check that we got the parent-child relationship right, we can check the JSON file of the layer ded7cd95e059.

All right! So we got that right. Now we understand what these <none>:<none> images stand for. They stand for intermediate images and can be seen using docker images -a. They don’t result into a disk space problem but it is definitely a screen real estate problem. Since all these <none>:<none> images can be quite confusing as what they signify.
We have already covered points (1), (3) and (4). Lets throw some light onto point (2).
The Bad <none>:<none>
Another style of <none>:<none> images are the dangling images which can cause disk space problems.
In programming languages like Java or Golang a dangling block of memory is a block that is not referenced by any piece of code. The garbage collection system of those languages periodically marks the dangling blocks and return it back to the heap, so that these memory blocks are available for future allocations. Similarly a dangling file system layer in Docker is something that is unused and is not being referenced by any images. Hence we need a mechanism for Docker to clear these dangling images.
We already know what <none>:<none> in docker images -a stand for. Those are the intermediate images as described above. However if I do docker images and see <none>:<none> images in the list, these are dangling images and needs to be pruned. But where do they come from?
These dangling images are produced as a result of docker build or pull command. To give a more concrete example,
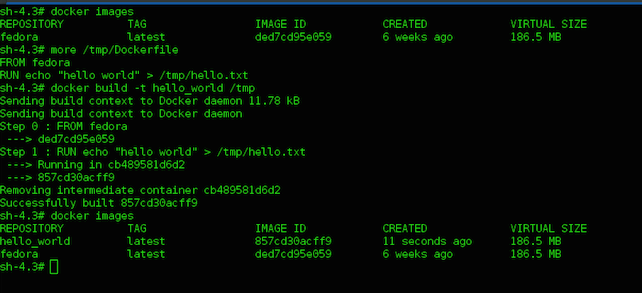
Let’s build a hello_world image using our fedora base image that we downloaded earlier. We will build the hello_world image using a Dockerfile.

As we can see in the above screenshot, we were successfully able to build our hello_world image using the Dockerfile.
A month has passed after building our hello_world image, and a new version of Fedora is available. So Let’s pull this new Fedora image.

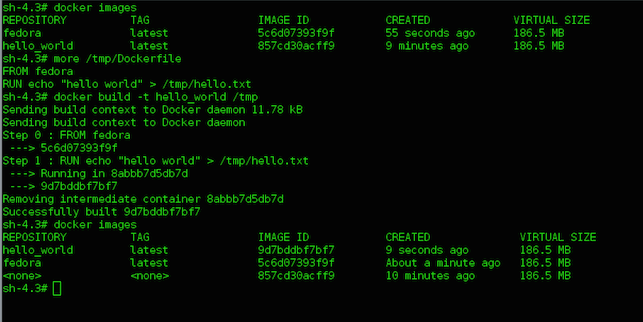
I got my new Fedora image. Now I would want to build my hello_world image again with this new Fedora. So, let’s build the image again using the same Dockerfile.

If you go back and check, the old Fedora image had an IMAGE ID (ded7cd95e059) and the new Fedora image in the above screenshot has an IMAGE ID (5c6d07393f9f), which means our Fedora image was updated successfully. The important thing that we need to look for in the above screenshot is the <none>:<none> image.
If you remember <none>:<none> images listed in docker images -a are intermediate images (The good ones), but this <none>:<none> image is being listed as part of docker images. This is a dangling image and needs to be pruned. When our hello_world image was rebuilt using the Dockerfile, its reference to old Fedora became untagged and dangling.
The next command can be used to clean up these dangling images.
docker rmi $(docker images -f "dangling=true" -q)
Docker doesn’t have an automatic garbage collection system as of now. That would definitely be a nice feature to have. For now this command can be used to do a manual garbage collection.