先做成一个application。
我这里做成的application的id是"app3.App3"。
然后在这个app的i18n文件中添加对应的内容,我写了一个简单的Common。

之后将这个工程发布。我设置的Application name是 ZTESTAPP3。
在Fiori的管理页面中,进行这样的配置。

需要在之后的App中用到url以及id
在另外一个App的manifest.jaso文件中追加以下内容
{
    "_version": "1.12.0",
    "sap.app": {
        "id": "redirectApp1.RedirectApp1",
        "type": "application",
        "i18n": "i18n/i18n.properties",
        "applicationVersion": {
            "version": "1.0.0"
        },
        "title": "{{appTitle}}",
        "description": "{{appDescription}}",
        "sourceTemplate": {
            "id": "ui5template.basicSAPUI5ApplicationProject",
            "version": "1.40.12"
        }
    },
    "sap.ui": {
        "technology": "UI5",
        "icons": {
            "icon": "",
            "favIcon": "",
            "phone": "",
            "phone@2": "",
            "tablet": "",
            "tablet@2": ""
        },
        "deviceTypes": {
            "desktop": true,
            "tablet": true,
            "phone": true
        }
    },
    "sap.ui5": {
        "flexEnabled": false,
        "rootView": {
            "viewName": "redirectApp1.RedirectApp1.view.HelloApp1",
            "type": "XML",
            "async": true,
            "id": "HelloApp1"
        },
        "dependencies": {
            "minUI5Version": "1.65.6",
            "components": {
                "app3.App3": {
                    "minVersion": "1.0.0"
                }
            },
            "libs": {
                "sap.ui.layout": {},
                "sap.ui.core": {},
                "sap.m": {}
            }
        },
        "contentDensities": {
            "compact": true,
            "cozy": true
        },
        "models": {
            "i18n": {
                "type": "sap.ui.model.resource.ResourceModel",
                "settings": {
                    "bundleName": "redirectApp1.RedirectApp1.i18n.i18n"
                }
            }
        },
        "resources": {
            "css": [
                {
                    "uri": "css/style.css"
                }
            ]
        },
        "routing": {
            "config": {
                "routerClass": "sap.m.routing.Router",
                "viewType": "XML",
                "async": true,
                "viewPath": "redirectApp1.RedirectApp1.view",
                "controlAggregation": "pages",
                "controlId": "app",
                "clearControlAggregation": false
            },
            "routes": [
                {
                    "name": "RouteHelloApp1",
                    "pattern": "RouteHelloApp1",
                    "target": [
                        "TargetHelloApp1"
                    ]
                }
            ],
            "targets": {
                "TargetHelloApp1": {
                    "viewType": "XML",
                    "transition": "slide",
                    "clearControlAggregation": false,
                    "viewId": "HelloApp1",
                    "viewName": "HelloApp1"
                }
            }
        }
    },
    "sap.platform.hcp": {
        "uri": "webapp",
        "_version": "1.1.0"
    },
    "sap.platform.abap": {
        "uri": "/sap/bc/ui5_ui5/sap/ztestredirect/webapp",
        "_version": "1.1.0"
    }
}
将app3.App3作为组件添加进来。
修改Component.js
jQuery.sap.registerModulePath("app3.App3", {
    url: "/sap/bc/ui5_ui5/sap/ZTESTAPP3"
});

sap.ui.define([
    "sap/ui/core/UIComponent",
    "sap/ui/Device",
    "redirectApp1/RedirectApp1/model/models"
], function (UIComponent, Device, models) {
    "use strict";

    return UIComponent.extend("redirectApp1.RedirectApp1.Component", {

        metadata: {
            manifest: "json"
        },

        /**
         * The component is initialized by UI5 automatically during the startup of the app and calls the init method once.
         * @public
         * @override
         */
        init: function () {
                // get the i18n model for the app
                var oI18nModel = this.getModel("i18n");

                // get the common component
                var oCommonComponent = sap.ui.component({
                    name: "app3.App3"
                });

                // get the common component resource bundle
                if (oCommonComponent) {
                    var oBundle = oCommonComponent.getModel("i18n").getResourceBundle();

                    // enhance the app i18n with the resources from the commmon component
                    oI18nModel.enhance(oBundle);
                }


            // call the base component's init function
            UIComponent.prototype.init.apply(this, arguments);

            // enable routing
            this.getRouter().initialize();

            // set the device model
            this.setModel(models.createDeviceModel(), "device");

            //jQuery.sap.registerModulePath("common", "./../../common");
        }
    });
});
使用App1的deploy信息,将他注册到App2中,
jQuery.sap.registerModulePath("app3.App3", {
url: "/sap/bc/ui5_ui5/sap/ZTESTAPP3"
});
两个参数,一个是App1的id,一个是App1的url。
注册之后,可以取得App1的i18n的Model,将他扩展到App2中。
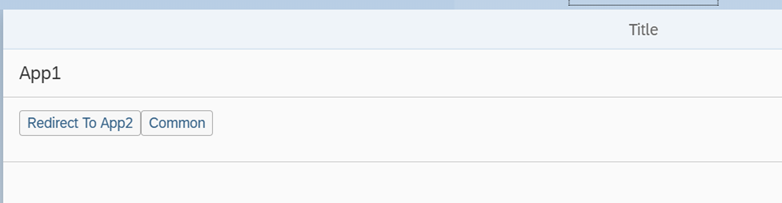
App2的View
<mvc:View controllerName="redirectApp1.RedirectApp1.controller.HelloApp1"
    xmlns:mvc="sap.ui.core.mvc"
    xmlns="sap.m"
    displayBlock="true">
    <Shell id="shell">
        <App id="app">
            <pages>
                <Page id="page" title="{i18n>title}">
                    <content>
                        <Panel
                          headerText="App1">
                          <content>
                             <Button
                                text="Redirect To App2"
                                press=".onRedirect"/>

                              <Button text="{i18n>commonText}"/>
                          </content>
                        </Panel>
                    </content>
                </Page>
            </pages>
        </App>
    </Shell>
</mvc:View>
App2的i18n文件,没有定义commonText

显示的Common,是定义在app3.App3中的。
使用这种方法,应该也可以抽出共通,然后所有的app都使用共通的component
参照blog:https://jasper07.secondphase.com.au/blog/2016/04/09/merge-translatable-texts/