16 Step 16: Dialogs and Fragments
fragments 是一个轻量级的UI组件,可以重用,但没有任何controller。
当你想定义一个跨多个视图的,特定的ui的一部分时,可以选择fragments。
一个fragment里面可以包括一个到多个控件,在运行的时候,视图中的fragments中的控件的内容会像普通视图中的content内容一样,被包含在视图的DOM中。这样我们可以像访问普通视图的控件一样,直接访问fragments中的控件。
当然,也有一些控件不会成为视图的一部分,例如对话框。
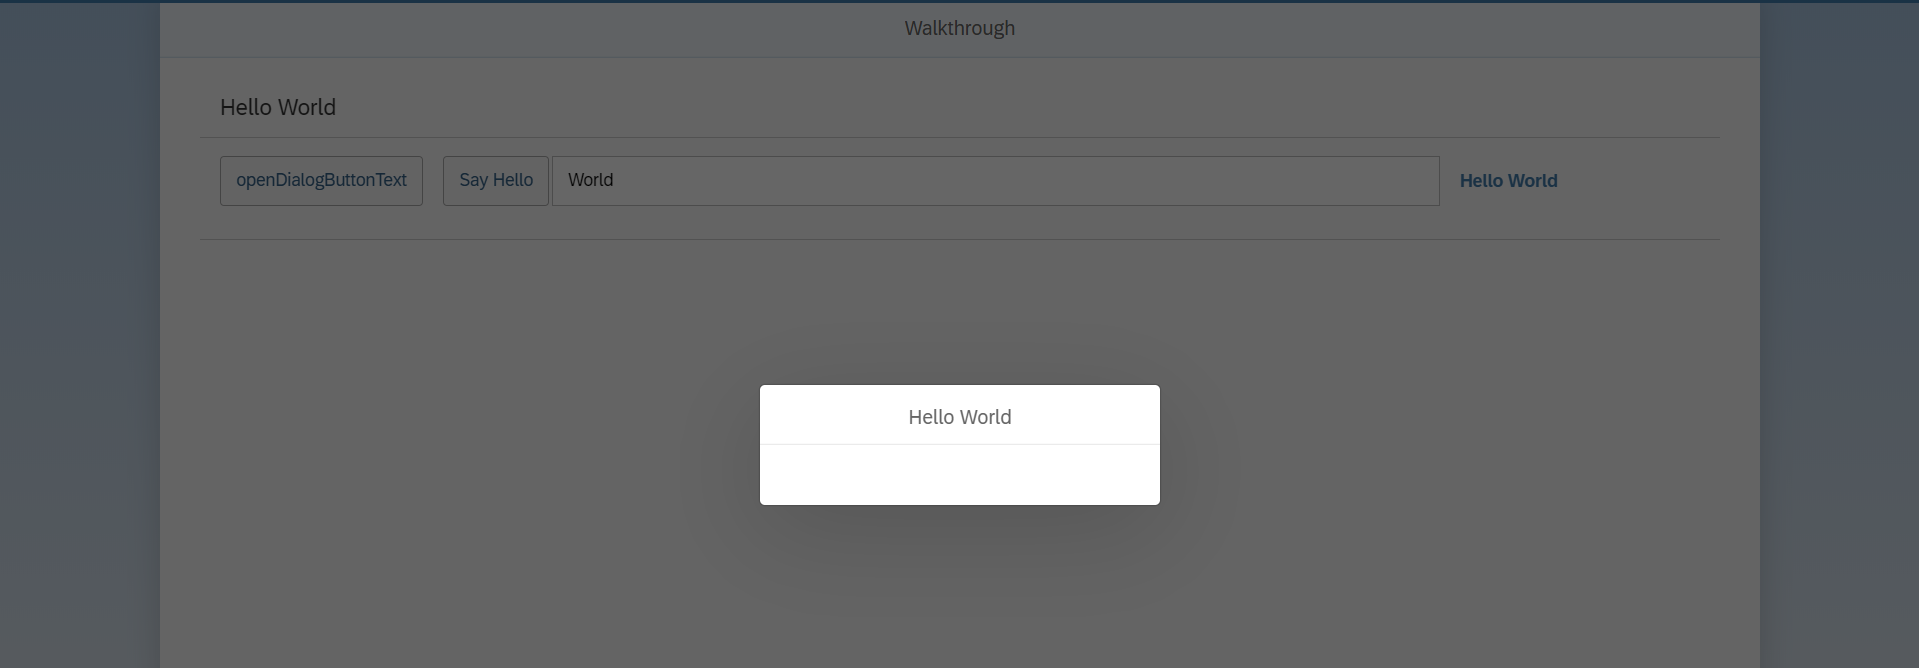
添加一个对话框到应用程序中,对话框打开在常规的应用程序内容之上,因此不属于特定的视图,所以必须在controller的某个地方进行实例化。
另外由于需要尽可能灵活的重用构件,并且不能将对话框指定为view,所以我们将创建包含dialog的XML fragment。
修改 HelloPanel.view.xml
<mvc:View
   controllerName="sap.ui.demo.walkthrough.controller.HelloPanel"
   xmlns="sap.m"
   xmlns:mvc="sap.ui.core.mvc">
   <Panel
      headerText="{i18n>helloPanelTitle}"
      class="sapUiResponsiveMargin"
      width="auto" >
      <content>
      <Button
         id="helloDialogButton"
         text="{i18n>openDialogButtonText}"
         press=".onOpenDialog"
         class="sapUiSmallMarginEnd"/>

      <Button
         text="{i18n>showHelloButtonText}"
         press=".onShowHello"
         class="myCustomButton"/>
      <Input
         value="{/recipient/name}"
         valueLiveUpdate="true"
         width="60%"/>
      <FormattedText
         htmlText="Hello {/recipient/name}"
         class="sapUiSmallMargin sapThemeHighlight-asColor myCustomText"/>
      </content>
   </Panel>
</mvc:View>
给控件一个唯一的标示是一个良好的习惯,比如这里的id="helloDialogButton",可以通过这个标示很容易的对控件进行操作,如果不指定id的话,sapui5会在运行的时候,自动生成一个id。
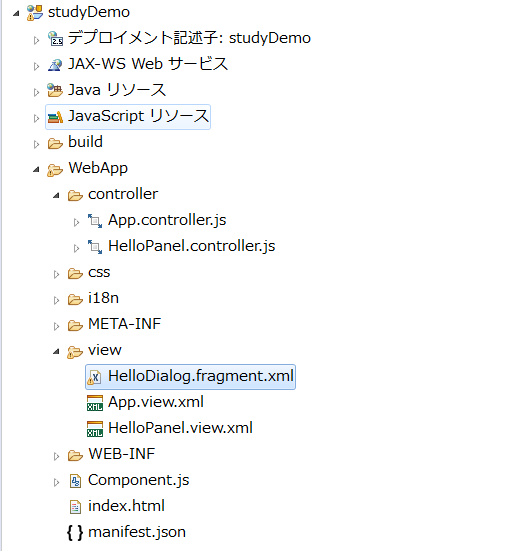
新加HelloDialog.fragment.xml
<core:FragmentDefinition
   xmlns="sap.m"
   xmlns:core="sap.ui.core" >
   <Dialog
      id="helloDialog"
      title="Hello {/recipient/name}">
   </Dialog>
</core:FragmentDefinition>
将定义的dialog放入fragment中,并且创建一个新的xml文件。
fragment位于core的命名空间中,因此在FragmentDefinition标记中为它添加了一个xml名称空间。
fragment没有controller,不占用内容,也没有控件实例,只是一组重用空间的容器。
这里我理解为,view中的<button>会有button的实例,button点击时,会触发button实例的方法。但是fragment没有实例的,所以也没有该fragment对应的方法属性之类的。
修改 HelloPanel.controller.js
sap.ui.define([
    "sap/ui/core/mvc/Controller",
    "sap/m/MessageToast",
    "sap/ui/core/Fragment"
], function (Controller, MessageToast, Fragment) {
    "use strict";

    return Controller.extend("sap.ui.demo.walkthrough.controller.HelloPanel", {

        onShowHello : function () {
            …
        },
        onOpenDialog : function () {
            var oView = this.getView();

            // create dialog lazily
            if (!this.byId("helloDialog")) {
                // load asynchronous XML fragment
                Fragment.load({
                    id: oView.getId(),
                    name: "sap.ui.demo.walkthrough.view.HelloDialog"
                }).then(function (oDialog) {
                    // connect dialog to the root view of this component (models, lifecycle)
                    oView.addDependent(oDialog);
                    oDialog.open();
                });
            } else {
                this.byId("helloDialog").open();
            }
        }

    });
});
先通过this.byId("helloDialog")来获取这个对话框,如果不存在的话,那么就需要通过 sap.ui.xmlfragment 来对它进行实例化。他有着这些参数:
id: 视图HelloPanel的ID,用于为fragment加上前缀,在这里,为对话框控件定义了ID helloDialog,可以通过调用oView.byId(“helloDialog”)通过view访问dialog。
这确保即使以相同的方式在其他view中实例化相同的fragment,每个dialog都有其惟一的ID,该ID由view ID和dialog ID连接而成。
如果有相同的id,那么框架会报错。
.then(function (oDialog) 其中的oDialog为返回的DIalog控件。
oView.addDependent(oDialog); 我们将对话框添加为Dependent,依赖于要连接到视图模型生命周期的视图。当视图被销毁时,对话框将自动销毁。否则,需要销毁对话框以释放其资源。
始终使用addDependent方法将对话框连接到视图的生命周期管理和数据绑定。
私有函数和变量总是以下划线开头。
17 Step 17: Fragment Callbacks
为dialog添加事件。
修改HelloPanel.controller.js
sap.ui.define([
    "sap/ui/core/mvc/Controller",
    "sap/m/MessageToast",
    "sap/ui/core/Fragment"
], function (Controller, MessageToast, Fragment) {
    "use strict";

    return Controller.extend("sap.ui.demo.walkthrough.controller.HelloPanel", {

        onShowHello : function () {
            // read msg from i18n model
            var oBundle = this.getView().getModel("i18n").getResourceBundle();
            var sRecipient = this.getView().getModel().getProperty("/recipient/name");
            var sMsg = oBundle.getText("helloMsg", [sRecipient]);

            // show message
            MessageToast.show(sMsg);
        },

        onOpenDialog : function () {
            var oView = this.getView();

            // create dialog lazily
            if (!this.byId("helloDialog")) {
                // load asynchronous XML fragment
                Fragment.load({
                    id: oView.getId(),
                    name: "sap.ui.demo.walkthrough.view.HelloDialog",
                    controller: this
                }).then(function (oDialog) {
                    // connect dialog to the root view of this component (models, lifecycle)
                    oView.addDependent(oDialog);
                    oDialog.open();
                });
            } else {
                this.byId("helloDialog").open();
            }
        },

        onCloseDialog : function () {
            this.byId("helloDialog").close();
        }
    });

});
fragment没有controller,controller这个参数是可选的,它允许将该引用传递给对象,他可以是任何对象,不一定是controller,这里将dialog的引用传递给HelloPanel controller。
onCloseDialog被放入同一个controller中,通过调用dialog的内部函数来关闭对话框。
修改 HelloDialog.fragment.xml
<core:FragmentDefinition
   xmlns="sap.m"
   xmlns:core="sap.ui.core" >
   <Dialog
      id="helloDialog"
      title ="Hello {/recipient/name}">
      <beginButton>
         <Button
            text="{i18n>dialogCloseButtonText}"
            press=".onCloseDialog"/>
      </beginButton>
   </Dialog>
</core:FragmentDefinition>
在fragment中,我们在Dialog的聚合beginButton中,添加了一个按钮,并给其分配了一个事件onCloseDialog,当按钮摁下时,就会触发HelloPanel controller中的函数,来关闭该窗口。
Dialog名为beginButton与endButton的aggregation,将button放在这两个aggregation中可以保证beginButton在endButton的前方。
如果文本是从左至右,那么按钮也是从左至右,如果文本是从右至左,那么按钮也是从右至左。
修改i18n.properties
# App Descriptor
appTitle=Hello World
appDescription=A simple walkthrough app that explains the most important concepts of SAPUI5

# Hello Panel
showHelloButtonText=Say Hello
helloMsg=Hello {0}
homePageTitle=Walkthrough
helloPanelTitle=Hello World
openDialogButtonText=Say Hello With Dialog
dialogCloseButtonText=Ok

18 Step 18: Icons
修改HelloPanel.view.xml
<mvc:View
   controllerName="sap.ui.demo.walkthrough.controller.HelloPanel"
   xmlns="sap.m"
   xmlns:mvc="sap.ui.core.mvc">
   <Panel
      headerText="{i18n>helloPanelTitle}"
      class="sapUiResponsiveMargin"
      width="auto" >
      <content>
         <Button
            id="helloDialogButton"
            icon="sap-icon://world"
            text="{i18n>openDialogButtonText}"
            press=".onOpenDialog"
            class="sapUiSmallMarginEnd"/>
         <Button
            text="{i18n>showHelloButtonText}"
            press=".onShowHello"
            class="myCustomButton"/>
         <Input
            value="{/recipient/name}"
            valueLiveUpdate="true"
            width="60%"/>
           <FormattedText
              htmlText="Hello {/recipient/name}"
              class="sapUiSmallMargin sapThemeHighlight-asColor myCustomText"/>
      </content>
   </Panel>
</mvc:View>
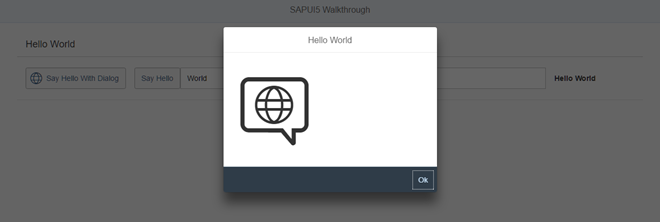
为button追加了一个icon,icon需要使用"sap-icon://"的规则来标示图标。
可以访问https://sapui5.hana.ondemand.com/test-resources/sap/m/demokit/iconExplorer/webapp/index.html来选择图标。
修改HelloDialog.fragment.xml
<core:FragmentDefinition
   xmlns="sap.m"
   xmlns:core="sap.ui.core" >
   <Dialog
      id="helloDialog"
      title ="Hello {/recipient/name}">
      <content>
         <core:Icon
            src="sap-icon://hello-world"
            size="8rem"
            class="sapUiMediumMargin"/>
      </content>
      <beginButton>
         <Button
            text="{i18n>dialogCloseButtonText}"
            press=".onCloseDialog"/>
      </beginButton>
   </Dialog>
</core:FragmentDefinition>
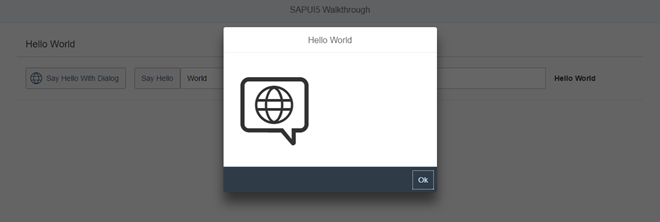
在Dialog中加入一个Icon的control,并放入Dialog的aggregation content中。
19 Step 19: Reuse Dialogs
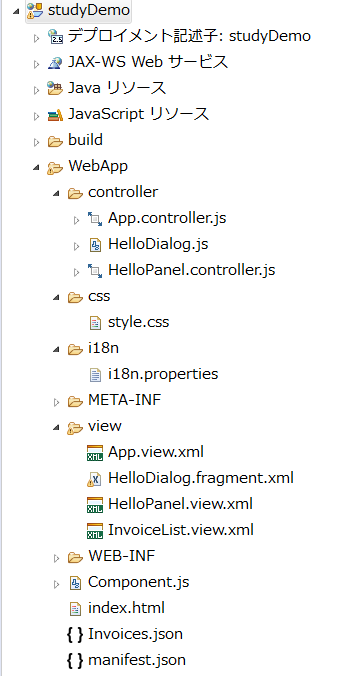
之前实装的Dialog并没有跨视图重用,因为我们将打开Dialog与关闭Dialog的方法放在了HelloPanel这个controller中了。如果使用这种方法,需要将打开Dialog与关闭Dialog的代码放到每个视图的控制器中。
所以我们需要在component级别上调用Dialog。
修改Component.js
sap.ui.define([
    "sap/ui/core/UIComponent",
    "sap/ui/model/json/JSONModel",
    "./controller/HelloDialog"

], function (UIComponent, JSONModel, HelloDialog) {
    "use strict";
    return UIComponent.extend("sap.ui.demo.walkthrough.Component", {
        metadata : {
            manifest : "json"
        },
        init : function () {
            // call the init function of the parent
            UIComponent.prototype.init.apply(this, arguments);
            // set data model
            var oData = {
                recipient : {
                    name : "World"
                }
            };
            var oModel = new JSONModel(oData);
            this.setModel(oModel);

            // set dialog
            this._helloDialog = new HelloDialog(this.getRootControl());
        },


        exit : function() {
            this._helloDialog.destroy();
            delete this._helloDialog;
        },

        openHelloDialog : function () {
            this._helloDialog.open();
        }
    });
});
this._helloDialog = new HelloDialog(this.getRootControl());
执行HelloDialog中的构造方法constructor。
对话框被实例化成一个新的对象,并被保存在component的私有属性中。我们需要将跟视图的实例传递给构造函数,因为需要将Dialog与根视图的生命周期进行连接。
可以通过查看manifest.json文件中的参数rootView来确定根视图,这里根视图是sap.ui.demo.walkthrough.view.App。
openHelloDialog函数,调用dialog对象的open方法。
exit函数为一个钩子函数,sapui5在销毁组件时调用exit的函数,这里销毁dialog对象。
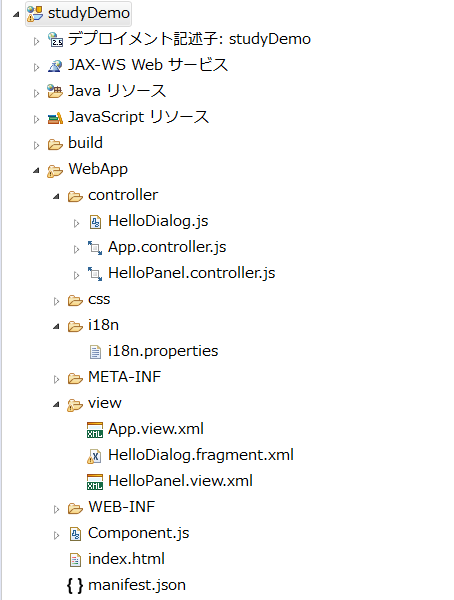
新建HelloDialog.js
sap.ui.define([
    "sap/ui/base/ManagedObject",
    "sap/ui/core/Fragment"
], function (ManagedObject, Fragment) {
    "use strict";

    return ManagedObject.extend("sap.ui.demo.walkthrough.controller.HelloDialog", {

        constructor : function (oView) {
            this._oView = oView;
        },

        exit : function () {
            delete this._oView;
        },

        open : function () {
            var oView = this._oView;

            // create dialog lazily
            if (!oView.byId("helloDialog")) {
                var oFragmentController = {
                    onCloseDialog : function () {
                        oView.byId("helloDialog").close();
                    }
                };
                // load asynchronous XML fragment
                Fragment.load({
                    id: oView.getId(),
                    name: "sap.ui.demo.walkthrough.view.HelloDialog",
                    controller: oFragmentController
                }).then(function (oDialog) {
                    // connect dialog to the root view of this component (models, lifecycle)
                    oView.addDependent(oDialog);
                    oDialog.open();
                });
            } else {
                oView.byId("helloDialog").open();
            }
        }

    });

});
扩展sap.ui.base.ManagedObject 对象,来继承sapui5的核心功能。
这里没有传递一个controller作为第三个参数给Fragment,只传递给了一个定义在local的对象,用来执行onCloseDialog函数。
open方法实现Dialog的实例化,oView对象是sap.ui.demo.walkthrough.view.App,因为在component的init方法中,执行了执行HelloDialog中的构造方法constructor。
exit函数会被自动调用,用来释放内存。
修改HelloPanel.controller.js
sap.ui.define([
    "sap/ui/core/mvc/Controller",
    "sap/m/MessageToast"
], function (Controller, MessageToast) {
    "use strict";
    return Controller.extend("sap.ui.demo.walkthrough.controller.HelloPanel", {
        onShowHello : function () {
            // read msg from i18n model
            var oBundle = this.getView().getModel("i18n").getResourceBundle();
            var sRecipient = this.getView().getModel().getProperty("/recipient/name");
            var sMsg = oBundle.getText("helloMsg", [sRecipient]);
            // show message
            MessageToast.show(sMsg);
        },
        onOpenDialog : function () {
            this.getOwnerComponent().openHelloDialog();
        }
    });
});
调用getOwnerComponent访问来componet,并调用openHelloDialog函数将当前的视图与Dialog进行绑定。
修改App.view.xml
<mvc:View
    controllerName="sap.ui.demo.walkthrough.controller.App"
    xmlns="sap.m"
    xmlns:mvc="sap.ui.core.mvc"
    displayBlock="true">
    <Shell>
        <App class="myAppDemoWT">
            <pages>
                <Page title="{i18n>homePageTitle}">
                    <headerContent>
                        <Button
                            icon="sap-icon://hello-world"
                            press=".onOpenDialog"/>
                    </headerContent>

                    <content>
                        <mvc:XMLView viewName="sap.ui.demo.walkthrough.view.HelloPanel"/>
                    </content>
                </Page>
            </pages>
        </App>
    </Shell>
</mvc:View>
追加一个按钮,以显示对话框的重用。
修改App.controller.js
sap.ui.define([
    "sap/ui/core/mvc/Controller"
], function (Controller) {
    "use strict";

    return Controller.extend("sap.ui.demo.walkthrough.controller.App", {

        onOpenDialog : function () {
            this.getOwnerComponent().openHelloDialog();
        }
    });

});
添加函数用来打开Dialog。
20 Step 20: Aggregation Binding
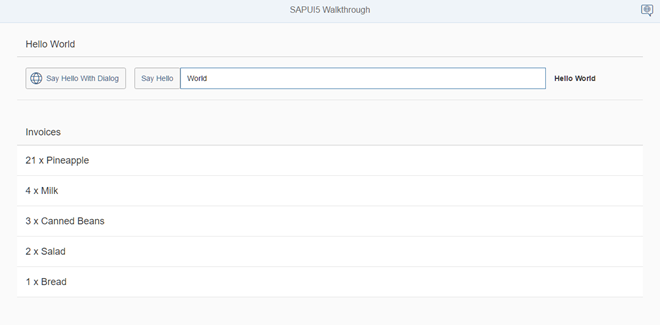
将json数据绑定在页面上。
新建Invoices.json
{
  "Invoices": [
    {
      "ProductName": "Pineapple",
      "Quantity": 21,
      "ExtendedPrice": 87.2000,
      "ShipperName": "Fun Inc.",
      "ShippedDate": "2015-04-01T00:00:00",
      "Status": "A"
    },
    {
      "ProductName": "Milk",
      "Quantity": 4,
      "ExtendedPrice": 9.99999,
      "ShipperName": "ACME",
      "ShippedDate": "2015-02-18T00:00:00",
      "Status": "B"
    },
    {
      "ProductName": "Canned Beans",
      "Quantity": 3,
      "ExtendedPrice": 6.85000,
      "ShipperName": "ACME",
      "ShippedDate": "2015-03-02T00:00:00",
      "Status": "B"
    },
    {
      "ProductName": "Salad",
      "Quantity": 2,
      "ExtendedPrice": 8.8000,
      "ShipperName": "ACME",
      "ShippedDate": "2015-04-12T00:00:00",
      "Status": "C"
    },
    {
      "ProductName": "Bread",
      "Quantity": 1,
      "ExtendedPrice": 2.71212,
      "ShipperName": "Fun Inc.",
      "ShippedDate": "2015-01-27T00:00:00",
      "Status": "A"
    }
  ]
}
修改manifest.json
{
…
  "sap.ui5": {
    "rootView": "sap.ui.demo.walkthrough.view.App",
[…]
    "models": {
      "i18n": {
        "type": "sap.ui.model.resource.ResourceModel",
        "settings": {
          "bundleName": "sap.ui.demo.walkthrough.i18n.i18n"
        }
      },
      "invoice": {
        "type": "sap.ui.model.json.JSONModel",
        "uri": "Invoices.json"
      }
    }
  }
}
新添加了一个model invoice,因为是一个json数据,所以设置成JSONModel的type,uri是相对于component的路径,通过这个配置,component会自动实例化一个JSONModel,将丛 Invoices.json文件中加载数据。
最后将实例化的JSONModel命名为invoice model放到组件上。这个被命名的model,在整个app中都是可见的。
修改App.view.xml
<mvc:View
    controllerName="sap.ui.demo.walkthrough.controller.App"
    xmlns="sap.m"
    xmlns:mvc="sap.ui.core.mvc"
    displayBlock="true">
    <Shell>
        <App class="myAppDemoWT">
            <pages>
                <Page title="{i18n>homePageTitle}">
                    <headerContent>
                        <Button
                            icon="sap-icon://hello-world"
                            press=".onOpenDialog"/>
                    </headerContent>
                    <content>
                        <mvc:XMLView viewName="sap.ui.demo.walkthrough.view.HelloPanel"/>
                        <mvc:XMLView viewName="sap.ui.demo.walkthrough.view.InvoiceList"/>
                    </content>
                </Page>
            </pages>
        </App>
    </Shell>
</mvc:View>
新建InvoiceList.view.xml
<mvc:View
   xmlns="sap.m"
   xmlns:mvc="sap.ui.core.mvc">
   <List
      headerText="{i18n>invoiceListTitle}"
      class="sapUiResponsiveMargin"
      width="auto"
      items="{invoice>/Invoices}" >
      <items>
         <ObjectListItem
            title="{invoice>Quantity} x {invoice>ProductName}"/>
      </items>
   </List>
</mvc:View>
在这个新的view中,会显示一个list的控件,在list的aggregation item中,为其绑定json数据的根路径Invoices,由于我们为model进行了命名,所以在每个绑定之前都要加上"invoice>"。
在aggregation items中,定义了一个模板,将自动地放入json数据。更准确的说,是使用了ObjectListItem为items aggregation创建子控件。
将单个invoice的一些属性绑定到tltle上,这里使用一个相对路径不包含"/"。由于我们使用了items={invoice>/ invoice}将invoices绑定到了控件,所以我们可以进行访问。
修改i18n.properties
# App Descriptor
appTitle=Hello World
appDescription=A simple walkthrough app that explains the most important concepts of SAPUI5

# Hello Panel
showHelloButtonText=Say Hello
helloMsg=Hello {0}
homePageTitle=Walkthrough
helloPanelTitle=Hello World
openDialogButtonText=Say Hello With Dialog
dialogCloseButtonText=Ok

# Invoice List
invoiceListTitle=Invoices
将后台数据放入JSONModel
                oModel.read("/DocumentSet/", {
                    async: false,
                    filters: aFilter,
                    success: function (oERP) {
                        that.fHideBusyIndicator();
                        if (oERP.results[0].MSGTY == "E") {
                            that.fShowMessageBox('error', oERP.results[0].MSGCT);
                            that.getView().byId("table").setModel(new JSONModel([]));
                            that.getView().setModel(new JSONModel());
                            return;
                        } else if (oERP.results[0].MSGTY == "S") {
                            sCount = oERP.results.length;
                            //Inner table search field
                            for (var i in oERP.results) {
                                var posnr = oERP.results[i].POSNR;
                                var matnr = oERP.results[i].MATNR;
                                var maktx = oERP.results[i].MAKTX;
                                var menge = oERP.results[i].MENGE;
                                var meins = oERP.results[i].MEINS;
                                var kostl = oERP.results[i].KOSTL;
                                var grund = oERP.results[i].GRUND;
                                var zcomm = oERP.results[i].ZCOMM;
                                var lfdat = oERP.results[i].LFDAT;
                                var total = oERP.results[i].TOTAL;
                                oERP.results[i].filter = posnr + matnr + maktx + menge + meins + kostl + grund + zcomm + lfdat + total;
                            }
                            var oTable = that.getView().byId('table');
                            var oModel = new JSONModel(oERP);
                            oTable.setModel(oModel);
                        }
                    },
                    error: function (oError) {
                        that.fHideBusyIndicator();
                        that.getView().setModel(new JSONModel());
                        that.fShowMessageBox('error', oError.message);
                    }
                });