redis介绍

1.aof存储的文件会越来越大,当文件很大时我们可以进行一次rdb存储原来的aof文件就可以删除了,因为aof就相当与mysql中的binlog文件会一致增长,当redis里面的key过期了,这个记录还在,所以当aof文件很大时应该做一次rdb存储。
redis安装

1.下载redis包
[root@centos-02 src]# wget http://download.redis.io/releases/redis-4.0.8.tar.gz
--2018-03-26 22:05:06--  http://download.redis.io/releases/redis-4.0.8.tar.gz
正在解析主机 download.redis.io (download.redis.io)... 109.74.203.151
正在连接 download.redis.io (download.redis.io)|109.74.203.151|:80... 已连接。
已发出 HTTP 请求,正在等待回应... 200 OK
长度:1729973 (1.6M) [application/x-gzip]
正在保存至: “redis-4.0.8.tar.gz”

100%[===============================================>] 1,729,973    228KB/s 用时 7.8s

2018-03-26 22:05:16 (218 KB/s) - 已保存 “redis-4.0.8.tar.gz” [1729973/1729973])

[root@centos-02 src]#
2.解压并编译安装
[root@centos-02 src]# tar -zxvf redis-4.0.8.tar.gz
[root@centos-02 src]# cd redis-4.0.8
[root@centos-02 redis-4.0.8]# make && make install
3.redis默认安装目录/usr/local/bin/
[root@centos-02 redis-4.0.8]# echo $?
0
[root@centos-02 redis-4.0.8]# which redis-cli
/usr/local/bin/redis-cli
[root@centos-02 redis-4.0.8]#
4.将配置文件拷贝到/ect/目录并将daemonize设置为yes,这样设置启动redis会自动在后台启动,这个终端不会被占用
[root@centos-02 redis-4.0.8]#
[root@centos-02 redis-4.0.8]# cp redis.conf /etc/
[root@centos-02 redis-4.0.8]# vim /etc/redis.conf
daemonize yes
logfile "/var/log/redis.log" (定义日志文件路径)
databases 16 (redis默认有16个库)

下面是设置rdb持久化的
save 900 1    九百秒发生了一次更改就会记录到磁盘去
save 300 10
save 60 10000

定义rdb文件放到什么位置,aof文件也会放到这里
dir /data/redis
开启aof
appendonly yes

aof文件名
appendfilename "appendonly.aof"

什么时候记录日志,默认是每一秒都会记录
appendfsync everysec
5.创建data/redis目录
[root@centos-02 redis-4.0.8]# mkdir -p /data/redis
[root@centos-02 redis-4.0.8]#
6.启动redis
[root@centos-02 redis-4.0.8]# redis-server /etc/redis.conf
[root@centos-02 redis-4.0.8]# ps aux|grep redis
root       5691  1.5  0.7 145264  7464 ?        Ssl  22:33   0:00 redis-server 127.0.0.1:6379
root       5696  0.0  0.0 112680   944 pts/0    R+   22:34   0:00 grep --color=auto redi
[root@centos-02 redis-4.0.8]#
7.查看redis日志
[root@centos-02 redis-4.0.8]# less /var/log/redis.log


5690:C 26 Mar 22:33:58.547 # oO0OoO0OoO0Oo Redis is starting oO0OoO0OoO0Oo
5690:C 26 Mar 22:33:58.549 # Redis version=4.0.8, bits=64, commit=00000000, modified=0, pid=5690, just started
5690:C 26 Mar 22:33:58.550 # Configuration loaded
5691:M 26 Mar 22:33:58.572 * Increased maximum number of open files to 10032 (it was originally set to 1024).
                _._
           _.-``__ ''-._
      _.-``    `.  `_.  ''-._           Redis 4.0.8 (00000000/0) 64 bit
  .-`` .-```.  ```/    _.,_ ''-._
 (    '      ,       .-`  | `,    )     Running in standalone mode
 |`-._`-...-` __...-.``-._|'` _.-'|     Port: 6379
 |    `-._   `._    /     _.-'    |     PID: 5691
  `-._    `-._  `-./  _.-'    _.-'
 |`-._`-._    `-.__.-'    _.-'_.-'|
 |    `-._`-._        _.-'_.-'    |           http://redis.io
  `-._    `-._`-.__.-'_.-'    _.-'
 |`-._`-._    `-.__.-'    _.-'_.-'|
 |    `-._`-._        _.-'_.-'    |
  `-._    `-._`-.__.-'_.-'    _.-'
      `-._    `-.__.-'    _.-'
          `-._        _.-'
              `-.__.-'

5691:M 26 Mar 22:33:58.588 # WARNING: The TCP backlog setting of 511 cannot be enforced b
ecause /proc/sys/net/core/somaxconn is set to the lower value of 128.
5691:M 26 Mar 22:33:58.588 # Server initialized
5691:M 26 Mar 22:33:58.589 # WARNING overcommit_memory is set to 0! Background save may f
ail under low memory condition. To fix this issue add 'vm.overcommit_memory = 1' to /etc/
sysctl.conf and then reboot or run the command 'sysctl vm.overcommit_memory=1' for this t
o take effect.
5691:M 26 Mar 22:33:58.590 # WARNING you have Transparent Huge Pages (THP) support enable
d in your kernel. This will create latency and memory usage issues with Redis. To fix thi
s issue run the command 'echo never > /sys/kernel/mm/transparent_hugepage/enabled' as roo
t, and add it to your /etc/rc.local in order to retain the setting after a reboot. Redis
must be restarted after THP is disabled.
5691:M 26 Mar 22:33:58.590 * Ready to accept connections
8.日志有警告提示,我们下面修复下,在命令行执行
[root@centos-02 redis-4.0.8]# sysctl vm.overcommit_memory=1
vm.overcommit_memory = 1
[root@centos-02 redis-4.0.8]# echo never > /sys/kernel/mm/transparent_hugepage/enabled
[root@centos-02 redis-4.0.8]#
9.将这两条命令放到rc.local里,让系统一启动就执行
[root@centos-02 redis-4.0.8]# cat /etc/rc.local
#!/bin/bash
# THIS FILE IS ADDED FOR COMPATIBILITY PURPOSES
#
# It is highly advisable to create own systemd services or udev rules
# to run scripts during boot instead of using this file.
#
# In contrast to previous versions due to parallel execution during boot
# this script will NOT be run after all other services.
#
# Please note that you must run 'chmod +x /etc/rc.d/rc.local' to ensure
# that this script will be executed during boot.

touch /var/lock/subsys/local
sysctl vm.overcommit_memory=1
echo never > /sys/kernel/mm/transparent_hugepage/enabled
[root@centos-02 redis-4.0.8]#
10.启动
[root@centos-02 redis-4.0.8]# redis-server /etc/redis.conf
[root@centos-02 redis-4.0.8]#
redis持久化
1.关闭rdb持久化
[root@centos-02 redis-4.0.8]# vim /etc/redis.conf
[root@centos-02 redis-4.0.8]#
save ""

#save 900 1
#save 300 10
#save 60 10000
2.数据恢复首选aof
redis数据类型

1.redis可以设置密码,当没有密码我们可以直接进入到redis
[root@centos-02 redis-4.0.8]# redis-cli
127.0.0.1:6379>
2.设置key,获取key的值
127.0.0.1:6379> set mykey "123"
OK
127.0.0.1:6379> get mykey
"123"
127.0.0.1:6379>
3.一次设置对个key,获取多个key
127.0.0.1:6379> mset k1 1 k2 2 k3 3
OK
127.0.0.1:6379> mget k1 k2
1) "1"
2) "2"
127.0.0.1:6379>

1.list中lpush往队列推数据
127.0.0.1:6379> lpush list1 "linux"
(integer) 1
127.0.0.1:6379> lpush list1 "123"
(integer) 2
127.0.0.1:6379> lpush list1 "aaa"
(integer) 3
127.0.0.1:6379>
2.查看队列里面的值从0开始到最后一个
127.0.0.1:6379> lrange list1 0 -1
1) "aaa"
2) "123"
3) "linux"
127.0.0.1:6379>
3.用lpop取数据,取出来的数据就不在list里面了
127.0.0.1:6379> lpop list1
"aaa"
127.0.0.1:6379> lrange list1 0 -1
1) "123"
2) "linux"
127.0.0.1:6379>
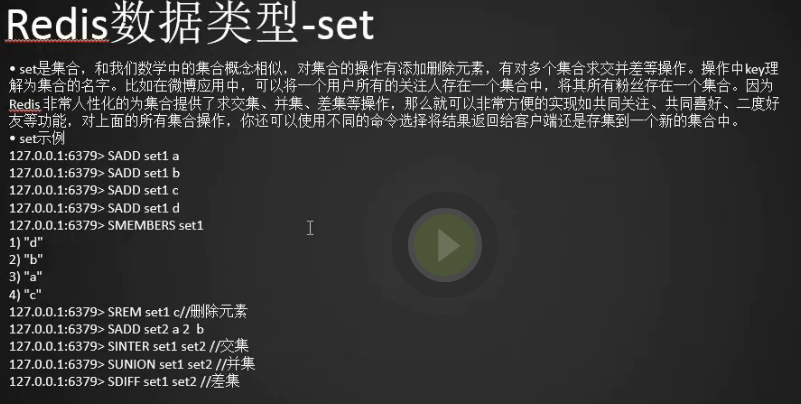
1.向set1集合中添加a b c
127.0.0.1:6379> sadd set1 a
(integer) 1
127.0.0.1:6379> sadd set1 b
(integer) 1
127.0.0.1:6379> sadd set1 c
(integer) 1
127.0.0.1:6379> smembers set1
1) "b"
2) "c"
3) "a"
127.0.0.1:6379>
2.向set2集合中添加a 1 2
127.0.0.1:6379> sadd set2 a
(integer) 1
127.0.0.1:6379> sadd set2 1
(integer) 1
127.0.0.1:6379> sadd set2 2
(integer) 1
127.0.0.1:6379> smembers set2
1) "1"
2) "2"
3) "a"
127.0.0.1:6379>
3.sunion求set1和set2的并集
127.0.0.1:6379> sunion set1 set2
1) "c"
2) "a"
3) "b"
4) "1"
5) "2"
127.0.0.1:6379>
4.sinter求交集
127.0.0.1:6379> sinter set1 set2
1) "a"
127.0.0.1:6379>
5.sdiff求差集
127.0.0.1:6379> sdiff set1 set2
1) "b"
2) "c"
127.0.0.1:6379>
6.srem删除集合中的某个元素
127.0.0.1:6379> srem set1 a
(integer) 1
127.0.0.1:6379> smembers set1
1) "b"
2) "c"
127.0.0.1:6379>
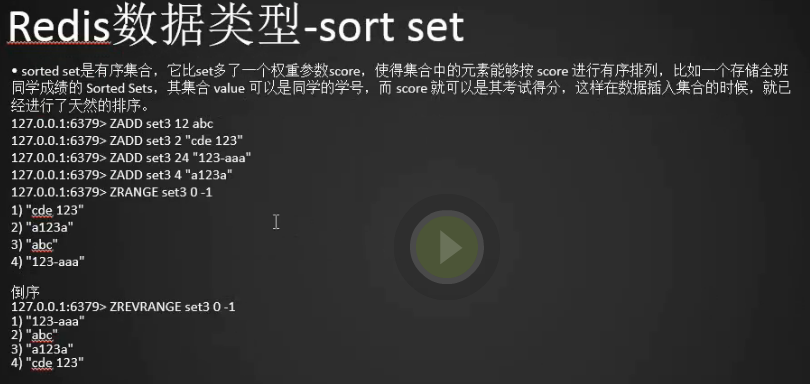
1.zadd添加有序集合,查看的时候发现按score正序排了
127.0.0.1:6379>
127.0.0.1:6379> zadd set3 12 abc
(integer) 1
127.0.0.1:6379> zadd set3 2 aaa
(integer) 1
127.0.0.1:6379> zadd set3 24 bbb
(integer) 1
127.0.0.1:6379> zadd set3 4 ccc
(integer) 1
127.0.0.1:6379> zrange set 3 0 -1
(error) ERR syntax error
127.0.0.1:6379> zrange set3 0 -1
1) "aaa"
2) "ccc"
3) "abc"
4) "bbb"
127.0.0.1:6379>
2.zrevrange按score倒序排
127.0.0.1:6379> zrevrange set3 0 -1
1) "bbb"
2) "abc"
3) "ccc"
4) "aaa"
127.0.0.1:6379>

1.设置hash
127.0.0.1:6379>
127.0.0.1:6379> hset hash1 name linux
(integer) 1
127.0.0.1:6379> hset hash1 age 30
(integer) 1
127.0.0.1:6379> hset hash1 job it
(integer) 1
127.0.0.1:6379>
2.获取hash1里面的属性的值
127.0.0.1:6379> hget hash1 name
"linux"
127.0.0.1:6379> hget hash1 age
"30"
127.0.0.1:6379> hget hash1 job
"it"
127.0.0.1:6379>
3.获取全部的hash1的值,奇数行是key,偶数行是value
127.0.0.1:6379> hgetall hash1
1) "name"
2) "linux"
3) "age"
4) "30"
5) "job"
6) "it"
127.0.0.1:6379>
redis常用操作
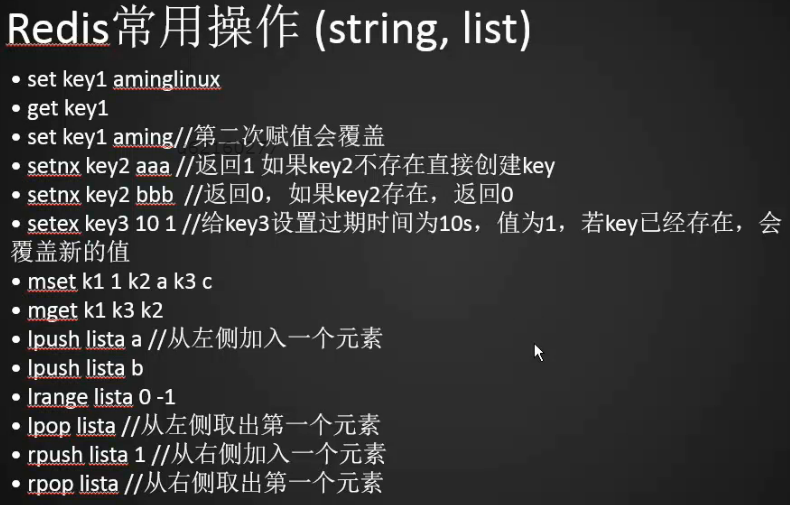
1.set一个key1值为1,然后再set一个key1值为2,则前面的key1值会被覆盖掉
127.0.0.1:6379> set key1 1
OK
127.0.0.1:6379> set key1 2
OK
127.0.0.1:6379> get key1
"2"
127.0.0.1:6379>
2.当一个key存在我们用setnx时会返回0,key不存在时会返回1并插入数据成功
127.0.0.1:6379> setnx key1 aaa
(integer) 0
127.0.0.1:6379> setnx key2 bbb
(integer) 1
127.0.0.1:6379> get key2
"bbb"
127.0.0.1:6379>
3.set命令设置超时时间10秒过期,过期后返回nil
127.0.0.1:6379> set key3 ccc ex 10
OK
127.0.0.1:6379> get key3
"ccc"
127.0.0.1:6379> get key3
(nil)
127.0.0.1:6379>
4.setex设置超时时间为10秒,过期后返回nil
127.0.0.1:6379> setex key4 10 ddd
OK
127.0.0.1:6379> get key4
"ddd"
127.0.0.1:6379> get key4
(nil)
127.0.0.1:6379>
5.lpush,从左边往list里推数据,返回值递增,当我们取数据的时候发现先进去的排在后面后进去的排在前面。
127.0.0.1:6379> lpush list2 aaa
(integer) 1
127.0.0.1:6379> lpush list2 bbb
(integer) 2
127.0.0.1:6379> lrange list2 0 -1
1) "bbb"
2) "aaa"
127.0.0.1:6379>
6.lpop先取出最后推进去的数据,从左侧取出一个元素(取出来列表中就没有数据了)
127.0.0.1:6379> lpop list2
"bbb"
127.0.0.1:6379>
7.rpush是从右边取出第一个数据
127.0.0.1:6379> rpop list2
"aaa"
127.0.0.1:6379>
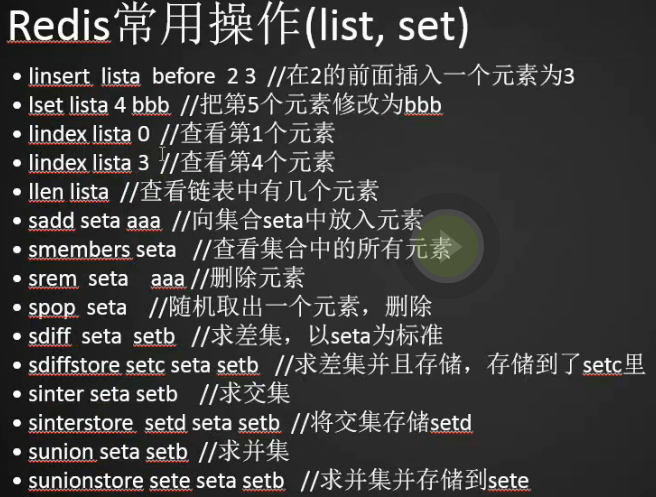
1.linsert在123的前面插入bbb,在linux的后面插入xp
127.0.0.1:6379> lrange list1 0 -1
1) "aaa"
2) "123"
3) "linux"
127.0.0.1:6379> linsert list1 before 123 bbb
(integer) 4
127.0.0.1:6379> linsert list1 after linux xp
(integer) 5
127.0.0.1:6379> lrange list1 0 -1
1) "aaa"
2) "bbb"
3) "123"
4) "linux"
5) "xp"
127.0.0.1:6379>
2.lset把第一个值aaa修改为111
127.0.0.1:6379> lset list1 0 111
OK
127.0.0.1:6379> lrange list1 0 -1
1) "111"
2) "bbb"
3) "123"
4) "linux"
5) "xp"
127.0.0.1:6379>
3.lindex查看第一个元素,不弹出
127.0.0.1:6379> lindex list1 0
"111"
127.0.0.1:6379>
4.llen查看列表中有几个元素
127.0.0.1:6379> llen list1
(integer) 5
127.0.0.1:6379>
5.sadd向集合中插入数据,smembers查看集合中的元素
127.0.0.1:6379> sadd seta aaa
(integer) 1
127.0.0.1:6379> sadd seta bbb
(integer) 1
127.0.0.1:6379> smembers seta
1) "bbb"
2) "aaa"
127.0.0.1:6379>
6.srem删除元素aaa
127.0.0.1:6379> smembers seta
1) "bbb"
2) "aaa"
127.0.0.1:6379> srem seta aaa
(integer) 1
127.0.0.1:6379> smembers seta
1) "bbb"
127.0.0.1:6379>
7.spop随机取出集合中一个元素,多个可以加数字 spop seta 1
127.0.0.1:6379> spop seta
"bbb"
127.0.0.1:6379>
8.sdiff求差集,以前面的集合为主 seta
127.0.0.1:6379> sadd seta aaa
(integer) 1
127.0.0.1:6379> sadd seta bbb
(integer) 1
127.0.0.1:6379> sadd seta ccc
(integer) 1
127.0.0.1:6379> sadd seta ddd
(integer) 1
127.0.0.1:6379> sadd seta eee
(integer) 1
127.0.0.1:6379> smembers seta
1) "bbb"
2) "ddd"
3) "ccc"
4) "aaa"
5) "eee"
127.0.0.1:6379> sadd setb 111
(integer) 1
127.0.0.1:6379> sadd setb 222
(integer) 1
127.0.0.1:6379> sadd setb 333
(integer) 1
127.0.0.1:6379> sadd setb 444
(integer) 1
127.0.0.1:6379> sadd setb 555
(integer) 1
127.0.0.1:6379> smembers setb
1) "111"
2) "222"
3) "333"
4) "444"
5) "555"
127.0.0.1:6379>
127.0.0.1:6379> sdiff seta setb
1) "bbb"
2) "ddd"
3) "aaa"
4) "ccc"
5) "eee"
127.0.0.1:6379>
9.sdiffstore求差集并且存储,存到setc中
127.0.0.1:6379> sdiffstore setc seta setb
(integer) 5
127.0.0.1:6379> smembers setc
1) "bbb"
2) "ddd"
3) "aaa"
4) "ccc"
5) "eee"
127.0.0.1:6379>
10.sinter求seta setb的交集(也可以用sinterstore将交集存储到新的集合中)
127.0.0.1:6379> sinter seta setb
(empty list or set)
127.0.0.1:6379>
11.sunion求并集(也可以用sunionstore将并集存储到新的集合中)
127.0.0.1:6379> sunion seta setb
 1) "222"
 2) "111"
 3) "bbb"
 4) "333"
 5) "ddd"
 6) "ccc"
 7) "aaa"
 8) "444"
 9) "555"
10) "eee"
127.0.0.1:6379>

1.sismember判断一个元素是否在一个集合里,在返回1,不在返回0
127.0.0.1:6379> sismember seta aaa
(integer) 1
127.0.0.1:6379>
2.srandmember随机取出几个元素,但不删除,类似与spop(spop取出元素后就没有了)
127.0.0.1:6379> srandmember seta 2
1) "ddd"
2) "aaa"
127.0.0.1:6379>
3.zadd创建有序集合,zrange查看集合元素默认按score正序排,可以带上分值
127.0.0.1:6379> zadd zseta 11 123
(integer) 1
127.0.0.1:6379> zadd zseta 1 111
(integer) 1
127.0.0.1:6379> zadd zseta 3 333
(integer) 1
127.0.0.1:6379> zrange zseta 0 -1
1) "111"
2) "333"
3) "123"
127.0.0.1:6379>
4.删除某个元素
127.0.0.1:6379> zrem zseta 123
(integer) 1
127.0.0.1:6379> zrange zseta 0 -1
1) "111"
2) "333"
127.0.0.1:6379>
5.zrank返回元素的索引值,索引值从0开始,按score正向排序
127.0.0.1:6379> zrank zseta 333
(integer) 1
127.0.0.1:6379>
6.zrevrank和zrank相反,按score反序排序
127.0.0.1:6379> zrevrank zseta 333
(integer) 0
127.0.0.1:6379>
7.zrevrange反序显示所有元素并带分值和zrange相反
127.0.0.1:6379> zrevrange zseta 0 -1
1) "333"
2) "111"
127.0.0.1:6379>
8.zcard返回集合中所有元素的个数
127.0.0.1:6379> zcard zseta
(integer) 2
127.0.0.1:6379>
9.zcount返回分值(10-100)范围元素的个数
127.0.0.1:6379> zcount zseta 10 100
(integer) 0
127.0.0.1:6379> zcount zseta 1 100
(integer) 2
127.0.0.1:6379>
10.zrangebyscore返回分值范围的元素
127.0.0.1:6379> zrangebyscore zseta 1 100
1) "111"
2) "333"
127.0.0.1:6379>
11.zremrangebyrank删除索引范围0-2的元素
127.0.0.1:6379> zremrangebyrank zseta 0 2
(integer) 2
127.0.0.1:6379>
12.删除分值范围0-2的元素
127.0.0.1:6379> zremrangebyscore zseta 0 2
(integer) 0
127.0.0.1:6379>
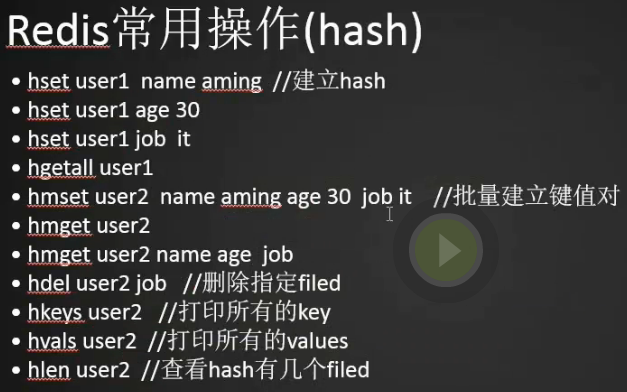
1.hmset批量建立元素键值对,hgetall获取所有的键值,奇数为键,偶数为值
127.0.0.1:6379> hmset hash2 a 1 b 2 c 3 d 4
OK
127.0.0.1:6379> hgetall hash2
1) "a"
2) "1"
3) "b"
4) "2"
5) "c"
6) "3"
7) "d"
8) "4"
127.0.0.1:6379>
2.hmget批量获取键的值
127.0.0.1:6379> hmget hash2 a
1) "1"
127.0.0.1:6379> hmget hash2 b c
1) "2"
2) "3"
127.0.0.1:6379>
3.hdel删除指定的filed
127.0.0.1:6379> hdel hash2 a
(integer) 1
127.0.0.1:6379> hgetall hash2
1) "b"
2) "2"
3) "c"
4) "3"
5) "d"
6) "4"
127.0.0.1:6379>
4.hkeys打印所有的key
127.0.0.1:6379> hkeys hash2
1) "b"
2) "c"
3) "d"
127.0.0.1:6379>
5.hvals打印所有的值
127.0.0.1:6379> hvals hash2
1) "2"
2) "3"
3) "4"
127.0.0.1:6379>
6.查看hash有几个filed
127.0.0.1:6379> hlen hash2
(integer) 3
127.0.0.1:6379>
redis操作键值
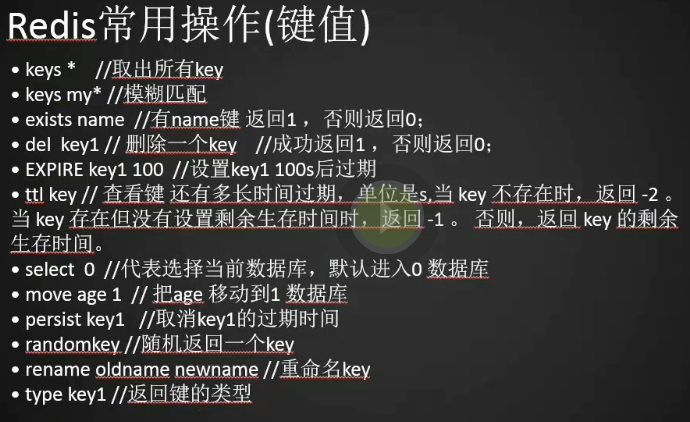
1.keys *取出redis中所有的key
127.0.0.1:6379> keys *
 1) "setb"
 2) "seta"
 3) "mykey"
 4) "k1"
 5) "k3"
 6) "setc"
 7) "hash2"
 8) "key1"
 9) "set1"
10) "key2"
11) "k2"
12) "hash1"
13) "list1"
14) "set2"
15) "set3"
127.0.0.1:6379>
2.keys支持模糊匹配
127.0.0.1:6379> keys my*
1) "mykey"
127.0.0.1:6379>
3.exists查看键是否存在,存在返回1不存在返回0
127.0.0.1:6379> exists mykey
(integer) 1
127.0.0.1:6379> exists mykey1
(integer) 0
127.0.0.1:6379>
4.del删除一个key,成功返回1
127.0.0.1:6379> del k1
(integer) 1
127.0.0.1:6379> keys *
 1) "setb"
 2) "seta"
 3) "mykey"
 4) "k3"
 5) "setc"
 6) "hash2"
 7) "key1"
 8) "set1"
 9) "key2"
10) "k2"
11) "hash1"
12) "list1"
13) "set2"
14) "set3"
127.0.0.1:6379>
5.expire设置key多长时间过期
127.0.0.1:6379> expire k2 10
(integer) 1
127.0.0.1:6379> keys *
 1) "setb"
 2) "seta"
 3) "mykey"
 4) "k3"
 5) "setc"
 6) "hash2"
 7) "key1"
 8) "set1"
 9) "key2"
10) "k2"
11) "hash1"
12) "list1"
13) "set2"
14) "set3"
127.0.0.1:6379> keys *
 1) "setb"
 2) "seta"
 3) "mykey"
 4) "k3"
 5) "setc"
 6) "hash2"
 7) "key1"
 8) "set1"
 9) "key2"
10) "hash1"
11) "list1"
12) "set2"
13) "set3"
127.0.0.1:6379>
6.ttl设置查看key还有多长时间过期,到key过期了ttl执行的结果返回-2,当key存在但没有设置过期时间ttl返回-1
127.0.0.1:6379> get k3
"3"
127.0.0.1:6379> expire k3 10
(integer) 1
127.0.0.1:6379> ttl k3
(integer) 6
127.0.0.1:6379> ttl k3
(integer) 5
127.0.0.1:6379> ttl k3
(integer) -2
127.0.0.1:6379> get k3
(nil)
127.0.0.1:6379>
127.0.0.1:6379> ttl key1
(integer) -1
127.0.0.1:6379>
7.redis默认的库在0下面,一共有16个库,当我们选择1库是发现下面没有key
127.0.0.1:6379> select 1
OK
127.0.0.1:6379[1]> keys *
(empty list or set)
127.0.0.1:6379[1]>
8.move将0库中的键set2移动到1库中
127.0.0.1:6379> move set2 1
(integer) 1
127.0.0.1:6379> select 1
OK
127.0.0.1:6379[1]> keys *
1) "set2"
127.0.0.1:6379[1]>
9.expire取消key的过期时间,成功返回1
127.0.0.1:6379> expire key1 1000
(integer) 1
127.0.0.1:6379> ttl key1
(integer) 994
127.0.0.1:6379> ttl key1
(integer) 990
127.0.0.1:6379> persist key1
(integer) 1
127.0.0.1:6379> ttl key1
(integer) -1
127.0.0.1:6379>
10.randomkey随机返回一个key
127.0.0.1:6379> randomkey
"list1"
127.0.0.1:6379> randomkey
"key1"
127.0.0.1:6379>
11.rename将key重命名
127.0.0.1:6379> keys *
 1) "setb"
 2) "seta"
 3) "mykey"
 4) "setc"
 5) "hash2"
 6) "key1"
 7) "set1"
 8) "key2"
 9) "hash1"
10) "list1"
11) "set3"
127.0.0.1:6379> rename set3 set2
OK
127.0.0.1:6379> keys set*
1) "setb"
2) "seta"
3) "setc"
4) "set1"
5) "set2"
127.0.0.1:6379>
12.type返回key的类型
127.0.0.1:6379> type set2
zset
127.0.0.1:6379> type key1
string
127.0.0.1:6379> type list1
list
127.0.0.1:6379>
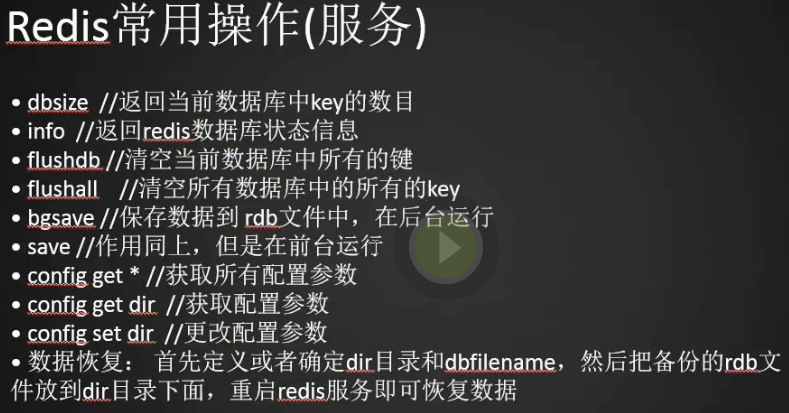
1.dbsize返回当前数据库中key的数目
127.0.0.1:6379> dbsize
(integer) 11
127.0.0.1:6379>
2.info返回redis服务器状态信息
127.0.0.1:6379> info
# Server
redis_version:4.0.8
redis_git_sha1:00000000
redis_git_dirty:0
redis_build_id:1e69ef108354b3c7
redis_mode:standalone
os:Linux 3.10.0-514.el7.x86_64 x86_64
arch_bits:64
multiplexing_api:epoll
atomicvar_api:atomic-builtin
gcc_version:4.8.5
process_id:5691
run_id:e0d06093b5cd94da20afe518283fb7643e82b0b6
tcp_port:6379
uptime_in_seconds:171939
uptime_in_days:1
hz:10
lru_clock:12297337
executable:/usr/local/src/redis-4.0.8/redis-server
config_file:/etc/redis.conf

# Clients
connected_clients:1
client_longest_output_list:0
client_biggest_input_buf:0
blocked_clients:0

# Memory
used_memory:829776
used_memory_human:810.33K
used_memory_rss:7892992
used_memory_rss_human:7.53M
used_memory_peak:829776
used_memory_peak_human:810.33K
used_memory_peak_perc:100.09%
used_memory_overhead:815974
used_memory_startup:765672
used_memory_dataset:13802
used_memory_dataset_perc:21.53%
total_system_memory:1023934464
total_system_memory_human:976.50M
used_memory_lua:37888
used_memory_lua_human:37.00K
maxmemory:0
maxmemory_human:0B
maxmemory_policy:noeviction
mem_fragmentation_ratio:9.51
mem_allocator:jemalloc-4.0.3
active_defrag_running:0
lazyfree_pending_objects:0

# Persistence
loading:0
rdb_changes_since_last_save:0
rdb_bgsave_in_progress:0
rdb_last_save_time:1522245386
rdb_last_bgsave_status:ok
rdb_last_bgsave_time_sec:0
rdb_current_bgsave_time_sec:-1
rdb_last_cow_size:2387968
aof_enabled:1
aof_rewrite_in_progress:0
aof_rewrite_scheduled:0
aof_last_rewrite_time_sec:-1
aof_current_rewrite_time_sec:-1
aof_last_bgrewrite_status:ok
aof_last_write_status:ok
aof_last_cow_size:0
aof_current_size:2826
aof_base_size:0
aof_pending_rewrite:0
aof_buffer_length:0
aof_rewrite_buffer_length:0
aof_pending_bio_fsync:0
aof_delayed_fsync:0

# Stats
total_connections_received:3
total_commands_processed:193
instantaneous_ops_per_sec:0
total_net_input_bytes:6284
total_net_output_bytes:34691
instantaneous_input_kbps:0.00
instantaneous_output_kbps:0.00
rejected_connections:0
sync_full:0
sync_partial_ok:0
sync_partial_err:0
expired_keys:4
evicted_keys:0
keyspace_hits:81
keyspace_misses:9
pubsub_channels:0
pubsub_patterns:0
latest_fork_usec:2257
migrate_cached_sockets:0
slave_expires_tracked_keys:0
active_defrag_hits:0
active_defrag_misses:0
active_defrag_key_hits:0
active_defrag_key_misses:0

# Replication
role:master
connected_slaves:0
master_replid:6dd6f7728411ff03e2f2ee30fb0df078b1c5d013
master_replid2:0000000000000000000000000000000000000000
master_repl_offset:0
second_repl_offset:-1
repl_backlog_active:0
repl_backlog_size:1048576
repl_backlog_first_byte_offset:0
repl_backlog_histlen:0

# CPU
used_cpu_sys:53.70
used_cpu_user:171.24
used_cpu_sys_children:1.04
used_cpu_user_children:0.06

# Cluster
cluster_enabled:0

# Keyspace
db0:keys=11,expires=0,avg_ttl=0
db1:keys=1,expires=0,avg_ttl=0
127.0.0.1:6379>
3.flushdb清空当前数据库中所有的key,flushall清空所有数据库中的key
127.0.0.1:6379> select 1
OK
127.0.0.1:6379[1]> keys *
1) "set2"
127.0.0.1:6379[1]> flushdb
OK
127.0.0.1:6379[1]> keys *
(empty list or set)
127.0.0.1:6379[1]>
4.bgsave保存文件到rdb文件中,在后台运行 save作用通上,但是在前台运行
127.0.0.1:6379[1]> bgsave
Background saving started
127.0.0.1:6379[1]> save
OK
127.0.0.1:6379[1]>
5.config get * 获取所有配置参数,奇数是名字偶数是值。
127.0.0.1:6379[1]> config get *
  1) "dbfilename"
  2) "dump.rdb"
  3) "requirepass"
  4) ""
  5) "masterauth"
  6) ""
  7) "cluster-announce-ip"
  8) ""
  9) "unixsocket"
 10) ""
 11) "logfile"
 12) "/var/log/redis.log"
6.config get logfile 单独获取某个名字的值
127.0.0.1:6379> config get logfile
1) "logfile"
2) "/var/log/redis.log"
127.0.0.1:6379>
7.config set timeout 设置某个名字的值
127.0.0.1:6379> config get timeout
1) "timeout"
2) "0"
127.0.0.1:6379> config set timeout 100
OK
127.0.0.1:6379> config get timeout
1) "timeout"
2) "100"
127.0.0.1:6379>
8.数据恢复,首先确定dir目录和dbfilename文件,然后把备份的rdb文件放到dir目录下,重启redis服务就可以恢复了
127.0.0.1:6379> config get dir
1) "dir"
2) "/data/redis"
127.0.0.1:6379> config get dbfilename
1) "dbfilename"
2) "dump.rdb"
127.0.0.1:6379>
redis安全设置
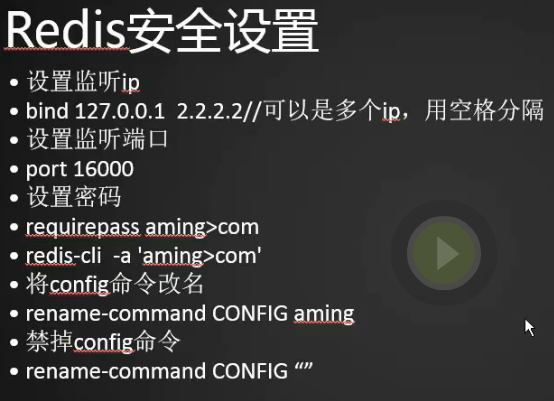
1.redis怎么被黑的呢
redis服务器启动了,结果监听了一个全网ip,如果你的服务器没有做iptables规则,6379端口没有限制
,公网ip也开放着,这样的话用户就可以远程链接你的服务器,没有设置密码直接链接redis相当于获得
了一个超级管理员的权限,这时候就可以设定
dir=/root/.ssh/authorized_keys,dbfilename=authorized_keys (dir目录设置成了存放公钥的文件路径了,原来文件
dir=/data/redis,dbfilename=dump.rdb),黑客存了一个key一个value,这个value就是黑客的公钥,这样公钥就放到/root/.ssh/authorized_keys中了,然后他就可以登录服务器了
2.怎么解决这个问题呢?
设置一个密码,监听内网ip,加防火墙,以普通用户的身份启动redis
3.设置redis密码
[root@centos-02 ~]# vim /etc/redis.conf
[root@centos-02 ~]#
requirepass root
4.重启redis服务测试发现redis命令不能用了
[root@centos-02 ~]# killall redis-server
[root@centos-02 ~]# redis-server /etc/redis.conf
[root@centos-02 ~]# redis-cli
127.0.0.1:6379> keys *
(error) NOAUTH Authentication required.
127.0.0.1:6379>
5.用密码登录,这样就可以了
[root@centos-02 ~]# redis-cli -a 'root'
127.0.0.1:6379> keys *
 1) "hash2"
 2) "set1"
 3) "set2"
 4) "seta"
 5) "key2"
 6) "hash1"
 7) "setb"
 8) "setc"
 9) "key1"
10) "list1"
11) "mykey"
127.0.0.1:6379>
6.将config命令改名字,这样即使黑客登录了也猜不到config的名字,反而用改后的config命令就可以
[root@centos-02 ~]# vim /etc/redis.conf
[root@centos-02 ~]#
rename-command CONFIG b840fc02d524045429941cc15f59e41cb7be6c52
[root@centos-02 ~]# killall redis-server
[root@centos-02 ~]# redis-server /etc/redis.conf
[root@centos-02 ~]# !redis-cli
redis-cli -a 'root'
127.0.0.1:6379> config get dir
(error) ERR unknown command 'config'
127.0.0.1:6379> b840fc02d524045429941cc15f59e41cb7be6c52 get dir
1) "dir"
2) "/data/redis"
127.0.0.1:6379>
7.也可以直接禁掉config命令
[root@centos-02 ~]# vim /etc/redis.conf
[root@centos-02 ~]#
rename-command CONFIG ""
redis慢查询日志
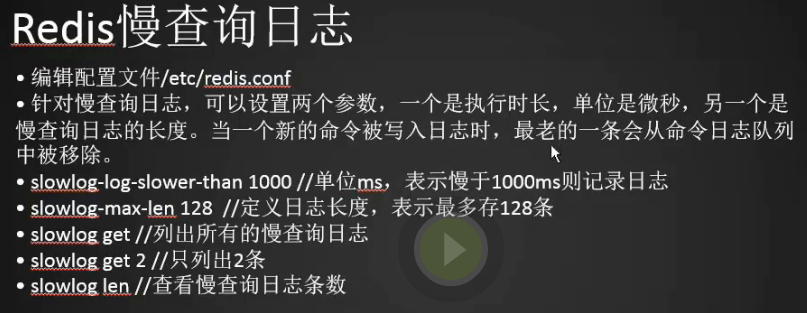
1.可以配置慢查询日志的执行时间和日志的长度
slowlog-log-slower-than 10000
slowlog-max-len 128
2.列出所有慢查询日志

127.0.0.1:6379> SLOWLOG get
(empty list or set)
127.0.0.1:6379>
3.只列出两条
127.0.0.1:6379> SLOWLOG get 2
(empty list or set)
127.0.0.1:6379>
4.查看慢查询日志条数
127.0.0.1:6379> slowlog len
(integer) 0
127.0.0.1:6379>
php安装redis扩展模块

1.下载phpredis, 编译安装
[root@centos-02 src]# wget https://github.com/phpredis/phpredis/archive/develop.zip
[root@centos-02 src]# ls
develop.zip                 jdk-8u161-linux-x64.tar.gz  package.xml
elasticsearch-6.2.2         memcache-2.2.3              redis-4.0.8
elasticsearch-6.2.2.tar.gz  memcache-2.2.3.tgz          redis-4.0.8.tar.gz
[root@centos-02 src]# unzip develop.zip
[root@centos-02 src]# cd phpredis-develop/
[root@centos-02 phpredis-develop]# /usr/bin/phpize (如果是nginx phpize文件可能在为/usr/local/php-fpm/bin/phpize,我这里用yum安装的)
Configuring for:
PHP Api Version:         20100412
Zend Module Api No:      20100525
Zend Extension Api No:   220100525
[root@centos-02 phpredis-develop]#
[root@centos-02 phpredis-develop]# ./configure --with-php-config=/usr/bin/php-config
[root@centos-02 phpredis-develop]# make && make install
2.编辑php.ini加载phpredis模块,重启httpd
[root@centos-02 /]# vim /etc/php.ini
[root@centos-02 /]#
extension=memcache.so
extension=redis.so
[root@centos-02 /]# /usr/bin/php -m|grep redis
redis
[root@centos-02 /]#
[root@centos-02 /]# systemctl restart httpd (如果装的是php-fpm需要重启 /etc/init.d/php-fpm restart)
[root@centos-02 /]#
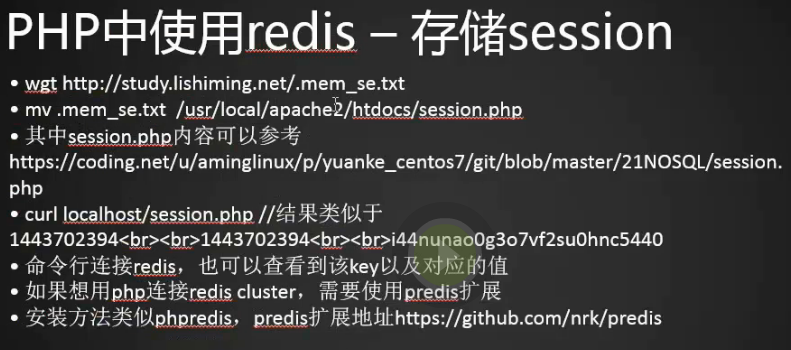
redis存储session

1.编辑httpd.conf文件添加session保存到redis配置
[root@centos-02 /]# vim /etc/httpd/conf/httpd.conf (如果是php-fpm编辑vim /usr/local/php-fpm/etc/php-fpm.d/xxx.conf
添加php_value[session.save_handler]=redis  php_value[session.save_path]=" tcp://127.0.0.1:6379 ")
[root@centos-02 /]#
<Directory "/var/www/html">
    #
    # Possible values for the Options directive are "None", "All",
    # or any combination of:
    #   Indexes Includes FollowSymLinks SymLinksifOwnerMatch ExecCGI MultiViews
    #
    # Note that "MultiViews" must be named *explicitly* --- "Options All"
    # doesn't give it to you.
    #
    # The Options directive is both complicated and important.  Please see
    # http://httpd.apache.org/docs/2.4/mod/core.html#options
    # for more information.
    #
    Options Indexes FollowSymLinks

    #
    # AllowOverride controls what directives may be placed in .htaccess files.
    # It can be "All", "None", or any combination of the keywords:
    #   Options FileInfo AuthConfig Limit
    #
    AllowOverride None

    #
    # Controls who can get stuff from this server.
    #
    Require all granted
   # php_value session.save_handler "memcache"
   # php_value session.save_path "tcp://192.168.133.88:11211"
   php_value session.save_handler "redis"
   php_value session.save_path "tcp://127.0.0.0:6379"

</Directory>
2.重启httpd(如果是php-fpm重启/etc/init.d/php-fpm restart)
[root@centos-02 /]# systemctl restart httpd
[root@centos-02 /]#
1.测试
[root@centos-02 /]# cd /var/www/html/
[root@centos-02 html]#
[root@centos-02 html]# cat 1.php
<?php
session_start();
if (!isset($_SESSION['TEST'])) {
$_SESSION['TEST'] = time();
}
$_SESSION['TEST3'] = time();
print $_SESSION['TEST'];
print "<br><br>";
print $_SESSION['TEST3'];
print "<br><br>";
print session_id();
?>
[root@centos-02 html]#
2.为了方便测试我们先把之前设置的redis服务器密码关掉
[root@centos-02 /]# vim /etc/redis.conf
[root@centos-02 /]#
#requirepass root
[root@centos-02 /]# killall redis-server
[root@centos-02 /]# redis-server /etc/redis.conf
[root@centos-02 /]#
3.curl测试
[root@centos-02 /]# curl localhost/1.php
1522339511<br><br>1522339511<br><br>ua4c0grlin57igp7jop5l3drp1
[root@centos-02 /]# curl localhost/1.php
1522339513<br><br>1522339513<br><br>g0l5v16hfqkahr4bnege78eh81
[root@centos-02 /]# curl localhost/1.php
1522339514<br><br>1522339514<br><br>fcnu70vmcn7cjjs0r0be1ms452
[root@centos-02 /]# curl localhost/1.php
1522339514<br><br>1522339514<br><br>l84uigqbdm63og6op6d85r88o0
[root@centos-02 /]# curl localhost/1.php
1522339515<br><br>1522339515<br><br>7ubv2qt0hcrf90o5t7q3g96807
[root@centos-02 /]#
4.我x成功了
[root@centos-02 /]# redis-cli
127.0.0.1:6379> keys *
 1) "list1"
 2) "mykey"
 3) "setc"
 4) "hash2"
 5) "PHPREDIS_SESSION:7ubv2qt0hcrf90o5t7q3g96807"
 6) "PHPREDIS_SESSION:g0l5v16hfqkahr4bnege78eh81"
 7) "setb"
 8) "hash1"
 9) "key1"
10) "set1"
11) "PHPREDIS_SESSION:fcnu70vmcn7cjjs0r0be1ms452"
12) "PHPREDIS_SESSION:ot7esi7p984a56efa1c34dkm32"
13) "PHPREDIS_SESSION:ua4c0grlin57igp7jop5l3drp1"
14) "set2"
15) "seta"
16) "key2"
17) "PHPREDIS_SESSION:l84uigqbdm63og6op6d85r88o0"
127.0.0.1:6379>
5.如果想建redis集群,需要用redis cluster,安装predis扩展
redis主从配置
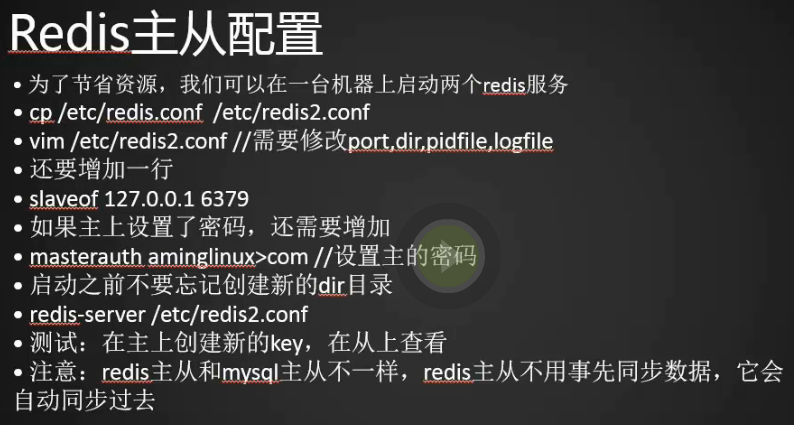
在一台机器上启动两个redis服务
1.第一步拷贝redis配置文件为Redis2.conf,修改配置文件端口、pid文件名、redis2日志文件、dir目录
[root@centos-02 ~]# cp /etc/redis.conf /etc/redis2.conf
[root@centos-02 ~]# vim /etc/redis2.conf
[root@centos-02 ~]#
port 6380
pidfile /var/run/redis_6380.pid
logfile "/var/log/redis2.log"
dir /data/redis2
2.配置主从的时候,主上基本上不用变,但是从上需要指定它的主是谁,编辑从配置文件,如果主上配置了requirepass ***,从上也需要配置masterauth和主的一样
slaveof 127.0.0.1 6379 (添加主的ip和端口,我们主从在一台机器上所以配置为127.0.0.1 6379,如果主从不在一台电脑上需要写主的ip和端口)
3.创建redis2目录,启动redis从
[root@centos-02 ~]# mkdir /data/redis2
[root@centos-02 ~]# redis-server /etc/redis2.conf
[root@centos-02 ~]# ps aux|grep redis
root      12180  1.1  0.2 147312  2440 ?        Ssl  13:51   0:36 redis-server 127.0.0.1:6379
root      12704  1.6  0.2 147312  2320 ?        Ssl  14:41   0:00 redis-server 127.0.0.1:6380
root      12711  0.0  0.0 112680   948 pts/0    R+   14:41   0:00 grep --color=auto redi
[root@centos-02 ~]# netstat -lntp
Active Internet connections (only servers)
Proto Recv-Q Send-Q Local Address           Foreign Address         State       PID/Program name
tcp        0      0 127.0.0.1:6379          0.0.0.0:*               LISTEN      12180/redis-server
tcp        0      0 127.0.0.1:6380          0.0.0.0:*               LISTEN      12704/redis-server
tcp        0      0 0.0.0.0:22              0.0.0.0:*               LISTEN      1029/sshd
tcp        0      0 127.0.0.1:25            0.0.0.0:*               LISTEN      1668/master
tcp        0      0 0.0.0.0:10051           0.0.0.0:*               LISTEN      1142/zabbix_server
tcp6       0      0 :::3306                 :::*                    LISTEN      1428/mysqld
tcp6       0      0 :::80                   :::*                    LISTEN      12213/httpd
tcp6       0      0 :::22                   :::*                    LISTEN      1029/sshd
tcp6       0      0 ::1:25                  :::*                    LISTEN      1668/master
tcp6       0      0 :::10051                :::*                    LISTEN      1142/zabbix_server
[root@centos-02 ~]#
4.这样主从就搭建完了,我们不用要同步数据,redis会自动将数据同步过来,是不是so easy,登录从服务器测试
[root@centos-02 ~]# redis-cli -h 127.0.0.1 -p 6380
127.0.0.1:6380> keys *
 1) "hash1"
 2) "list1"
 3) "seta"
 4) "set2"
 5) "setc"
 6) "setb"
 7) "key2"
 8) "set1"
 9) "key1"
10) "hash2"
11) "mykey"
127.0.0.1:6380>
127.0.0.1:6380> b840fc02d524045429941cc15f59e41cb7be6c52 get dir
1) "dir"
2) "/data/redis2"
127.0.0.1:6380> b840fc02d524045429941cc15f59e41cb7be6c52 get dbfilename
1) "dbfilename"
2) "dump.rdb"
127.0.0.1:6380> b840fc02d524045429941cc15f59e41cb7be6c52 get *
127.0.0.1:6380> b840fc02d524045429941cc15f59e41cb7be6c52 get slaveof
1) "slaveof"
2) "127.0.0.1 6379"
127.0.0.1:6380>
5.从上的配置文件有个配置只能读不能写配置
slave-read-only yes
6.我们做个写的实验,提示我们只读的不能写
[root@centos-02 ~]# redis-cli -h 127.0.0.1 -p 6380
127.0.0.1:6380> set key110 110
(error) READONLY You can't write against a read only slave.
127.0.0.1:6380> quite