笔者本人其实对react的项目经验很少,主要是用Angular框架。前段时间和同学合作做了一个酒店加盟平台项目,我负责后台管理系统,采用的是Angular框架。他负责微信小程序,采用react框架。但随着项目的进行,我发现他的项目文件我一时难以理清,整个项目结构比较零散。只有他自己对自己的项目很熟悉。我也提出了一些疑问,说react架构为何如此松散。当然,后续的故事就不赘述了。
笔者现在在校答辩中,利用空余时间对react做了较为深入的一些研究。以下是笔者的个人心得分享。
很多开发者都知道react并不是一个完整的前端框架,它仅仅是一个UI层面的框架。如果我们需要用react来进行开发,那作为一个开发者必须整合react周边的生态,自己搭建出一个完整的框架。例如我们通常需要redux进行数据管理,需要特定的HTTP模块进行前后端通信,需要react-router来进行路由管理等等。这带来一个问题:react让我有更多的选择的同时也带来的架构松散性的问题。正因为react过于开放的环境,使得不同开发者搭建出来的框架结构也是不尽相同。如果一个开发者缺乏一定的经验,他很可能写出难以维护的代码结构出来。
在经过反复思考过后,笔者按照自己在实际项目中的经验搭建了一个react的架构。笔者很欣赏Angular严谨的架构,所以在架构React的时候参照了很多Angular的架构设计。
首先让我们来看看整体项目结构。

通常一个应用可以先拆分为三个部分:登陆页、注册页、主体业务页面。这三个功能模块是平级的,对应图中login、regist、pc三个文件夹。其中pc文件就是主体业务模块,个人喜好根据终端类型来命名如pc、mobile。也有很多人喜欢用类似pages、home来命名。根据个人和团队喜好而定。
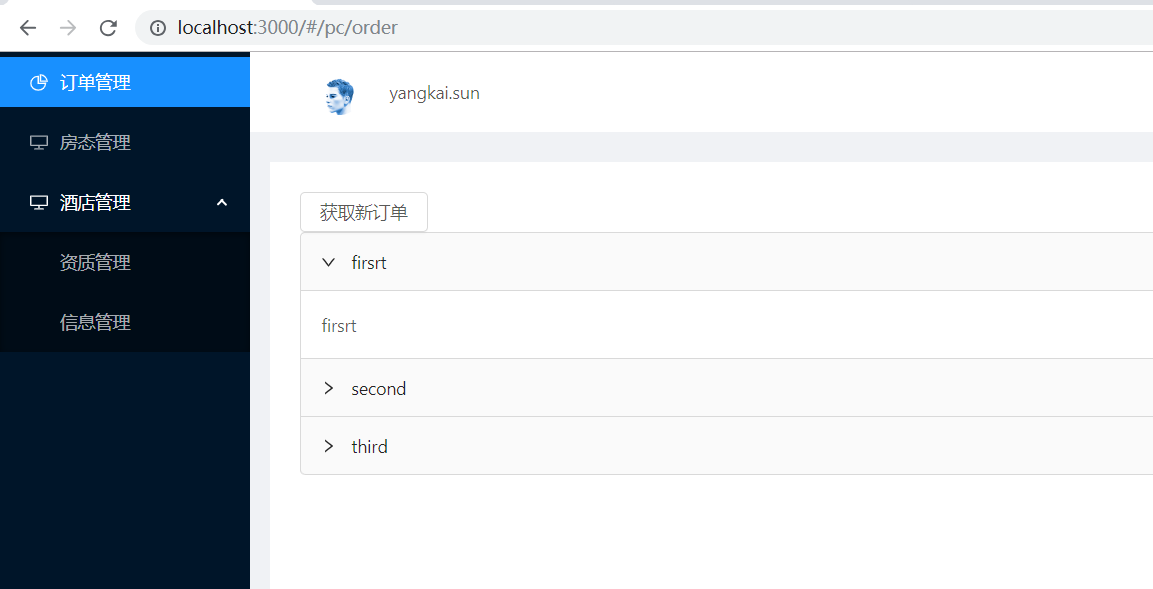
我们要写的绝大部分页面都放在主体页面下,即pc文件下。现在pc文件夹下有hotel(酒店模块)、order(订单模块)、room(房间模块)。我们先不管这些模块的细节,只需要知道当前主体业务模块下有这几个模块。它们在页面上表现如下:
我们重点来看pc文件夹下的pc.ui.tsx、pc.css、pc.component.tsx、pc.router.tsx、pc.reducer.tsx这几个文件里都有什么,以及它们各自的作用。这里我采用了typescript。采用typescript的原因是强类型在多人协作开发方面能带来很大好处,类型检测可以防止不同的开发者不按项目规范写代码造成项目混乱,同时类型提示也方便不同开发者默契地交流。
pc.ui.tsx
  1 import * as React from "react";
  2 import { NavLink } from 'react-router-dom';
  3 import PcRouter from './pc.router';
  4 import "./pc.ui.css";
  5 import { Menu, Icon, Layout, Avatar, Row, Col  } from "antd";
  6
  7
  8 const { Header, Content, Footer, Sider } = Layout;
  9 const SubMenu = Menu.SubMenu;
 10 const height = document.body.clientHeight;
 11 const Index = [
 12   {
 13     icon: 'pie-chart',
 14     path: '/pc/order',
 15     name: '订单管理',
 16   },
 17   {
 18     icon: 'desktop',
 19     path: '/pc/room',
 20     name: '房态管理',
 21   },
 22   {
 23     icon: 'desktop',
 24     path: '/pc/hotel',
 25     name: '酒店管理',
 26     children: [
 27       {
 28         path: '/pc/hotel/qualification',
 29         name: '资质管理'
 30       },
 31       {
 32         path: '/pc/hotel/info',
 33         name: '信息管理'
 34       }
 35     ]
 36   }
 37 ];
 38
 39 interface Props {
 40   index: string[];
 41   getIndex: () => void;
 42   getList: () => void;
 43 }
 44 interface State {
 45   collapsed: boolean
 46 }
 47
 48 class Pc extends React.Component<Props, State> {
 49   constructor(props: Props, state: State) {
 50     super(props);
 51     this.state = state;
 52   }
 53
 54   change = () => {
 55     this.setState({
 56       collapsed: !this.state.collapsed
 57     })
 58   }
 59
 60   render() {
 61     return (
 62       <Layout style={{ height: height }}>
 63         <Sider
 64           breakpoint="lg"
 65           collapsedWidth="0"
 66         >
 67           <div className="logo" />
 68           <Menu
 69             defaultSelectedKeys={["1"]}
 70             defaultOpenKeys={["sub1"]}
 71             mode="inline"
 72             theme="dark"
 73             inlineCollapsed={this.state.collapsed}
 74           >
 75             {Index.map((i) => {
 76               if (i.children) {
 77                 return (
 78                   <SubMenu
 79                     key={i.path}
 80                     title={
 81                       <span>
 82                         <Icon type={i.icon} />
 83                         <span>{i.name}</span>
 84                       </span>
 85                     }>
 86                     {
 87                       i.children.map((child) =>
 88                         <Menu.Item key={child.path}>
 89                           {child.name}
 90                           <NavLink to={child.path}></NavLink>
 91                         </Menu.Item>
 92                       )
 93                     }
 94                   </SubMenu>
 95                 )
 96               } else {
 97                 return (
 98                   <Menu.Item key={i.path}>
 99                     <Icon type={i.icon} />
100                     <span>{i.name}</span>
101                     <NavLink to={i.path}></NavLink>
102                   </Menu.Item>
103                 )
104               }
105             })}
106           </Menu>
107         </Sider>
108         <Layout>
109           <Header style={{ background: '#fff', padding: 0 }} >
110               <Row>
111                 <Col span={1} offset={1}>
112                   <Avatar src="https://zos.alipayobjects.com/rmsportal/ODTLcjxAfvqbxHnVXCYX.png" />
113                 </Col>
114                 <Col span={2} >
115                    yangkai.sun
116                 </Col>
117               </Row>
118           </Header>
119           <Content style={{ margin: '24px 16px 0' }}>
120               <div style={{ padding: 24, background: '#fff', minHeight: 360 }}>
121               <PcRouter></PcRouter>
122             </div>
123           </Content>
124           <Footer style={{ textAlign: 'center' }}>
125             住行科技©2018 Created by sun.yangkai
126         </Footer>
127         </Layout>
128       </Layout>
129     );
130   }
131 }
132 export default Pc;
pc.ui.tsx这个文件很显然就是UI组件,它只负责UI层面的展现。这里的命名范式是:模块名.功能名.tsx。pc.ui.tsx这个文件里放了一个侧边栏<Sider></Sider>标签和主体内容标签<Content></Content>。重点请看<Content></Content>:
1  <Content style={{ margin: '24px 16px 0' }}>
2               <div style={{ padding: 24, background: '#fff', minHeight: 360 }}>
3                   <PcRouter></PcRouter>
4             </div>
5 </Content>
里面有一个我们自定义的组件标签<PcRouter></PcRouter>。在Angular里它被称之为路由出口,现在我们在react里实现了一个路由出口。pc模块下的所有路由组件将会被渲染到<PcRouter></PcRouter>标签里。我们可以看到这个标签来自于 import PcRouter from './pc.router'; 即pc.router.tsx文件。
pc.router.tsx
 1 import * as React from "react";
 2 import { Route  } from 'react-router-dom';
 3
 4 import Order from './order/order.component';
 5 import Room from './room/room.ui';
 6 import Hotel from './hotel/hotel.ui';
 7
 8 const routes = [
 9             {
10                 path: '/pc/order',
11                 component: Order,
12             },
13             {
14                 path: '/pc/room',
15                 component: Room,
16             },
17             {
18                 path: '/pc/hotel',
19                 component: Hotel,
20             },
21 ];
22
23 class PcRouter extends React.Component{
24
25     render() {
26         return (
27             routes.map((route) =>
28                 <Route key={route.path} path={route.path} component={route.component}>
29                 </Route>
30             )
31         )
32     }
33 }
34
35 export default PcRouter;
pc.router.tsx是路由配置文件,它导入了pc模块下的三个路由组件Room、Hotel、Order并按照react-router的语法配置渲染。最终导出一个PcRouter的路由标签供Pc模块使用。
pc.component.tsx
 1 import { connect } from 'react-redux';
 2 import  Pc from './pc.ui';
 3 import  { State } from '../reducer';
 4 import { actionType } from './pc.reducer';
 5 import { HTTPS } from '../network/network';
 6
 7
 8
 9 const mapStateToProps = (state: State) => {
10     return {
11         index: state.pc.index
12     }
13 }
14
15 const mapDispatchToProps = (dispatch) => ({
16     getIndex: () => {
17         dispatch({
18             type: actionType.pc_first
19         })
20     },
21
22     getList: () => {
23         HTTPS.post('/getList', {id: 2}).subscribe({
24             next: (res) => {
25                 dispatch({
26                     type: actionType.pc_getList,
27                     list: res.data
28                 })
29             },
30             error: (e) => {
31
32             }
33         })
34     }
35 })
36
37  export default connect(mapStateToProps, mapDispatchToProps)(Pc);
pc.component.tsx就是容器组件,可以看到它导入了pc.ui.tsx并且将之连接形成一个完整的组件:export default connect(mapStateToProps, mapDispatchToProps)(Pc);
在这里,我们编写一个组件的主要逻辑,例如Ajax请求函数。这里的 mapStateToProps, mapDispatchToProps两个函数都是redux的语法规则,笔者就不再赘述。本文主要研究react架构。
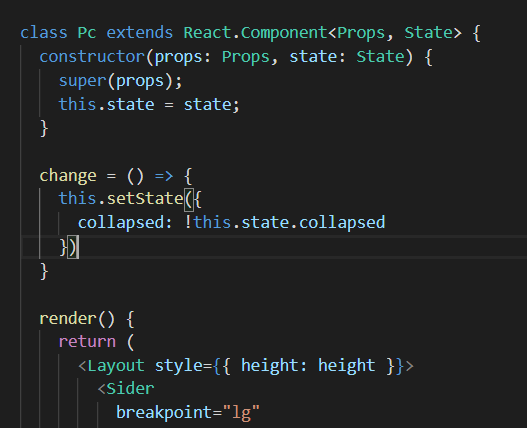
值得注意的是并非任何函数都要写在容器组件里,例如在pc.ui.tsx中有一个 change函数就写在ui组件中。因为此函数修改的数据并不在redux提供的全局store中。这个change函数事实上是一个控制侧边栏是否收起的函数。显然图中的collapsed变量是存放在pc组件本身所维护的state当中。也就是说一些数据只需要组件自己维护就可以了,不需要借助redux来维护其状态。通常来将这些数据都是决定组件本身状态的数据。我们在处理这样的数据时应该把它当成一个UI层面的事件,自然我们也应该把这些函数写在UI组件里。
pc.reducer.tsx
 1 const initialState = {
 2     index: ['test']
 3 }
 4
 5 export interface PcState {
 6     index: string[]
 7 }
 8
 9 export const actionType = {
10     pc_first: 'pc_first',
11     pc_getList: 'pc_getList'
12 }
13
14 const pc = (state: PcState = initialState, action: any) => {
15     switch (action.type) {
16         case actionType.pc_first:
17             return {
18                 ...state,
19                 index: ['sun', 'yang', 'kai']
20             }
21
22         case actionType.pc_getList:
23             return {
24                 ...state,
25                 index: action.list
26             }
27         default:
28             return state;
29     }
30 }
31
32 export { pc };
pc.reducer.tsx很显然就是专门用于维护组件数据的文件。它负责去修改和更新store树上的数据。store树也是redux的概念,这里也不再赘述。修改store树上的数据的唯一方式是发起一个action,这是redux的规则。随着我们的action越来越多,我们需要对action进行范式化的命名。例如这里的pc_getList。它代表pc模块下的getList函数,也就是pc模块下获取一个列表的函数。
然后我们来看整个应用的store是如何构成的:
首先找到根reducer:reducer.tsx
reducer.tsx
 1 import { combineReducers } from 'redux';
 2 import { pc, PcState } from './pc/pc.reducer';
 3 import { pc_order, PcOrderState } from './pc/order/order.reducer';
 4
 5 export default combineReducers({
 6     pc,
 7     pc_order
 8 });
 9
10 export interface State {
11     pc: PcState,
12     pc_order: PcOrderState
13 }
State接口包含我们整个应用的数据,它定义redux的store的类型. 我们可以看到reducer.tsx导入了pc模块和pc_order模块下各自的reducer并用combineReducers将它们合并。根据我们的范式化设计可以看出pc_order就是pc模块下的order模块。这里的store树的设计依旧是按照范式化扁平化的设计原则,为的也是提高store树的性能。如果我们将pc_order命名为order并将之嵌套 在pc下:
1 export interface State {
2     pc: {
3         order: PcOrderState
4     }
5
6 }
随着业务越来越复杂,order模块下可能还会有其它其它模块,order下又会嵌套更多的对象。最终整个store树层级太深变得臃肿不堪,会影响性能。所以采取范式化扁平化的设计会提高store树的性能。
同时请注意我们在reducer.tsx导入各个模块的reducer时还导入了它们的类型如PcState、PcOrderState。我们利用这些类型完整地定义了整个全局State类型。所以今后无论我们在哪个地方操作store树只需要导入此State接口,就能对整个store树地结构一目了然,因为typescript会有类型提示。
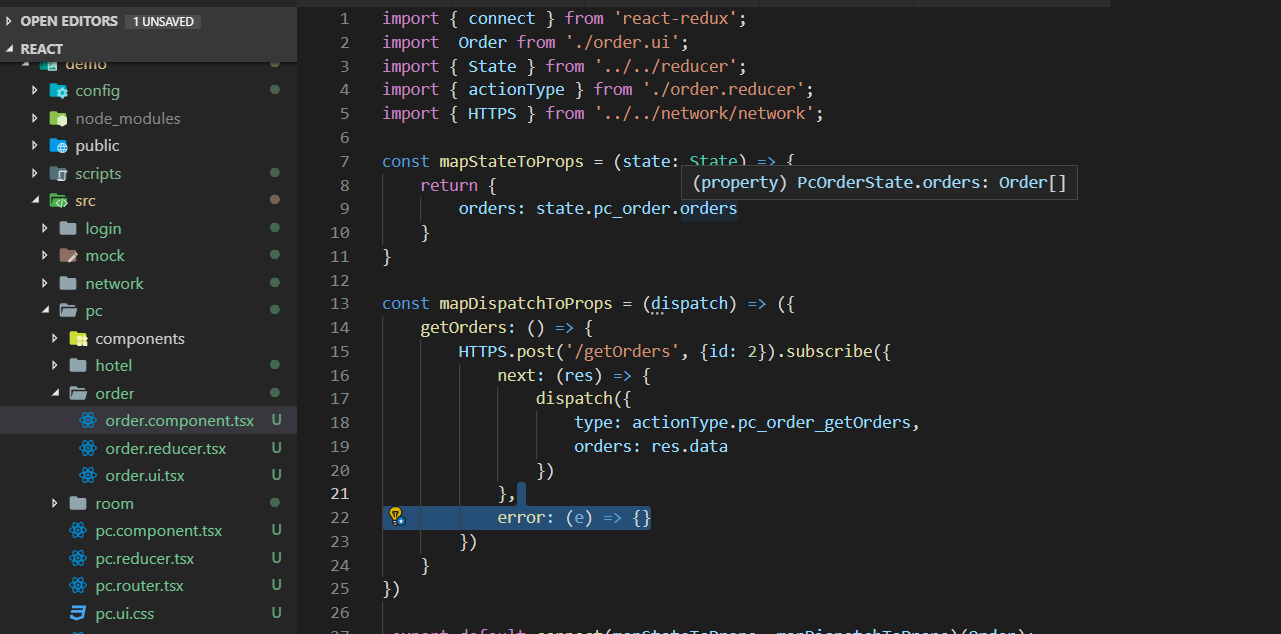
例如我们在order组件中操纵全局的store, 根据导入的State类型提示,我们清楚地知道store的每一个细节:
我们已经讨论完pc模块下的文件划分以及它们的功能。其它任何文件都可以按照这样的方式划分。最后我们总结一下划分思路:我们首先在第一维度上是按照业务层次(页面层次)上来划分文件夹,如pc文件夹代表主体页面,这个页面下包含订单页面、酒店页面、房间页面。所以我们又在pc文件夹下划分了三个文件夹room、order、hotel。这样整体业务层次划分就非常清晰。其次在第二维度上,我们根据页面元素可以再次拆分一个页面。例如pc页面。通常首页包含的元素有很多,例如轮播图、导航栏、页眉页脚等等。我们可以将这些元素拆分出来放进pc下的components文件夹中。当然这里笔者偷了懒,components文件夹是空的。对于任何一个页面我们都可以这样做,像order订单页面,我们也可以在其下建一个components文件夹用于存放拆分出来的页面元素。
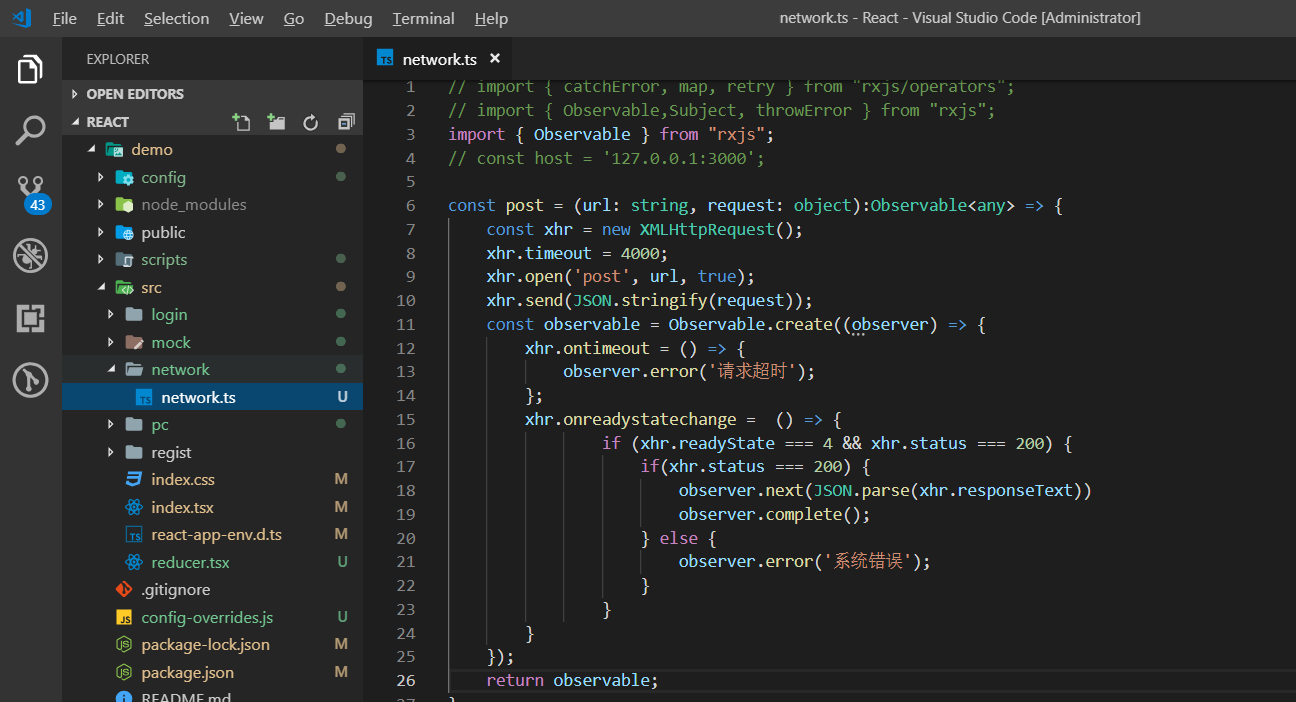
最后做一点补充:network文件夹里存放了网络相关的配置。这里只是简单得封装了一个post请求,用的rxjs。我不喜欢promise,明明rxjs功能更加强悍。
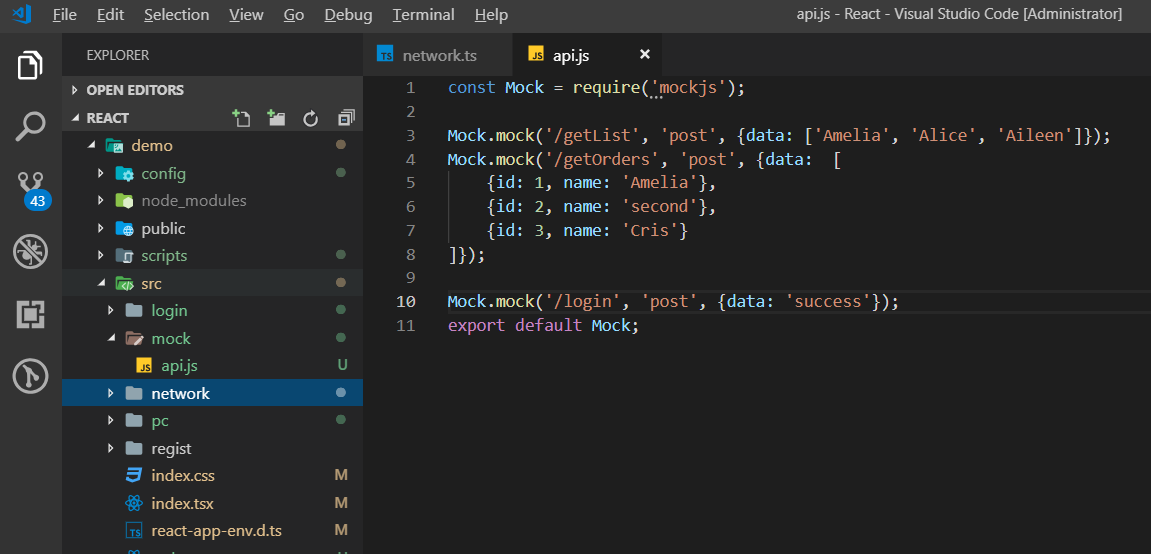
mock文件夹下模拟了后台服务得接口,这里简单写了几个接口:
在order.ui.tsx中,借助immutable.js进行了渲染优化,利用react提供的shouldComponentUpdate函数避免不必要的渲染。感兴趣得同学可以自己研究一下
import * as React from "react";
import { Collapse, Button } from 'antd';
import { Order as OrderProps } from './order.reducer';
import { is, Map } from  'immutable';

const Panel = Collapse.Panel;

interface OrderItemProps {
    order: OrderProps
}
interface OrderItemState {}

class OrderItem extends React.Component<OrderItemProps, OrderItemState> {
    constructor(props: OrderItemProps, state: OrderItemState) {
        super(props);
        this.state = {}
    }
    shouldComponentUpdate(nextProps,nextState){
        const thisProps = this.props;
        const thisState = this.state;
        if(!is(Map({...thisProps.order}), Map({...nextProps.order}))) {
            return true;
        }
        for (const key in nextState) {
            if (thisState[key] !== nextState[key] && !is(thisState[key], nextState[key])) {
              return true;
            }
        }
        return false;
    }

    render() {
        const order = this.props.order;
        console.log('render: ' + order.name);
        return(
            <span>{order.name}</span>
        )
    }
}


interface State {}
interface Props {
    orders: OrderProps[],
    getOrders: () => void
}
class Order extends React.Component<Props, State> {
    constructor(props: Props, state: State) {
        super(props);
    }
    render() {
        return (
            <div>
              <Button onClick={this.props.getOrders}>获取新订单</Button>
              <Collapse defaultActiveKey={['key0']}>
                {
                    this.props.orders.map((order, index) =>
                        <Panel header={order.name} key={'key' + index}>
                             <OrderItem order={order} ></OrderItem>
                        </Panel>
                    )
                }
            </Collapse>
            </div>
        )
    }
}

export default Order;
最后做一点总结吧。我认为架构好一个前端应用需要从页面层次上清晰地划分整个应用,再从页面元素层次上清晰地划分每一个页面。另外关于框架的选择问题,网上也有很多讨论。但是往往他们只是罗列了一大堆各个框架的特性,最终并没有给出一个明确的建议。总是以它们各有格的特点为由不给出答案。我其实并不完全这样认为。拿React和Angular来说,React更适合有一定经验的团队,Angular更适合没有经验的团队。因为React它不是一个完整的框架却有着庞大的生态环境,如果你和你的团队足够老练,那么你们可以随心所欲地架构起适合自己项目的框架,这样就非常地灵活,所构建地应用也和当前项目契合度很高。Angular是一个完整地框架,它把一切都规定好限制好了,虽然它很优秀,但对于一个有经验地团队实在是限制过度了。打个比方,Angular就像是倚天屠龙剑,一个初出茅庐的小子拿着它也能和各路江湖高手过上几招,但是如果你重度依赖它,自己是很难突破自我提升能力的,厉害的是剑而不是使用者。而一个熟练使用React的人,他就像一个武器大师,草木皆为剑。没有固定的武器,但是他能在不同的境地找到适合自己的武器,他真正的提升了自己的能力而不是依赖武器本身。
项目github地址:https://github.com/sunyangkai/ReactDemo
以上就是笔者对react架构方面的一些思考。文中若有不当之处还请各位少侠不吝赐教!