先来一个springmvc的基本配置,照样输出hello world
1.先导入springmvc所需要的开发包
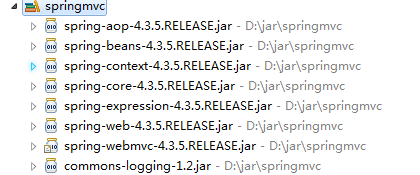
最起码需要这么多的基本包,然后开始上配置
2.先在web.xml里进行引入,和Struts的差不多,
<?xml version="1.0" encoding="UTF-8"?>
<web-app xmlns:xsi="http://www.w3.org/2001/XMLSchema-instance"
xmlns="http://java.sun.com/xml/ns/javaee"
xmlns:web="http://java.sun.com/xml/ns/javaee/web-app_2_5.xsd"
xsi:schemaLocation="http://java.sun.com/xml/ns/javaee http://java.sun.com/xml/ns/javaee/web-app_3_0.xsd"
version="3.0">
  <display-name>SpringMvc</display-name>

  <!--配置DispatcherServlet-->
    <servlet>
        <servlet-name>spring</servlet-name>
        <servlet-class>org.springframework.web.servlet.DispatcherServlet</servlet-class>
        <!--配置初始化参数:作用是配置SpringMVC配置文件的位置和名称-->
        <init-param>
            <param-name>contextConfigLocation</param-name>
            <param-value>/WEB-INF/servlet.xml</param-value>
        </init-param>
        <load-on-startup>1</load-on-startup>
    </servlet>

    <servlet-mapping>
        <servlet-name>spring</servlet-name>
        <url-pattern>/</url-pattern>
    </servlet-mapping>


  <welcome-file-list>
    <welcome-file>index.html</welcome-file>
    <welcome-file>index.htm</welcome-file>
    <welcome-file>index.jsp</welcome-file>
    <welcome-file>default.html</welcome-file>
    <welcome-file>default.htm</welcome-file>
    <welcome-file>default.jsp</welcome-file>
  </welcome-file-list>
</web-app>
3.然后就是写springmvc本身的配置文件了,名为servlet.xml
<?xml version="1.0" encoding="UTF-8"?>
<beans
    xmlns="http://www.springframework.org/schema/beans"
    xmlns:xsi="http://www.w3.org/2001/XMLSchema-instance"
    xmlns:tx="http://www.springframework.org/schema/tx"
    xmlns:context="http://www.springframework.org/schema/context"
    xmlns:mvc="http://www.springframework.org/schema/mvc"
    xsi:schemaLocation="http://www.springframework.org/schema/beans
    http://www.springframework.org/schema/beans/spring-beans-3.2.xsd
    http://www.springframework.org/schema/tx
    http://www.springframework.org/schema/tx/spring-tx-3.2.xsd
    http://www.springframework.org/schema/context
    http://www.springframework.org/schema/context/spring-context-3.2.xsd
    http://www.springframework.org/schema/mvc
    http://www.springframework.org/schema/mvc/spring-mvc-3.2.xsd">
    <!--配置自动扫描的包-->
    <context:component-scan base-package="com.sun"/>
    <!--配置视图解析器:如何把handle方法返回值解析为实际的物理视图-->
    <bean class="org.springframework.web.servlet.view.InternalResourceViewResolver">
        <property name="prefix" value="/WEB-INF/jsp/"/>
        <property name="suffix" value=".jsp"/>
    </bean>
</beans>
可以看出springmvc的配置文件真的很少。
4.开始写action了 Helloworld.java
package com.sun.action;

import org.springframework.stereotype.Controller;
import org.springframework.web.bind.annotation.RequestMapping;

@Controller
public class Helloworld {


	@RequestMapping("/hello")
	public String hello(){

		System.out.println("hello world");

		return "success";
	}

	@RequestMapping("/login")
	public String say(){

		System.out.println("login");

		return "login";
	}

}
5.随便定义一个jsp文件,名为:success.jsp
<%@ page language="java" contentType="text/html; charset=UTF-8"
    pageEncoding="UTF-8"%>
<!DOCTYPE html PUBLIC "-//W3C//DTD HTML 4.01 Transitional//EN" "http://www.w3.org/TR/html4/loose.dtd">
<html>
<head>
<meta http-equiv="Content-Type" content="text/html; charset=UTF-8">
<title>Hello World</title>
</head>
<body>
<B>Hello World</B>
</body>
</html>
在Struts里面,通过在xml里配置,通过返回值来选择返回的页面,而springmvc是直接返回值和文件名同名就行
6.这样基本,就能够访问了。
http://localhost:8080/SpringMvc/hello