Semaphore用于管理信号量,在并发编程中,可以控制返访问同步代码的线程数量。Semaphore在实例化时传入一个int值,也就是指明信号数量。主要方法有两个:acquire()和release()。acquire()用于请求信号,每调用一次,信号量便少一个。release()用于释放信号,调用一次信号量加一个。信号量用完以后,后续使用acquire()方法请求信号的线程便会加入阻塞队列挂起。本篇简单分析Semaphore的源码,说明其实现原理。
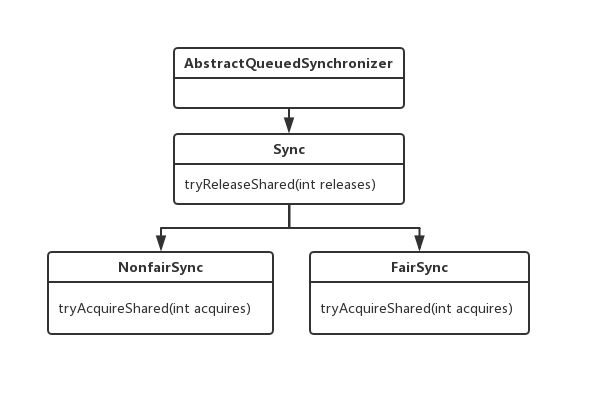
Semaphore对于信号量的控制是基于AQS(AbstractQueuedSynchronizer)来做的。Semaphore有一个内部类Sync继承了AQS。而且Semaphore中还有两个内部类FairSync和NonfairSync继承Sync,也就是说Semaphore有公平锁和非公平锁之分。以下是Semaphore中内部类的结构:

看一下Semaphore的两个构造函数:
public Semaphore(int permits) {
        sync = new NonfairSync(permits);
    }
public Semaphore(int permits, boolean fair) {
        sync = fair ? new FairSync(permits) : new NonfairSync(permits);
    }
默认是非公平锁。两个构造方法都必须传int permits值。
这个int值在实例化内部类时,被设置为AQS中的state。
Sync(int permits) {
            setState(permits);
        }
一、acquire()获取信号
内部类Sync调用AQS中的acquireSharedInterruptibly()方法
public final void acquireSharedInterruptibly(int arg)
            throws InterruptedException {
        if (Thread.interrupted())
            throw new InterruptedException();
        if (tryAcquireShared(arg) < 0)
            doAcquireSharedInterruptibly(arg);
    }
- 调用tryAcquireShared()方法尝试获取信号。
- 如果没有可用信号,将当前线程加入等待队列并挂起
tryAcquireShared()方法被Semaphore的内部类NonfairSync和FairSync重写,实现有一些区别。
NonfairSync.tryAcquireShared()
final int nonfairTryAcquireShared(int acquires) {
            for (;;) {
                int available = getState();
                int remaining = available - acquires;
                if (remaining < 0 ||
                    compareAndSetState(available, remaining))
                    return remaining;
            }
        }
可以看到,非公平锁对于信号的获取是直接使用CAS进行尝试的。
FairSync.tryAcquireShared()
protected int tryAcquireShared(int acquires) {
            for (;;) {
                if (hasQueuedPredecessors())
                    return -1;
                int available = getState();
                int remaining = available - acquires;
                if (remaining < 0 ||
                    compareAndSetState(available, remaining))
                    return remaining;
            }
        }
- 先调用hasQueuedPredecessors()方法,判断队列中是否有等待线程。如果有,直接返回-1,表示没有可用信号
- 队列中没有等待线程,再使用CAS尝试更新state,获取信号
再看看acquireSharedInterruptibly()方法中,如果没有可用信号加入队列的方法doAcquireSharedInterruptibly()
private void doAcquireSharedInterruptibly(int arg)
        throws InterruptedException {
        final Node node = addWaiter(Node.SHARED);   // 1
        boolean failed = true;
        try {
            for (;;) {
                final Node p = node.predecessor();
                if (p == head) {      // 2
                    int r = tryAcquireShared(arg);
                    if (r >= 0) {
                        setHeadAndPropagate(node, r);
                        p.next = null; // help GC
                        failed = false;
                        return;
                    }
                }
                if (shouldParkAfterFailedAcquire(p, node) &&     // 3
                    parkAndCheckInterrupt())
                    throw new InterruptedException();
            }
        } finally {
            if (failed)
                cancelAcquire(node);
        }
    }
- 封装一个Node节点,加入队列尾部
- 在无限循环中,如果当前节点是头节点,就尝试获取信号
- 不是头节点,在经过节点状态判断后,挂起当前线程
二、release()释放信号
public final boolean releaseShared(int arg) {
        if (tryReleaseShared(arg)) {    // 1
            doReleaseShared();  // 2
            return true;
        }
        return false;
    }
- 更新state加一
- 唤醒等待队列头节点线程
tryReleaseShared()方法在内部类Sync中被重写
protected final boolean tryReleaseShared(int releases) {
            for (;;) {
                int current = getState();
                int next = current + releases;
                if (next < current) // overflow
                    throw new Error("Maximum permit count exceeded");
                if (compareAndSetState(current, next))
                    return true;
            }
        }
这里也就是直接使用CAS算法,将state也就是可用信号,加1。
看看Semaphore具体的使用示例:
public static void main(String[] args) {
        ThreadPoolExecutor threadPool = new ThreadPoolExecutor(10, 10,
                0L, TimeUnit.MILLISECONDS,
                new LinkedBlockingQueue<Runnable>(10));
        //信号总数为5
        Semaphore semaphore = new Semaphore(5);
        //运行10个线程
        for (int i = 0; i < 10; i++) {
            threadPool.execute(new Runnable() {

                @Override
                public void run() {
                    try {
                        //获取信号
                        semaphore.acquire();
                        System.out.println(Thread.currentThread().getName() + "获得了信号量,时间为" + System.currentTimeMillis());
                        //阻塞2秒,测试效果
                        Thread.sleep(2000);
                        System.out.println(Thread.currentThread().getName() + "释放了信号量,时间为" + System.currentTimeMillis());
                    } catch (InterruptedException e) {
                        e.printStackTrace();
                    } finally {
                        //释放信号
                        semaphore.release();
                    }

                }
            });
        }
        threadPool.shutdown();
    }
代码结果为:
pool-1-thread-2获得了信号量,时间为1550584196125
pool-1-thread-1获得了信号量,时间为1550584196125
pool-1-thread-3获得了信号量,时间为1550584196125
pool-1-thread-4获得了信号量,时间为1550584196126
pool-1-thread-5获得了信号量,时间为1550584196127
pool-1-thread-2释放了信号量,时间为1550584198126
pool-1-thread-3释放了信号量,时间为1550584198126
pool-1-thread-4释放了信号量,时间为1550584198126
pool-1-thread-6获得了信号量,时间为1550584198126
pool-1-thread-9获得了信号量,时间为1550584198126
pool-1-thread-8获得了信号量,时间为1550584198126
pool-1-thread-1释放了信号量,时间为1550584198126
pool-1-thread-10获得了信号量,时间为1550584198126
pool-1-thread-5释放了信号量,时间为1550584198127
pool-1-thread-7获得了信号量,时间为1550584198127
pool-1-thread-6释放了信号量,时间为1550584200126
pool-1-thread-8释放了信号量,时间为1550584200126
pool-1-thread-10释放了信号量,时间为1550584200126
pool-1-thread-9释放了信号量,时间为1550584200126
pool-1-thread-7释放了信号量,时间为1550584200127
可以看到,最多5个线程获得信号,其它线程必须等待获得信号的线程释放信号。