前篇 - 基本认证,用户名密码
后篇 - OAuth2 认证
前文使用包passport实现了一个简单的用户名、密码认证。本文改用oauth2来实现更加安全的认证。全部代码在这里。
OAUTH2
用户认证,只使用用户名、密码还是非常基础的认证方式。现在RESTful API认证最多使用的是oauth2。使用oauth2就需要使用https,并hash处理client secret、auth code以及access token。
oauth2需要使用包oauth2orize:
npm install --save oauth2orize
首先看看oauth2的认证时序图:
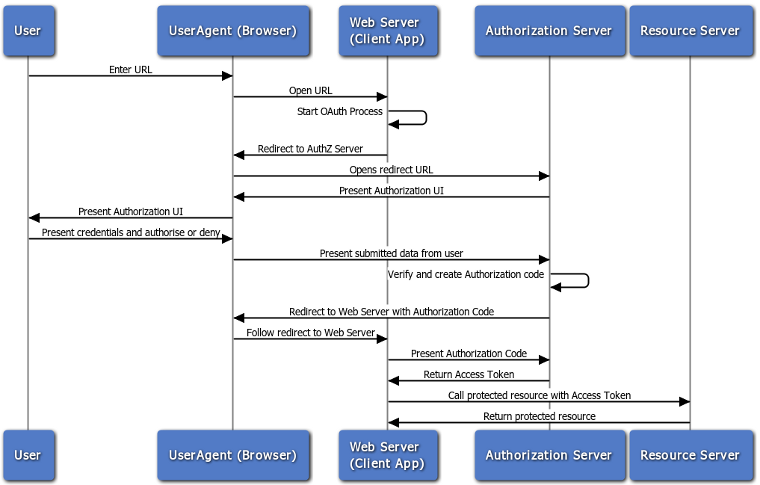
仔细看图发现我们现在的代码并不足以支撑oauth2认证。我们还需要一个UI界面供用户输入用户名、密码产生authorization code和access token。
UI界面
目前为止,还没有使用过任何的界面。我们现在添加一个简单的页面。用户可以允许活拒绝application client访问他们账户的请求。
Express可以使用的界面模板是很多的:jade、handlebars、ejs等。我们使用ejs。安装ejs:
npm install --save ejs
在server.js中设置Express,让Express可以解析ejs模板:
var ejs                 = require('ejs');
...

// 创建一个express的server
var app = express();

app.set('view engine', 'ejs');

...
在目录petshop/server/下添加一个文件夹views。在目录中添加文件dialog.ejs。
<!DOCTYPE html>
<html>
  <head>
    <title>Beer Locker</title>
  </head>
  <body>
    <p>Hi <%= user.username %>!</p>
    <p><b><%= client.name %></b> is requesting <b>full access</b> to your account.</p>
    <p>Do you approve?</p>

    <form action="/api/oauth2/authorize" method="post">
      <input name="transaction_id" type="hidden" value="<%= transactionID %>">
      <div>
      <input type="submit" value="Allow" id="allow">
      <input type="submit" value="Deny" name="cancel" id="deny">
      </div>
    </form>

  </body>
</html>
使用Session
oauth2orize需要用到session。只有这样才能完成认证过程。首先安装session依赖包express-session。
npm install --save express-session
接下来是如何使用这个包。更新server.js文件:
var session             = require('express-session');

...

app.use(bodyParser.urlencoded({
    extended: true
}));

app.use(session({
    secret: 'a4f8071f-4447-c873-8ee2',
    saveUninitialized: true,
    resave: true
}));

...
Application client的model和controller
首先,我们需要添加一个新的model和一个controller,然后再创建一个application client方便以后使用。一个application client会请求一个用户的账户。比如,有这么一个服务可以替你管理你的宠物。在狗粮不够的时候通知你。
model
var mongoose = require('mongoose');

var clientSchema = new mongoose.Schema({
    name: {type: String, unique: true, required: true},
    id: {type: String, required: true},
    secret: {type: String, required: true},
    userId: {type: String, required: true}
});

module.exports = mongoose.model('client', clientSchema);
name就是用来区分不同的application client的。id和secret会在后面的oauth2认证过程中使用。这两个字段的值应该一直都保证是加密的,不过在本文中没有做加密处理。产品环境必须加密。最后的userId用来表明哪个用户拥有这个application client。接下来创建client对应的controller。
controller
var Client = require('../models/client');

var postClients = function(req, res) {
    var client = new Client();

    client.name = req.body.name;
    client.id = req.body.id;
    client.secret = req.body.secret;
    client.userId = req.user._id;

    client.save(function(err) {
        if (err) {
            res.json({message: 'error', data: err});
            return;
        }

        res.json({message: 'done', data: client});
    });

};

var getClients = function(req, res) {
    Client.find({userId: req.user._id}, function(err, clients) {
        if (err) {
            res.json({messag: 'error', data: err});
            return;
        }

        res.json({message: 'done', data: clients});
    });
};

module.exports = {postClients: postClients,
        getClients: getClients
    };
这两个方法可以用来添加新的client和获取某用户的全部的client。
修改server.js:
var clientController    = require('./controllers/client');

...

// 处理 /clients
router.route('/clients')
    .post(authController.isAuthenticated, clientController.postClients)
    .get(authController.isAuthenticated, clientController.getClients);

...
下面使用Postman来创建一个application client。
认证Application client
前文中,我们已经可以使用用户名和密码来验证用户了。下面就来验证application client。
更新原来的basic认证
在controllers里打开auth.js。更新这个文件, 添加一个新的认证strategy:
passport.use('client-basic', new BasicStrategy(
    function(username, password, done) {
        Client.findOne({id: username}, function(err, client) {
            if (err) {
                return done(err);
            }

            if (!client || client.secret !== password) {
                return done(null, false);
            }

            return done(null, client);
        });
    }
));

module.exports.isClientAuthenticated = passport.authenticate('client-basic', {session: false});
我们新增了一个BasicStrategy,之所以可以这样就是应为我们给这个strategy指定了一个名称client-basic。
这个strategy的功能是用给定的clientId来查找一个client,并检查password(client的secret)是否正确。
Authorization code
我们还需要创建一个model来存放authorization code。这个authorizention code用来来获取access token。
现在我们在models目录下创建一个code.js文件。代码如下:
var mongoose = require('mongoose');
var Schema = mongoose.Schema;

var codeSchema = new Schema({
    value: {type: String, required: true},
    redirectUri: {type: String, required: true},
    userId: {type: String, required: true},
    clientId: {type: String, required: true}
});

module.exports = mongoose.model('code', codeSchema);
很简单对吧。value是用来存放authorization code的。redirectUri用来存放跳转的uri,稍后会详细介绍。clientId和userId用来存放哪个用户和哪个application client拥有这个authorization code。为了安全考虑,你可以hash了authorization code。
Access token
这里也需要我们来创建一个model来存放access token。在models目录下添加一个token.js文件:
var mongoose = require('mongoose');
var Schema = mongoose.Schema;

var tokenSchema = new Schema({
    value: {type: String, required: true},
    userId: {type: String, required: true},
    clientId: {type: String, required: true}
});

module.exports = mongoose.model('token', tokenSchema);
用户访问api的时候使用的token就是value字段的值。userId和clientId就是用来表明哪个用户和application client拥有这个token。产品环境下最好把token做hash处理,绝对不要想我们的例子一样使用明文。
使用access token来验证
我们之前已经添加了第二个BasicStrategy,这样就可以验证client发出的请求。现在我们在新建一个BearerStrategy,这样我们就可以验证用户使用oauth的token发出的请求了。
首先安装依赖包passport-http-bearer。
npm install passport-http-bearer --save
更新controllers/auth.js文件。在这个文件中require passport-http-bearer包和Token model。
var passport            = require('passport'),
    BasicStrategy       = require('passport-http').BasicStrategy,
    BearerStrategy      = require('passport-http-bearer').Strategy,

    User                = require('../models/user'),
    Client              = require('../models/client'),
    Token               = require('../models/token');

passport.use(new BearerStrategy(
    function(accessToken, done) {
        Token.findOne({value: accessToken}, function (err, token) {
            if (err) {
                return done(err);
            }

            if (!token) {
                return done(null, false);
            }

            User.findOne({_id: token.userId}, function (err, user) {
                if (err) {
                    return done(err);
                }

                if (!user) {
                    return done(null, false);
                }

                done(null, user, {scope: '*'});
            });
        });
    }
));

...

module.exports.isBearerAuthenticated = passport.authenticate('bearer', {session: false});
新的strategy允许我们接受application client发出的请求,并使用发送过来的token验证这些请求。
创建OAuth2 controller
现在正式进入oauth2的开发阶段。首先安装oauth2orize包:
npm install --save oauth2orize
接下来在controllers里创建一个oauth2.js文件。接下来在这个写代码。
var oauth2orize     = require('oauth2orize'),
    User            = require('../models/user'),
    Client          = require('../models/client'),
    Token           = require('../models/token'),
    Code            = require('../models/code');
创建OAuth2 server
// 创建一个OAuth 2.0 server
var server = oauth2orize.createServer();
注册序列化反序列化方法
server.serializeClient(function(client, callback) {
    return callback(null, client._id);
});

server.deserializeClient(function(id, callback) {
    Client.findOne({_id: id}, function (err, client) {
        if (err) {
            return callback(err);
        }

        return callback(null, client);
    });
});
注册authorization code许可类型
server.grant(oauth2orize.grant.code(function(client, redirectUri, user, ares, callback) {
    var code = new Code({
        value: uid(16),
        clientId: client._id,
        redirectUri: redirectUri,
        useId: user._id
    });

    code.save(function(err) {
        if (err) {
            return callback(err);
        }

        callback(null, code.value);
    });
}));
使用oauth2.0,用户可以指定application client可以访问哪些被保护的资源。其过程概括起来就是用户授权client application,之后client再用用户许可换取access token。
使用autho code交换access token
server.exchange(oauth2orize.exchange.code(function(client, code, redirectUri, callback) {
    Code.findOne({value: code}, function (err, authCode) {
        if (err) {return callback(err);}
        if (authCode === undefined) {return callback(null, false);}
        if (client._id.toString() !== authCode.clientId) {return callback(null, false);}
        if (redirectUri !== authCode.redirectUri) {return callback(null, false);}

        authCode.remove(function (err) {
            if (err) {return callback(err);}

            var token = new token({
                value: uid(256),
                clientId: authCode.clientId,
                userId: authCode.userId
            });

            token.save(function (err) {
                if (err) {
                    return callback(err);
                }

                callback(null, token);
            });
        });
    });
}));
上面的代码就完成了authorization code交换access token的过程。首先检查是否存在一个authorization code,如果存在则开始以后的验证过程。在前面的步骤全部通过的时候,删除已存在的authorization code,这样就不能再次使用。并创建一个新的access token。这个token和application client以及用户绑定在一起。最后存入MongoDB。
用户给终端授权
module.exports.authorization = [
    server.authorization(function(clientId, redirectUri, callback) {
        Client.findOne({id: clientId}, function(err, client) {
            if (err) {return callback(err);}

            return callback(null, client, redirectUri);
        });
    }),
    function(req, res) {
        res.render('dialog', {transationID: req.oauth2.transactionID, user: req.user, client: req.oauth2.client});
    }
];
这个终端初始化了一个新的授权事务。这个事务里首先找到访问用户账户的client,然后渲染我们前面创建的dialog视图。
用户决定是否授权
module.exports.decision = [server.decision()];
无论用户同意或拒绝授权,都有server.decision()来处理。之后调用server.grant()方法。这个方法我们在前面已经创建好。
application client token
module.exports.token = [
    server.token(),
    server.errorHandler()
];
这段代码用来处理用户授权application client之后的请求。
生成唯一编号的util方法
function uid(len) {
    var buf = [],
        chars = 'ABCDEFGHIJKLMNOPQRSTUVWXYZabcdefghijklmnopqrstuvwxyz0123456789',
        charlen = chars.length;

    for (var i = 0; i < len; i++){
        buf.push(chars[getRandomInt(0, charlen - 1)]);
    }

    return buf.join('');
}

function getRandomInt(min, max) {
    return Math.floor(Math.random() * (max - min + 1)) + min;
}
给OAuth2终端添加路由
现在我们可以给oauth2添加路由了。现在来更新server.js代码,给这些终端添加必要的路由。
var oauth2Controller    = require('./controllers/oauth2');

...

router.route('/oauth2/authorize')
    .post(authController.isAuthenticated, oauth2Controller.authorization)
    .get(authController.isAuthenticated, oauth2Controller.decision);

router.route('/oauth2/token')
    .post(authController.isClientAuthenticated, oauth2Controller.token);
给API终端的access token授权
在这一步,oauth2 server需要的全部“工具”都有了。最后一步,需要我们更新一下需要授权的终端(endpoint)。现在我们使用BasicStrategy来认证的,这主要需要用户名和密码。我们现在要换用BearerStrategy来使用access token认证。
把文件controllers/auth.js中module.exports.isAuthenticated语句修改为可以使用basic或者bearer策略。
module.exports.isAuthenticated = passport.authenticate(['basic', 'bearer'], {session: false});
这已修改,认证就会使用用户名、密码和access token两个了。
使用OAuth2
代码好多。赶紧试试效果。在浏览器中输入url:http://localhost:3090/api/oauth2/authorize?client_id=my_id&response_type=code&redirect_uri=http://localhost:3090。注意:client_id的值是我前面用postman添加的一个,你需要改成你自己的client_id。

如果你选择了allow(同意),那么就会显示下面的界面:

最后
oauth2orize是一个很强的库,开发一个oauth2 server简单了很多。