微信好友分析
一、用到的库
pillow、pyecharts、itchat、jieba、numpy、pandas、wxpy
运行环境:python3
二、功能实现
1、登录微信
首先让程序登录微信,并获取我的好友相关信息。运行登录代码会自动弹出一个二维码页面(如下图所示),用手机扫码同意后,进入微信 并获取微信好友的相关信息。
代码如下:
#导入模块
from wxpy import *
#初始化机器人,选择缓存模式(扫码)登录
bot = Bot(cache_path=True)
#获取我的所有微信好友信息
friend_all = bot.friends()
print(friend_all[0].raw)
print(len(friend_all))
运行结果如下:


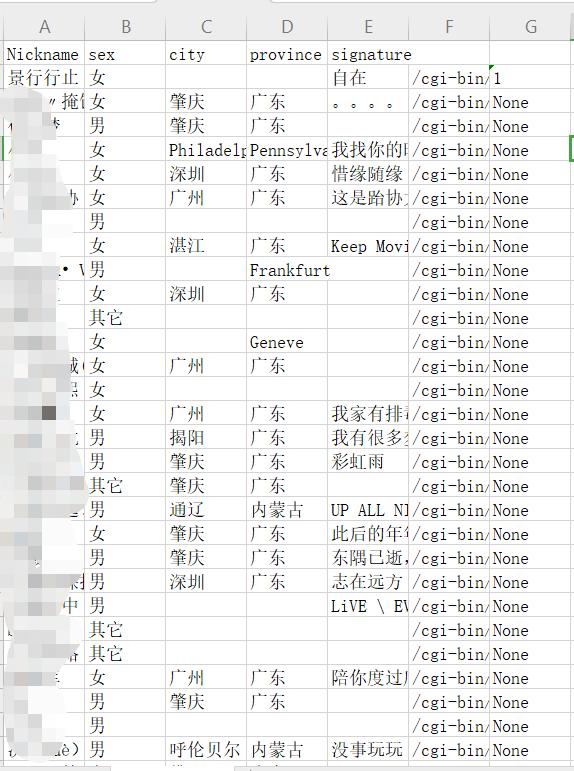
2、将好友信息存为一个文件
代码如下:
lis=[]
for a_friend in friend_all:
    NickName = a_friend.raw.get('NickName',None)
    #Sex = a_friend.raw.get('Sex',None)
    Sex ={1:"男",2:"女",0:"其它"}.get(a_friend.raw.get('Sex',None),None)
    City = a_friend.raw.get('City',None)
    Province = a_friend.raw.get('Province',None)
    Signature = a_friend.raw.get('Signature',None)
    HeadImgUrl = a_friend.raw.get('HeadImgUrl',None)
    HeadImgFlag = a_friend.raw.get('HeadImgFlag',None)
    list_0=[NickName,Sex,City,Province,Signature,HeadImgUrl,HeadImgFlag]
    lis.append(list_0)

def lis2e07(filename,lis):
    import openpyxl
    wb = openpyxl.Workbook()
    sheet = wb.active
    sheet.title = 'list2excel07'
    file_name = filename +'.xlsx'
    for i in range(0, len(lis)):
        for j in range(0, len(lis[i])):
            sheet.cell(row=i+1, column=j+1, value=str(lis[i][j]))
    wb.save(file_name)
print("写入数据成功!")
print(lis2e07('SLFWXin1',lis))
运行结果如下:
3、将好友所在城市做成词云
代码如下:
#利用 pyecharm 做词云
import pandas as pd
#count = df.city.value_counts() #对 dataframe 进行全频率统计,排除了 nan
from pandas import read_excel
df = read_excel('SLFWXin1.xlsx',sheetname='list2excel07')
#df.tail(10)
city_list = df['city'].fillna('NAN').tolist()#将 dataframe 的列转化为 list,其中的 nan 用“NAN”替换
count_city = pd.value_counts(city_list)#对 list 进行全频率统计
from pyecharts import WordCloud
name = count_city.index.tolist()
value = count_city.tolist()
wordcloud = WordCloud(width=1300, height=620)
wordcloud.add("", name, value, word_size_range=[20, 100])
wordcloud.show_config()
wordcloud.render(r'D:/我的文件/Python作业/wc0.html')
运行结果如下:

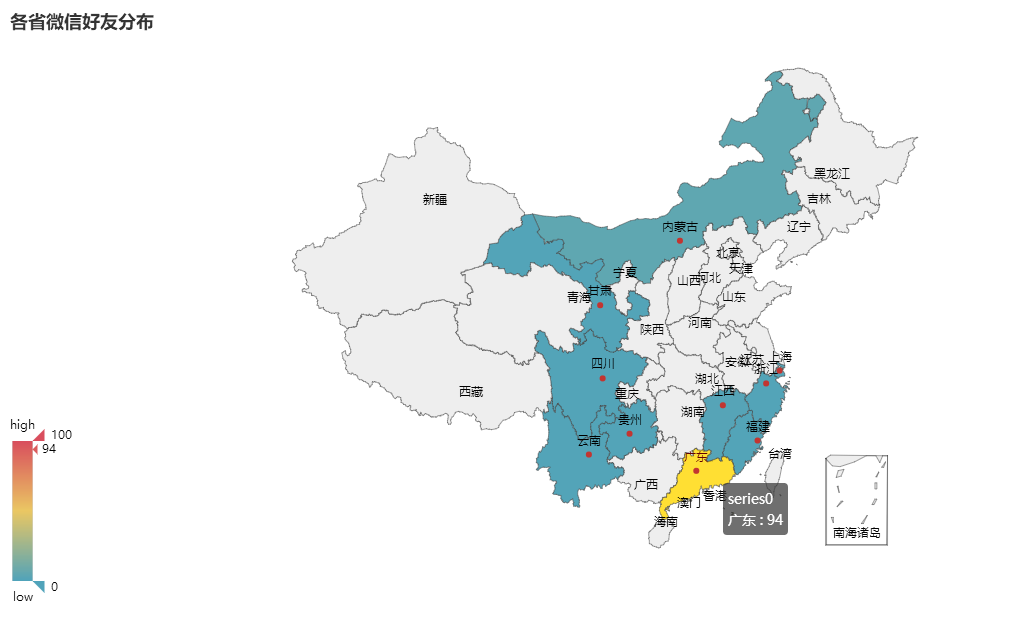
4、将好友所在城市标志在地图上
代码如下:
#将这些个好友在全国地图上做分布
province_list = df['province'].fillna('NAN').tolist()#将 dataframe 的列转化为 list,其中的 nan 用“NAN”替换
count_province = pd.value_counts(province_list)#对 list 进行全频率统计
from pyecharts import Map
value =count_province.tolist()
attr =count_province.index.tolist()
map=Map("各省微信好友分布", width=1200, height=600)
map.add("", attr, value, maptype='china', is_visualmap=True,
 visual_text_color='#000',
is_label_show = True) #显示地图上的省份
map.show_config()
map.render(r'D:/我的文件/Python作业/map0.html')
#做成的地图保存在 D:/我的文件/Python作业/map0.html
运行结果如下:
5、将好友的个性签名做成词云
代码如下:
#用pyecharts做个性签名的词云
import pandas as pd
#count = df.city.value_counts() #对 dataframe 进行全频率统计,排除了 nan
from pandas import read_excel
df = read_excel('SLFWXin1.xlsx',sheetname='list2excel07')
#df.tail(10)
city_list = df['signature'].fillna('NAN').tolist()#将 dataframe 的列转化为 list,其中的 nan 用“NAN”替换
count_city = pd.value_counts(city_list)#对 list 进行全频率统计
from pyecharts import WordCloud
name = count_city.index.tolist()
value = count_city.tolist()
wordcloud = WordCloud(width=1300, height=620)
wordcloud.add("", name, value, word_size_range=[20, 100])
wordcloud.show_config()
wordcloud.render(r'D:/我的文件/Python作业/wc00.html')
运行结果如下:

完整代码如下:(先生成SLFWXin1文件,再调用)
# -*- coding: utf-8 -*-
"""
Created on Tue Jun  4 21:43:54 2019

@author: 一枚小可爱--08
"""

#导入模块
from wxpy import *
#初始化机器人,选择缓存模式(扫码)登录
bot = Bot(cache_path=True)
#获取我的所有微信好友信息
friend_all = bot.friends()
print(friend_all[0].raw)
print(len(friend_all))

lis=[]
for a_friend in friend_all:
    NickName = a_friend.raw.get('NickName',None)
    #Sex = a_friend.raw.get('Sex',None)
    Sex ={1:"男",2:"女",0:"其它"}.get(a_friend.raw.get('Sex',None),None)
    City = a_friend.raw.get('City',None)
    Province = a_friend.raw.get('Province',None)
    Signature = a_friend.raw.get('Signature',None)
    HeadImgUrl = a_friend.raw.get('HeadImgUrl',None)
    HeadImgFlag = a_friend.raw.get('HeadImgFlag',None)
    list_0=[NickName,Sex,City,Province,Signature,HeadImgUrl,HeadImgFlag]
    lis.append(list_0)
'''
def lis2e07(filename,lis):
    import openpyxl
    wb = openpyxl.Workbook()
    sheet = wb.active
    sheet.title = 'list2excel07'
    file_name = filename +'.xlsx'
    for i in range(0, len(lis)):
        for j in range(0, len(lis[i])):
            sheet.cell(row=i+1, column=j+1, value=str(lis[i][j]))
    wb.save(file_name)
print("写入数据成功!")
print(lis2e07('SLFWXin1',lis))
'''
#利用 pyecharm 做词云
import pandas as pd
#count = df.city.value_counts() #对 dataframe 进行全频率统计,排除了 nan
from pandas import read_excel
df = read_excel('SLFWXin1.xlsx',sheetname='list2excel07')
#df.tail(10)
city_list = df['city'].fillna('NAN').tolist()#将 dataframe 的列转化为 list,其中的 nan 用“NAN”替换
count_city = pd.value_counts(city_list)#对 list 进行全频率统计
from pyecharts import WordCloud
name = count_city.index.tolist()
value = count_city.tolist()
wordcloud = WordCloud(width=1300, height=620)
wordcloud.add("", name, value, word_size_range=[20, 100])
wordcloud.show_config()
wordcloud.render(r'D:/我的文件/Python作业/wc0.html')

#用pyecharts做个性签名的词云
import pandas as pd
#count = df.city.value_counts() #对 dataframe 进行全频率统计,排除了 nan
from pandas import read_excel
df = read_excel('SLFWXin1.xlsx',sheetname='list2excel07')
#df.tail(10)
city_list = df['signature'].fillna('NAN').tolist()#将 dataframe 的列转化为 list,其中的 nan 用“NAN”替换
count_city = pd.value_counts(city_list)#对 list 进行全频率统计
from pyecharts import WordCloud
name = count_city.index.tolist()
value = count_city.tolist()
wordcloud = WordCloud(width=1300, height=620)
wordcloud.add("", name, value, word_size_range=[20, 100])
wordcloud.show_config()
wordcloud.render(r'D:/我的文件/Python作业/wc00.html')

#将这些个好友在全国地图上做分布
province_list = df['province'].fillna('NAN').tolist()#将 dataframe 的列转化为 list,其中的 nan 用“NAN”替换
count_province = pd.value_counts(province_list)#对 list 进行全频率统计
from pyecharts import Map
value =count_province.tolist()
attr =count_province.index.tolist()
map=Map("各省微信好友分布", width=1200, height=600)
map.add("", attr, value, maptype='china', is_visualmap=True,
 visual_text_color='#000',
is_label_show = True) #显示地图上的省份
map.show_config()
map.render(r'D:/我的文件/Python作业/map0.html')
#做成的地图保存在 D:/我的文件/Python作业/map0.html
dengdengdengdeng完成啦哈哈哈哈~~~~~