本次内容列表:
1.使用线程的经验:设置名称、响应中断、使用ThreadLocal
2.Executor:ExecutorService和Future
3.阻塞队列:put和take、offer和poll、drainTo
4.线程间的协调手段:lock、condition、wait、notify、notifyAll
5.Lock-free:atomic、concurrentMap.putlfAbsent、CopyOnWriteArrayList
6.关于锁使用的经验介绍
7.并发流程控制手段:CountDownlatch、Barrier
8.定时器:ScheduledExecutorService、大规模定时器TimeWheel
9.并发三大定律:Amdahl、Gustafson、Sun-Ni
1.线程的经验:无论何种方式,启动一个线程,就要给它一个名字。这对排错诊断系统监控有帮助。否则诊断问题时,无法直观知道某个线程的用途
设置名称:以下为常用的几种命名方式:
1     //命名方式一:
2     Thread thread = new Thread("thread name one") {
3         public void run() {
4             //do xxx
5         }
6     };
1     //命名方式二:
2     Thread thread = new Thread() {
3         public void run() {
4             //do xxx
5         }
6     };
7     thread.setName("thread name two");
8     thread.start();
 1 //命名方式三:
 2 public class MyThread extends Thread{
 4     public MyThread() {
 5         super("thread name three");
 6     }
 7     public void run() {
 8         //do xxx
 9     }
10 }
11 MyThread thread = new MyThread();
12 thread.start();
1 //命名方式四:
2 Thread thread = new Thread(task, "thread name four");
3 thread.start();
响应线程中断:thread.interrupt(); 程序应该对线程中断作出恰当的响应
 1      //中断响应方式一:
 2     Thread thread = new Thread("interrupt test") {
 3         public void run() {
 4             for(;;) {
 5                 try {
 6                     doXXX();
 7                 } catch(InterruptedException e) {
 8                     break;
 9                 } catch(Exception e) {
10                     //handle Exception
11                 }
12             }
13         }
14     };
15     thread.start();
 1     //中断响应方式二:
 2     Thread thread = new Thread("interrupt test") {
 3         public void run() {
 4             for(;;) {
 5                 if(Thread.interrupted()) {
 6                     break;
 7                 }
 8             }
 9         }
10     };
11     thread.start();
1     //中断响应方式三:
2     public void foo() throws InterruptedException{
3         if(Thread.interrupted()) {
4             throw new InterruptedException();
5         }
6     }
ThreadLocal(局部线程变量):它的功能非常简单,就是为每一个使用该变量的线程都提供一个变量值的副本,是每一个线程都可以独立地改变自己的副本,而不会和其他线程的副本冲突。从线程的角度看,就好像每一个线程都完全拥有该变量。使用ThreadLocal,一般都是声明在静态变量中,如果不断的创建ThreadLocal而且没有调用其remove方法,将会导致内存泄漏。如果是static的ThreadLocal,一般不需要调用remove。
2.Executor
为了方便并发执行任务,使用Executor用来专门执行任务的实现,任务的提交者不需要在创建管理线程,使用更方便,也减少了开销。
java.util.concurrent.Executors是Executor的工厂类,通过Executors可以创建你所需要的Executor。
任务的提交者和执行者之间的通讯手段
 1     ExecutorService executor = Executors.newSingleThreadExecutor();
 2     Callable<Object> task = new Callable<Object>() {
 3         @Override
 4         public Object call() throws Exception {
 5             Object result = "";
 6             return result;
 7         }
 8     };
 9     public void subTask() {
10         Future<Object> future = executor.submit(task);
11         try {
12             future.get();    //等待至完成
13         } catch (InterruptedException e) {
14             e.printStackTrace();
15         } catch (ExecutionException e) {
16             e.printStackTrace();
17         }
18     }
Task Submitter
1     Future<Object> future = executor.submit(task);
2     //等待到任务被执行完毕返回结果
3     //如果任务执行出错,这里会抛ExecutionException
4     future.get();
5     //等待3秒,超时后会抛TimeoutException
6     future.get(3, TimeUnit.SECONDS);
Task Executor
1     Callable<Object> task = new Callable<Object>() {
2         @Override
3         public Object call() throws Exception {
4             Object result = ...;
5             return result;
6         }
7     };
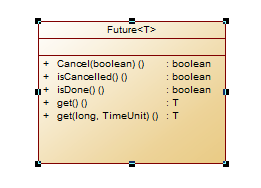
Task Submitter 把任务提交给Executor执行,他们之间需要一种通讯手段,这种手段的具体实现,通常叫做Future。Future通常包括get(阻塞至任务完成),cancel, get(timeout)(等待一段时间)等等。Future也用于异步变同步的场景。
3.阻塞队列:阻塞队列,是一种常用的并发数据结构,常用域生产者-消费者模式。
有多种阻塞队列:
ArrayBlockingQueue(最常用)
LinkedBolckingQueue(不会满的)
SynchronousQueue(size为0)
PriorityBlockingQueue
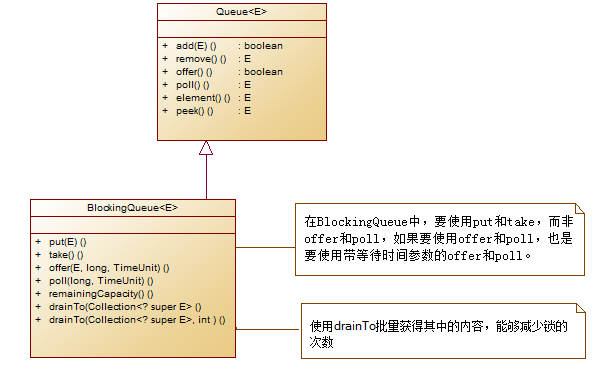
阻塞中常用的方法有:


注:在使用BlockingQueue的时候,尽量不要使用从Queue继承下来的方法,否则就失去了Blocking的特性了。
例1:
 1         final BlockingQueue<Object> blockingQ = new ArrayBlockingQueue<Object>(10);
 2         Thread thread = new Thread("consumer thread") {
 3             public void run() {
 4                 for(;;) {
 5                     try {
 6                         Object object = blockingQ.take();    //等到有数据才继续
 7                         handle(object);    //处理
 8                     } catch (InterruptedException e) {
 9                         break;
10                     } catch(Exception e) {
11                         e.printStackTrace();
12                     }
13                 }
14             }
15         };
例2:
 1 final BlockingQueue<Object> blockingQ = new ArrayBlockingQueue<Object>(10);
 2     Thread thread = new Thread("consumer thread two") {
 3         public void run() {
 4             for(;;) {
 5                 try {
 6                     Object object = blockingQ.poll(1, TimeUnit.SECONDS);    //防止死锁
 7                     if(object == null) {
 8                         //TODO
 9                         continue;    //或者进行其他操作
10                     }
11                 } catch (InterruptedException e) {
12                     break;
13                 } catch (Exception e) {
14                     e.printStackTrace();
15                 }
16             }
17         }
18     };