出处:http://www.cnblogs.com/isaboy/
声明:本文版权归作者和博客园共有,欢迎转载,但未经作者同意必须保留此段声明,且在文章页面明显位置给出原文连接,否则保留追究法律责任的权利。
二维码是用某种特定的几何图形按一定规律在平面(二维方向上)分布的黑白相间的图形记录数据符号信息的,国外对二维码技术的研究始于20世纪80年代末,在二维码符号表示技术研究方面已研制出多种码制,常见的有PDF417、QR Code、Code 49、Code 16K、Code One等。
二维码技术已经被广泛应用于公安、外交、军事等部门对各类证件的管理,而且也将二维码应用于海关、税务等部门对各类报表和票据的管理,商业、交通运输等部门对商品及货物运输的管理、邮政部门对邮政包裹的管理、工业生产领域对工业生产线的自动化管理。
下面介绍一下如何用.NET生成二维码(QR Code码制),下面给出详细步骤:
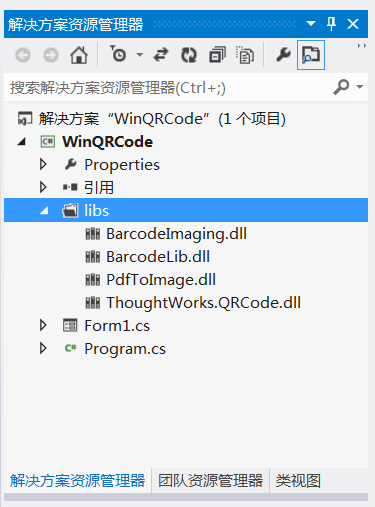
1、新建一个window应用程序,然后引入.NET二维码类库(开源的类库,可从网上下载):

2、构建UI界面,代码如下:
namespace WinQRCode
{
    partial class Form1
    {
        /// <summary>
        /// 必需的设计器变量。
        /// </summary>
        private System.ComponentModel.IContainer components = null;

        /// <summary>
        /// 清理所有正在使用的资源。
        /// </summary>
        /// <param name="disposing">如果应释放托管资源,为 true;否则为 false。</param>
        protected override void Dispose(bool disposing)
        {
            if (disposing && (components != null))
            {
                components.Dispose();
            }
            base.Dispose(disposing);
        }

        #region Windows 窗体设计器生成的代码

        /// <summary>
        /// 设计器支持所需的方法 - 不要
        /// 使用代码编辑器修改此方法的内容。
        /// </summary>
        private void InitializeComponent()
        {
            this.button1 = new System.Windows.Forms.Button();
            this.button2 = new System.Windows.Forms.Button();
            this.pictureBox1 = new System.Windows.Forms.PictureBox();
            this.label1 = new System.Windows.Forms.Label();
            this.textBox1 = new System.Windows.Forms.TextBox();
            this.label2 = new System.Windows.Forms.Label();
            this.lbl解码信息 = new System.Windows.Forms.Label();
            ((System.ComponentModel.ISupportInitialize)(this.pictureBox1)).BeginInit();
            this.SuspendLayout();
            //
            // button1
            //
            this.button1.Location = new System.Drawing.Point(446, 31);
            this.button1.Margin = new System.Windows.Forms.Padding(4, 5, 4, 5);
            this.button1.Name = "button1";
            this.button1.Size = new System.Drawing.Size(103, 37);
            this.button1.TabIndex = 0;
            this.button1.Text = "编码";
            this.button1.UseVisualStyleBackColor = true;
            this.button1.Click += new System.EventHandler(this.button1_Click);
            //
            // button2
            //
            this.button2.Location = new System.Drawing.Point(446, 81);
            this.button2.Margin = new System.Windows.Forms.Padding(4, 5, 4, 5);
            this.button2.Name = "button2";
            this.button2.Size = new System.Drawing.Size(103, 37);
            this.button2.TabIndex = 1;
            this.button2.Text = "解码";
            this.button2.UseVisualStyleBackColor = true;
            this.button2.Click += new System.EventHandler(this.button2_Click);
            //
            // pictureBox1
            //
            this.pictureBox1.Location = new System.Drawing.Point(23, 117);
            this.pictureBox1.Margin = new System.Windows.Forms.Padding(4, 5, 4, 5);
            this.pictureBox1.Name = "pictureBox1";
            this.pictureBox1.Size = new System.Drawing.Size(279, 253);
            this.pictureBox1.SizeMode = System.Windows.Forms.PictureBoxSizeMode.StretchImage;
            this.pictureBox1.TabIndex = 2;
            this.pictureBox1.TabStop = false;
            //
            // label1
            //
            this.label1.AutoSize = true;
            this.label1.Location = new System.Drawing.Point(18, 39);
            this.label1.Margin = new System.Windows.Forms.Padding(4, 0, 4, 0);
            this.label1.Name = "label1";
            this.label1.Size = new System.Drawing.Size(69, 25);
            this.label1.TabIndex = 3;
            this.label1.Text = "信息:";
            //
            // textBox1
            //
            this.textBox1.Location = new System.Drawing.Point(95, 37);
            this.textBox1.Margin = new System.Windows.Forms.Padding(4, 5, 4, 5);
            this.textBox1.Name = "textBox1";
            this.textBox1.Size = new System.Drawing.Size(333, 31);
            this.textBox1.TabIndex = 4;
            //
            // label2
            //
            this.label2.AutoSize = true;
            this.label2.Location = new System.Drawing.Point(18, 81);
            this.label2.Margin = new System.Windows.Forms.Padding(4, 0, 4, 0);
            this.label2.Name = "label2";
            this.label2.Size = new System.Drawing.Size(88, 25);
            this.label2.TabIndex = 5;
            this.label2.Text = "二维码:";
            //
            // lbl解码信息
            //
            this.lbl解码信息.AutoSize = true;
            this.lbl解码信息.Location = new System.Drawing.Point(101, 81);
            this.lbl解码信息.Margin = new System.Windows.Forms.Padding(4, 0, 4, 0);
            this.lbl解码信息.Name = "lbl解码信息";
            this.lbl解码信息.Size = new System.Drawing.Size(0, 25);
            this.lbl解码信息.TabIndex = 6;
            //
            // Form1
            //
            this.AutoScaleDimensions = new System.Drawing.SizeF(11F, 24F);
            this.AutoScaleMode = System.Windows.Forms.AutoScaleMode.Font;
            this.ClientSize = new System.Drawing.Size(572, 384);
            this.Controls.Add(this.lbl解码信息);
            this.Controls.Add(this.label2);
            this.Controls.Add(this.textBox1);
            this.Controls.Add(this.label1);
            this.Controls.Add(this.pictureBox1);
            this.Controls.Add(this.button2);
            this.Controls.Add(this.button1);
            this.Font = new System.Drawing.Font("微软雅黑", 10.8F, System.Drawing.FontStyle.Regular, System.Drawing.GraphicsUnit.Point, ((byte)(134)));
            this.Margin = new System.Windows.Forms.Padding(4, 5, 4, 5);
            this.Name = "Form1";
            this.Text = "二维码";
            ((System.ComponentModel.ISupportInitialize)(this.pictureBox1)).EndInit();
            this.ResumeLayout(false);
            this.PerformLayout();

        }

        #endregion

        private System.Windows.Forms.Button button1;
        private System.Windows.Forms.Button button2;
        private System.Windows.Forms.PictureBox pictureBox1;
        private System.Windows.Forms.Label label1;
        private System.Windows.Forms.TextBox textBox1;
        private System.Windows.Forms.Label label2;
        private System.Windows.Forms.Label lbl解码信息;
    }
}
图形如下所示:

3、编写 编码和解码按钮事件,进行编码和解码处理:
using System;
using System.Collections.Generic;
using System.ComponentModel;
using System.Data;
using System.Drawing;
using System.Linq;
using System.Text;
using System.Windows.Forms;

namespace WinQRCode
{
    using ThoughtWorks.QRCode.Codec;
    using ThoughtWorks.QRCode.Codec.Data;
    using ThoughtWorks.QRCode.Codec.Util;
    using System.IO;
    using PdfToImage;
    public partial class Form1 : Form
    {
        public Form1()
        {
            InitializeComponent();
        }
        /// <summary>
        /// 编码
        /// </summary>
        /// <param name="sender"></param>
        /// <param name="e"></param>
        private void button1_Click(object sender, EventArgs e)
        {
            if (this.textBox1.Text != "")
            {
                Cursor.Current = Cursors.WaitCursor;
                if (textBox1.Text.Trim() == String.Empty)
                {
                    MessageBox.Show("不能为空.");
                    return;
                }
                QRCodeEncoder qrCodeEncoder = new QRCodeEncoder();
                qrCodeEncoder.QRCodeEncodeMode = QRCodeEncoder.ENCODE_MODE.BYTE;
                qrCodeEncoder.QRCodeScale = 4;
                qrCodeEncoder.QRCodeVersion = 7;
               qrCodeEncoder.QRCodeErrorCorrect = QRCodeEncoder.ERROR_CORRECTION.M;
                System.Drawing.Image image;
                String data = textBox1.Text;
                //编码
                image = qrCodeEncoder.Encode(data);
                //图片显示
                this.pictureBox1.Image = image;
                Cursor.Current = Cursors.Default;

            }
        }
        /// <summary>
        /// 解码
        /// </summary>
        /// <param name="sender"></param>
        /// <param name="e"></param>
        private void button2_Click(object sender, EventArgs e)
        {
            Cursor.Current = Cursors.WaitCursor;
            Bitmap b = this.pictureBox1.Image as Bitmap;
            try
            {
                QRCodeDecoder decoder = new QRCodeDecoder();
                //解码
                String decodedString = decoder.decode(new QRCodeBitmapImage(b));
                //显示解码信息
                this.lbl解码信息.Text += decodedString ;
            }
            catch (Exception ex)
            {
                MessageBox.Show(ex.Message);
            }
            Cursor.Current = Cursors.Default;
        }

        private void Form1_Load(object sender, EventArgs e)
        {

        }
    }
}
4、编译运行,如下图:
