小程序的云开发功能
云开发功能是为小程序开发者提供的完整的原生云端支持和微信服务支持,使得开发者无需自己搭建服务器即可使用云端能力,使用平台提供的API即可进行核心业务开发。
云开发提供的几大基础能力
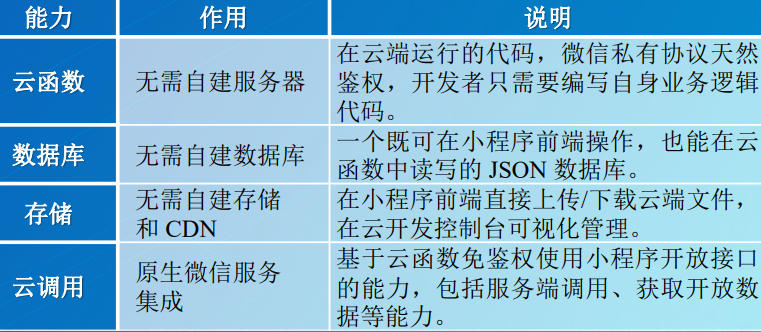
小程序支持了云开发之后,就可以自动的获取云端的存储区,云端的数据库,以及运行云端代码的能力
在云开发能力的支持下,云端运行的代码 (云函数)使用微信私有协议天然鉴权,开发者只需 编写自身业务逻辑代码即可。
获取OpenID的步骤
定义云函数login
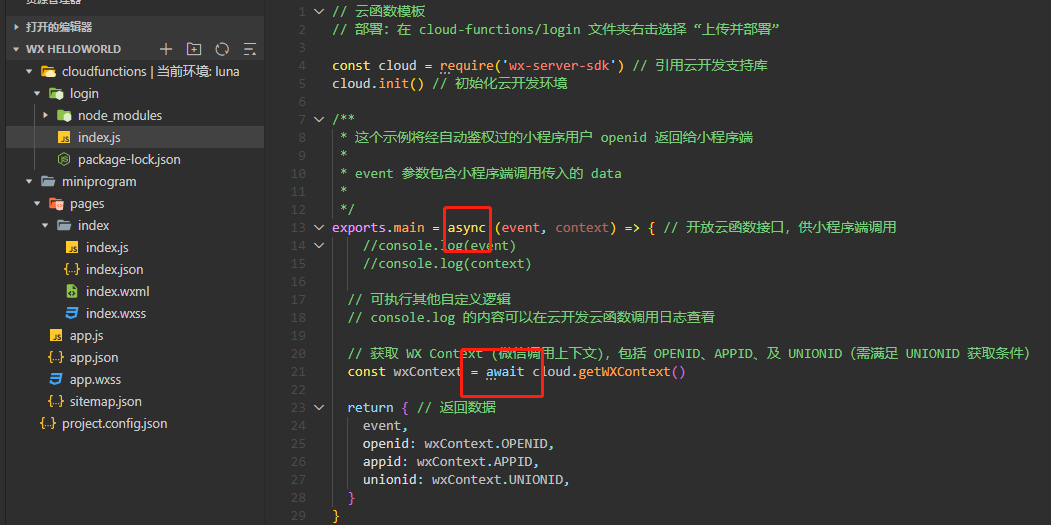
获取微信调用上下文(包括 OPENID、APPID、 及 UNIONID)并返回这些信息。
部署云函数login
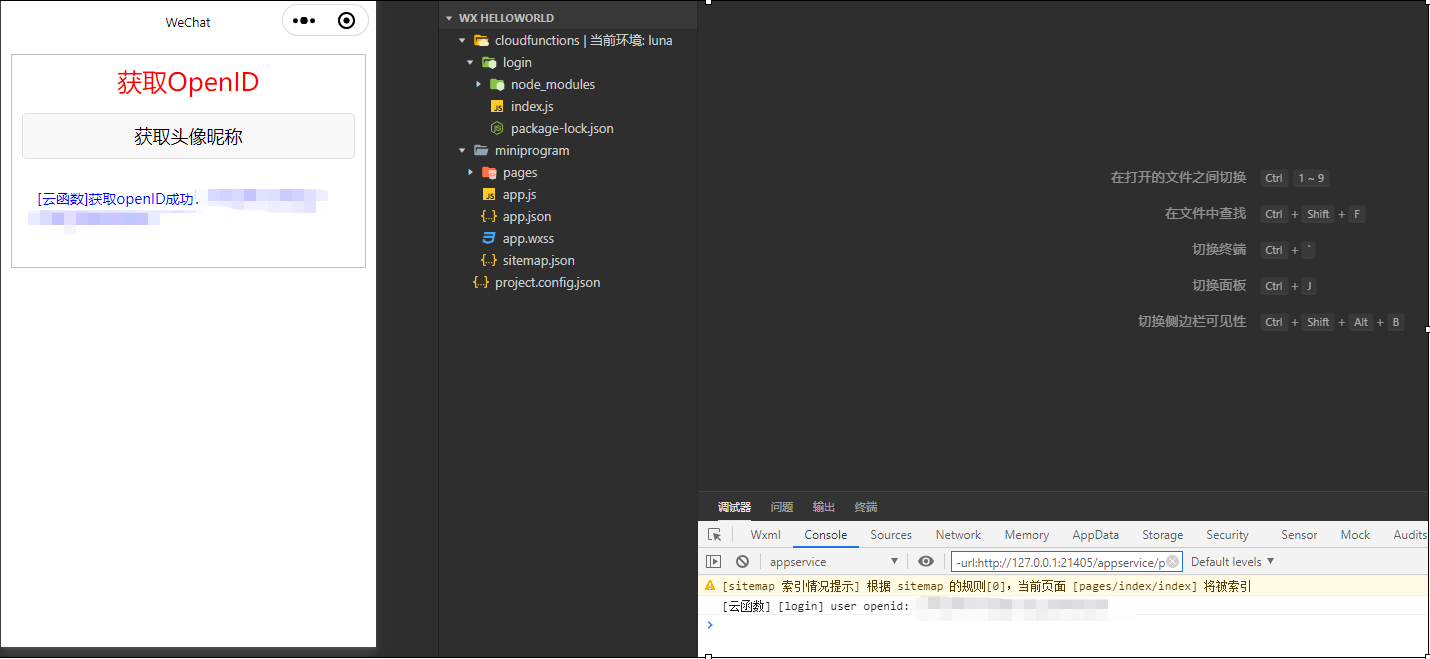
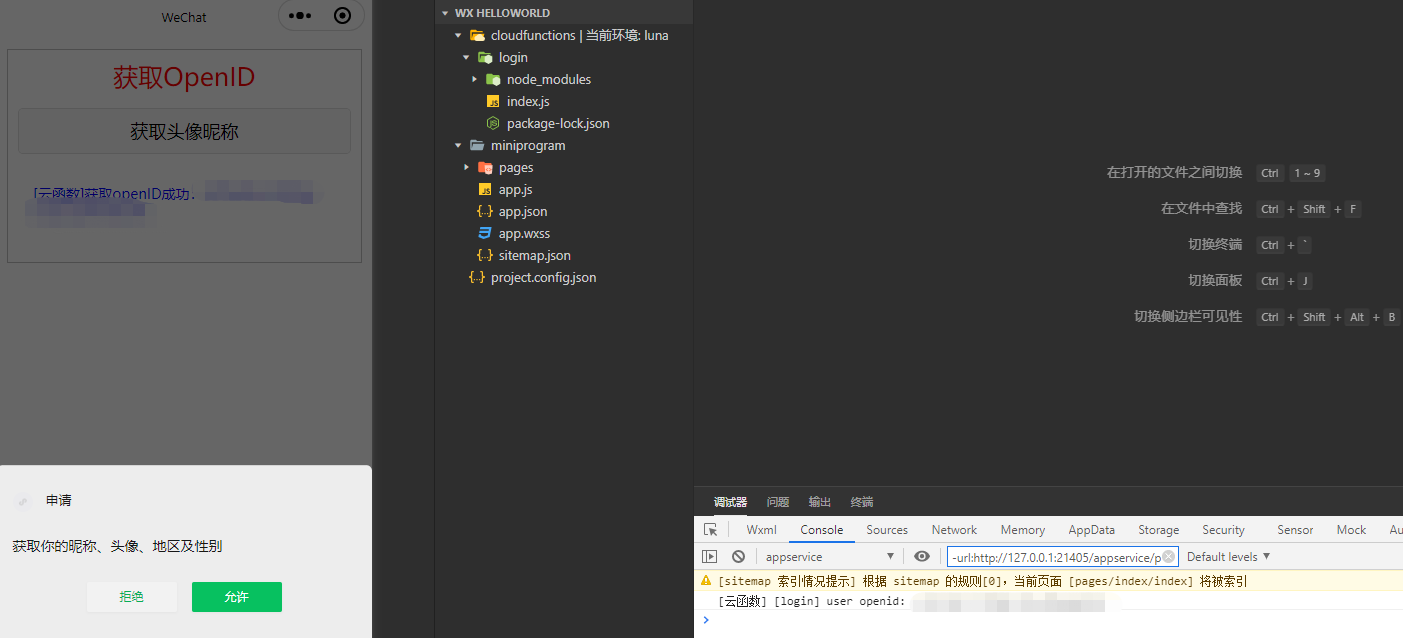
调用云函数login
实例:
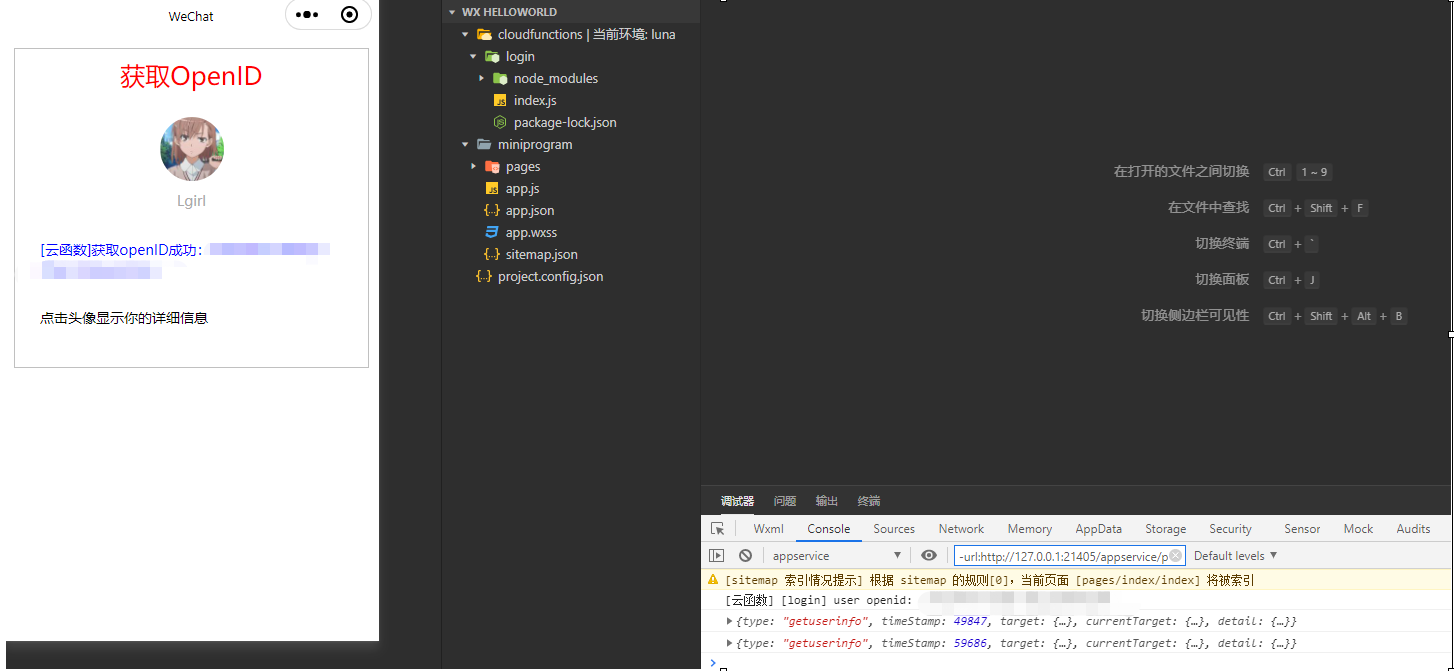

app.json
{
  "pages": [
    "pages/index/index"
  ],
  "window": {
    "backgroundTextStyle": "light",
    "navigationBarBackgroundColor": "#fff",
    "navigationBarTitleText": "云开发",
    "navigationBarTextStyle": "black"
  },
  "sitemapLocation": "sitemap.json"
}
//app.js
App({
  onLaunch: function () {

    if (!wx.cloud) {
      console.error('请使用 2.2.3 或以上的基础库以使用云能力')
    } else {
      wx.cloud.init({
        // 此处请填入环境 ID, 环境 ID 可打开云控制台查看
        env: '你的云环境ID',
        traceUser: true,
      })
    }

    this.globalData = {}
  }
})
小程序开发中使用云开发功能,需要在app.js文件中 启动函数onLaunch中先检查云环境是否可用,可以使用云开发功能的话需要初始化云环境,init接口中需要指明云开发环境的id,如果只有一个云开发环境的话,就不需要特意指明了
<!--pages/index/index.wxml-->
<view class='box'>
  <view class='title'>获取OpenID</view>
    <block wx:if="{{!hasUserInfo}}"><!--条件渲染的结构块,block组件,没有获取用户的信息,会显示一个button组件或者是一个test组件-->
        <button wx:if="{{canIUse}}" open-type="getUserInfo" bindgetuserinfo="getUserInfo"> 获取头像昵称 </button><!--canIUse为true显示button组件,false显示test组件,canIUse变量的意思当前的小程序是否支持使用open-type为getUserInfo属性值的按钮组件,当前小程序版本支持的话,就会显示button组件-->
        <text wx:else> 请升级微信版本,使用1.3.0或以上的基础库以支持open-type按钮获取用户公开信息! </text>
    </block>
  <view wx:else class='userinfo'>
      <image bindtap='getDetail' class='userinfo-avatar' src='{{userInfo.avatarUrl}}' mode='cover'></image><!--绑定了用户头像image组件,它的单击事件函数是getDetail-->
      <text class='userinfo-nickname'>{{userInfo.nickName}}</text>
  </view>
  <view class='user-openid'>
    <text>{{openID}}</text>
  </view>
  <view class='user-detail' wx:if='{{hasUserInfo}}'>
    <text>{{detail}}</text>
  </view>
</view>
/* pages/index/index.wxss */
page{
  font-size: 14px;
}
.userinfo {
  display: flex;
  flex-direction: column;
  align-items: center;
}

.userinfo-avatar {
  width: 128rpx;
  height: 128rpx;
  margin: 20rpx;
  border-radius: 50%;
}

.userinfo-nickname {
  color: #aaa;
}

.user-openid {
  margin: 60rpx 30rpx;
  color:blue;
}

.user-detail{
  margin: 60rpx 30rpx;
  text-align: left;
  color: black
}
// pages/index/index.js
Page({

  /**
   * 页面的初始数据
   */
  data: {
    userInfo: {}, // 用户公开信息
    hasUserInfo: false, // 是否获取了用户公开信息
    canIUse: wx.canIUse('button.open-type.getUserInfo'), // 是否支持使用getUserInfo按钮
    openID: '', // 用户身份ID信息
    detail: '点击头像显示你的详细信息', // 用户详细信息
  },

  /**
   * 生命周期函数--监听页面加载
   */
  onLoad: function(options) {
        wx.getSetting({ // 调用接口获取用户的当前设置
            success: res => { // 调用成功时的回调函数
        if (res.authSetting['scope.userInfo']) {
          // 如果已经授权,可以直接调用 getUserInfo 获取头像昵称,不会弹框
          wx.getUserInfo({ // 调用接口获取用户公开信息
                        success: res => { // 调用成功时的回调函数
              this.setData({ // 设置页面绑定数据
                userInfo: res.userInfo,
                hasUserInfo: true
              })
            }
          })
                }
      }
    })
    this.getOpenID() // 调用getOpenID函数
  },
  getUserInfo: function (e) { // 定义getUserInfo按钮的单击事件函数
    console.log(e)
        if (e.detail.userInfo){ // 如果返回参数中包含userInfo数据,则已经获取了用户公开信息
            this.setData({ // 设置页面绑定数据
                userInfo: e.detail.userInfo,
                hasUserInfo: true
            })
        }else{ // 否则就显示模态对话框,提示授权失败信息
            wx.showModal({
                title: e.detail.errMsg,
                content: '小程序需要用户授权获取公开信息才可以继续。',
            })
        }
  },

  // 定义获取用户OpenID的函数
  getOpenID: function() {
    var that = this;
    wx.showLoading({ // 显示加载提示框
      title: '获取openID。。。',
    })
    wx.cloud.callFunction({ // 调用云函数
      name: 'login', // 函数名称
      data: {}, // 函数参数
      complete: res => { // 调用完成时的回调函数
        wx.hideLoading() // 隐藏加载提示框
      },
      success: res => { // 调用成功时的回调函数
        console.log('[云函数] [login] user openid: ', res.result.openid)
        that.setData({ // 设置页面绑定数据
          openID: '[云函数]获取openID成功:' + res.result.openid,
        })
      },
      fail: err => { // 调用失败时的回调函数
        console.error('[云函数] [login] 调用失败', err)
        that.setData({ // 设置页面绑定数据
          openID: '[云函数]获取openID失败' + err
        })
      }
    })
  },
  // 定义获取用户详细信息的函数
  getDetail: function() {
    var userInf = this.data.userInfo;
    var gender = (userInf.gender == 1) ? "男" : (userInf.gender == 2) ? "女" : "未知";
    var detailStr = "性别:" + gender;
    detailStr = detailStr + "
国家:" + userInf.country;
    detailStr = detailStr + "
省份:" + userInf.province;
    detailStr = detailStr + "
城市:" + userInf.city;
    this.setData({ // 设置页面绑定数据
      detail: detailStr
    })
  }
})
js文件里定义page对象时,定义了一些页面的变量,定义了监听页面加载的onload函数,以及其他一些用到的事件函数
{
  "miniprogramRoot": "miniprogram/",
  "cloudfunctionRoot": "cloudfunctions/",
  "setting": {
    "urlCheck": true,
    "es6": true,
    "enhance": true,
    "postcss": true,
    "preloadBackgroundData": false,
    "minified": true,
    "newFeature": true,
    "coverView": true,
    "nodeModules": false,
    "autoAudits": false,
    "showShadowRootInWxmlPanel": true,
    "scopeDataCheck": false,
    "uglifyFileName": false,
    "checkInvalidKey": true,
    "checkSiteMap": true,
    "uploadWithSourceMap": true,
    "compileHotReLoad": false,
    "lazyloadPlaceholderEnable": false,
    "useMultiFrameRuntime": true,
    "useApiHook": true,
    "useApiHostProcess": false,
    "babelSetting": {
      "ignore": [],
      "disablePlugins": [],
      "outputPath": ""
    },
    "enableEngineNative": false,
    "useIsolateContext": false,
    "userConfirmedBundleSwitch": false,
    "packNpmManually": false,
    "packNpmRelationList": [],
    "minifyWXSS": true,
    "showES6CompileOption": false
  },
  "appid": "wx6b706fbbff7d6d0a",
  "projectname": "EX601-GetOpenID",
  "libVersion": "2.6.6",
  "simulatorType": "wechat",
  "simulatorPluginLibVersion": {},
  "cloudfunctionTemplateRoot": "cloudfunctionTemplate",
  "condition": {
    "search": {
      "list": []
    },
    "conversation": {
      "list": []
    },
    "plugin": {
      "list": []
    },
    "game": {
      "list": []
    },
    "miniprogram": {
      "list": []
    }
  }
}
// 云函数模板
// 部署:在 cloud-functions/login 文件夹右击选择 “上传并部署”

const cloud = require('wx-server-sdk') // 引用云开发支持库
cloud.init() // 初始化云开发环境

/**
 * 这个示例将经自动鉴权过的小程序用户 openid 返回给小程序端
 *
 * event 参数包含小程序端调用传入的 data
 *
 */
exports.main = async (event, context) => { // 开放云函数接口,供小程序端调用
    console.log(event)
    console.log(context)

    // 可执行其他自定义逻辑
    // console.log 的内容可以在云开发云函数调用日志查看

    // 获取 WX Context (微信调用上下文),包括 OPENID、APPID、及 UNIONID(需满足 UNIONID 获取条件)
    const wxContext = await cloud.getWXContext()

    return { // 返回数据
        event,
        openid: wxContext.OPENID,
        appid: wxContext.APPID,
        unionid: wxContext.UNIONID,
    }
}
2、安装wx-server-sdk依赖。
在cmd中首先通过cd 云函数路径的命令,定位到云函数目录,这里要定位到某个具体的云函数文件夹内,如login函数则要定位到login文件夹内。然后再执行npm install --save wx-server-sdk命令,安装wx-server-sdk依赖。对于每一个你创建云函数都要安装该依赖。
如果在执行安装命令后出现类似错误提示:rollbackFailedOptional: verb npm-session ****************,这是由于npm官方库是国外的网站,在访问时可能由于网络原因导致异常。
解决方案:执行npm config set registry "http://registry.npm.taobao.org"命令,将官方库替换为淘宝库即可。
执行命令后可能会出现以下警告:
npm WARN **** No description
npm WARN **** No repository field
直接忽略即可,并不会影响后续的云函数功能。成功安装依赖后,相应的云函数文件夹将生成一个package-lock.json文件。
3、上传云函数:在相应的云函数文件夹上右键,选择“上传并部署:所有文件”。
