WordPress是使用PHP语言开发的博客平台,是一款开源的软件,用户可以在支持PHP和MySQL数据库的服务器上架设属于自己的网站。也可以把 WordPress当作一个内容管理系统(CMS)来使用。因为使用者众多,所以WordPress社区非常活跃,有丰富的插件模板资源。使用WordPress可以快速搭建独立的博客网站。
官网:https://cn.wordpress.org/中文文档:https://codex.wordpress.org/zh-cn:Main_Page
一、LNMP环境的搭建详情:https://www.cnblogs.com/su-root/p/11073215.html
二、搭建wordpress bolog博客程序准备:
mysql数据库配置准备:
登陆mysql数据库:
mysql –uroot –p123456
创建并授权一个专用的数据库wordpress用于存放blog数据:
create database wordpress;
show database like ‘wordpress’;
grant all on worpress.* to worpress@'localhost' identified by '123456';
注:当数据库和php服务不在同一台机器上,可执行如下命令授权
grant all on wordpress.* to wordpress@’192.168.0.%’ identified by ‘123456’;
刷新权限,使得创建的用户生效:
flush privileges;
查看用户对应的权限:
select user,host from mysql.user where user='wordpress';
博客程序下载:
[root@bqh-118 blog]# wget https://cn.wordpress.org/wordpress-4.2.2-zh_CN.tar.gz
[root@bqh-118 blog]# ls
wordpress-4.2.2-zh_CN.tar.gz
[root@bqh-118 blog]# tar xf wordpress-4.2.2-zh_CN.tar.gz
[root@bqh-118 blog]# ll
总用量 6572
drwxr-xr-x 5 nobody nfsnobody    4096 5月  20 2015 wordpress
-rw-r--r-- 1 root   root      6722406 6月  23 12:05 wordpress-4.2.2-zh_CN.tar.gz
[root@bqh-118 blog]# mv wordpress/* .
[root@bqh-118 blog]# ls
index.php    wordpress-4.2.2-zh_CN.tar.gz  wp-comments-post.php  wp-includes        wp-mail.php       xmlrpc.php
license.txt  wp-activate.php               wp-config-sample.php  wp-links-opml.php  wp-settings.php
readme.html  wp-admin                      wp-content            wp-load.php        wp-signup.php
wordpress    wp-blog-header.php            wp-cron.php           wp-login.php       wp-trackback.php
[root@bqh-118 blog]#rm –rf wordpress/    #删掉,避免带路径
nginx环境配置准备:
[root@bqh-118 conf]# vim nginx.conf
worker_processes  1;
events {
    worker_connections  1024;
}
http {
    include       mime.types;
    default_type  application/octet-stream;
    sendfile        on;
    keepalive_timeout  65;

 server {
        listen       80;
        server_name  www.test.com;
        root  html/blog;
    location / {
            index  index.php index.html index.htm;
           }
        location ~ .*.(php|php5)?$ {
           fastcgi_pass 127.0.0.1:9000;
       fastcgi_index index.php;
       include fastcgi.conf;
         }
        error_page   500 502 503 504  /50x.html;
     }
}
php环境配置准备:
[root@bqh-118 html]# chown -R root.root blog/
[root@bqh-118 html]# find ./blog/ -type f|xargs chmod 644
[root@bqh-118 html]# find ./blog/ -type d|xargs chmod 755
[root@bqh-118 html]# mkdir -p ./blog/wp-content/uploads
但是这样设置用户无法更改头像,上传图片,我们可以单独给他们设置权限。
[root@bqh-118 html]# chown -R nginx.nginx ./blog/wp-content/uploads #网站上传目录权限,没有则创建一个即可
修改所有php文件属主为root,避免网站php程序遭到篡改
[root@bqh-118 html]# find ./blog/ -type f -name "*.php"|xargs chown -R root.root
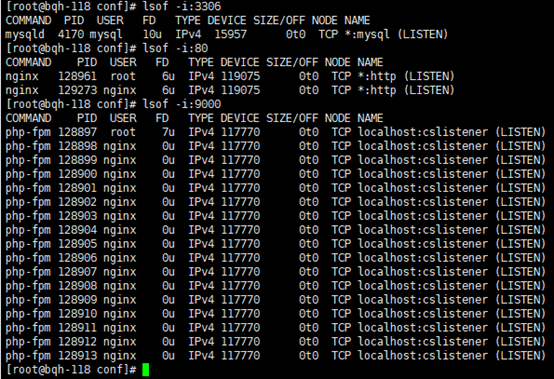
现在我们启动nginx服务、php服务、mysql服务:
[root@bqh-118 html]# /application/nginx/sbin/nginx
[root@bqh-118 html]# /application/php/sbin/php-fpm
[root@bqh-118 html]# /etc/init.d/mysqld start
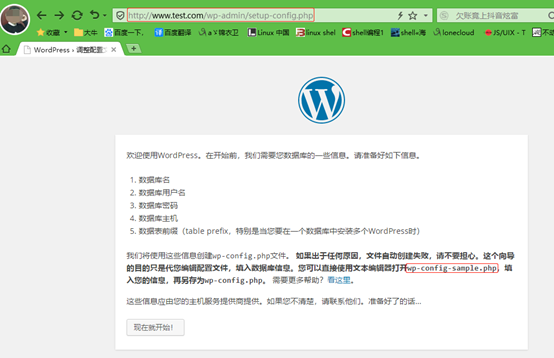
打开浏览器:www.test.com
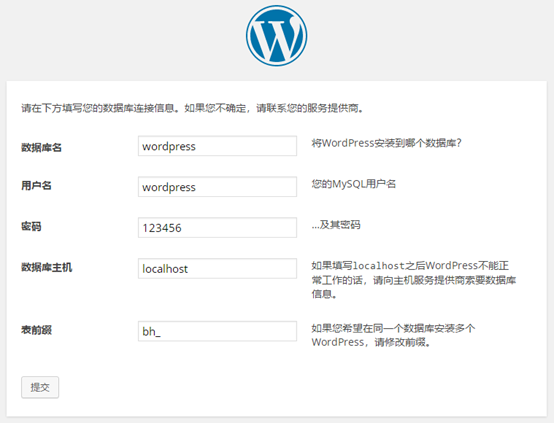
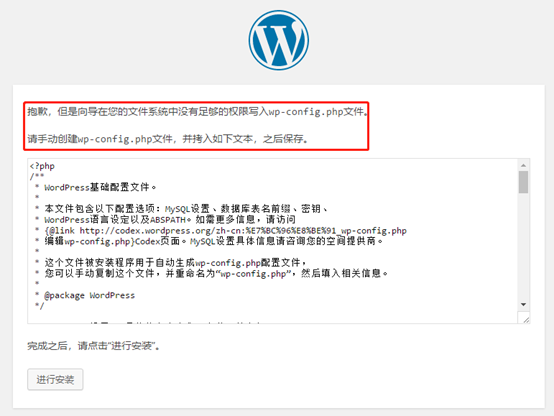
由于前期我们把权限搞了,现在需要复制出来,手动创建wp-config.php文件传上去即可。当然也可以在前面把安全降低777也行,后期再加固权限。

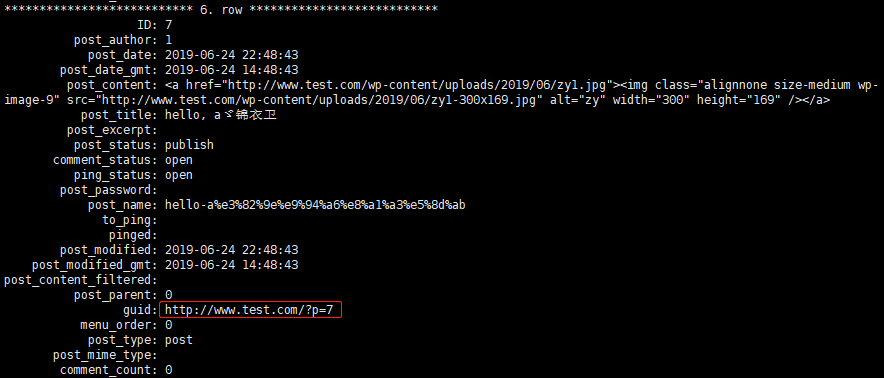
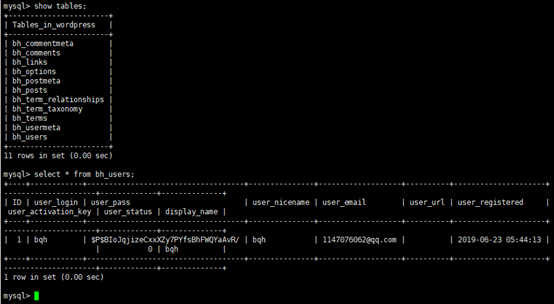
此时我们查询下数据库里面的信息:

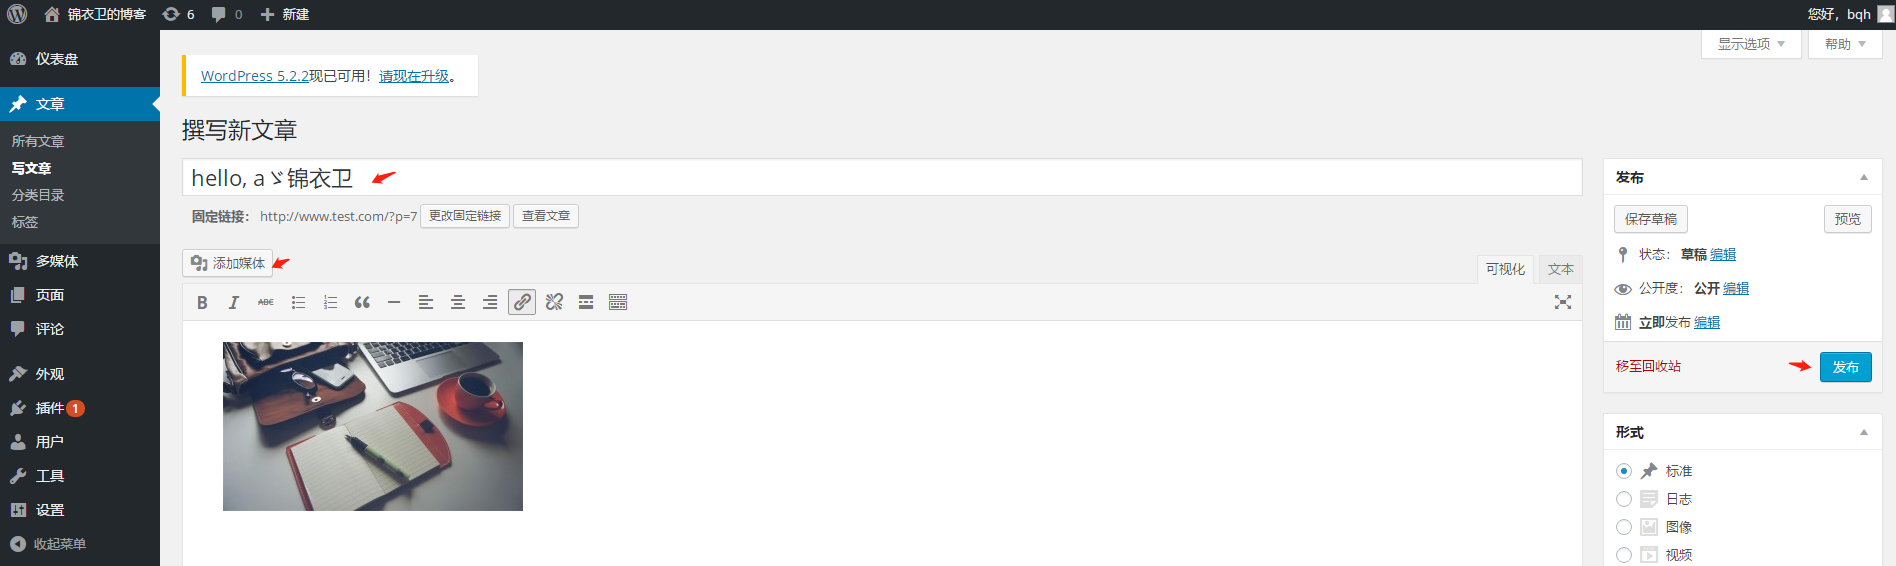
ok,我们现在发一个博客试试:

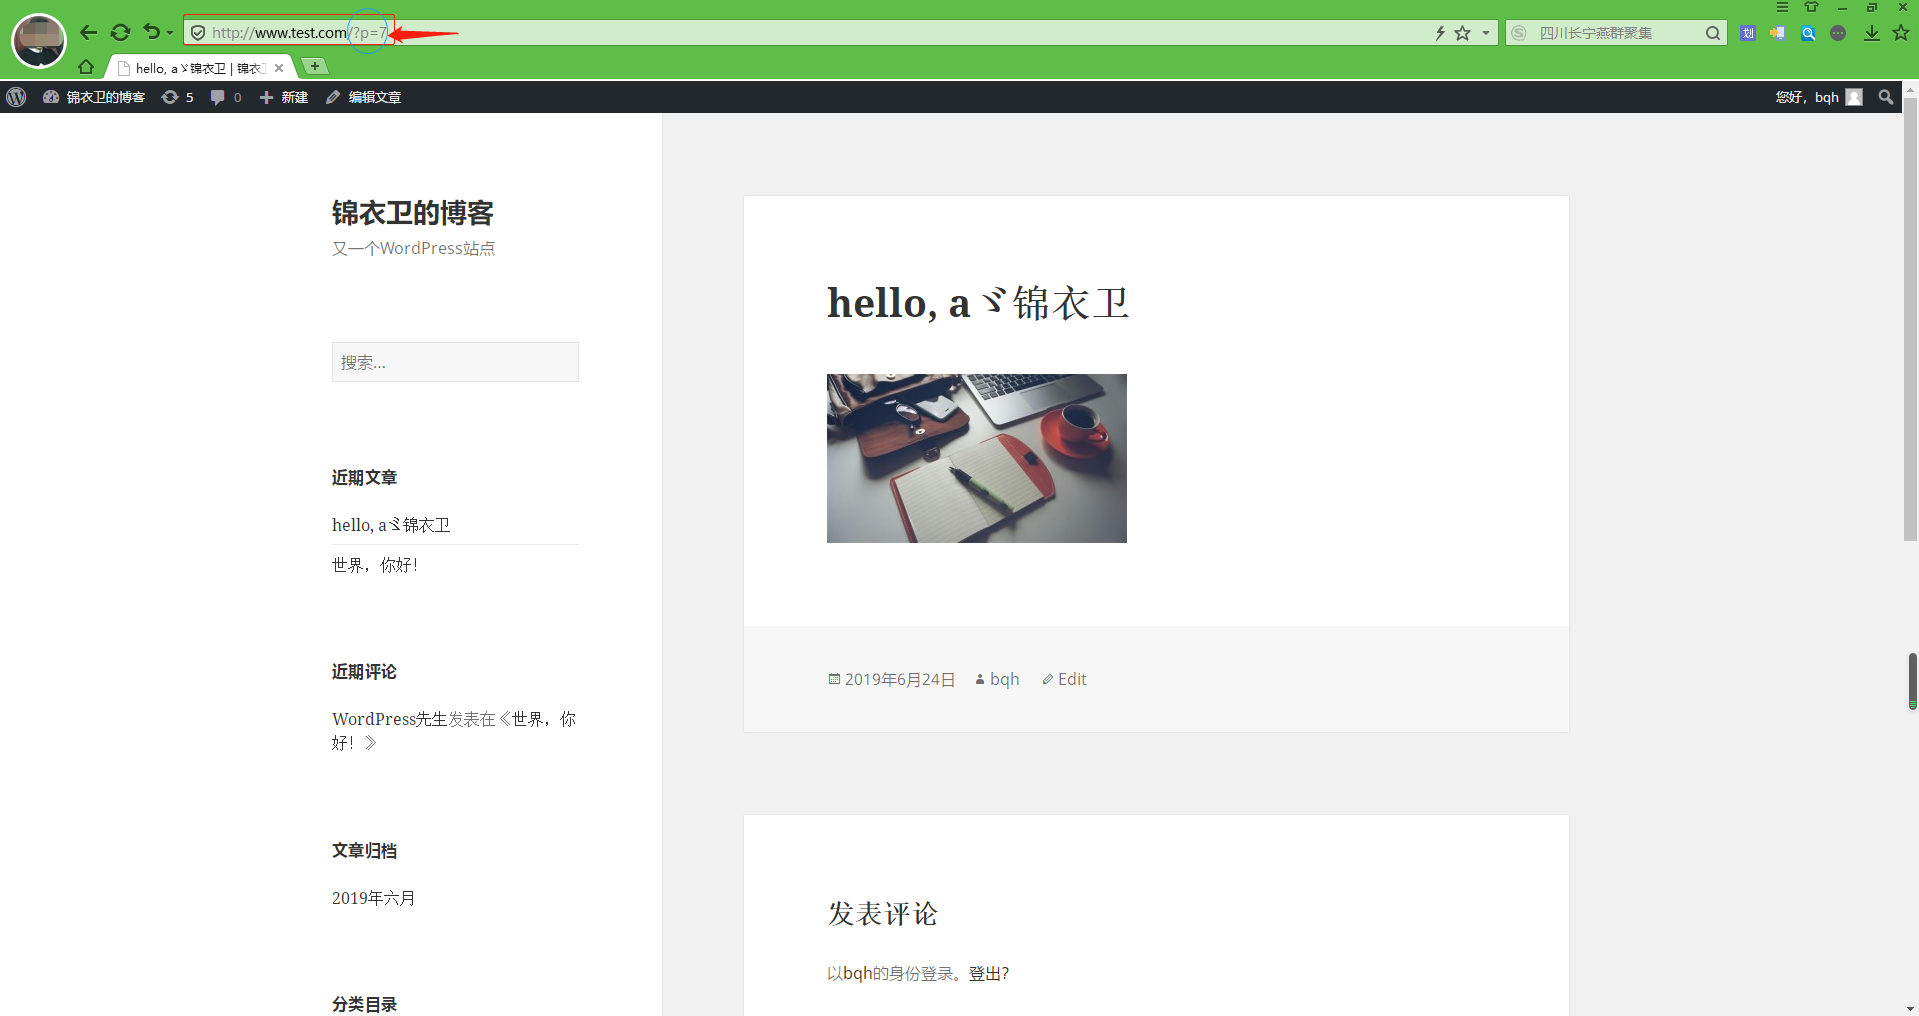
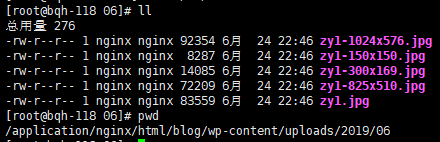
我们查看一下上传图片路径,发现有多张图片,原因是博客优化图片来着(主页展示图片跟文章展示图片大小)
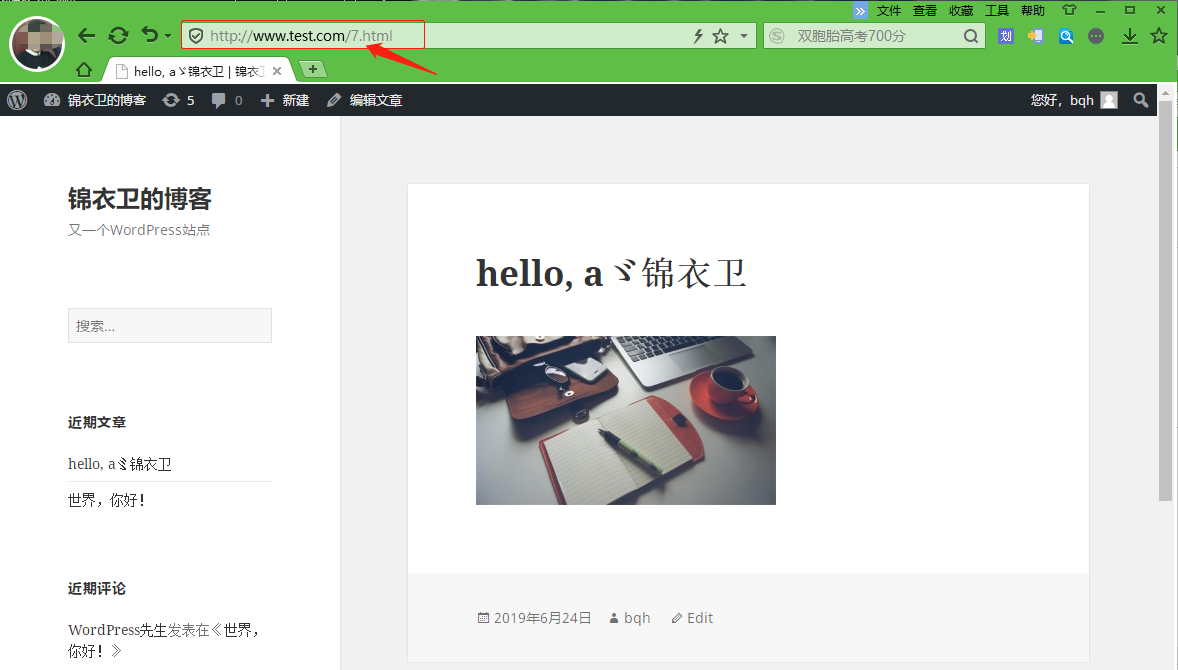
同时我们还发现网址后面带参数,说明是动态博客。
下面我们为wordpress博客设置伪静态规则:
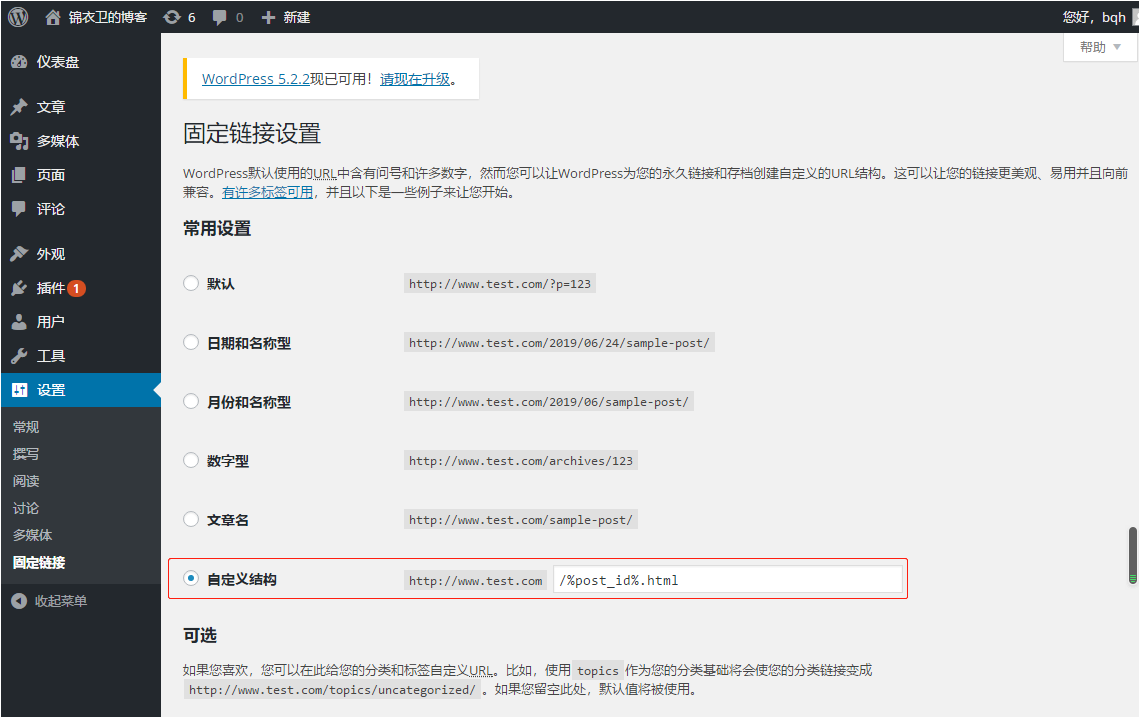
1.打开博客后台登录进去----设置----固定连接----自定义结构,输入下面的代码保存即可:
自定义结构帮助:https://codex.wordpress.org/Using_Permalinks
2. nginx配置文件的server容器中添加下面的代码:(红色部分)
[root@bqh-118 conf]# vim nginx.conf
worker_processes  1;
events {
    worker_connections  1024;
}
http {
    include       mime.types;
    default_type  application/octet-stream;
    sendfile        on;
    keepalive_timeout  65;

 server {
        listen       80;
        server_name  www.test.com;
        root  html/blog;
    location / {
            index  index.php index.html index.htm;
    if (-f $request_filename/index.html){
    rewrite (.*) $1/index.html break;
     }
    if (-f $request_filename/index.php){
    rewrite (.*) $1/index.php;
     }
    if (!-f $request_filename){
    rewrite (.*) /index.php;
     }
    }
        location ~ .*.(php|php5)?$ {
           fastcgi_pass 127.0.0.1:9000;
       fastcgi_index index.php;
       include fastcgi.conf;
         }
        error_page   500 502 503 504  /50x.html;
     }
}
[root@bqh-118 conf]# /application/nginx/sbin/nginx -t
nginx: the configuration file /application/nginx-1.6.3/conf/nginx.conf syntax is ok
nginx: configuration file /application/nginx-1.6.3/conf/nginx.conf test is successful
[root@bqh-118 conf]# /application/nginx/sbin/nginx -s reload
我们进入mysql 可以查看到原始的地址加以对比:
[root@bqh-118 conf]# mysql -uroot -p123456
Welcome to the MySQL monitor.  Commands end with ; or g.
Your MySQL connection id is 118
Server version: 5.5.32 MySQL Community Server (GPL)

Copyright (c) 2000, 2013, Oracle and/or its affiliates. All rights reserved.

Oracle is a registered trademark of Oracle Corporation and/or its
affiliates. Other names may be trademarks of their respective
owners.

Type 'help;' or 'h' for help. Type 'c' to clear the current input statement.

mysql> use wordpress;
Database changed
mysql> show tables;
+-----------------------+
| Tables_in_wordpress   |
+-----------------------+
| bh_commentmeta        |
| bh_comments           |
| bh_links              |
| bh_options            |
| bh_postmeta           |
| bh_posts              |
| bh_term_relationships |
| bh_term_taxonomy      |
| bh_terms              |
| bh_usermeta           |
| bh_users              |
+-----------------------+
11 rows in set (0.00 sec)

mysql> select * from bh_postsG;