实现FastCGI:
CGI的由来:
最早的Web服务器只能简单地响应浏览器发来的HTTP请求,并将存储在服务器上的HTML文件返回给浏览器,也
就是静态html文件,但是后期随着网站功能增多网站开发也越来越复杂,以至于出现动态技术,比如像php(1995
年)、java(1995)、python(1991)语言开发的网站,但是nginx/apache服务器并不能直接运行 php、java这样的文
件,apache实现的方式是打补丁,但是nginx缺通过与第三方基于协议实现,即通过某种特定协议将客户端请求转
发给第三方服务处理,第三方服务器会新建新的进程处理用户的请求,处理完成后返回数据给Nginx并回收进程,
最后nginx在返回给客户端,那这个约定就是通用网关接口(common gateway interface,简称CGI),CGI(协议)
是web服务器和外部应用程序之间的接口标准,是cgi程序和web服务器之间传递信息的标准化接口。

为什么FastCGI?
CGI协议虽然解决了语言解析器和seb server之间通讯的问题,但是它的效率很低,因为web server每收到一个请
求都会创建一个CGI进程,PHP解析器都会解析php.ini文件,初始化环境,请求结束的时候再关闭进程,对于每一
个创建的CGI进程都会执行这些操作,所以效率很低,而FastCGI是用来提高CGI性能的,FastCGI每次处理完请求之
后不会关闭掉进程,而是保留这个进程,使这个进程可以处理多个请求。这样的话每个请求都不用再重新创建一个
进程了,大大提升了处理效率。
什么是PHP-FPM?
PHP-FPM(FastCGI Process Manager:FastCGI进程管理器)是一个实现了Fastcgi的程序,并且
提供进程管理的功能。进程包括master进程和worker进程。master进程只有一个,负责监听端口,接受来自web
server的请求。worker进程一般会有多个,每个进程中会嵌入一个PHP解析器,进行PHP代码的处理。
FastCGI配置指令:
Nginx基于模块ngx_http_fastcgi_module实现通过fastcgi协议将指定的客户端请求转发至php-fpm处理,其配置指
令如下:
fastcgi_pass address;
#转发请求到后端服务器,address为后端的fastcgi server的地址,可用位置:location, if in location
fastcgi_index name;
#fastcgi默认的主页资源,示例:fastcgi_index index.php;
fastcgi_param parameter value [if_not_empty];
#设置传递给FastCGI服务器的参数值,可以是文本,变量或组合,可用于将Nginx的内置变量赋值给自定义key
fastcgi_param REMOTE_ADDR $remote_addr; #客户端源IP
fastcgi_param REMOTE_PORT $remote_port; #客户端源端口
fastcgi_param SERVER_ADDR $server_addr; #请求的服务器IP地址
fastcgi_param SERVER_PORT $server_port; #请求的服务器端口
fastcgi_param SERVER_NAME $server_name; #请求的server name
Nginx默认配置示例:
location ~ .php$ {
root html;
fastcgi_pass 127.0.0.1:9000;
fastcgi_index index.php;
fastcgi_param SCRIPT_FILENAME /scripts$fastcgi_script_name; #默认脚本路径
include fastcgi_params;
}
实战:Nginx与php-fpm在同一服务器
nginx服务端相关配置
1、安装nginx服务,并修改配置文件。
[root@centos27site1]#yum install nginx -y
[root@centos27site1]#vim /etc/nginx/conf.d/test.conf
server  {
    listen 80;
    server_name www.magedu.net;
    root /data/php/;
    location ~* .php$ {
        root /data/php;
        fastcgi_pass 127.0.0.1:9000;
        fastcgi_index index.php;
        fastcgi_param SCRIPT_FILENAME $document_root$fastcgi_script_name;
        #fastcgi_param SCRIPT_FILENAME /data/php$fastcgi_script_name;
        include fastcgi_params;
        }

    access_log  /var/log/nginx/access_json.log  access_json;
}
修改完配置文件之后,重启nginx服务:nginx -s reload
2、先安装php和连接mysql数据库相关包,并启动php-fpm服务。
[root@centos27~]#yum install php-fpm php-mysql -y
[root@centos27~]#systemctl start php-fpm
3、查看php相关配置文件,并修改所有者和所属组。
[root@centos27~]#rpm -ql php-fpm  查看php相关包
/etc/logrotate.d/php-fpm
/etc/php-fpm.conf
/etc/php-fpm.d
/etc/php-fpm.d/www.conf
/etc/sysconfig/php-fpm
/run/php-fpm
/usr/lib/systemd/system/php-fpm.service
/usr/lib/tmpfiles.d/php-fpm.conf
/usr/sbin/php-fpm
/usr/share/doc/php-fpm-5.4.16
/usr/share/doc/php-fpm-5.4.16/fpm_LICENSE
/usr/share/doc/php-fpm-5.4.16/php-fpm.conf.default
/usr/share/fpm
/usr/share/fpm/status.html
/usr/share/man/man8/php-fpm.8.gz
/var/log/php-fpm

[root@centos27~]#vim /etc/php-fpm.d/www.conf  修改配置文件,将所有者和所属组都改为nginx,避免后面权限问题。
user=nginx
group=nginx
查看php配置文件中可以优化配置的含义
cat /etc/php-fpm.d/www.conf
[www]
listen = 127.0.0.1:9000 #监听地址及IP
listen.allowed_clients = 127.0.0.1 #允许客户端从哪个源IP地址访问,要允许所有行首加 ;注释即可
user = nginx #php-fpm启动的用户和组,会涉及到后期文件的权限问题
group = nginx
pm = dynamic #动态模式进程管理
pm.max_children = 500 #静态方式下开启的php-fpm进程数量,在动态方式下他限定php-fpm的最大进程数
pm.start_servers = 100 #动态模式下初始进程数,必须大于等于pm.min_spare_servers和小于等于pm.max_children的值。
pm.min_spare_servers = 100 #最小空闲进程数
pm.max_spare_servers = 200 #最大空闲进程数
pm.max_requests = 500000 #进程累计请求回收值,会重启
pm.status_path = /pm_status #状态访问URL
ping.path = /ping #ping访问动地址
ping.response = ping-pong #ping返回值
slowlog = /var/log/php-fpm/www-slow.log #慢日志路径
php_admin_value[error_log] = /var/log/php-fpm/www-error.log #错误日志
php_admin_flag[log_errors] = on
php_value[session.save_handler] = files #phpsession保存方式及路径
php_value[session.save_path] = /var/lib/php/session #当时使用file保存session的文件路径
4、将下载的wordpress解压到data目录下,然后移动到php目录下
[root@centos27~]#mkdir /data/php
[root@centos27~]#tar xvf wordpress-4.9.4-zh_CN.tar.gz  -C /data/
[root@centos27data]#mv wordpress/* /data/php
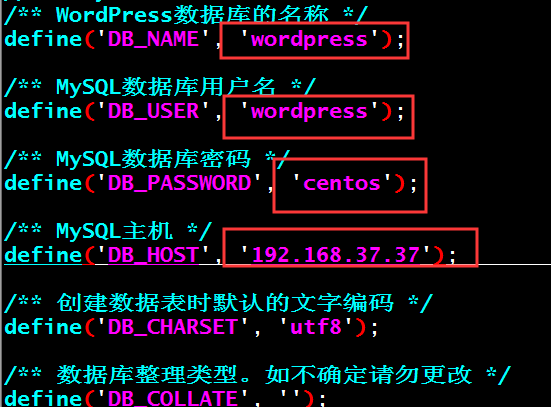
5、修改wordpress配置文件,与mysql数据库进行关联。
[root@centos27data]#cd php
[root@centos27php]#ls
index.php    wp-activate.php     wp-comments-post.php  wp-cron.php        wp-load.php   wp-settings.php   xmlrpc.php
license.txt  wp-admin            wp-config-sample.php  wp-includes        wp-login.php  wp-signup.php
readme.html  wp-blog-header.php  wp-content            wp-links-opml.php  wp-mail.php   wp-trackback.php
[root@centos27php]#mv wp-config-sample.php  wp-config.php
[root@centos27php]#chown -R nginx.nginx  .  修改目录权限
[root@centos27php]#vim wp-config.php
mysql服务器端进行相关配置
1、创建数据库和wordpress用户账号
[root@centos37~]#yum install mariadb-server -y
[root@centos37~]#systemctl start mariadb
[root@centos37~]#mysql -e 'create database wordpress;grant all on wordpress.* to wordpress@"192.168.37.%"  identified by "centos"'
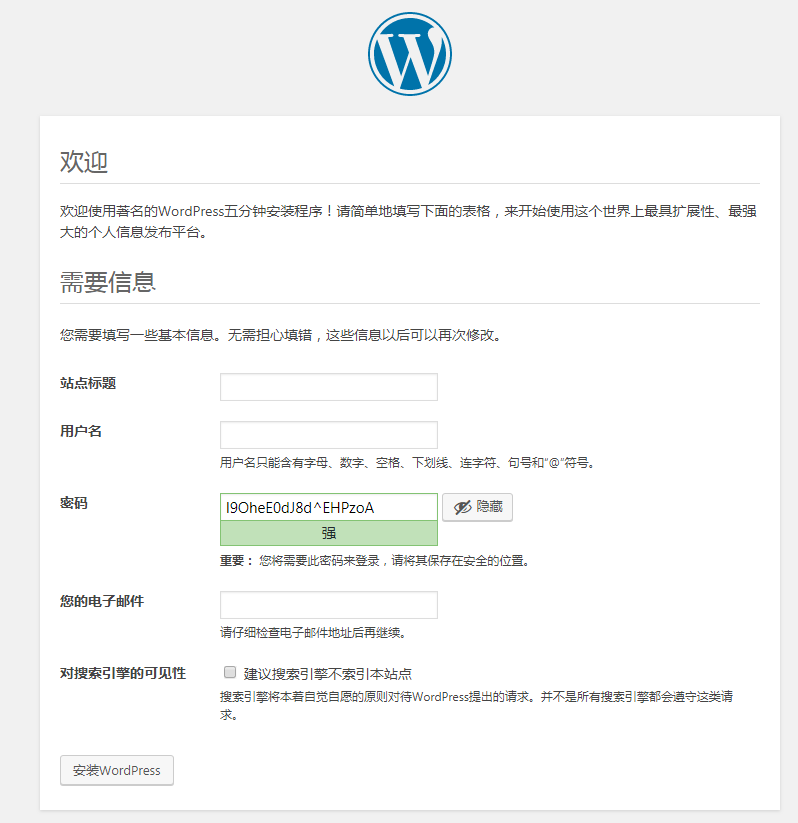
查看网页效果:www.magedu.net/index.php
实战:Nginx与php不在同一个服务器
在php服务器上配置相关文件
安装最新版本的php-fpm和php-mysql包
https://mirrors.tuna.tsinghua.edu.cn/remi/
[root@centos27yum.repos.d]#yum install https://mirrors.tuna.tsinghua.edu.cn/remi/enterprise/remi-release-7.rpm
查看安装后的yum源仓库路径
[root@centos27yum.repos.d]#rpm -ql remi-release
/etc/pki/rpm-gpg/RPM-GPG-KEY-remi
/etc/pki/rpm-gpg/RPM-GPG-KEY-remi2017
/etc/pki/rpm-gpg/RPM-GPG-KEY-remi2018
/etc/pki/rpm-gpg/RPM-GPG-KEY-remi2019
/etc/yum.repos.d/remi-glpi91.repo
/etc/yum.repos.d/remi-glpi92.repo
/etc/yum.repos.d/remi-glpi93.repo
/etc/yum.repos.d/remi-glpi94.repo
/etc/yum.repos.d/remi-modular.repo
/etc/yum.repos.d/remi-php54.repo
/etc/yum.repos.d/remi-php70.repo
/etc/yum.repos.d/remi-php71.repo
/etc/yum.repos.d/remi-php72.repo
/etc/yum.repos.d/remi-php73.repo
/etc/yum.repos.d/remi-php74.repo
/etc/yum.repos.d/remi-safe.repo
/etc/yum.repos.d/remi.repo
在php服务器上启用yum源仓库
[root@centos27yum.repos.d]#vim /etc/yum.repos.d/remi-php73.repo
[remi-php73]
name=Remi's PHP 7.3 RPM repository for Enterprise Linux 7 - $basearch
#baseurl=http://rpms.remirepo.net/enterprise/7/php74/$basearch/
#mirrorlist=https://rpms.remirepo.net/enterprise/7/php74/httpsmirror
mirrorlist=http://cdn.remirepo.net/enterprise/7/php74/mirror
enabled=1
gpgcheck=1
gpgkey=file:///etc/pki/rpm-gpg/RPM-GPG-KEY-remi
安装php-fpm和php-mysql包
[root@centos27yum.repos.d]#yum install php73-php-fpm php73-php-mysql -y
查看安装后的软件包
[root@centos27~]#rpm -ql php73-php-fpm
/etc/logrotate.d/php73-php-fpm
/etc/opt/remi/php73/php-fpm.conf
/etc/opt/remi/php73/php-fpm.d
/etc/opt/remi/php73/php-fpm.d/www.conf
/etc/opt/remi/php73/sysconfig/php-fpm
/etc/systemd/system/php73-php-fpm.service.d
/opt/remi/php73/root/usr/sbin/php-fpm
/opt/remi/php73/root/usr/share/doc/php73-php-fpm-7.3.12
/opt/remi/php73/root/usr/share/doc/php73-php-fpm-7.3.12/php-fpm.conf.default
/opt/remi/php73/root/usr/share/doc/php73-php-fpm-7.3.12/www.conf.default
/opt/remi/php73/root/usr/share/fpm
/opt/remi/php73/root/usr/share/fpm/status.html
/opt/remi/php73/root/usr/share/licenses/php73-php-fpm-7.3.12
/opt/remi/php73/root/usr/share/licenses/php73-php-fpm-7.3.12/fpm_LICENSE
/opt/remi/php73/root/usr/share/man/man8/php-fpm.8.gz
/usr/lib/systemd/system/php73-php-fpm.service
/var/opt/remi/php73/lib/php/opcache
/var/opt/remi/php73/lib/php/session
/var/opt/remi/php73/lib/php/wsdlcache
/var/opt/remi/php73/log/php-fpm
/var/opt/remi/php73/run/php-fpm
如果是nginx服务器和php程序分开,就需要查看nginx服务器的nginx用户属性,在php程序新建的用户要与nginx服务一致,查看nginx服务器的nginx用户账号信息。
[root@centos17~]#getent passwd nginx
nginx:x:987:981::/home/nginx:/sbin/nologin
在php服务器上创建nginx用户账号
[root@centos27~]#groupadd -g 981 nginx
[root@centos27~]#useradd -r -u 987  -g nginx  -s /sbin/nologin
修改php配置文件,指定nginx用户连接php程序信息。
[root@centos27php]#vim /etc/opt/remi/php73/php-fpm.d/www.conf
user = nginx    用户名
group = nginx    组
listen = 9000  监听9000端口,默认所有IP地址都可以连接
;listen.allowed_clients = 127.0.0.1  注释掉此行,允许所有人访问

[root@centos27php]#systemctl start php73-php-fpm.service  启动php-fpm服务
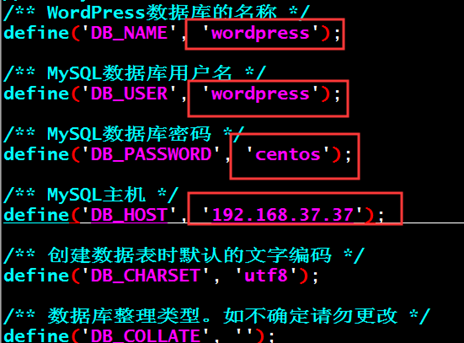
修改wordpress配置文件,与mysql数据库进行关联。
[root@centos27data]#cd php
[root@centos27php]#ls
index.php    wp-activate.php     wp-comments-post.php  wp-cron.php        wp-load.php   wp-settings.php   xmlrpc.php
license.txt  wp-admin            wp-config-sample.php  wp-includes        wp-login.php  wp-signup.php
readme.html  wp-blog-header.php  wp-content            wp-links-opml.php  wp-mail.php   wp-trackback.php
[root@centos27php]#mv wp-config-sample.php  wp-config.php
[root@centos27php]#chown -R nginx.nginx  .  修改目录权限
[root@centos27php]#vim wp-config.php
nginx服务端修改相关配置
修改nginx服务端的配置文件,vim /etc/nginx/conf.d/test.conf
server  {
    listen 80;
    server_name www.magedu.net;
    root /data/php;
    location ~* .php$ {
        root /data/php;
        fastcgi_pass 192.168.37.27:9000;       指定nginx服务端的IP地址
        fastcgi_index index.php;
        fastcgi_param SCRIPT_FILENAME $document_root$fastcgi_script_name;
        #fastcgi_param SCRIPT_FILENAME /data/php$fastcgi_script_name;
        include fastcgi_params;
        }
}
mysql服务端进行创建用户账号
在mysql服务端创建用户账号
[root@centos37~]#yum install mariadb-server -y
[root@centos37~]#systemctl start mariadb
[root@centos37~]#mysql -e 'create database wordpress;grant all on wordpress.* to wordpress@"192.168.37.%"  identified by "centos"'
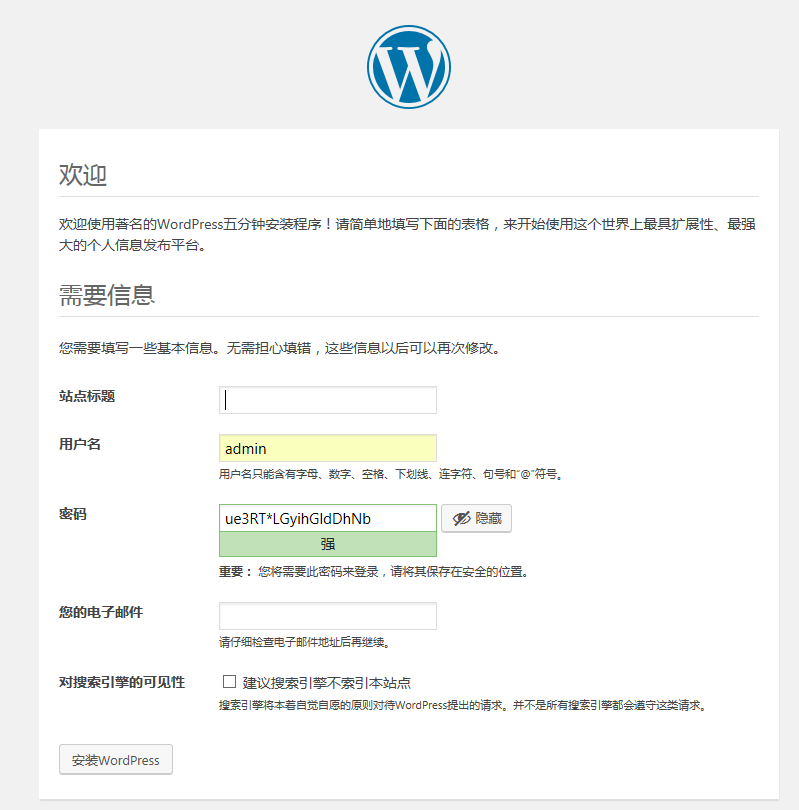
访问页面测试效果:www.magedu.net/index.php
实现缓存效果:
缓存定义指令:
fastcgi_cache_path path [levels=levels] [use_temp_path=on|off] keys_zone=name:size
[inactive=time] [max_size=size] [manager_files=number] [manager_sleep=time]
[manager_threshold=time] [loader_files=number] [loader_sleep=time]
[loader_threshold=time] [purger=on|off] [purger_files=number] [purger_sleep=time]
[purger_threshold=time];

定义fastcgi的缓存;
path #缓存位置为磁盘上的文件系统路径
max_size=size #磁盘path路径中用于缓存数据的缓存空间上限
levels=levels:缓存目录的层级数量,以及每一级的目录数量,levels=ONE:TWO:THREE,示例:
leves=1:2:2
keys_zone=name:size #设置缓存名称及k/v映射的内存空间的名称及大小
inactive=time #缓存有效时间,默认10分钟,需要在指定时间满足fastcgi_cache_min_uses 次数被
视为活动缓存。
缓存调用指令:
fastcgi_cache zone | off;
#调用指定的缓存空间来缓存数据,可用位置:http, server, location

fastcgi_cache_key string;
#定义用作缓存项的key的字符串,示例:fastcgi_cache_key $request_uri;

fastcgi_cache_methods GET | HEAD | POST ...;
#为哪些请求方法使用缓存

fastcgi_cache_min_uses number;
#缓存空间中的缓存项在inactive定义的非活动时间内至少要被访问到此处所指定的次数方可被认作活动项

fastcgi_keep_conn on | off;
#收到后端服务器响应后,fastcgi服务器是否关闭连接,建议启用长连接

fastcgi_cache_valid [code ...] time;
#不同的响应码各自的缓存时长

fastcgi_hide_header field; #隐藏响应头指定信息
fastcgi_pass_header field; #返回响应头指定信息,默认不会将Status、X-Accel-...返回
示例:
http {
fastcgi_cache_path /var/cache/nginx/fcgi_cache levels=1:2:1 keys_zone=fcgicache:20m inactive=120s;
...
server {
location ~* .php$ {
...
fastcgi_cache fcgicache;
fastcgi_cache_key $request_uri;
fastcgi_cache_valid 200 302 10m;
fastcgi_cache_valid 301 1h;
fastcgi_cache_valid any 1m;
...
}
}
1、在nginx服务端配置文件中添加缓存指令
[root@centos27php]#vim /etc/nginx/nginx.conf
fastcgi_cache_path /var/cache/nginx/fcgi_cache levels=1:2:1 keys_zone=fcgicache:20m inactive=120s;

vim /etc/nginx/conf.d/test.conf
server  {
    listen 80;
    server_name www.magedu.net;
    root /data/php;
    location ~* .php$ {
        root /data/php;
        fastcgi_pass 127.0.0.1:9000;
        fastcgi_index index.php;
        fastcgi_param SCRIPT_FILENAME $document_root$fastcgi_script_name;
        #fastcgi_param SCRIPT_FILENAME /data/php$fastcgi_script_name;
        include fastcgi_params;

        fastcgi_cache fcgicache;
        fastcgi_cache_key $request_uri;
        fastcgi_cache_valid 200 302 10m;
        fastcgi_cache_valid 301 1h;
        fastcgi_cache_valid any 1m;
        }
}
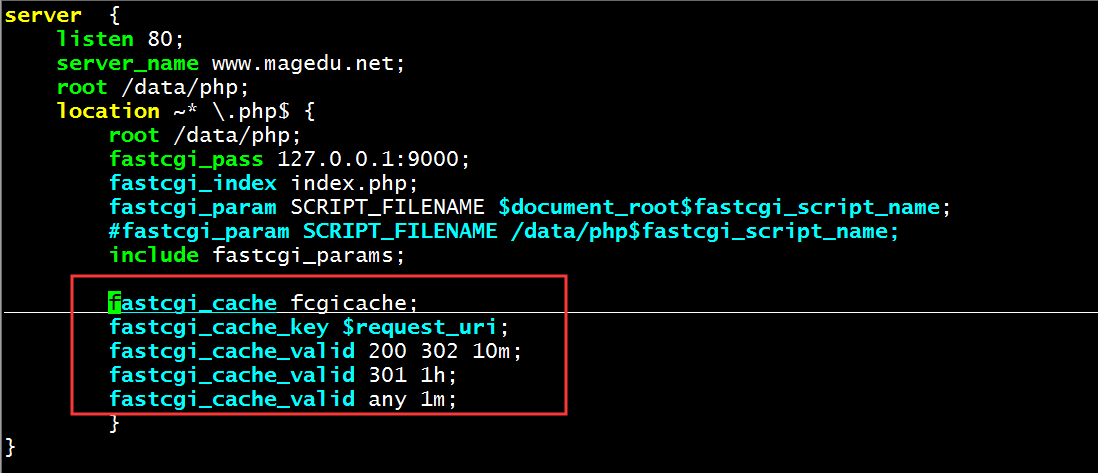
配置完之后重新加载nginx服务:nginx -s reload
2、在客户端进行测试效果:
ab -c 10 -n 100 http://www.magedu.net/index.php