sentinel和springCloud整合
减少开发的复杂度,对大部分的主流框架,例如:Web Servlet、Dubbo、Spring Cloud、gRPC、Spring WebFlux、Reactor等做了适配。只需要引入对应应用的以来即可方便地整合Sentinel。
如果要实现SpringCloud和Sentinel的整合,可以通过引入Spring Cloud Alibaba Sentinel来更方便得整合Sentinel。
Spring Cloud Alibaba是阿里巴巴集团提供的,致力于提供微服务开发的一站式解决方案。Spring Cloud Alibaba默认为Sentinel整合Servlet、RestTemplate、FeignClient和Spring WebFlux、Sentinel在Spring Cloud生态中,不仅补全了hystrix在Servlet和RestTemplate这一块的空白,而且完全兼容hystrix在FeignClient种限流降级的用法,并且支持运用时灵活地配置和调整限流降级规则。
需求
使用SpringCloud + Sentinel实现访问http://localhost:8080/ann路径的流量控制。
import org.jetbrains.kotlin.gradle.tasks.KotlinCompile

plugins {
    id("org.springframework.boot") version "2.3.7.RELEASE"
    id("io.spring.dependency-management") version "1.0.10.RELEASE"
    kotlin("jvm") version "1.3.72"
    kotlin("plugin.spring") version "1.3.72"
    java
}

group = "xyz.ytfs"
version = "0.0.1-SNAPSHOT"
java.sourceCompatibility = JavaVersion.VERSION_1_8

repositories {
    mavenCentral()
}

extra["springCloudAlibabaVersion"] = "2.2.2.RELEASE"

dependencies {
    implementation("org.springframework.boot:spring-boot-starter-web")
    implementation("com.alibaba.cloud:spring-cloud-starter-alibaba-sentinel")
    implementation("com.fasterxml.jackson.module:jackson-module-kotlin")
    implementation("org.jetbrains.kotlin:kotlin-reflect")
    implementation("org.jetbrains.kotlin:kotlin-stdlib-jdk8")
    testImplementation("org.springframework.boot:spring-boot-starter-test") {
        exclude(group = "org.junit.vintage", module = "junit-vintage-engine")
    }
}

dependencyManagement {
    imports {
        mavenBom("com.alibaba.cloud:spring-cloud-alibaba-dependencies:${property("springCloudAlibabaVersion")}")
    }
}

tasks.withType<Test> {
    useJUnitPlatform()
}

tasks.withType<KotlinCompile> {
    kotlinOptions {
        freeCompilerArgs = listOf("-Xjsr305=strict")
        jvmTarget = "1.8"
    }
}
@SentinelResource(value = "spring_cloud_sentinel_test", blockHandler = "exceptionHandler")
    @GetMapping("ann")
    fun springCloudSentinelTest(): String {
        return "hello Spring-Cloud-Sentinel_test"
    }


    fun exceptionHandler(bx: BlockException): String {
        return "系统繁忙,请稍后重试"
    }
Sentinel对Feign的支持
Sentinel适配了Feign组件,如果想使用,除了引入spring-cloud-starter-alibaba-sentinel的依赖外还需要2个步骤:
- 配置文件打开Sentinel对Feign的支持:
feign.sentinel.enabled=true - 加入
spring-cloud-starter-openfeign依赖Sentinel starter中的自动化配置类生效
需求
实现sentinel_feign_client微服务通过Feign访问sentinel_feign_provider微服务的流量控制
创建spring-cloud-parent父工程
- 依赖文件
extra["springCloudVersion"] = "Hoxton.SR9"
extra["springCloudAlibabaVersion"] = "2.2.2.RELEASE"

group = "xyz.ytfs"
version = "0.0.1-SNAPSHOT"
java.sourceCompatibility = JavaVersion.VERSION_1_8

allprojects {
    repositories {
        maven(url = "http://maven.aliyun.com/nexus/content/groups/public/")
        mavenCentral()
        maven { url = uri("https://repo.spring.io/snapshot") }
        maven { url = uri("https://repo.spring.io/milestone") }
    }
}

dependencies {
    implementation("org.springframework.boot:spring-boot-starter")
    implementation("org.jetbrains.kotlin:kotlin-reflect")
    implementation("org.jetbrains.kotlin:kotlin-stdlib-jdk8")
    testImplementation("org.springframework.boot:spring-boot-starter-test") {
        exclude(group = "org.junit.vintage", module = "junit-vintage-engine")
    }
}
创建eureka-server注册中心子工程
- 依赖添加
dependencies {
    implementation("org.springframework.boot:spring-boot-starter-web")
    implementation("org.jetbrains.kotlin:kotlin-reflect")
    implementation("org.jetbrains.kotlin:kotlin-stdlib-jdk8")
    implementation("org.springframework.cloud:spring-cloud-starter-netflix-eureka-server")
    testImplementation("org.springframework.boot:spring-boot-starter-test") {
        exclude(group = "org.junit.vintage", module = "junit-vintage-engine")
    }
}

dependencyManagement {
    imports {
        mavenBom("com.alibaba.cloud:spring-cloud-alibaba-dependencies:${property("springCloudAlibabaVersion")}")
        mavenBom("org.springframework.cloud:spring-cloud-dependencies:${property("springCloudVersion")}")
    }
}
- 启动类和配置文件的修改
@EnableEurekaServer  //在启动类上添加此注解,表示开启eureka注册中心服务
@SpringBootApplication
class EurekaServerApplication

fun main(args: Array<String>) {
    runApplication<EurekaServerApplication>(*args)
}
# 应用名称
spring.application.name=eureka-server
server.port=8060

#eureka配置
eureka.client.service-url.defaultZone=http://127.0.0.1:8060/eureka
#不拉去服务
eureka.client.fetch-registry=false
#不注册自己
eureka.client.register-with-eureka=false
创建sentinel-feign-client
-
添加依赖
implementation("com.alibaba.cloud:spring-cloud-starter-alibaba-sentinel") implementation("org.springframework.boot:spring-boot-starter-web") implementation("com.fasterxml.jackson.module:jackson-module-kotlin") implementation("org.jetbrains.kotlin:kotlin-reflect") implementation("org.jetbrains.kotlin:kotlin-stdlib-jdk8") implementation("org.springframework.cloud:spring-cloud-starter-netflix-eureka-client") implementation("org.springframework.cloud:spring-cloud-starter-openfeign") testImplementation("org.springframework.boot:spring-boot-starter-test") { exclude(group = "org.junit.vintage", module = "junit-vintage-engine") } -
创建代理的个接口
@FeignClient(value="sentinel-feign-provider", fallback = FallBackService::class) interface ProviderClient { @GetMapping("hello") fun hello(): String } -
创建controller
@RestController class TestController(val providerClient: ProviderClient) { @GetMapping("hello") fun hello(): String{ return this.providerClient.hello() } } -
创建降级相应示例
@Service /** * 实现代理接口 **/ class FallBackService : ProviderClient { override fun hello(): String { return "系统繁忙,请稍后重试" } } -
配置文件
# 应用名称 spring: application: name: sentinel-feign-client cloud: sentinel: transport: dashboard: localhost:8045 eureka: client: service-url: defaultZone: http://127.0.0.1:8060/eureka server: port: 8061 # 开启Sentinel对feign的支持 feign: sentinel: enabled: true -
启动类添加注解
@SpringBootApplication
@EnableFeignClients
@EnableDiscoveryClient
class SentinelFeignClientApplication

fun main(args: Array<String>) {
    runApplication<SentinelFeignClientApplication>(*args)
}
创建sentinel-feign-provider
-
添加依赖
dependencies { implementation("org.springframework.boot:spring-boot-starter-web") implementation("com.fasterxml.jackson.module:jackson-module-kotlin") implementation("org.jetbrains.kotlin:kotlin-reflect") implementation("org.jetbrains.kotlin:kotlin-stdlib-jdk8") implementation("org.springframework.cloud:spring-cloud-starter-netflix-eureka-client") implementation("org.springframework.cloud:spring-cloud-starter-openfeign") testImplementation("org.springframework.boot:spring-boot-starter-test") { exclude(group = "org.junit.vintage", module = "junit-vintage-engine") } } dependencyManagement { imports { mavenBom("org.springframework.cloud:spring-cloud-dependencies:${property("springCloudVersion")}") mavenBom("org.springframework.cloud:spring-cloud-dependencies:${property("springCloudVersion")}") } } -
修改配置文件
# 应用名称 spring.application.name=sentinel-feign-provider # 应用服务 WEB 访问端口 server.port=8062 eureka.client.service-url.defaultZone=http://127.0.0.1:8060/eureka -
启动类增加注解
@SpringBootApplication @EnableDiscoveryClient @EnableFeignClients class SentinelFeignProviderApplication fun main(args: Array<String>) { runApplication<SentinelFeignProviderApplication>(*args) } -
提供接口
@RestController
class ProviderController {


   @GetMapping("hello")
    fun hello(): String {
       return "Hello Feign Sentintl"
    }

}
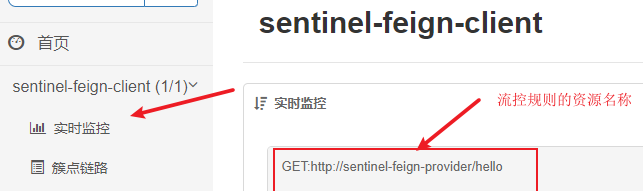
运行测试
启动项目,在Sentinel控制台中增加关于资源流控规则.Sentinel和Feign整合时,流控规则的编写形式为:http请求方式:协议//服务名称/请求路径跟参数 例如GET:http://sentinel-feign-provider/hello
Sentinel对Spring Cloud Gateway的支持
从1.6.0版本开始,Sentinel提供了Spring Cloud Gateway的适配模块,可以提供两种资源维度的限流:
- route维度:即在Spring的配置文件种配置的路由条目,资源名对应相应的routeId
- 自定义API维度:用户可以利用Sentinel提供的API来自定义一些API分组
微服务网关搭建
在上面基础上创建
创建子工程sentinel-gateway,在build.gradle.kts中引入依赖
implementation("org.springframework.cloud:spring-cloud-starter-gateway")
整合Sentinel
-
导入依赖
implementation("com.alibaba.cloud:spring-cloud-starter-alibaba-sentinel") implementation("com.alibaba.cloud:spring-cloud-alibaba-sentinel-gateway") -
创建一个配置类,配置流控降级回调操作
@Configuration
class GatewayConfiguration {


    @PostConstruct
    fun doInit() {
        GatewayCallbackManager.setBlockHandler(BlockRequestHandler {
                serverWebExchange: ServerWebExchange?, throwable: Throwable? ->
            return@BlockRequestHandler ServerResponse.status(200).bodyValue("系统繁忙,请稍后再试!")
         })
    }

}
-
路由的配置
# 配置路由
spring.cloud.gateway.routes[0].id=sentinel-feign-gateway
# lb代表的是 Load Balance负载均衡,如果是一个服务(auth-service)多个实例,实现自主分发
spring.cloud.gateway.routes[0].uri=lb://sentinel-feign-client
# 匹配路径
spring.cloud.gateway.routes[0].predicates[0]=Path=/hello/**
# 配置Stentinel的控制台地址
spring.cloud.sentinel.transport.dashboard=http://localhost:8045
流量控制实现
Sentinel的所有规则都可以在内存太中动态的查询及修改,修改之后立即生效。同时Sentinel也提供相关API,供您来定制自己的规则策略。
Sentinel主要支持一下几种规则:
- 流量控制规则
- 熔断降级规则
- 系统保护规则
- 来源访问控制规则
- 动态规划扩展
流量控制规则实现
流量控制(Flow Control) ,其原理是监控应用流量的QPS或并发线程数等指标,当达到指定的阀值时对流量进行控制,以免被瞬时的流量高峰冲垮,从而保障应用的高可用性。
流量控制主要两种方式:
- 并发线程数:并发线程数限流用于保护业务线程数不被耗尽
- QPS:当QPS超过某个阀值的时候,则采取措施进行流量控制
一条限流规则主要由几个因素组成,我们可以组合这些元素来实现不同的限流效果:
resource:资源名,即限流规则的作用对象count: 限流阈值grade: 限流阈值类型(QPS 或并发线程数)limitApp: 流控针对的调用来源,若为default则不区分调用来源strategy: 调用关系限流策略controlBehavior: 流量控制效果(直接拒绝、Warm Up、匀速排队)
直接拒绝
直接拒绝:(RuleConstant.CONTROL_BEHAVIOR_DEFAULT)方式是默认的流量控制方式,当QPS超过任意规则的阈值后,新的请求就会被立即拒绝,拒绝方式为抛出FlowException。这种方式适用于对系统处理能力确切已知的情况下,比如通过压测确定了系统的准确水位时。
Warm Up
Warm Up(RuleConstant.CONTROL_BEHAVIOR_WARM_UP)方式,即预热/冷启动方式。当系统长期处于低水位的情况下,当流量突然增加时,直接把系统拉升到高水位可能瞬间把系统压垮。通过"冷启动",让通过的流量缓慢增加,在一定时间内逐渐增加到阈值上限,给冷系统一个预热的时间,避免冷系统被压垮。
匀速排队
匀速排队(RuleConstant.CONTROL_BEHAVIOR_RATE_LIMITER)方式会严格控制请求通过的间隔时间,也即是让请求以均匀的速度通过,对应的是漏桶算法。该方式的作用如下图所示:
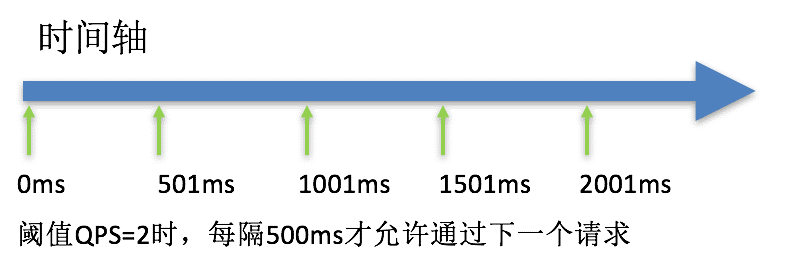
这种方式主要用于处理间隔性突发的流量,例如消息队列。想象一下这样的场景,在某一秒有大量的请求到来,而接下来的几秒则处于空闲状态,我们希望系统能够在接下来的空闲期间逐渐处理这些请求,而不是在第一秒直接拒绝多余的请求。
注意:匀速排队模式暂时不支持 QPS > 1000 的场景。
熔断降级
概述
除了流量控制以外,对调用链路中不稳定的资源进行熔断降级也是保障高可用的重要措施之一。一个服务常常会调用别的模块,可能是另外的一个远程服务、数据库,或者第三方 API 等。例如,支付的时候,可能需要远程调用银联提供的 API;查询某个商品的价格,可能需要进行数据库查询。然而,这个被依赖服务的稳定性是不能保证的。如果依赖的服务出现了不稳定的情况,请求的响应时间变长,那么调用服务的方法的响应时间也会变长,线程会产生堆积,最终可能耗尽业务自身的线程池,服务本身也变得不可用。
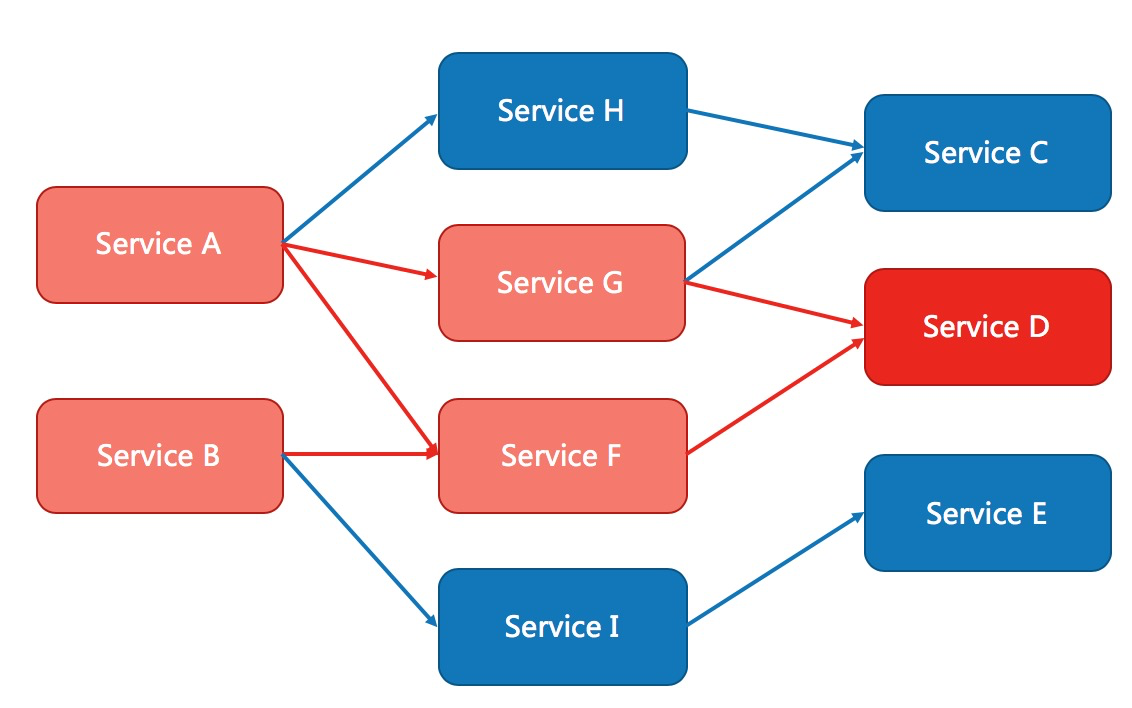
现代微服务架构都是分布式的,由非常多的服务组成。不同服务之间相互调用,组成复杂的调用链路。以上的问题在链路调用中会产生放大的效果。复杂链路上的某一环不稳定,就可能会层层级联,最终导致整个链路都不可用。因此我们需要对不稳定的弱依赖服务调用进行熔断降级,暂时切断不稳定调用,避免局部不稳定因素导致整体的雪崩。熔断降级作为保护自身的手段,通常在客户端(调用端)进行配置。
注意:本文档针对 Sentinel 1.8.0 及以上版本。1.8.0 版本对熔断降级特性进行了全新的改进升级,请使用最新版本以更好地利用熔断降级的能力。
重要的属性
| Field | 说明 | 默认值 |
|---|---|---|
| resource | 资源名,即规则的作用对象 | |
| grade | 熔断策略,支持慢调用比例/异常比例/异常数策略 | 慢调用比例 |
| count | 慢调用比例模式下为慢调用临界 RT(超出该值计为慢调用);异常比例/异常数模式下为对应的阈值 | |
| timeWindow | 熔断时长,单位为 s | |
| minRequestAmount | 熔断触发的最小请求数,请求数小于该值时即使异常比率超出阈值也不会熔断(1.7.0 引入) | 5 |
| statIntervalMs | 统计时长(单位为 ms),如 60*1000 代表分钟级(1.8.0 引入) | 1000 ms |
| slowRatioThreshold | 慢调用比例阈值,仅慢调用比例模式有效(1.8.0 引入) |
熔断降级策略详解
Sentinel 提供以下几种熔断策略:
- 慢调用比例 (
SLOW_REQUEST_RATIO):选择以慢调用比例作为阈值,需要设置允许的慢调用 RT(即最大的响应时间),请求的响应时间大于该值则统计为慢调用。当单位统计时长(statIntervalMs)内请求数目大于设置的最小请求数目,并且慢调用的比例大于阈值,则接下来的熔断时长内请求会自动被熔断。经过熔断时长后熔断器会进入探测恢复状态(HALF-OPEN 状态),若接下来的一个请求响应时间小于设置的慢调用 RT 则结束熔断,若大于设置的慢调用 RT 则会再次被熔断。 - 异常比例 (
ERROR_RATIO):当单位统计时长(statIntervalMs)内请求数目大于设置的最小请求数目,并且异常的比例大于阈值,则接下来的熔断时长内请求会自动被熔断。经过熔断时长后熔断器会进入探测恢复状态(HALF-OPEN 状态),若接下来的一个请求成功完成(没有错误)则结束熔断,否则会再次被熔断。异常比率的阈值范围是[0.0, 1.0],代表 0% - 100%。 - 异常数 (
ERROR_COUNT):当单位统计时长内的异常数目超过阈值之后会自动进行熔断。经过熔断时长后熔断器会进入探测恢复状态(HALF-OPEN 状态),若接下来的一个请求成功完成(没有错误)则结束熔断,否则会再次被熔断。
注意异常降级仅针对业务异常,对 Sentinel 限流降级本身的异常(BlockException)不生效。为了统计异常比例或异常数,需要通过 Tracer.trace(ex) 记录业务异常。示例:
Entry entry = null;
try {
  entry = SphU.entry(key, EntryType.IN, key);

  // Write your biz code here.
  // <<BIZ CODE>>
} catch (Throwable t) {
  if (!BlockException.isBlockException(t)) {
    Tracer.trace(t);
  }
} finally {
  if (entry != null) {
    entry.exit();
  }
}
开源整合模块,如 Sentinel Dubbo Adapter, Sentinel Web Servlet Filter 或 @SentinelResource 注解会自动统计业务异常,无需手动调用。
熔断器事件监听
Sentinel 支持注册自定义的事件监听器监听熔断器状态变换事件(state change event)。示例:
EventObserverRegistry.getInstance().addStateChangeObserver("logging",
    (prevState, newState, rule, snapshotValue) -> {
        if (newState == State.OPEN) {
            // 变换至 OPEN state 时会携带触发时的值
            System.err.println(String.format("%s -> OPEN at %d, snapshotValue=%.2f", prevState.name(),
                TimeUtil.currentTimeMillis(), snapshotValue));
        } else {
            System.err.println(String.format("%s -> %s at %d", prevState.name(), newState.name(),
                TimeUtil.currentTimeMillis()));
        }
    });
代码实现
//定义熔断资源和回调函数
@SentinelResource(value = "degrade_rule", blockHandler = "exceptionHandler")
@GetMapping("degrade")
fun ruleHello(): String {
    return "hello rule  sentinel"
}

//降级方法
fun exceptionHandler(e: BlockException): String {
    e.printStackTrace()
    return "系统繁忙,请稍后!,降级"
}

@PostConstruct
fun initDegradeRule() {
    //1、创建存放熔断规则的集合
    val rules: ArrayList<DegradeRule> = ArrayList()
    //2、创建熔断规则
    val rule: DegradeRule = DegradeRule()
    //设置熔断资源名称
    rule.resource = "degrade_rule"
    //阀值
    rule.count = 0.01
    //降级的时间,单位S
    rule.timeWindow = 10
    //设置熔断类型
    /**
     * 当资源的平均响应时间超过阀值(DegradeRule中的count以毫秒为单位)之后,资源进入准降级状态。
     * 然后持续进入5个请求,他们的RT都持续超过这个阀值,
     * 那么在接下来的时间窗口(DegradeRule中的timeWindow,以s秒为单位)之内
     * 将抛出DegradeException
     */
    rule.grade = RuleConstant.DEGRADE_GRADE_RT
    //3、将熔断规则存入集合
    rules.add(rule)
    //4、加载熔断规则集合
    DegradeRuleManager.loadRules(rules)
}
黑白名单控制
很多时候,我们需要根据调用来源来判断该次请求是否允许放行,这时候可以使用 Sentinel 的来源访问控制(黑白名单控制)的功能。来源访问控制根据资源的请求来源(origin)限制资源是否通过,若配置白名单则只有请求来源位于白名单内时才可通过;若配置黑名单则请求来源位于黑名单时不通过,其余的请求通过。
调用方信息通过
ContextUtil.enter(resourceName, origin)方法中的origin参数传入。
规则配置
来源访问控制规则(AuthorityRule)非常简单,主要有以下配置项:
resource:资源名,即限流规则的作用对象。limitApp:对应的黑名单/白名单,不同 origin 用,分隔,如appA,appB。strategy:限制模式,AUTHORITY_WHITE为白名单模式,AUTHORITY_BLACK为黑名单模式,默认为白名单模式。
示例
比如我们希望控制对资源 test 的访问设置白名单,只有来源为 appA 和 appB 的请求才可通过,则可以配置如下白名单规则:
AuthorityRule rule = new AuthorityRule();
rule.setResource("test");
rule.setStrategy(RuleConstant.AUTHORITY_WHITE);
rule.setLimitApp("appA,appB");
AuthorityRuleManager.loadRules(Collections.singletonList(rule));
动态规则
规则
Sentinel 的理念是开发者只需要关注资源的定义,当资源定义成功后可以动态增加各种流控降级规则。Sentinel 提供两种方式修改规则:
- 通过 API 直接修改 (
loadRules) - 通过
DataSource适配不同数据源修改
手动通过 API 修改比较直观,可以通过以下几个 API 修改不同的规则:
FlowRuleManager.loadRules(List<FlowRule> rules); // 修改流控规则
DegradeRuleManager.loadRules(List<DegradeRule> rules); // 修改降级规则
手动修改规则(硬编码方式)一般仅用于测试和演示,生产上一般通过动态规则源的方式来动态管理规则。
DataSource 扩展
上述 loadRules() 方法只接受内存态的规则对象,但更多时候规则存储在文件、数据库或者配置中心当中。DataSource 接口给我们提供了对接任意配置源的能力。相比直接通过 API 修改规则,实现 DataSource 接口是更加可靠的做法。
我们推荐通过控制台设置规则后将规则推送到统一的规则中心,客户端实现 ReadableDataSource 接口端监听规则中心实时获取变更,流程如下:
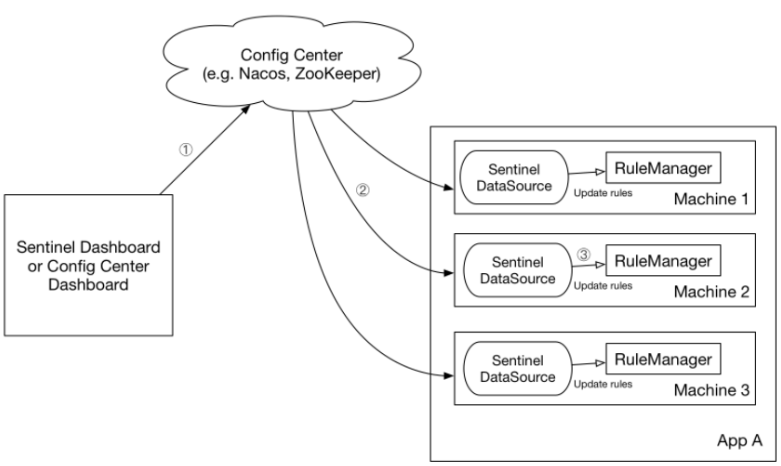
DataSource 扩展常见的实现方式有:
- 拉模式:客户端主动向某个规则管理中心定期轮询拉取规则,这个规则中心可以是 RDBMS、文件,甚至是 VCS 等。这样做的方式是简单,缺点是无法及时获取变更;
- 推模式:规则中心统一推送,客户端通过注册监听器的方式时刻监听变化,比如使用 Nacos、Zookeeper 等配置中心。这种方式有更好的实时性和一致性保证。
Sentinel 目前支持以下数据源扩展:
示例
1、启动本地的nacos
启动文件在``nacos/bin`目录下面
startup.cmd -m standalone :代表单机启动的意思
2、向nacos中添加限制规则
/**
 * 向nacos中发送配置
 */
fun send() {
    val remoteAddress = "localhost"
    val groupId = "Sentinel:Demo"
    val dataId = "com.alibaba.csp.sentinel.demo.flow.rule"
    val rule = """[
                  {
                    "resource": "TestResource",
                    "controlBehavior": 0,
                    "count": 5.0,
                    "grade": 1,
                    "limitApp": "default",
                    "strategy": 0
                  }
                ]"""
    val configService = NacosFactory.createConfigService(remoteAddress)
    println(configService.publishConfig(dataId, groupId, rule))
}
3、从nacos中读取配置规则
// remoteAddress 代表 Nacos 服务端的地址
val remoteAddress = "127.0.0.1"

// groupId 和 dataId 对应 Nacos 中相应配置
val groupId = "Sentinel:Demo"

val dataId = "com.alibaba.csp.sentinel.demo.flow.rule"

/**
 * 加载规则
 */
fun loadRules() {
    val flowRuleDataSource: NacosDataSource<List<FlowRule?>> = NacosDataSource<List<FlowRule?>>(
        remoteAddress, groupId, dataId
    ) { source: String? ->
        JSON.parseObject<List<FlowRule?>>(
            source,
            object : TypeReference<List<FlowRule?>?>() {})
    }
    FlowRuleManager.register2Property(flowRuleDataSource.property)
}