第一步:设置开发环境
• 安装JDK,下载地址http://www.oracle.com/technetwork/java/javase/archive-139210.html
• 下载netty包,下载地址http://netty.io/
• 安装Eclipse
导入包
第二步:编写一个应答服务器
通过创建ServerBootstrap对象来启动服务器,然后配置这个对象的相关选项,如端口、线程模式、事件循环,并且添加逻辑处理程序用来处理业务逻辑(下面是个简单的应答服务器例子)
package com.lzh.netty;
import io.netty.bootstrap.ServerBootstrap;
import io.netty.channel.ChannelFuture;
import io.netty.channel.ChannelInitializer;
import io.netty.channel.ChannelOption;
import io.netty.channel.EventLoopGroup;
import io.netty.channel.nio.NioEventLoopGroup;
import io.netty.channel.socket.SocketChannel;
import io.netty.channel.socket.nio.NioServerSocketChannel;
/**
 * 通过创建ServerBootstrap对象来启动服务器,然后配置这个对象的相关选项,如端口、线程模式、事件循环,并且添加逻辑处理程序用来处理业务逻辑
 */
public class NettyServer {

    private final int port;
    public NettyServer(int port){
        this.port=port;
    }
    public void start() throws Exception{
     //1.第一个线程组是用于接收Client端连接的
     EventLoopGroup bossGroup = new NioEventLoopGroup();
     //2.第二个线程组是用于实际的业务处理的
     EventLoopGroup workerGroup = new NioEventLoopGroup();
     try{
         //创建ServerBootstrap实例来引导绑定和启动服务器
         ServerBootstrap  b=new ServerBootstrap();
         //1.设置InetSocketAddress让服务器监听某个端口已等待客户端连接。
         //2.指定NIO的模式,如果是客户端就是NioSocketChannel
         //3.调用childHandler方法传ChannelInitializer类型的参数,ChannelInitializer是个抽象类,所以需要实现initChannel方法,这个方法就是用来设置ChannelHandler
         b.group(bossGroup,workerGroup).channel(NioServerSocketChannel.class)
         .option(ChannelOption.SO_BACKLOG, 1024)//连接数
         .option(ChannelOption.SO_SNDBUF, 32*1024)//设置发送缓冲区
         .option(ChannelOption.SO_RCVBUF, 32*1024)//设置接收缓冲区
         .option(ChannelOption.SO_KEEPALIVE, true)//长连续
         .childHandler(new ChannelInitializer<SocketChannel>() {
                protected void initChannel(SocketChannel cn) throws Exception {
                    cn.pipeline().addLast(new NettyServerHandler());
                }
         });
         //绑定服务器等待直到绑定完成,调用sync()方法会阻塞直到服务器完成绑定,然后服务器等待通道关闭,因为使用sync(),所以关闭操作也会被阻塞
         ChannelFuture f=b.bind(port).sync();
         if (f.isSuccess()) {
             System.out.println("启动Netty服务成功,端口号:" + this.port);
         }
         //这里会一直等待,直到socket被关闭
         f.channel().closeFuture().sync();
        }finally{
            //关闭EventLoopGroup和释放所有资源,包括创建的线程
            bossGroup.shutdownGracefully();
            workerGroup.shutdownGracefully();
        }
    }
    public static void main(String[] args) throws Exception{
        new NettyServer(8000).start();
    }
}
实现服务器业务逻辑
package com.lzh.netty;
import io.netty.buffer.ByteBuf;
import io.netty.buffer.Unpooled;
import io.netty.channel.ChannelHandlerContext;
import io.netty.channel.ChannelInboundHandlerAdapter;

public class NettyServerHandler extends ChannelInboundHandlerAdapter{

    //重写channelRead方法,这个方法在任何时候都会被调用来接收数据
    @Override
    public void channelRead(ChannelHandlerContext ctx, Object msg) throws Exception {
        ByteBuf buf=(ByteBuf)msg;
        byte [] bt=new byte[buf.readableBytes()];
        buf.readBytes(bt);
        System.out.println("Server received: " + new String(bt,"utf-8"));
        //服务器返回客户端信息
        String str="Hi client !!!";
        ctx.writeAndFlush(Unpooled.copiedBuffer(str.getBytes()));
    }
    //重写ChannelHandler的exceptionCaught方法可以捕获服务器的异常,
    //比如客户端连接服务器后强制关闭,服务器会抛出"客户端主机强制关闭错误",通过重写exceptionCaught方法就可以处理异常
    @Override
    public void exceptionCaught(ChannelHandlerContext ctx, Throwable cause)
            throws Exception {
        cause.printStackTrace();
        ctx.close();
    }
}
说明:
1.Netty使用多个Channel Handler来达到对事件处理的分离,因为可以很容的添加、更新、删除业务逻辑处理handler。Handler很简单,它的每个方法都可以被重写,它的所有的方法中只有channelRead方法是必须要重写的。
2.重写ChannelHandler的exceptionCaught方法可以捕获服务器的异常,比如客户端连接服务器后强制关闭,服务器会抛出"客户端主机强制关闭错误",通过重写exceptionCaught方法就可以处理异常,比如发生异常后关闭ChannelHandlerContext。
第三步:编写应答程序的客户端
package com.lzh.netty;
import io.netty.bootstrap.Bootstrap;
import io.netty.buffer.Unpooled;
import io.netty.channel.ChannelFuture;
import io.netty.channel.ChannelInitializer;
import io.netty.channel.EventLoopGroup;
import io.netty.channel.nio.NioEventLoopGroup;
import io.netty.channel.socket.SocketChannel;
import io.netty.channel.socket.nio.NioSocketChannel;

public class NettyClient {

    private final String host;
    private final int port;
    public NettyClient(String host,int port){
        this.host=host;
        this.port=port;
    }
    public void start() throws Exception{
        //创建EventLoopGroup对象并设置到Bootstrap中,EventLoopGroup可以理解为是一个线程池,这个线程池用来处理连接、接受数据、发送数据
         EventLoopGroup group =new NioEventLoopGroup();
        try{
             //创建Bootstrap对象用来引导启动客户端
             Bootstrap b=new Bootstrap();
             // 1.创建InetSocketAddress并设置到Bootstrap中,InetSocketAddress是指定连接的服务器地址
             // 2.添加一个ChannelHandler,客户端成功连接服务器后就会被执行
             b.group(group).channel(NioSocketChannel.class)
             //.remoteAddress(new InetSocketAddress(host,port))
             .handler(new ChannelInitializer<SocketChannel>() {
                @Override
                protected void initChannel(SocketChannel ch) throws Exception {
                    //添加一个“入站”handler到ChannelPipeline
                    ch.pipeline().addLast(new NettyClientHandler());
                }
            });
             //调用Bootstrap.connect()来连接服务器
            ChannelFuture f=b.connect(host, port).sync();

            f.channel().writeAndFlush(Unpooled.copiedBuffer("hello netty".getBytes()));
            Thread.sleep(1000);
            f.channel().writeAndFlush(Unpooled.copiedBuffer("hello netty1".getBytes()));
            Thread.sleep(1000);
            f.channel().writeAndFlush(Unpooled.copiedBuffer("hello netty2".getBytes()));
            f.channel().closeFuture().sync();
        }finally{
            //关闭EventLoopGroup来释放资源
            group.shutdownGracefully().sync();
        }
    }
    public static void main(String[] args) throws Exception{
         new NettyClient("127.0.0.1", 8000).start();
    }

}
实现客户端的业务逻辑
package com.lzh.netty;
import io.netty.buffer.ByteBuf;
import io.netty.buffer.ByteBufUtil;
import io.netty.channel.ChannelHandlerContext;
import io.netty.channel.SimpleChannelInboundHandler;
public class NettyClientHandler extends SimpleChannelInboundHandler<ByteBuf>{
    @Override
    protected void channelRead0(ChannelHandlerContext ctx, ByteBuf msg)throws Exception {
        ByteBuf buf=(ByteBuf)msg;
        byte [] bt=new byte[buf.readableBytes()];
        buf.readBytes(bt);
        System.out.println("Client received: " + new String(bt,"utf-8"));
        System.out.println("Client received: " + ByteBufUtil.hexDump(msg.readBytes(msg.readableBytes())));
    }
    //重写ChannelHandler的exceptionCaught方法可以捕获服务器的异常,
    //比如客户端连接服务器后强制关闭,服务器会抛出"客户端主机强制关闭错误",通过重写exceptionCaught方法就可以处理异常
    @Override
    public void exceptionCaught(ChannelHandlerContext ctx, Throwable cause)
            throws Exception {
        cause.printStackTrace();
        ctx.close();
    }
    /**
     * 1.为什么在这里使用的是SimpleChannelInboundHandler而不使用ChannelInboundHandlerAdapter?
     * 主要原因是ChannelInboundHandlerAdapter在处理完消息后需要负责释放资源。在这里将调用ByteBuf.release()来释放资源。
     * SimpleChannelInboundHandler会在完成channelRead0后释放消息,这是通过Netty处理所有消息的ChannelHandler实现了ReferenceCounted接口达到的。
     * 2.为什么在服务器中不使用SimpleChannelInboundHandler呢?因为服务器要返回相同的消息给客户端,在服务器执行完成写操作之前不能释放调用读取到的消息,因为写操作是异步的,一旦写操作完成后,Netty中会自动释放消息。
     */
}
第四步:编译和运行服务器和客户端
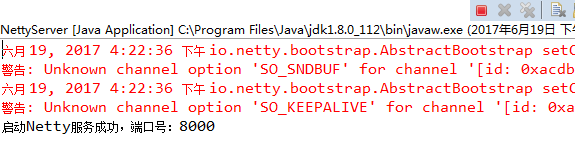
服务端启动
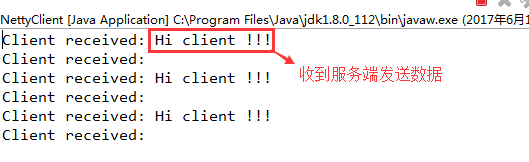
客户端启动
: