开发过程中,我们免不了需要用到一些自定义的 View,自定义 View 一般可分为三类:
① 继承类 View —— 一般继承系统以后的基本 View,新增/重置一些自定义属性 ,例如两端对齐的TextView;
② 组合类 View —— 将系统某几个基本View组合在一起形成一个新的View,例如末尾带 ”ד(清空) 的EditText,就是将EditText和ImageView组合在一起来实现;
③ 自绘制 View —— 某些特殊的设计控件,无法通过上两种方式实现时,我们就需要考虑通过自绘制来进行处理,本篇我们将着重介绍此类 View 的实现过程。
下面我们通过自定义一个圆形的Button(DCircleButton)来进行说明:
自定义View的步骤:
① 自定义 View 的属性;
② 在自定义 View 的构造方法中获取 View 的属性值;
③ 重写测量尺寸的方法 onMeasure(int, int); (是否需要重写根据具体根据需求);
④ 重写绘制方法 onDraw(Canvas c);
⑤ 在布局XML文件中,使用自定义 View 的属性。
1. 自定义 View 的属性:
在目录 res/values 下新建 attrs.xml 属性文件。
<?xml version="1.0" encoding="utf-8"?>
<resources>
    <!--name 是自定义控件的类名-->
    <declare-styleable name="DCircleButton" parent="android.widget.Button">
        <attr name="txtSize" format="dimension"/>
        <attr name="text" format="string"/>
        <attr name="txtColor" format="color"/>
        <attr name="txtBackgroundColor" format="color"/>
    </declare-styleable>
</resources>
② 定义属性名称及类型。
如上面的 xml 文件是自定义控件DCirclebutton的主题样式,主题样式里为属性定义,有些人可能会纠结format字段后面都有哪些属性单位?如果你是使用AS开发的话IDE会自动有提示,基本包括如下:
dimension(字体大小)string(字符串)color(颜色)boolean(布尔类型)float(浮点型)integer(整型)enmu(枚举)fraction(百分比)等。
2. 在构造方法中获取属性值,并绘制
第一步:继承View,实现(AS会提示)以下四种,
public DCircleButton(Context context) {
    super(context);
}
public DCircleButton(Context context, @Nullable AttributeSet attrs) {
    super(context, attrs);
}
public DCircleButton(Context context, @Nullable AttributeSet attrs, int defStyleAttr) {
    super(context, attrs, defStyleAttr);
}
@RequiresApi(api = Build.VERSION_CODES.LOLLIPOP)
public DCircleButton(Context context, @Nullable AttributeSet attrs, int defStyleAttr, int defStyleRes) {
    super(context, attrs, defStyleAttr, defStyleRes);
}
第二步,改写这四种构造,让其逐级递进:
public DCircleButton(Context context) {
    super(context, null);
}
public DCircleButton(Context context, AttributeSet attrs) {
    super(context, attrs, 0);
}
public DCircleButton(Context context, AttributeSet attrs, int defStyleAttr) {
    super(context, attrs, defStyleAttr, 0);
}
@RequiresApi(api = Build.VERSION_CODES.LOLLIPOP)
public DCircleButton(Context context, AttributeSet attrs, int defStyleAttr, int defStyleRes) {
    super(context, attrs, defStyleAttr, defStyleRes);
}
第三步,我们在最后一个方法获取属性值:
private void initAttrs(Context context, AttributeSet attrs) {
    TypedArray tArr = context.obtainStyledAttributes(attrs, R.styleable.DCircleButton);
    if (null != tArr) {
        txtColor = tArr.getColor(R.styleable.DCircleButton_txtColor, Color.BLACK); // 获取文字颜色
        txtSize = tArr.getDimensionPixelSize(R.styleable.DCircleButton_txtSize, 18);  // 获取文字大小
        txt = tArr.getString(R.styleable.DCircleButton_text); // 获取文字内容
        backgroundColor = tArr.getColor(R.styleable.DCircleButton_txtBackgroundColor, Color.GRAY); // 获取文字背景颜色
        tArr.recycle();
    }
}
第四步,绘制
/** 字体颜色 **/
private int txtColor;
/** 字体背景颜色 **/
private int backgroundColor;
/** 字体大小 **/
private int txtSize;
/** 按钮文字内容 **/
private String txt;
/** 圆半径 **/
private float mDrawableRadius;

/** 字体背景画笔  **/
private Paint mBackgroundPaint;
/** 字体画笔 **/
private Paint mTxtPaint;

public DCircleButton(Context context, AttributeSet attrs, int defStyleAttr) {
    super(context, attrs, defStyleAttr);
    initAttrs(context, attrs);
    init();
}
/** 初始化 **/
private void init() {
    mBackgroundPaint = new Paint();
    mBackgroundPaint.setColor(backgroundColor);

    mTxtPaint = new Paint();
    mTxtPaint.setTextAlign(Paint.Align.CENTER);
    mTxtPaint.setColor(txtColor);
    mTxtPaint.setTextSize(txtSize);
}

@Override
protected void onDraw(Canvas canvas) {
    super.onDraw(canvas);
    mDrawableRadius = Math.min(getWidth() >> 1, getHeight() >> 1);
    canvas.drawCircle(getWidth() >> 1, getHeight() >> 1, mDrawableRadius, mBackgroundPaint);
    if (null != txt)
        canvas.drawText(txt, getWidth() >> 1, getHeight() >> 1, mTxtPaint);
}
3. 布局中应用
<dinn.circle.button.DCircleButton
    android:layout_width="wrap_content"
    android:layout_height="wrap_content"
    app:text="我是按钮"
    app:txtBackgroundColor="@android:color/holo_orange_dark"
    app:txtColor="@android:color/white"
    app:txtSize="20sp" />
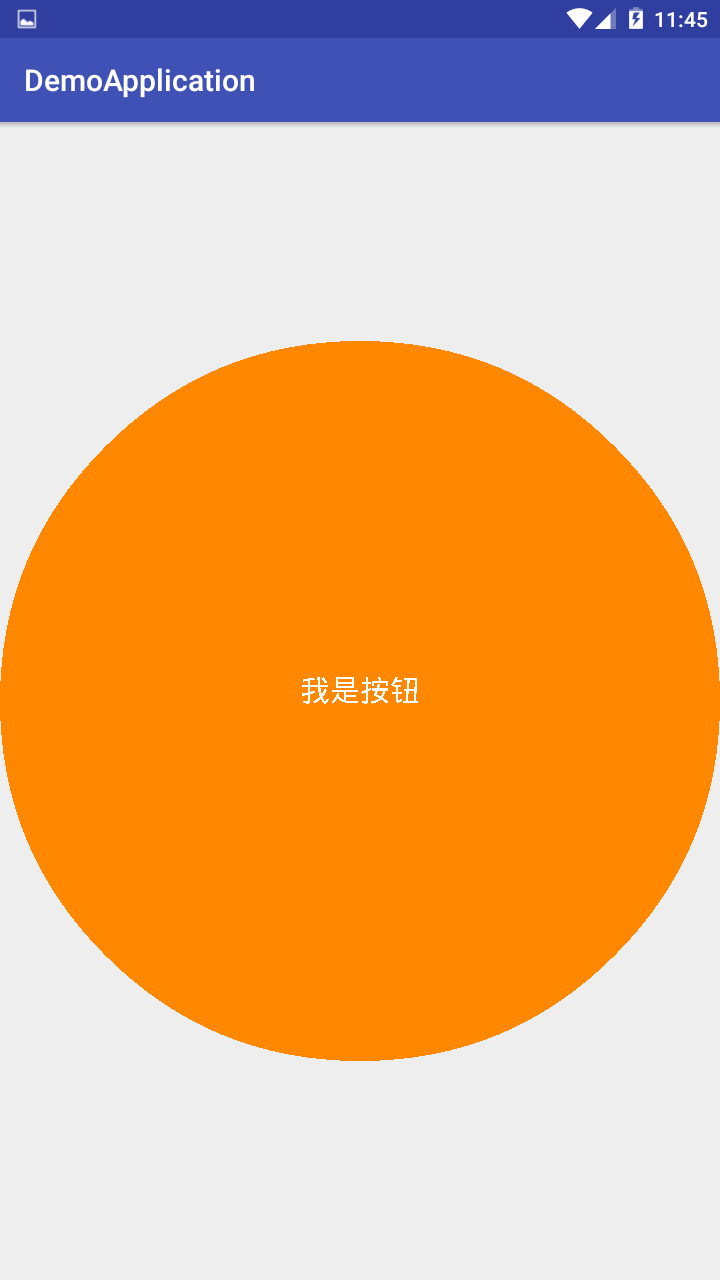
4. 运行结果

这个时候回发现按钮是充满屏幕的,但是布局中我们设置的尺寸属性为“wrap_content”。其实是由于我们在自定义View的流程中还有一个onMeasure方法没有重写。
5. 重写onMeasure控制View的大小
当你没有重写onMeasure方法时候,系统调用默认的onMeasure方法。
@Override
protected void onMeasure(int widthMeasureSpec, int heightMeasureSpec) {
    super.onMeasure(widthMeasureSpec, heightMeasureSpec);
}
这个方法的作用是:测量控件的大小。其实Android系统在加载布局的时候是由系统测量各子View的大小来告诉父View我需要占多大空间,然后父View会根据自己的大小来决定分配多大空间给子View。
那么从上面的效果来看,当你在布局中设置View的大小为”wrap_content”时,其实系统测量出来的大小是“match_parent”。为什么会是这样子呢?
那得从MeasureSpec的specMode模式说起了。一共有三种模式:
MeasureSpec.EXACTLY:父视图希望子视图的大小是specSize中指定的大小;一般是设置了明确的值或者是MATCH_PARENT。
MeasureSpec.AT_MOST:子视图的大小最多是specSize中的大小;表示子布局限制在一个最大值内,一般为WARP_CONTENT。
MeasureSpec.UNSPECIFIED:父视图不对子视图施加任何限制,子视图可以得到任意想要的大小;表示子布局想要多大就多大,很少使用。
我们看看系统源码 super.onMeasure(widthMeasureSpec, heightMeasureSpec); 是如何实现的:
protected void onMeasure(int widthMeasureSpec, int heightMeasureSpec) {
    setMeasuredDimension(getDefaultSize(getSuggestedMinimumWidth(), widthMeasureSpec),
            getDefaultSize(getSuggestedMinimumHeight(), heightMeasureSpec));
}
public static int getDefaultSize(int size, int measureSpec) {
    int result = size;
    int specMode = MeasureSpec.getMode(measureSpec);
    int specSize = MeasureSpec.getSize(measureSpec);

    switch (specMode) {
        case MeasureSpec.UNSPECIFIED:
            result = size;
            break;
        case MeasureSpec.AT_MOST:
        case MeasureSpec.EXACTLY:
            result = specSize;
            break;
    }
    return result;
}
从上面的代码 getDefaultSize() 方法中看出,原来 MeasureSpec.AT_MOST 和 MeasureSpec.EXACTLY 走的是同一个分支,也就是父视图希望子视图的大小是specSize中指定的大小。
得出来的默认值就是填充整个父布局。因此,不管你布局大小是 ”wrap_content” 还是 “match_parent” 效果都是充满整个父布局。那我想要 ”wrap_content” 的效果怎么办?那么只有重写onMeasure方法了。
@Override
protected void onMeasure(int widthMeasureSpec, int heightMeasureSpec) {
    // 测量模式
    int widthMode = MeasureSpec.getMode(widthMeasureSpec);
    // 父布局希望子布局的大小,如果布局里面设置的是固定值,这里取布局里面的固定值和父布局大小值中的最小值.
    // 如果设置的是match_parent,则取父布局的大小
    int widthSize = MeasureSpec.getSize(widthMeasureSpec);
    int heightMode = MeasureSpec.getMode(heightMeasureSpec);
    int heightSize = MeasureSpec.getSize(heightMeasureSpec);

    int width;
    int height;
    Rect mBounds = new Rect();
    if (widthMode == MeasureSpec.EXACTLY) {
        width = widthSize;
    } else {
        mTxtPaint.setTextSize(txtSize);
        mTxtPaint.getTextBounds(txt, 0, txt.length(), mBounds);
        float textWidth = mBounds.width();
        int desired = (int) (getPaddingLeft() + textWidth + getPaddingRight());
        width = desired;
    }

    if (heightMode == MeasureSpec.EXACTLY) {
        height = heightSize;
    } else {
        height = width;
    }
    // 最后调用父类方法,把View的大小告诉父布局。
    setMeasuredDimension(width, height);
}
这样实现的最终效果如下:
