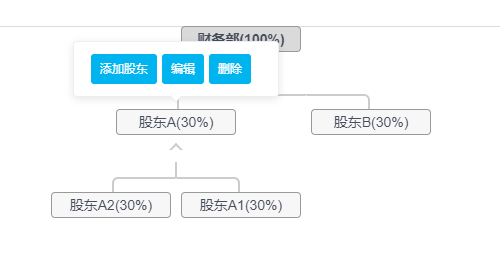
项目中用代码生成组织架构图 有新增,编辑,删除的功能
生成树形图的组件git-hub地址: https://github.com/tower1229/Vue-Tree-Chart 这个插件还是很不错的
建议把整个安装包下载下来,写成组件使用.这样方便定制自己的业务需求
初始代码:
<template>
    <table v-if="treeData.name">
      <tr>
        <td :colspan="treeData.children ? treeData.children.length * 2 : 1" :class="{parentLevel: treeData.children, extend: treeData.children && treeData.extend}">
          <div :class="{node: true, hasMate: treeData.mate}">
            <div class="person" @click="$emit('click-node', treeData)">
              <div class="avat">
                <img :src="treeData.image_url" />
              </div>
              <div class="name">{{treeData.name}}</div>
            </div>
            <div class="person" v-if="treeData.mate" @click="$emit('click-node', treeData.mate)">
              <div class="avat">
                <img :src="treeData.mate.image_url" />
              </div>
              <div class="name">{{treeData.mate.name}}</div>
            </div>
          </div>
          <div class="extend_handle" v-if="treeData.children" @click="toggleExtend(treeData)"></div>
        </td>
      </tr>
      <tr v-if="treeData.children && treeData.extend">
        <td v-for="(children, index) in treeData.children" :key="index" colspan="2" class="childLevel">
          <TreeChart :json="children" @click-node="$emit('click-node', $event)"/>
        </td>
      </tr>
    </table>
</template>
增加编辑功能,可以与element-ui的el-popover弹出框组件一起使用
<el-popover
  placement="top"
  width="180"
  trigger="hover">
  <div style="margin: 0">
    <el-button size="mini" type="primary" @click="addStock(0)" >新增</el-button>
    <el-button type="primary" size="mini" @click="addStock(1)">编辑</el-button>
    <el-button type="primary" size="mini" @click="dialogVisible2 = true" >删除</el-button>
  </div>
  <div class="avat" slot="reference">
    {{treeData.name}}
  </div>
</el-popover>
在网上找了好几个插件,感觉这个还是比较好用的
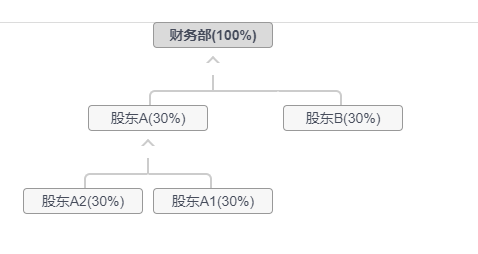
补充: 作者的树形图默认方向是由上向下,还提供了了切换为竖行的方法.但是我自己的项目是需要树形样式,由上之上的效果,如下图: 所以在原作者的代码上修改了下,主要是样式调整,有需要的可以看一下

<template>
    <table v-if="treeData.name">
      <tr v-if="treeData.children">
        <td v-for="(children, index) in treeData.children" :key="index" colspan="2" class="childLevel">
          <TreeChartOrder :json="children" @click-node="$emit('click-node', $event)"/>
        </td>
      </tr>
      <tr>
        <td :colspan="treeData.children ? treeData.children.length * 2 : 1" :class="{parentNode: treeData.children}">
          <div class="node">
            <div class="name">{{treeData.name}}</div>
          </div>
        </td>
      </tr>
    </table>
</template>

<script>
export default {
  name: "TreeChartOrder",
  props: ["json"],
  data() {
    return {
      treeData: {
        name: 'root',
        image_url: "https://static.refined-x.com/avat.jpg",
        children: [
          {
            name: 'children1',
            image_url: "https://static.refined-x.com/avat1.jpg"
          },
          {
            name: 'children2',
            image_url: "https://static.refined-x.com/avat2.jpg",
            mate: {
              name: 'mate',
              image_url: "https://static.refined-x.com/avat3.jpg"
            },
            children: [
              {
                name: 'grandchild',
                image_url: "https://static.refined-x.com/avat.jpg"
              },
              {
                name: 'grandchild2',
                image_url: "https://static.refined-x.com/avat1.jpg"
              },
              {
                name: 'grandchild3',
                image_url: "https://static.refined-x.com/avat2.jpg"
              }
            ]
          },
          {
            name: 'children3',
            image_url: "https://static.refined-x.com/avat.jpg"
          }
        ]
      }
    }
  },
  watch: {
    json: {
      handler: function(Props){
        let extendKey = function(jsonData){
          jsonData.extend = (jsonData.extend===void 0 ? true: !!jsonData.extend);
          if(Array.isArray(jsonData.children)){
            jsonData.children.forEach(c => {
              extendKey(c)
            })
          }
          return jsonData;
        }
        if(Props){
          this.treeData = extendKey(Props);
        }
      },
      immediate: true
    }
  },
  methods: {
    toggleExtend: function(treeData){
      treeData.extend = !treeData.extend;
      this.$forceUpdate();
    }
  }
}
</script>

<style scoped>
table{border-collapse: separate!important;border-spacing: 0!important;}
td{position: relative; vertical-align: bottom;padding:0 0 40px 0;text-align: center; }

.parentNode::after {content: "";position: absolute;left:49.9%;top:-56px;height:30px;border-left:2px solid #ccc;}
.childLevel::before{content: "";position: absolute;left:50%;bottom:57px;height:15px;border-left:2px solid #ccc;transform: translate3d(-1px,0,0)}
.childLevel::after{content: "";position: absolute;left:0;right:0;bottom:55px;border-top:2px solid #ccc;}
.childLevel:first-child:before, .childLevel:last-child:before{display: none;}
.childLevel:first-child:after{left:50%;height:15px; border:2px solid;border-color:transparent transparent #ccc #ccc;border-radius: 6px 0 0 0;transform: translate3d(1px,0,0)}
.childLevel:last-child:after{right:50%;height:15px; border:2px solid;border-color:transparent #ccc #ccc transparent;border-radius: 0 6px 0 0;transform: translate3d(-1px,0,0)}
.childLevel:first-child.childLevel:last-child::after{left:auto;border-radius: 0;border-color:transparent #ccc transparent transparent;transform: translate3d(1px,0,0)}

.node{position: relative; display: inline-block; 13em;box-sizing: border-box; text-align: center;}
.node .person{position: relative; display: inline-block;z-index: 2;6em; overflow: hidden;}
.node .avat{display: block;4em;height: 4em;margin:auto;overflow:hidden; background:#fff;border:1px solid #ccc;box-sizing: border-box;}
.node .avat img{100%;height: 100%;}
.node .name{height:2em;line-height: 2em;overflow: hidden;95%; background:#eee;border:1px solid #ccc;box-sizing: border-box;border-radius: 5px;}

</style>
git-hup地址: https://github.com/shengbid/vue-demo 这个文件是平时练习的项目,里面还有一些我写的其他博客的源码,有需要可以下载看看