补充:NameError: name 'buffer' is not defined
>>> import sys
>>> if sys.version_info > (3,):
...     buffer = memoryview
>>> b = buffer('yay!'.encode())
>>> len(b)
4
因为在Python3中buffer已经被memoryview取代了,buffer在Python2中使用,所以我们可以在文件中加入
import sys
if sys.version_info > (3,):
   buffer = memoryview
一:Mininet模拟多数据中心流量带宽实验
(一)案例目的

(二)为什么使用Mininet模拟数据中心--应用价值
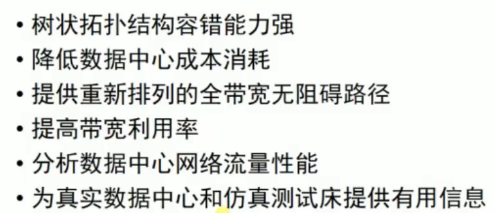
Mininet最常用的场景就是数据中心。因为Mininet可以模拟出很复杂的网络拓扑,而不需要硬件的支持,就可以搭建出不同的数据中心的拓扑。
可以为真正的数据中心网络的搭建起到模拟预测实验作用,为真实的数据中心的成本带来一定的节省。
二:数据中心网络拓扑
(一)数据中心网络拓扑结构
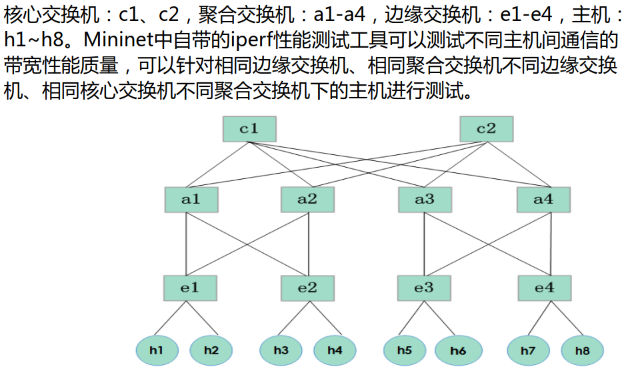
存在线路冗余(多条链路可达),容错能力强-----胖树拓扑
(二)实现网络拓扑---按照结构实现,代码不唯一
from mininet.topo import Topo
from mininet.net import Mininet
from mininet.node import RemoteController
from mininet.link import TCLink
from mininet.util import dumpNodeConnections

class MyTopo(Topo):

    def __init__(self):
        super(MyTopo,self).__init__()

        #Marking the number of switch for per level
        L1 = 2;
        L2 = L1*2
        L3 = L2

        #Starting create the switch
        c = []    #core switch
        a = []    #aggregate switch
        e = []    #edge switch

        #notice: switch label is a special data structure
        for i in range(L1):
            c_sw = self.addSwitch('c{}'.format(i+1))    #label from 1 to n,not start with 0
            c.append(c_sw)

        for i in range(L2):
            a_sw = self.addSwitch('a{}'.format(L1+i+1))
            a.append(a_sw)

        for i in range(L3):
            e_sw = self.addSwitch('e{}'.format(L1+L2+i+1))
            e.append(e_sw)

        #Starting create the link between switchs
        #first the first level and second level link
        for i in range(L1):
            c_sw = c[i]
            for j in range(L2):
                self.addLink(c_sw,a[j])

        #second the second level and third level link
        for i in range(L2):
            self.addLink(a[i],e[i])
            if not i%2:
                self.addLink(a[i],e[i+1])
            else:
                self.addLink(a[i],e[i-1])

        #Starting create the host and create link between switchs and hosts
        for i in range(L3):
            for j in range(2):
                hs = self.addHost('h{}'.format(i*2+j+1))
                self.addLink(e[i],hs)


topos = {"mytopo":(lambda:MyTopo())}
(三)使用Mininet测试
sudo mn --custom ./data_center_topo.py --topo=mytopo --controller=remote

三:流量模拟
(一)为什么需要流量模拟

(二)流量随机模型在Mininet中的应用

四:自定义命令拓展实现---为流量模拟做准备

(一)修改net.py
    def iperf_single( self, hosts=None, udpBw='10M',period=60,port=5001):
        """Run iperf between two hosts using UDP.
           hosts: list of hosts; if None, uses first and last hosts
           returns: results two-element array of server and client speeds
        """
        if not hosts:
            return
        else:
            assert len(hosts) == 2  #这段代码我们要求一定要有两个参数,即下面的client,和server

        client, server = hosts
        filename = client.name[1:]+'.out'
        output('*** Iperf:testing bandwidth between ')
        output('%s and %s
'%(client.name,server.name))  #这里在Mininet交互界面显示提示信息
        iperfArgs = 'iperf -u '
        bwArgs = '-b '+udpBw+' '  #设置命令和参数,这是要在client和server上执行的
        print("***start server***")
        server.cmd(iperfArgs+'-s -i 1'+' > /home/njzy/temp_log/'+filename+'&')  #服务器端执行指令,并且将返回的信息存放在文件中
                          #注意:对应我们存放日志的目录,一定是真实存在的
        print("***start client***")
        client.cmd(iperfArgs+'-t '+str(period)+' -c '+server.IP()+' '+bwArgs  #客户端执行指令,并且将返回的信息存放在文件中
                  +' > /home/njzy/temp_log/'+'client'+filename+'&')

    def iperfMulti(self,bw,period=60):
        base_port = 5001
        server_list = []
        client_list = [h for h in self.hosts]
        host_list = []
        host_list = [h for h in self.hosts]  #收集所有主机信息

        cli_outs = []
        ser_outs = []

        _len = len(host_list)
        for i in xrange(0,_len):  #按照主机数目进行循环,每次选择一台主机,作为客户端
            client = host_list[i]
            server = client
            while (server==client):  #如果客户端和服务端是同一台主机,那么我们随机从主机中国选择一台新的主机作为服务端,直到找到一台与客户端不同的主机,用来做服务端
              server = random.choice(host_list)

            server_list.append(server)
            self.iperf_single(hosts=[client,server],udpBw=bw,period=period,port=base_port)  #客户端和服务端进行带宽测试
            sleep(.05)
            base_port += 1  #更换端口号,做到随机

        sleep(period)
        print("test has done")  #结束,打印提示信息
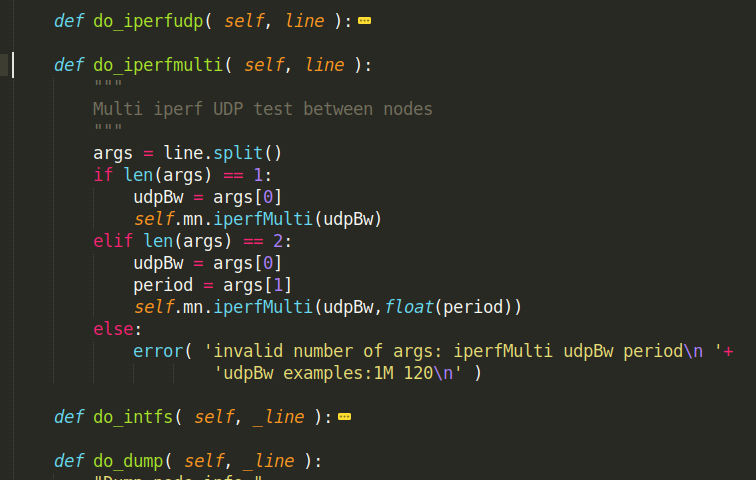
(二)修改cli.py将iperfmulti命令在CLI类中注册
    def do_iperfmulti( self, line ):
        """
        Multi iperf UDP test between nodes
        """
        args = line.split()
        if len(args) == 1:
            udpBw = args[0]
            self.mn.iperfMulti(udpBw)
        elif len(args) == 2:
            udpBw = args[0]
            period = args[1]
            self.mn.iperfMulti(udpBw,float(period))
        else:
            error( 'invalid number of args: iperfMulti udpBw period
 '+
                    'udpBw examples:1M 120
' )
(三) 在mininet/bin/mn文件中加入iperfmulti可执行命令
TESTS = { name: True
          for name in ( 'pingall', 'pingpair', 'iperf', 'iperfudp','iperfmulti' ) }
# Map to alternate spellings of Mininet() methods
ALTSPELLING = { 'pingall': 'pingAll', 'pingpair': 'pingPair',
                'iperfudp': 'iperfUdp','iperfmulti': 'iperfMulti' }
(四)重新编译mininet---因为我们修改了mininet内核文件

因为我们已经安装OpenFlow协议和openvswitch,所以不需要再加3V

sudo mn
iperfmulti  后面会自动补全
五:进行网络测试
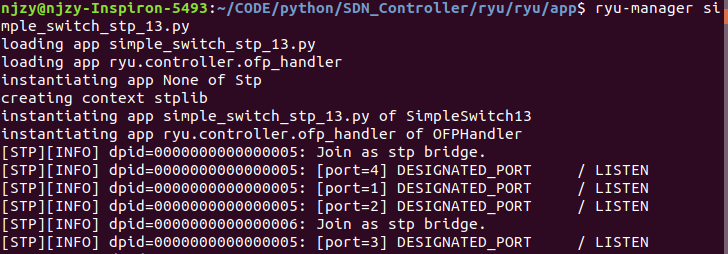
(一)开始Ryu---为了防止广播风暴,使用生成树协议《重点注意协议文件选择》
ryu-manager simple_switch_stp_13.py 注意:是使用simple_switch_stp_13协议,不要使用simple_switch_stp文件,不然会出问题
(二)Mininet启动网络拓扑
sudo mn --custom ./data_center_topo.py --topo=mytopo --controller=remote

(三)使用iperf命令,进行TCP带宽测试
注意:在测试之前先多ping几次<h1 ping h2>(找到可以ping通),使得网络拓扑结构提前存在控制器中,不然容易直接退出

![]()
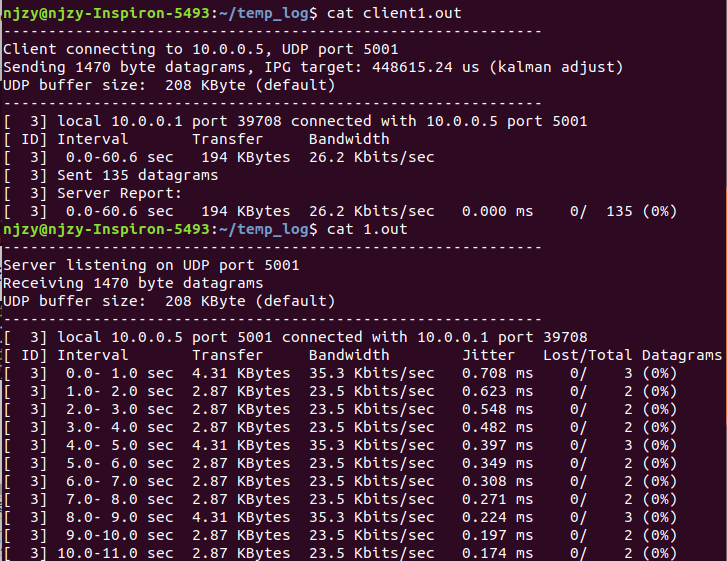
iperf h1 h2

![]()
iperf h1 h3

![]()
iperf h1 h5


(四)使用iperfmulti命令,进行UDP带宽测试
iperfmulti 0.025M
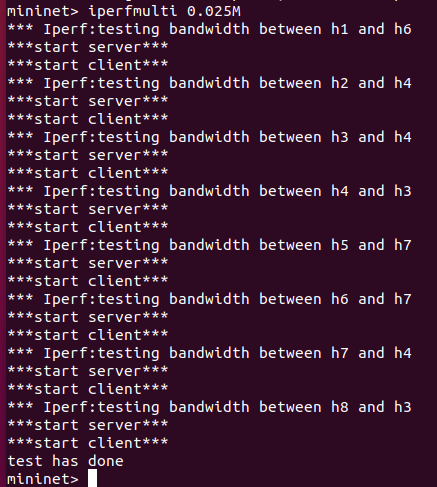
查看流量日志