本文转自http://www.cnblogs.com/fengwenit/p/3988249.html 作者 疯吻IT
Dynamic CRM 2013学习笔记(三)快速创建实体 EntityCreater
一、实体简介
实体用于在 Microsoft Dynamics CRM 中建立业务数据模型和管理业务数据。例如,可以使用客户、市场活动和事件(案例)等实体跟踪和支持销售、市场营销和服务活动。实体具有一组属性,每个属性表示一个特定类型的数据项。例如,客户实体具有 Name、Address 和 OwnerId 属性。从概念上讲,实体类似于数据库表,实体属性对应于表列。在 Microsoft Dynamics CRM 中创建实体记录(或记录)类似于在数据库表中添加记录。实体划分成三个类别:系统、业务和自定义。作为处理业务数据的开发人员,您将使用业务和自定义实体。Microsoft Dynamics CRM 使用系统实体处理所有内部流程,如工作流和异步作业。不能删除或自定义系统实体。
业务实体是默认安装的 Microsoft Dynamics CRM 的一部分,它们显示在自定义用户界面中。例如,客户、联系人和信件都是业务实体。安装 Microsoft Dynamics CRM 后,可以向其中添加自定义实体以满足组织的特定业务需求。在 Microsoft Dynamics CRM 解决方案中,可以将业务和自定义实体以及属性设置为可自定义或不可自定义。可以通过以下方式修改可自定义实体:重命名可自定义实体、添加新属性或更改各种设置,如重复检测或队列支持设置。不能修改不可自定义的实体。
二、存在的问题
- 我们一般在CRM系统上通过界面来创建实体,但这个效率太低了,而且有些属性不能修改,这样有时就会出现这样的问题:有时为了修改实体的一个属性,但这个属性却是不能修改的,这时我们不得不把整个实体删除,再把字段一个个的添加。
- 如果项目里人多了,虽然有命名规范文档,比如,我们一般把lookup类型的字段后面加上id,但有时一不小心有兄弟就会忘记了。
三、解决方法
于是就想着通过工具来生成实体,网上搜索后,没发现有什么好的实体生成工具。于是只得自己动手,创建entity及各类型的属性:
1. 实体创建
1: CreateEntityRequest request = new CreateEntityRequest2: {3: HasNotes = false,4: HasActivities = false,5: Entity = new EntityMetadata6: {7: IsActivity = false,8: SchemaName = customEntityName,9: DisplayName = new Label(entity.DisplayName, 1033),10: DisplayCollectionName = new Label(entity.DisplayName, 1033),11: OwnershipType = OwnershipTypes.UserOwned,12: IsAvailableOffline = true13: }14: };
2. string属性
1: [AttributeType("Single Line of Text")]2: public class StringAttributeeCreater : AttributeCreater3: {4: public override AttributeMetadata Create()5: {6: AttributeMetadata attribute = new StringAttributeMetadata7: {8: SchemaName = Field.PhysicalName,9: RequiredLevel = GetRequiredLevel(),10: MaxLength = 100,11: FormatName = StringFormatName.Text,12: DisplayName = new Microsoft.Xrm.Sdk.Label(Field.DisplayName, 1033)13: };14: return attribute;15: }16: }
3. optionset 属性1: [AttributeType(OptionSetAttributeeCreater.OptionSet_STR)]2: public class OptionSetAttributeeCreater : AttributeCreater3: {4: public const string OptionSet_STR = "Option Set";5: public override AttributeMetadata Create()6: {7: PicklistAttributeMetadata attribute = new PicklistAttributeMetadata8: {9: RequiredLevel = GetRequiredLevel(),10: SchemaName = Field.PhysicalName,11: DisplayName = new Microsoft.Xrm.Sdk.Label(Field.DisplayName, 1033),12: OptionSet = new OptionSetMetadata()13: };14:15: attribute.OptionSet.IsGlobal = true;16: if (!string.IsNullOrEmpty(Field.Remark))17: {18: attribute.OptionSet.Name = Field.Remark;19: }20: else if (!string.IsNullOrEmpty(Field.TypeRule))21: {22: string[] arr = Field.TypeRule.Split(' ');23:24: foreach (string item in arr)25: {26: string[] arr2 = item.Split(',', ',');27: if (arr2.Length == 2)28: {29: int value = int.Parse(arr2[0]);30: attribute.OptionSet.Options.Add(new OptionMetadata(new Microsoft.Xrm.Sdk.Label(arr2[1], 1033), value));31: }32: }33: }34: return attribute;35: }36: }
其它属性以此类推,这里就不一一介绍了,大家可以查看下sdk,里面有详细的介绍。
四、EntityCreater工具
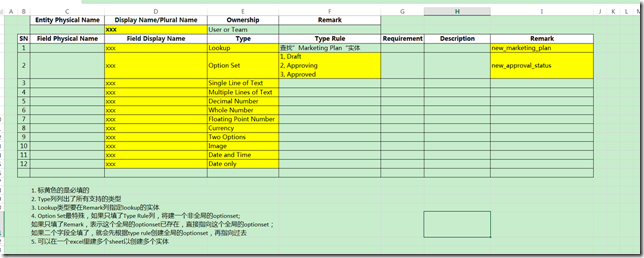
1. 通过excel列出实体名和字段名 (EntityCreaterGuide.xlsx)
下面是个例子:
2. 首次使用EntittyCreater里,要修改下CRMEntityCreater.exe.config里面的连接信息
<add name="name" connectionString="Url=http://xxxx:5555/xxx/; Domain=xxxx; Username=xxxx; Password=xxx;"/>
运行EntityCreater,并把保存好的excel文件拖入左上角的框框里,这时它会把里面所有的sheet都显示出来,我们可以依次创建这些实体:
3. 点击左边中间的按钮 Generate Phical Name, 自动生成 phisical name:
4.这时,就可以通过点击 Create Entity来创建实体了。如果只是添加些字段,也可以只勾选Fields:
5. 创建完成后,我们可以通过Save to Excel来保存生成的Phical Name到excel里,还可以点击View Result来查看创建过程中的log信息


