npm install --global vue-cli
vue init webpack my-project
cd my-project
npm install
npm run dev
这样就构建了一个本地vue项目
结下来,如何调用后端接口呢?
安装 vue-resource
npm i vue-resource --save
在main.js里面加入以下代码
import VueResource from 'vue-resource'
Vue.use(VueResource)
Vue.http.options.emulateJSON = true;  //http请求设置
Vue.http.options.headers = {
  'Content-Type': 'application/x-www-form-urlencoded;charset=UTF-8' //http请求头设置form表单提交
};
找到srccomponentsHello.vue 把下面代码替换原来的,加入了表单,点击登录,调用后端的接口
<template>
  <div>
    <div>
      <input
              type="text"
              placeholder="Enter your username"
              v-model="info.username"
      >
    </div>
    <div>
      <input
              type="password"
              placeholder="Enter your password"
              v-model="info.password"
      >
    </div>
    <button @click="submit()">登录</button>
  </div>
</template>

<script>
  export default {
    data () {
      return {
        info: {
          username: '',
          password: ''
        }
      }
    },
    methods: {
      submit () {
        var info = {
          data:JSON.stringify(
            {
              username: this.info.username,
              password: this.info.password
            }
          )
        }
        this.$http.post('/api/user/login', info).then(function (data) {
          console.log(data.data)
        }, function (err) {
          console.log(err)
        })
      }
    }
  }
</script>
由于后端的接口域名是是www.bobomusic.com/api/,post请求里面的接口域名其实是localhost:8080/api/, 这样是调用不到的,怎么办呢?
vue的configindex.js里面可以设置反向代理到后端的接口域名,打开index.js,加入如下图里面红色框的一段代码
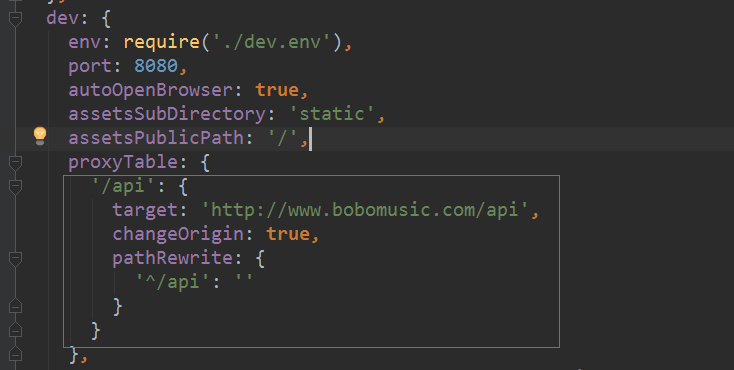
'/api': {
        target: 'http://www.bobomusic.com/api',
        changeOrigin: true,
        pathRewrite: {
          '^/api': ''
        }
      }
然后在页面点击登录按钮,调用成功,返回的数据如下图:

