相信大家知道 Windows phone 8 设备家族中非常耀眼的一款是 Nokia Lumia 920 但是有一点同学们未必知道知道 Nokia除了是老牌手机硬件厂商之外,Nokia的地图服务也是非常牛气的。 目前雅虎等网站已经完全采用Nokia地图库,而且windows phone 中的bing地图也在移植Nokia 地图库, windows phone 8 中已经原生集成Nokia 地图控件,那么今天我给大家介绍一下 windows phone 8 中的Nokia地图控件。
此文是 升级到WP8必需知道的13个特性 系列的一个更新 希望这个系列可以给 Windows Phone 8开发者带来一些开发上的便利。
同时欢迎大家在这里和我沟通交流或者在新浪微博上 @王博_Nick
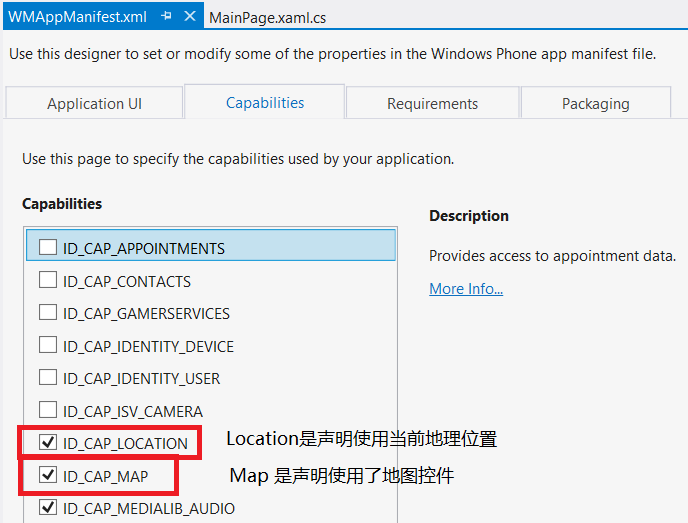
首先介绍下使用步骤使用Nokia地图控件和在WP7中使用BingMap十分相似 这里我选择了 location 和 Map 原因是我想在地图上显示我的本地位置。
另外每一款Nokia地图应用都需要 在应用中指定你的 ApplicationID 和 AuthenticationToken这两项需要在DEV Center中获取

当然在App中是要指定一下的
        private void myMapControl_Loaded(object sender, RoutedEventArgs e)
        {
            Microsoft.Phone.Maps.MapsSettings.ApplicationContext.ApplicationId = "ApplicationID";
            Microsoft.Phone.Maps.MapsSettings.ApplicationContext.AuthenticationToken = "AuthenticationToken";
        }
在我们的页面中添加一个地图控件
        <!--ContentPanel - place additional content here-->
        <Grid x:Name="ContentPanel" Grid.Row="1" Margin="12,0,12,0">
            <maps:Map x:Name="MyMap"  Center="39.92, 116.46" ZoomLevel="10"/>
        </Grid>
public MainPage()
{
   InitializeComponent();
   Map MyMap = new Map();
   ContentPanel.Children.Add(MyMap);
}
以上两段代码基本是等效的,但是细心的同学肯定注意到了 XAML文件中指定两个属性值 Center 和 ZoomLeve Center是指地图所在中心点的经纬度位置,zoomlevel 是用来设置地图的缩放级别(1-20)缩放级别越高 地图的分辨率也就对应越高。
public MainPage()
{
   InitializeComponent();
   Map MyMap = new Map();

   //Set the Map center by using Center property
   MyMap.Center = new GeoCoordinate(47.6097, -122.3331);

   //Set the map zoom by using ZoomLevel property
   MyMap.ZoomLevel = 10;
   ContentPanel.Children.Add(MyMap);
}

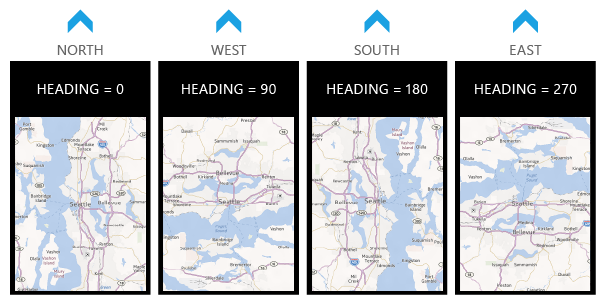
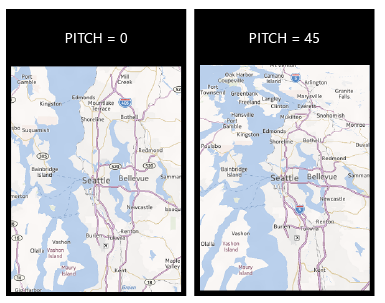
除了 Center 和 ZoomLevel 还有heading 和 pitch 属性可以对地图属性进行设置
heading 是标志地图的"指向“ 介于 0 - 360 默认 0 北向上
pitch 是标志地图的倾斜度 0 - 180
void OnCenterZoom_Click(object sender, EventArgs args)
{
   MyMap.Center = new GeoCoordinate(47.6097, -122.3331);
   MyMap.ZoomLevel = 18;
}

void OnAnimate_Click(object sender, EventArgs args)
{
   MyMap.SetView(new GeoCoordinate(47.6097, -122.3331), 15, MapAnimationKind.Parabolic);
}
其次地图又分为几种视图模式

void Road_Click(object sender, EventArgs args)
{
   MyMap.CartographicMode = MapCartographicMode.Road;
}

void Aerial_Click(object sender, EventArgs args)
{
   MyMap.CartographicMode = MapCartographicMode.Aerial;
}

void Hybrid_Click(object sender, EventArgs args)
{
   MyMap.CartographicMode = MapCartographicMode.Hybrid;
}

void Terrain_Click(object sender, EventArgs args)
{
   MyMap.CartographicMode = MapCartographicMode.Terrain;
}
还有一个比较任性话的设置 地图颜色设置
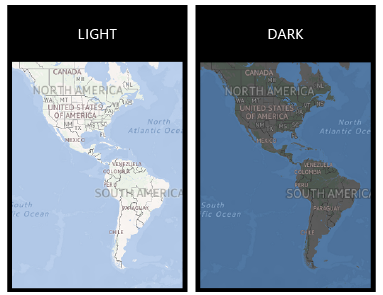
void Light_Click(object sender, EventArgs args)
{
   MyMap.ColorMode = MapColorMode.Light;
}

void Dark_Click(object sender, EventArgs args)
{
   MyMap.ColorMode = MapColorMode.Dark;
}
这里再向大家介绍一下 ,在地图应用中通常标注位置的方法或路径 我们会做一张图片或者一个UI控件,在此我告诉大家在 Nokia Map中如何添加一个UIElements或是一个定义控件。
第一 在Nokia 地图上显示 自定义控件/UIElements 是通过 MapOverlay 作为介质呈现的
第二 MapOverLay是要放在 MapLayer中 作为一个Item添加到 Nokia Map的Layer中去的
                        MapOverlay MyOverlay = new MapOverlay();
                        MyOverlay.Content = GetGrid();
                        MyOverlay.GeoCoordinate = new GeoCoordinate(CurrenLocation.Latitude, CurrenLocation.Longitude);
                        MyOverlay.PositionOrigin = new Point(0, 0.5);
                        MapLayer MyLayer = new MapLayer();
                        MyLayer.Add(MyOverlay);
                        MyMap.Layers.Add(MyLayer);
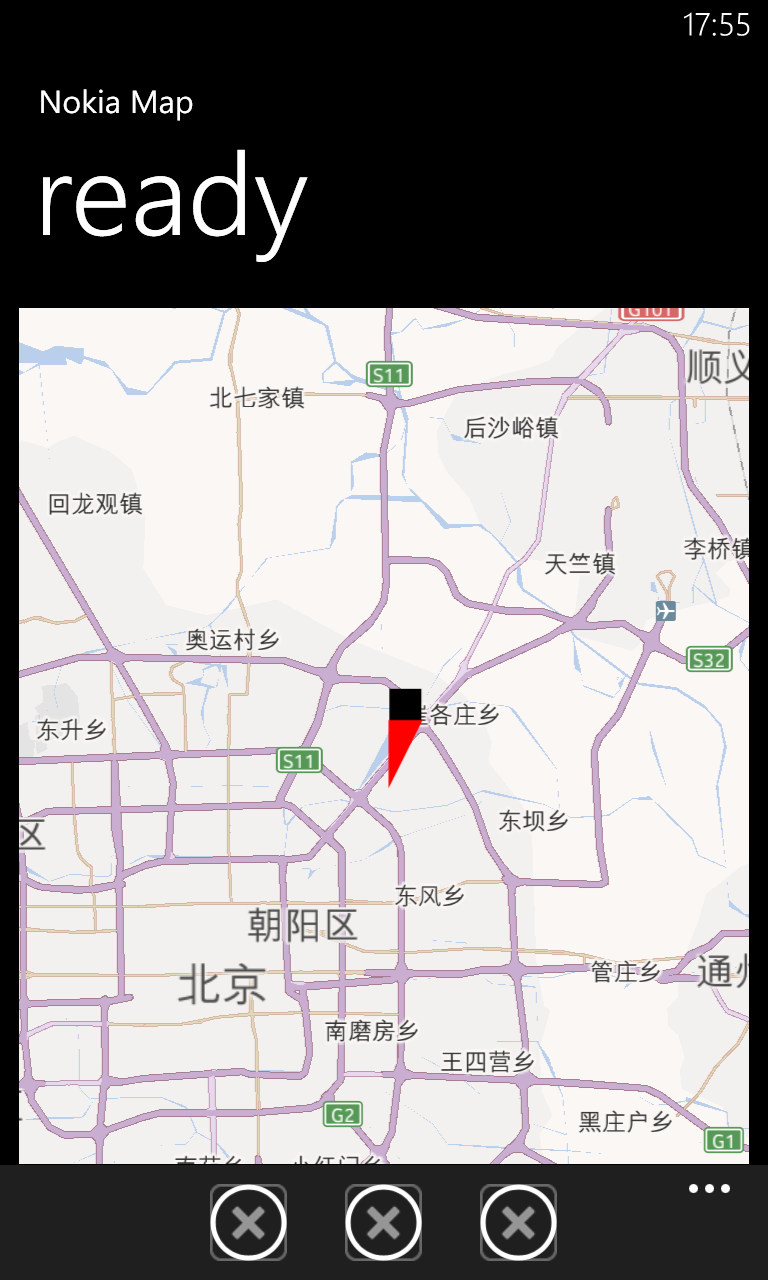
以上代码实际上我是在地图中添加了 一个GetGrid 函数返回值。
        Grid GetGrid()
        {
            Grid MyGrid = new Grid();
            MyGrid.RowDefinitions.Add(new RowDefinition());
            MyGrid.RowDefinitions.Add(new RowDefinition());
            MyGrid.Background = new SolidColorBrush(Colors.Transparent);

            //Creating a Rectangle
            Rectangle MyRectangle = new Rectangle();
            MyRectangle.Fill = new SolidColorBrush(Colors.Black);
            MyRectangle.Height = 20;
            MyRectangle.Width = 20;
            MyRectangle.SetValue(Grid.RowProperty, 0);
            MyRectangle.SetValue(Grid.ColumnProperty, 0);

            //Adding the Rectangle to the Grid
            MyGrid.Children.Add(MyRectangle);

            //Creating a Polygon
            Polygon MyPolygon = new Polygon();
            MyPolygon.Points.Add(new Point(2, 0));
            MyPolygon.Points.Add(new Point(22, 0));
            MyPolygon.Points.Add(new Point(2, 40));
            MyPolygon.Stroke = new SolidColorBrush(Colors.Red);
            MyPolygon.Fill = new SolidColorBrush(Colors.Red);
            MyPolygon.SetValue(Grid.RowProperty, 1);
            MyPolygon.SetValue(Grid.ColumnProperty, 0);

            //Adding the Polygon to the Grid
            MyGrid.Children.Add(MyPolygon);

            return MyGrid;
        }
当然这个函数只是一个参考这里可以返回任意的 UI自定义控件只要是基于UIElements即可。
好了今天就先给大家介绍这么多 后面我会在用一篇来介绍,如何实现基于定位的后台应用程序,欢迎大家在这里和我沟通交流或者在新浪微博上 @王博_Nick