一.Zookeeper概述和基本概念
1.Zookeeper背景
随着互联网技术的发展,企业对计算机系统的计算,存储能力要求越来越高,各大IT企业都在追求高并发,海量存储的极致,在这样的背景下,单纯依靠少量高性能单机来完成计算机,云计算的任务已经无法满足需求,
企业的IT架构逐渐由集中式往分布式过渡。所谓的分布式是指:把一个计算任务分解成若干个计算单元,并分派到不同的计算机中去执行,最终汇总计算结果的过程。
2.Zookeeper概述
Zookeeper是源代码开放的分布式协调服务,是一个高性能的分布式数据一致性的解决方案,它将那些复杂的,容易出错的分布式一致性服务封装起来。用户可以通过调用Zookeeper提供的接口来解决一些分布式应用中的实际问题。
3.Zookeeper典型应用场景
(1)数据发布/订阅
数据的发布与订阅,顾名思义就是一方把数据发布出来,另一方通过某种手段获取。
通常数据发布与订阅有两种模式:推模式和拉模式,推模式一般是服务器主动往客户端推送信息,拉模式是客户端主动去服务端请求目标数据(通常采用定时轮询的方式)
Zookeeper采用两种方式互相结合:发布者将数据发布到Zookeeper集群节点上,订阅者通过一定的方法告诉Zookeeper服务器,自己对哪个节点的数据感兴趣,那么在服务端数据发生变化时,就会通知客户端去获取这些信息。
(2)负载均衡
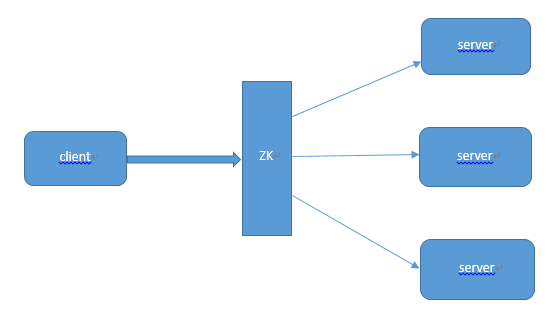
首先在服务端启动的时候,把自己在zookeeper服务器上注册成一个临时节点。zookeeper拥有两种形式的节点,一种是临时节点,一种是永久节点。这两种节点后面的博客会有较为详细的介绍。注册成临时节点后,再服务端出问题时,节点会自动的从
zookeeper上删除,如此zookeeper服务器上的列表就是最新的可用的列表。
客户端在需要访问服务器的时候首先会去Zookeeper获得所有可用的服务端的连接信息。
客户端通过一定的策略(如随机)选择一个与之建立连接。
当客户端发现连接不可用时,会再次从zookeeper上获取可用的服务端连接,并同时删除之前获取的连接列表。
(3)命名服务
提供名称的服务。如一般使用较多的有两种id,一种是数据库自增长id,一种是UUID,两种id都有局限,自增长id仅适合在单表单库中使用,uuid适合在分布式系统中使用但由于id没有规律难以理解。
而ZK提供了一定的接口可以用来获取一个顺序增长的,可以在集群环境下使用的id。
(4)分布式协调,通知,心跳服务
在分布式服务系统中,我们常常需要知道哪个服务是可用的,哪个服务是不可用的,传统的方式是通过ping主机来实现的,ping得200的结果说明说明该服务是OK的。

而在使用 zookeeper时,可以将所有的服务都注册成一个临时节点,我们判断一个服务是否可用,只需要判断这个节点是否在zookeeper集群中存在就可以了,不需要直接去连接和ping服务所在主机,减少系统的复杂度和对服务主机的压力。
(5)Zookeeper优势
●源代码开放

●高性能,易用稳定,该优势已在众多分布式系统中得到验证

●有着广泛的应用,并且与众多大数据相关技术能实现良好的融合开发。
二.Zookeeper安装以及配置
1.Zookeeper下载
下载ZooKeeper,地址:http://mirrors.hust.edu.cn/apache/zookeeper/
注意:注意版本,启动报错可能找不到主类,可以下载源码版
2.Zookeeper安装配置
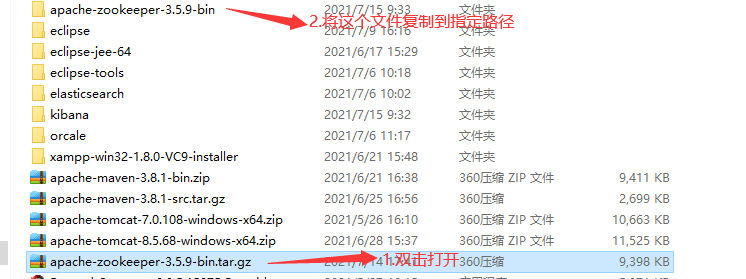
3.创建data、log文件夹目录
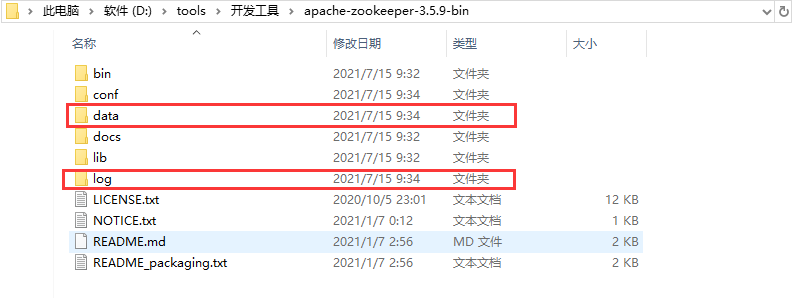
**4.进入conf目录,创建一个zookeeper的配置文件zoo.cfg,可复制conf/zoo_sample.cfg作为配置文件
 2 # tickTime:CS通信心跳数
 3 # Zookeeper 服务器之间或客户端与服务器之间维持心跳的时间间隔,也就是每个 tickTime 时间就会发送一个心跳。tickTime以毫秒为单位。
 4 tickTime=2000
 5
 6 # The number of ticks that the initial
 7 # synchronization phase can take
 8 # initLimit:LF初始通信时限
 9 # 集群中的follower服务器(F)与leader服务器(L)之间初始连接时能容忍的最多心跳数(tickTime的数量)。
10 initLimit=5
11
12 # The number of ticks that can pass between
13 # sending a request and getting an acknowledgement
14 # syncLimit:LF同步通信时限
15 # 集群中的follower服务器与leader服务器之间请求和应答之间能容忍的最多心跳数(tickTime的数量)。
16 syncLimit=2
17
18 # the directory where the snapshot is stored.
19 # do not use /tmp for storage, /tmp here is just
20 # example sakes.
21 # dataDir:数据文件目录
22 # Zookeeper保存数据的目录,默认情况下,Zookeeper将写数据的日志文件也保存在这个目录里。
23 dataDir=/data/soft/zookeeper-3.4.12/data
24
25
26 # dataLogDir:日志文件目录
27 # Zookeeper保存日志文件的目录。
28 dataLogDir=/data/soft/zookeeper-3.4.12/logs
29
30 # the port at which the clients will connect
31 # clientPort:客户端连接端口
32 # 客户端连接 Zookeeper 服务器的端口,Zookeeper 会监听这个端口,接受客户端的访问请求。
33 clientPort=2181
34
35 # the maximum number of client connections.
36 # increase this if you need to handle more clients
37 #maxClientCnxns=60
38 #
39 # Be sure to read the maintenance section of the
40 # administrator guide before turning on autopurge.
41 #
42 # http://zookeeper.apache.org/doc/current/zookeeperAdmin.html#sc_maintenance
43 #
44 # The number of snapshots to retain in dataDir 保留数量3
45 autopurge.snapRetainCount=3
46 # Purge task interval in hours
47 # Set to "0" to disable auto purge feature 清理时间间隔1小时
48 autopurge.purgeInterval=1
49
50
51 # 服务器名称与地址:集群信息(服务器编号,服务器地址,LF通信端口,选举端口)
52 # 这个配置项的书写格式比较特殊,规则如下:
53
54 # server.N=YYY:A:B
55
56 # 其中N表示服务器编号,YYY表示服务器的IP地址,A为LF通信端口,表示该服务器与集群中的leader交换的信息的端口。B为选举端口,表示选举新leader时服务器间相互通信的端口(当leader挂掉时,其余服务器会相互通信,选择出新的leader)。一般来说,集群中每个服务器的A端口都是一样,每个服务器的B端口也是一样。但是当所采用的为伪集群时,IP地址都一样,只能时A端口和B端口不一样。

1 # The number of milliseconds of each tick
 2 # tickTime:CS通信心跳数
 3 # Zookeeper 服务器之间或客户端与服务器之间维持心跳的时间间隔,也就是每个 tickTime 时间就会发送一个心跳。tickTime以毫秒为单位。
 4 tickTime=2000
 5
 6 # The number of ticks that the initial
 7 # synchronization phase can take
 8 # initLimit:LF初始通信时限
 9 # 集群中的follower服务器(F)与leader服务器(L)之间初始连接时能容忍的最多心跳数(tickTime的数量)。
10 initLimit=5
11
12 # The number of ticks that can pass between
13 # sending a request and getting an acknowledgement
14 # syncLimit:LF同步通信时限
15 # 集群中的follower服务器与leader服务器之间请求和应答之间能容忍的最多心跳数(tickTime的数量)。
16 syncLimit=2
17
18 # the directory where the snapshot is stored.
19 # do not use /tmp for storage, /tmp here is just
20 # example sakes.
21 # dataDir:数据文件目录
22 # Zookeeper保存数据的目录,默认情况下,Zookeeper将写数据的日志文件也保存在这个目录里。
23 dataDir=/data/soft/zookeeper-3.4.12/data
24
25
26 # dataLogDir:日志文件目录
27 # Zookeeper保存日志文件的目录。
28 dataLogDir=/data/soft/zookeeper-3.4.12/logs
29
30 # the port at which the clients will connect
31 # clientPort:客户端连接端口
32 # 客户端连接 Zookeeper 服务器的端口,Zookeeper 会监听这个端口,接受客户端的访问请求。
33 clientPort=2181
34
35 # the maximum number of client connections.
36 # increase this if you need to handle more clients
37 #maxClientCnxns=60
38 #
39 # Be sure to read the maintenance section of the
40 # administrator guide before turning on autopurge.
41 #
42 # http://zookeeper.apache.org/doc/current/zookeeperAdmin.html#sc_maintenance
43 #
44 # The number of snapshots to retain in dataDir 保留数量3
45 autopurge.snapRetainCount=3
46 # Purge task interval in hours
47 # Set to "0" to disable auto purge feature 清理时间间隔1小时
48 autopurge.purgeInterval=1
49
50
51 # 服务器名称与地址:集群信息(服务器编号,服务器地址,LF通信端口,选举端口)
52 # 这个配置项的书写格式比较特殊,规则如下:
53
54 # server.N=YYY:A:B
55
56 # 其中N表示服务器编号,YYY表示服务器的IP地址,A为LF通信端口,表示该服务器与集群中的leader交换的信息的端口。B为选举端口,表示选举新leader时服务器间相互通信的端口(当leader挂掉时,其余服务器会相互通信,选择出新的leader)。一般来说,集群中每个服务器的A端口都是一样,每个服务器的B端口也是一样。但是当所采用的为伪集群时,IP地址都一样,只能时A端口和B端口不一样。
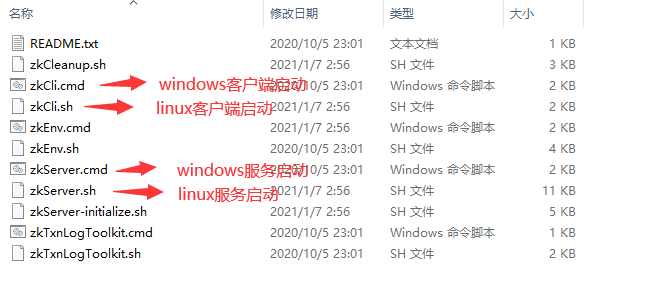
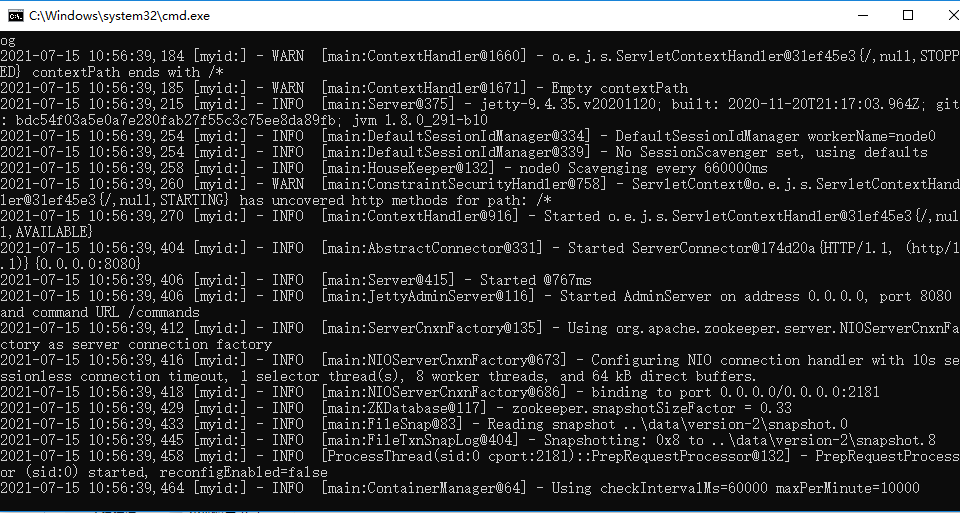
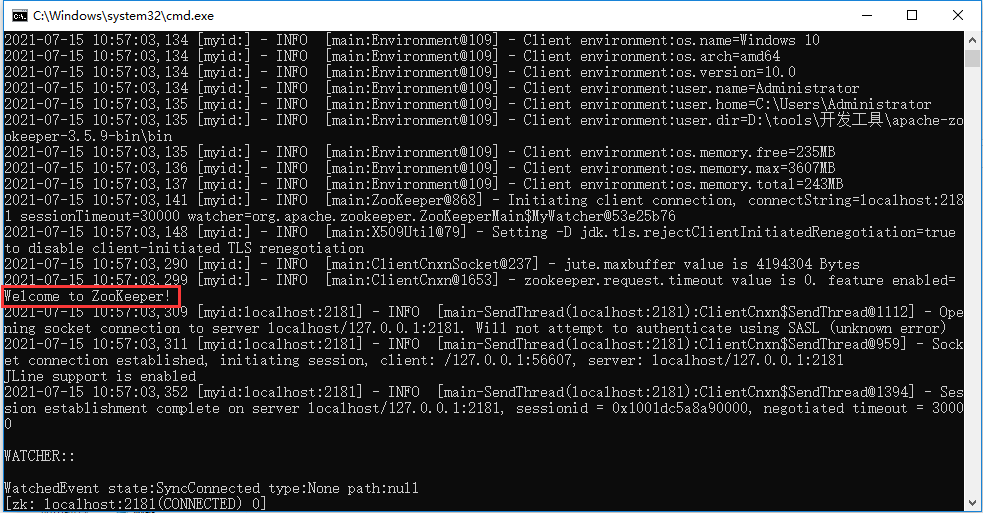
5.启动Zookeeper
三.Zookeeper基本命令
help 查看所有命令
ls  查看根路径下的节点 ls /
create  创建普通的永久节点 create /hello "helloword"
create -s 创建带序号的永久节点 create -s /app1 "app1 node"
create -e 创建普通的临时节点 create -e /app2 "app2 node"
create -e -s 创建带序号的临时节点 create -e -s /app3 "app3 node"
get 查找节点数据 get /hello
stat 查看节点状态 stat /hello
set 修改节点数据 set /hello 'hello node'
delete 删除节点 delete /hello(设hello节点下没子节点)
deleteall 递归删除节点 deleteall /hello (设hello节点下有子节点)
四.Zookeeper通过java实现的demo
1.需要引入的pom依赖
 <dependency>
            <groupId>junit</groupId>
            <artifactId>junit</artifactId>
            <version>4.12</version>
            <scope>test</scope>
        </dependency>
        <dependency>
            <groupId>org.apache.zookeeper</groupId>
            <artifactId>zookeeper</artifactId>
            <version>3.4.7</version>
        </dependency>

        <dependency>
            <groupId>org.apache.curator</groupId>
            <artifactId>curator-framework</artifactId>
            <version>4.0.1</version>
        </dependency>

        <dependency>
            <groupId>org.apache.curator</groupId>
            <artifactId>curator-recipes</artifactId>
            <version>4.0.1</version>
        </dependency>
        <dependency>
            <groupId>junit</groupId>
            <artifactId>junit</artifactId>
            <version>3.8.2</version>
            <scope>compile</scope>
        </dependency>
        <dependency>
            <groupId>junit</groupId>
            <artifactId>junit</artifactId>
            <version>RELEASE</version>
            <scope>compile</scope>
        </dependency>
2.创建测试类
import org.apache.curator.RetryPolicy;
import org.apache.curator.framework.CuratorFramework;
import org.apache.curator.framework.CuratorFrameworkFactory;
import org.apache.curator.retry.ExponentialBackoffRetry;
import org.apache.zookeeper.CreateMode;
import org.junit.Before;
import org.junit.Test;

public class ZookeeperApiTest {

    private  CuratorFramework client = null;
    /**
     * 创建客户端
     * 1.创建连接失败重试策略对象
     * 2.创建客户端对象
     */
    @Before
    public void before(){

        /**创建重试的连接对象
         *RetryPolicy接口 失败重试策略的公共接口;ExponentialBackoffRetry 实现类 是失败重试celue接口实现类
         * 参数1:两次重试之间等待的初始时间(单位:毫秒)
         * 参数2:最大重试次数
         */
        RetryPolicy retryPolicy = new ExponentialBackoffRetry(3000,3);
        /**
         * 创建客户端对象
         * 参数1:连接zookeeper服务器IP地址和端口号
         * 参数2:会话超时时间(单位:毫秒)
         * 参数3:连接超时时间(单位:毫秒)
         * 参数4:失败失败重试策略
         */
        client = CuratorFrameworkFactory.newClient("127.0.0.1:2181", 1000, 1000, retryPolicy);
    }

    /**
     * 创建节点
     * 1.开启客户端(会阻塞到会话连接成功为止)
     * 2.创建节点
     * 3.关闭节点
     */
    @Test
    public void createNode() throws Exception {
        //开启客户端
        client.start();
        // 方式一:创建一个空节点(只能创建一个节点)
        //client.create().forPath("/app1");
        //方式二:创建一个有内容的节点(只能创建一层节点)
        //client.create().forPath("/app2","app2 node".getBytes());
        //方式三:创建多层节点
        //client.create().creatingParentsIfNeeded().forPath("/app3/a","a node".getBytes());
        //创建持久性节点(CreateMode.PERSISTENT)
        //client.create().creatingParentsIfNeeded().withMode(CreateMode.PERSISTENT).forPath("/app3/b","b node".getBytes());
        //创建带序号持久性节点(CreateMode.PERSISTENT)
        //client.create().creatingParentsIfNeeded().withMode(CreateMode.PERSISTENT_SEQUENTIAL).forPath("/app3/c","c node".getBytes());
        //创建临时节点
        //client.create().creatingParentsIfNeeded().withMode(CreateMode.EPHEMERAL).forPath("/app3/d","d node".getBytes());
        // 创建带序号临时节点
        client.create().creatingParentsIfNeeded().withMode(CreateMode.EPHEMERAL_SEQUENTIAL).forPath("/app3/e","e node".getBytes());


        Thread.sleep(10000);
        // 关闭客户端
        client.close();
    }

    /**
     * 修改节点数据
     * 1.开启客户端
     * 2.修改节点
     * 3.关闭客户端
     */
    @Test
    public void updateNode() throws Exception {
        // 1.开启客户端
        client.start();
        //2.修改节点
        client.setData().forPath("/app1","app1 node".getBytes());
        //3.关闭客户端
        client.close();
    }

    /**
     * 获取节点数据
     * 1.开启客户端
     * 2.获取节点数据
     * 3.关闭客户端
     */
    @Test
    public void  findNode() throws Exception {
        // 1.开启客户端
        client.start();
        //2.获取节点数据
        byte[] bytes = client.getData().forPath("/app1");
        System.out.println("节点数据:"+new String(bytes));
        //3.关闭客户端
        client.close();
    }

    /**
     * 删除节点
     * 1.开启客户端
     * 2.删除节点
     * 3.关闭客户端
     */
    @Test
    public void deleteNode() throws Exception {
        // 1.开启客户端
        client.start();
        //方式1:删除一个子节点(此节点下面不能有子节点)
        //client.delete().forPath("/app1");
        //方式2:带有节点并递归删除其子节点
        //client.delete().deletingChildrenIfNeeded().forPath("/app3");
        //方式3:强制保证删除一个节点
        client.delete().guaranteed().forPath("/app2");
        //3.关闭客户端
        client.close();
    }

}