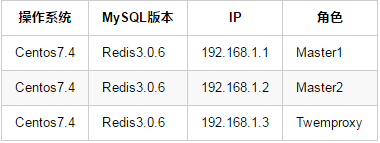
Redis 集群和主从不同,是把所有的数据按照算法分布在每一个节点上。
这里分别使用第三方 Twemproxy 和官方 Cluster 集群工具搭建
- Twemproxy
- 优点:代理的方式,不用Redis相应的设置,对持久化不友好,适合做纯缓存
- 缺点:当添加、删除或者修改节点时,需要重新导入所有的数据。
- Cluster
- 优点:没有服务端,可以在任意节点进入集群,主从自动切换
- 缺点:需要集群自行处理数据。节点之间通信,使用带宽大
Redis集群之Twemproxy(nutcracker)
Twemproxy 是Twitter开源的一个 Redis 和 Memcache 集群工具
Twemproxy 后端的redis服务器不需要额外的配置,Twemproxy 会通过hash算法选择某个配置的后端 Redis 服务器去分配 key
Twemproxy 只有一个库,集群不支持多库
Twemproxy 不支持所有的 Redis 命令:
Twemproxy和Redis命令兼容性列表
Twemproxy 编译安装

Master1和Master2分别安装Redis并启动,不做主从
## 安装Twemproxy和使用过程需要的YUM包
[root@Twemproxy ~]# yum install gcc wget unzip libtool autoconf -y
## 下载Twemproxy源码包
[root@Twemproxy ~]# wget https://codeload.github.com/twitter/twemproxy/zip/master
## 解压Twemproxy源码包
[root@Twemproxy ~]# unzip master
## 进入到Twemproxy源码包
[root@Twemproxy ~]# cd twemproxy-master/
## 安装Twemproxy源码包
[root@Twemproxy twemproxy-master]# CFLAGS="-ggdb3 -O0" autoreconf -fvi
[root@Twemproxy twemproxy-master]# ./configure --prefix=/soft/twemproxy --enable-debug=log
[root@Twemproxy twemproxy-master]# make && make install
## 查看Twemproxy软件版本
[root@Twemproxy twemproxy-master]# /soft/twemproxy/sbin/nutcracker -V
This is nutcracker-0.4.1
配置Twemproxy
## 创建相应的目录
[root@Twemproxy ~]# mkdir -p /soft/twemproxy/{conf,log}
## 写入配置文件(遵循YAML格式)
[root@Twemproxy ~]# vim /soft/twemproxy/conf/nutcracker.yml
beta:
  listen: 192.168.1.3:22122 ## 使用本机IP和端口
  redis: true ## 是否是Redis的proxy
  hash: fnv1a_64 ## 指定具体的hash函数
  hash_tag: "{}"  ## 值内有{},取括号内计算
  distribution: ketama ## 具体的hash算法
  auto_eject_hosts: false ## 是否在结点无法响应的时候临时摘除结点
  timeout: 4000 ## 超时时间(毫秒)
  server_retry_timeout: 2000 ## 重试的时间(毫秒)
#  redis_auth: 认证密码  ## 如果Redis有密码认证,这里验证
  servers: ## 下面表示所有的Redis节点(IP:端口号:权重:实例)
    - 192.168.1.1:6379:1 master0
    - 192.168.1.2:6379:1 master1
## 检测配置文件有没有语法错误
[root@Twemproxy ~]# /soft/twemproxy/sbin/nutcracker -t -c /soft/twemproxy/conf/nutcracker.yml
nutcracker: configuration file '/soft/twemproxy/conf/nutcracker.yml' syntax is ok
Twemproxy 配置文件用的是 YAML 语法,YAML 语法主要有三个规范:
- 缩进:和 Python 一样,YAML 使用缩进表示数据关系,建议两个空格(有的服务配置文件强制两个空格,比如 SaltStack,为了以后,还是两个空格吧),不建议使用Tab
- 冒号:冒号后面不是空格就是换行
- 短横线:短横线后面一定是空格,短横线表示选项
Twemproxy 启动
[root@Twemproxy ~]# /soft/twemproxy/sbin/nutcracker -d -c /soft/twemproxy/conf/nutcracker.yml -p /soft/twemproxy/log/redisproxy.pid -o /soft/twemproxy/log/redisproxy.log -a 192.168.1.3
## 验证启动
[root@Twemproxy ~]# lsof -i :22122
COMMAND PID USER FD TYPE DEVICE SIZE/OFF NODE NAME
nutcracke 7709 root 6u IPv4 41298 0t0 TCP bogon:22122 (LISTEN)
Twemproxy 启动的参数
-h, --help : this help
-V, --version : show version and exit
-t, --test-conf : test configuration for syntax errors and exit
-d, --daemonize : run as a daemon
-D, --describe-stats : print stats description and exit
-v, --verbose=N : set logging level (default: 5, min: 0, max: 11)
-o, --output=S : set logging file (default: stderr)
-c, --conf-file=S : set configuration file (default: conf/nutcracker.yml)
-s, --stats-port=N : set stats monitoring port (default: 22222)
-a, --stats-addr=S : set stats monitoring ip (default: 0.0.0.0)
-i, --stats-interval=N : set stats aggregation interval in msec (default: 30000 msec)
-p, --pid-file=S : set pid file (default: off)
-m, --mbuf-size=N : set size of mbuf chunk in bytes (default: 16384 bytes)
验证 Twemproxy
## 添加500个数据
[root@Twemproxy ~]# for line in `seq -w 500`;do
  /soft/redis/bin/redis-cli -h 192.168.1.3 -p 22122 set key_${line} value_${line}
done
## 查看Master1节点数据情况
[root@Master1 ~]# /soft/redis/bin/redis-cli info Keyspace
# Keyspace
db0:keys=100,expires=0,avg_ttl=0
## 查看Master2节点数据情况
[root@Master2 ~]# /soft/redis/bin/redis-cli info Keyspace
# Keyspace
db0:keys=400,expires=0,avg_ttl=0
Redis集群之Cluster
Cluster 在3.0之后 Redis 自带的集群工具
Cluster 集群去中心化,只要通过其中一个入口连接即可
Cluster 只有一个库,集群不支持多库。支持主从自动切换
Cluster 集群配置
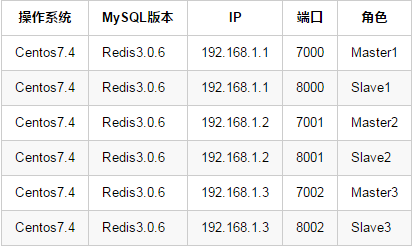
这里为了效果用了三个服务器,每台服务器一对主从。其中端口7开头的为主,8开头的为从
环境搭建
源码安装Redis、相应的目录和配置文件优化简单优化就不介绍了
## 创建目录
[root@Master1 ~]# mkdir /soft/redis/7000/{conf,data,log,var} -p
## 复制配置文件到相应的目录
[root@Master1 ~]# cp /soft/redis/conf/redis.conf /soft/redis/7000/conf/
## 修改7000目录配置文件里下面几项
[root@Master1 ~]# vim /soft/redis/7000/conf/redis.conf
cluster-enabled yes     ## 开启Cluster集群
cluster-config-file nodes-7000.conf      ## 集群内部配置文件
port 7000
logfile "/soft/redis/7000/redis.log"
pidfile /soft/redis/7000/redis.pid
dir /soft/redis/7000/data/
daemonize yes
## 拷贝7000一份目录
[root@Master1 ~]# cp -rf /soft/redis/7000/ /soft/redis/8000
## 把8000目录配置文件里所有7000改成8000
[root@Master1 ~]# sed -i 's#7000#8000#g' /soft/redis/8000/conf/redis.conf
## 把目录复制到另外两个服务器上
[root@Master1 ~]# scp -r /soft/redis/7000/ root@192.168.1.2:/soft/redis/7001
[root@Master1 ~]# scp -r /soft/redis/7000/ root@192.168.1.2:/soft/redis/8001
[root@Master1 ~]# scp -r /soft/redis/7000/ root@192.168.1.3:/soft/redis/7002
[root@Master1 ~]# scp -r /soft/redis/7000/ root@192.168.1.3:/soft/redis/8002
## 到Master2上修改配置文件
[root@Master2 ~]# sed -i 's#7000#7001#g' /soft/redis/7001/conf/redis.conf
[root@Master2 ~]# sed -i 's#7000#8001#g' /soft/redis/8001/conf/redis.conf
## 到Master3上修改配置文件
[root@Master3 ~]# sed -i 's#7000#7002#g' /soft/redis/7002/conf/redis.conf
[root@Master3 ~]# sed -i 's#7000#8002#g' /soft/redis/8002/conf/redis.conf
启动所有Redis
## Master1
[root@Master1 ~]# /soft/redis/bin/redis-server /soft/redis/7000/conf/redis.conf
[root@Master1 ~]# /soft/redis/bin/redis-server /soft/redis/8000/conf/redis.conf
## Master2
[root@Master2 ~]# /soft/redis/bin/redis-server /soft/redis/7001/conf/redis.conf
[root@Master2 ~]# /soft/redis/bin/redis-server /soft/redis/8001/conf/redis.conf
## Master3
[root@Master3 ~]# /soft/redis/bin/redis-server /soft/redis/7002/conf/redis.conf
[root@Master3 ~]# /soft/redis/bin/redis-server /soft/redis/8002/conf/redis.conf
安装Redis集群管理工具 redis-trib.rb
redis-trib.rb 是redis集群的命令行工具,我们可以通过使用这个工具非常方便的创建和维护我们的集群。可以帮助我们检查槽位信息,进行槽位迁移和均衡等想过的运维操作。
安装 redis-trib.rb 需要大于2.2版本的ruby,默认源不足,这里需要增加源
## 增加yum源
[root@Master1 ~]# yum install centos-release-scl-rh -y
## 安装ruby
[root@Master1 ~]# yum install rh-ruby23 -y
 ## 选择使用ruby版本
[root@Master1 ~]# scl enable rh-ruby23 bash
## 查看ruby版本
[root@Master1 ~]# ruby -v
ruby 2.3.8p459 (2018-10-18 revision 65136) [x86_64-linux]
## 安装redis接口
[root@Master1 ~]# gem install redis
使用redis-trib.rb 创建集群
[root@Master1 ~]# /soft/redis-3.0.6/src/redis-trib.rb create --replicas 1 192.168.1.1:7000 192.168.1.1:8000 192.168.1.2:7001 192.168.1.2:8001 192.168.1.3:7002 192.168.1.3:8002之后会给出集群方案,包含主从方案。以及槽位分配方案,我们同意方案的话,输入“yes”即可
连接 Cluster 集群
因为 Cluster 是去中心化(没有服务端),所以连接任意节点都可以连接集群。这里要注意的是,需要加
-c代表操作集群
## -c 代表对集群操作,在操作过程会根据写入数据自动切换节点
[root@Master1 ~]# /soft/redis/bin/redis-cli -c -h 192.168.1.3 -p 7002
## 导入500条数据查看节点存储情况
[root@Master1 ~]# for line in `seq -w 500`;do /soft/redis/bin/redis-cli -h 192.168.1.3 -p 7002 -c set key_${line} value_${line}; done
## Master1主
[root@Master1 ~]# /soft/redis/bin/redis-cli -h 192.168.1.1 -p 7000 info Keyspace
# Keyspace
db0:keys=168,expires=0,avg_ttl=0
## Master2主
[root@Master1 ~]# /soft/redis/bin/redis-cli -h 192.168.1.2 -p 7001 info Keyspace
# Keyspace
db0:keys=167,expires=0,avg_ttl=0
## Master3主
[root@Master1 ~]# /soft/redis/bin/redis-cli -h 192.168.1.3 -p 7002 info Keyspace
# Keyspace
db0:keys=165,expires=0,avg_ttl=0
检测集群角色
## 每个节点会生成一个40位的16进制的ID,从是指向主的ID
[root@Master1 ~]# /soft/redis-3.0.6/src/redis-trib.rb check 192.168.1.2:7001
/soft/redis-3.0.6/src/redis-trib.rb:1573: warning: key "threshold" is duplicated and overwritten on line 1573
>>> Performing Cluster Check (using node 192.168.1.1:7000)
M: 57fc1b96be5acecc9d6576942fd26e54da51af18 192.168.1.1:7000
   slots:0-5460 (5461 slots) master
   1 additional replica(s)
M: a3c6917cfd88ce1dedc1b33a3ac4166c3d45281d 192.168.1.3:7002
   slots:10923-16383 (5461 slots) master
   1 additional replica(s)
M: 185fb47cd71fb0d0f23eba02af4f05e8c9769c9d 192.168.1.2:7001
   slots:5461-10922 (5462 slots) master
   1 additional replica(s)
S: da4cfe5f3277368393bad87853366fa0703a27ce 192.168.1.3:8002
   slots: (0 slots) slave
   replicates a3c6917cfd88ce1dedc1b33a3ac4166c3d45281d
S: 282b4b7ea7c6dc24f5c4a1c2f31ebd39c4e1b692 192.168.1.1:8000
   slots: (0 slots) slave
   replicates 185fb47cd71fb0d0f23eba02af4f05e8c9769c9d
S: 4513285491f62aaf2cb944e68dd0af4559e94a04 192.168.1.2:8001
   slots: (0 slots) slave
   replicates 57fc1b96be5acecc9d6576942fd26e54da51af18
[OK] All nodes agree about slots configuration.
>>> Check for open slots...
>>> Check slots coverage...
[OK] All 16384 slots covered.
我们把Master1主库down掉,看看角色变化
[root@Master1 ~]# /soft/redis/bin/redis-cli -h 192.168.1.1 -p 7000 shutdown
## 从会顶上去
[root@Master1 ~]# /soft/redis-3.0.6/src/redis-trib.rb check 192.168.1.2:7001
/soft/redis-3.0.6/src/redis-trib.rb:1573: warning: key "threshold" is duplicated and overwritten on line 1573
>>> Performing Cluster Check (using node 192.168.1.2:7001)
M: 185fb47cd71fb0d0f23eba02af4f05e8c9769c9d 192.168.1.2:7001
   slots:5461-10922 (5462 slots) master
   1 additional replica(s)
S: 282b4b7ea7c6dc24f5c4a1c2f31ebd39c4e1b692 192.168.1.1:8000
   slots: (0 slots) slave
   replicates 185fb47cd71fb0d0f23eba02af4f05e8c9769c9d
M: a3c6917cfd88ce1dedc1b33a3ac4166c3d45281d 192.168.1.3:7002
   slots:10923-16383 (5461 slots) master
   1 additional replica(s)
M: 4513285491f62aaf2cb944e68dd0af4559e94a04 192.168.1.2:8001
   slots:0-5460 (5461 slots) master
   0 additional replica(s)
S: da4cfe5f3277368393bad87853366fa0703a27ce 192.168.1.3:8002
   slots: (0 slots) slave
   replicates a3c6917cfd88ce1dedc1b33a3ac4166c3d45281d
[OK] All nodes agree about slots configuration.
>>> Check for open slots...
>>> Check slots coverage...
[OK] All 16384 slots covered.
原来down掉的主库启动也不会再切换,主库会变成从库。手动切换可以执行 cluster failover
使用 Python 操作 Redis-Cluster 集群
需要安装 Python 扩展
redis-py-cluster来操作集群
## 安装Python包管理工具pip
[root@Master1 ~]# yum install python-pip
## 安装redis-py-cluster
[root@Master1 ~]# pip install redis-py-cluster
## 写一个Python脚本
[root@Master1 ~]# vim edit_redis.py
# -*- coding:utf-8 -*-
from rediscluster import StrictRedisCluster
redis_nodes = [{'host':'192.168.1.1','port':7000},
                    {'host':'192.168.1.2','port':7001},
                    {'host':'192.168.1.3','port':7002},
                    {'host':'192.168.1.1','port':8000},
                    {'host':'192.168.1.2','port':8001},
                    {'host':'192.168.1.3','port':8002}
]
redisconn = StrictRedisCluster(startup_nodes=redis_nodes)
redisconn.set('username','zhaoliu')
print(redisconn.get('username'))
## 执行一下脚本
[root@Master3 ~]# python edit_redis.py
zhaoliu