Mysql的主从架构模式,是很多企业广泛使用,并且大家所广为熟知的一种架构模式,这是 DBA 所应该熟练掌握的技能。
- Mysql主从复制主要用途
- 用于备份,避免影响业务
- 实时灾备,用于故障切换
- 读写分离,提供查询服务
- Mysql主从复制存在的问题
- 主库宕机后, 数据可能丢失
- 主库写压力大, 复制可能会延时
- Mysql主从复制解决方法
- 半同步复制、或者全同步复制. 要求: Mysql5.7版本
- 并行复制, 解决从库复制延迟的问题. 建议: 5.7版
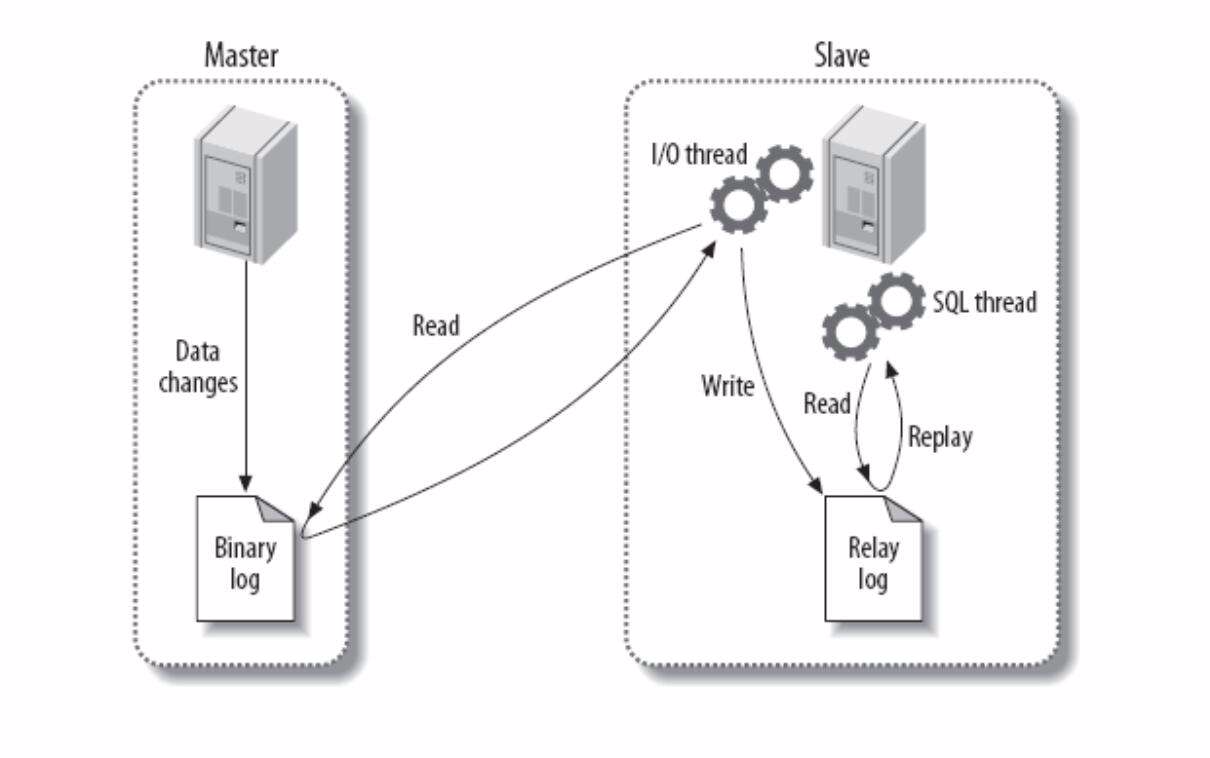
- Mysql主从复制原理
- 在主库上把将更改 DDL DML DCL 记录到二进制日志
Binary Log中 - 备库 I/O 线程将主库上的二进制日志复制到自己的中继日志
Relay Log中 - 备库 SQL 线程读取中继日志中的事件,将其重放到备库数据库之上
- 在主库上把将更改 DDL DML DCL 记录到二进制日志
Mysql传统复制
如果虚拟机是克隆的改一下uuid,避免 uuid 相同
配置好了的话,可以在/var/lib/auto.cnf里面的 uuid
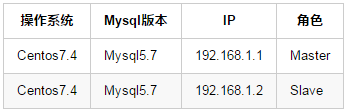
环境准备
## 更改本地主机名字(角色为Master)
[root@Mysql ~]# hostnamectl set-hostname Master
[root@Mysql ~]# bash
## 更改本地主机名字(角色为Slave)
[root@Mysql ~]# hostnamectl set-hostname Slave
[root@Mysql ~]# bash
## 两台服务器相同配置
[root@Master ~]# systemctl stop firewalld
[root@Master ~]# systemctl disable firewalld
[root@Master ~]# setenforce 0
## 两台服务器的 /etc/hosts 文件配置
[root@Master ~]# cat > /etc/hosts << EOF
192.168.1.1 Master
192.168.1.2 Slave
EOF
Master 配置
为了效果需要模拟先上数据这里就不赘述了。。。
## 配置文件 /etc/my.cnf
log-bin
server-id=1
## 重启 mysql 服务生效
[root@Master ~]# systemctl restart mysqld
## 创建用户并授权 , 允许能够远程连接的主机 (replicaiton)
mysql> grant replication slave, replication client on *.* to 'slave'@'192.168.1.%' identified by 'Sgy123.com';
## 导出当前数据
[root@Master ~]# mysqldump -uroot -p'Sgy123.com' --all-databases --single-transaction --master-data=1 --flush-logs > /root/db-$(date +%F)-all.sql
## 将备份文件传送至 Slave
[root@Master ~]# scp /root/db-2019-04-11-all.sql root@Slave:/root
Slave 配置
Slave 也需要开启
binlog二进制日志,server-id和 Master 不一样
## 配置文件 /etc/my.cnf
log-bin
server-id=2
## 重启 mysql 服务生效
[root@Master ~]# systemctl restart mysqld
## 检查是否能使用远程账户登录
[root@Slave ~]# mysql -hMaster -u'slave' -p'Sgy123.com'
## 登陆本地数据库,导入 Master 数据
[root@Slave ~]# grep 'password' /var/log/mysqld.log
2019-04-11T08:23:19.180675Z 1 [Note] A temporary password is generated for root@localhost: laC!!trni8Og
[root@Slave ~]# mysql -uroot -p'laC!!trni8Og'
mysql> alter user root@'localhost' identified by 'Sgy123.com';
mysql> source /root/db-2019-04-11-all.sql
## 指向 Master
mysql> change master to master_host='Master',master_user='slave',master_password='Sgy123.com';
## 启动slave角色
mysql> start slave;
## 查看角色是否同步(Slave_IO_Running和Slave_SQL_Running都为Yes就是同步了)
mysql> show slave statusG
Mysql Gtid复制

如果虚拟机是克隆的改一下uuid,避免 uuid 相同
配置好了的话,可以在/var/lib/auto.cnf里面的 uuid
环境准备
## 更改本地主机名字(角色为Master)
[root@Mysql ~]# hostnamectl set-hostname Master
[root@Mysql ~]# bash
## 更改本地主机名字(角色为Slave)
[root@Mysql ~]# hostnamectl set-hostname Slave
[root@Mysql ~]# bash
## 两台服务器相同配置
[root@Master ~]# systemctl stop firewalld
[root@Master ~]# systemctl disable firewalld
[root@Master ~]# setenforce 0
## 两台服务器的 /etc/hosts 文件配置
[root@Master ~]# cat > /etc/hosts << EOF
192.168.1.1 Master
192.168.1.2 Slave
EOF
Master 配置
为了效果需要模拟先上数据这里就不赘述了。。。
## 配置文件 /etc/my.cnf
log-bin
server-id=1
gtid_mode = ON
enforce_gtid_consistency=1
## 重启 Mysql 服务生效
[root@Master ~]# systemctl restart mysqld
## 创建用户并授权 , 允许能够远程连接的主机 (replicaiton)
mysql> grant replication slave, replication client on *.* to 'slave'@'192.168.1.%' identified by 'Sgy123.com';
## 导出当前数据
[root@Master ~]# mysqldump -uroot -p'Sgy123.com' --all-databases --single-transaction --master-data=1 --flush-logs > /root/db-$(date +%F)-all.sql
## 将备份文件传送至 Slave
[root@Master ~]# scp /root/db-2019-04-11-all.sql root@Slave:/root
Slave 配置
## 检查是否能使用远程账户登录
[root@Slave ~]# mysql -hMaster -u'slave' -p'Sgy123.com'
## 修改配置文件/etc/my.cnf
log-bin
server-id=2
gtid_mode = ON
enforce_gtid_consistency=1
## 重启Mysql数据库服务
[root@Slave ~]# systemctl restart mysqld
## 导入数据
mysql> source /root/db-2019-04-12-all.sql
## 指向Master,gtid自动协商同步
mysql> change master to master_host='Master',master_user='slave',master_password='Sgy123.com',master_auto_position=1;
## 启动slave角色
mysql> start slave;
## 查看角色是否同步(Slave_IO_Running和Slave_SQL_Running都为Yes就是同步了)
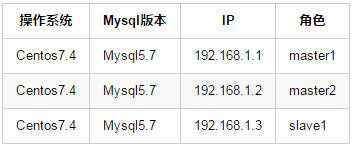
mysql> show slave statusGMysql双主复制和双主多从复制
双主复制是基于gtid的主从架构演变,我会先搭建双主复制,再在双主复制基础上增加从
如果虚拟机是克隆的改一下uuid,避免 uuid 相同
配置好了的话,可以在/var/lib/auto.cnf里面的 uuid
环境准备
## 更改本地主机名字(角色为master1)
[root@Mysql ~]# hostnamectl set-hostname master1
[root@Mysql ~]# bash
## 更改本地主机名字(角色为master2)
[root@Mysql ~]# hostnamectl set-hostname master2
[root@Mysql ~]# bash
## 更改本地主机名字(角色为slave1,只做双主复制用不到本主机)
[root@Mysql ~]# hostnamectl set-hostname slave1
[root@Mysql ~]# bash
## 多台服务器相同配置
[root@master1 ~]# systemctl stop firewalld
[root@master1 ~]# systemctl disable firewalld
[root@master1 ~]# setenforce 0
## 两台服务器的 /etc/hosts 文件配置
[root@Master ~]# cat > /etc/hosts << EOF
192.168.1.1 master1
192.168.1.2 master2
192.168.1.3 slave1
EOF
master1 配置
再说一遍,为了效果需要模拟先上数据这里就不赘述了。。。
## 配置文件 /etc/my.cnf
log-bin
server-id=1
gtid_mode = ON
enforce_gtid_consistency=1
## 重启Mysql数据库服务
[root@master1 ~]# systemctl restart mysqld
## 创建用户并授权 , 允许能够远程连接的主机 (replicaiton)
mysql> grant replication slave, replication client on *.* to 'master'@'192.168.1.%' identified by 'Sgy123.com';
## 导出当前数据
[root@master1 ~]# mysqldump -uroot -p'Sgy123.com' --all-databases --single-transaction --master-data=1 --flush-logs > /root/db-$(date +%F)-all.sql
## 将备份文件传送至 master2
[root@master1 ~]# scp db-2019-04-13-all.sql root@master2:/root/
master2 配置
## 检查是否能使用远程账户登录
[root@master2 ~]# mysql -hmaster1 -umaster -p'Sgy123.com'
## 配置文件 /etc/my.cnf
log-bin
server-id=2
gtid_mode = ON
enforce_gtid_consistency=1
## 重启Mysql数据库服务
[root@master2 ~]# systemctl restart mysqld
## 导入数据
mysql> source /root/db-2019-04-13-all.sql
## 指定master
mysql> reset master;
mysql> change master to master_host='master1',master_user='master',master_password='Sgy123.com',master_auto_position=1;
## 启动slave角色
mysql> start slave;
## 查看角色是否同步(Slave_IO_Running和Slave_SQL_Running都为Yes就是同步了)
mysql> show slave statusG
master1 配置
## 刷新权限
mysql> flush privileges;
## 指定master
mysql> change master to master_host='master2',master_user='master',master_password='Sgy123.com',master_auto_position=1;
## 启动slave角色
mysql> start slave;
## 查看角色是否同步(Slave_IO_Running和Slave_SQL_Running都为Yes就是同步了)
mysql> show slave statusG
双主复制完成了,接下了增加从数据库
slave1 配置
我这里添加一个从数据库。一样的配置,就是
server-id和其他的数据库不一样
## 检查是否能使用远程账户登录
[root@slave1 ~]# mysql -hmaster1 -umaster -p'Sgy123.com'
[root@slave1 ~]# mysql -hmaster2 -umaster -p'Sgy123.com'
## 配置文件 /etc/my.cnf
log-bin
server-id=3
gtid_mode = ON
enforce_gtid_consistency=1
master-info-repository=TABLE
relay-log-info-repository=TABLE
## 重启Mysql数据库服务
[root@slave1 ~]# systemctl restart mysqld
## 把备份文件传送过来
[root@slave1 ~]# scp root@master1:/root/db-2019-04-13-all.sql /root/
## 导入数据
mysql> source /root/db-2019-04-13-all.sql
## 指定两个master
mysql> reset master;
mysql> change master to master_host='master1',master_user='master',master_password='Sgy123.com',master_auto_position=1 for channel 'master1-channel';
mysql> change master to master_host='master2',master_user='master',master_password='Sgy123.com',master_auto_position=1 for channel 'master2-channel';
## 启动slave角色
mysql> start slave;
## 查看角色是否同步(Slave_IO_Running和Slave_SQL_Running都为Yes就是同步了,不成功看一下Last_IO_Error报错)
mysql> show slave statusG