ElasticSearch介绍
1.ElasticSearch是一款基于Apache Lucene构建的开源高性能分布式开源搜索引擎。由于Lucene的复杂性以及构建搜索会有很多重复性的工作。
2.采用java编写并提供简单易用的Restful Api。
3.可以很容易横向扩展,能支持PB级别的结构化和非结构化数据处理。当存储容量不够时候可以不断的增加节点去扩容。
ElasticSearch应用场景
1.海量数据分析引擎,可以支持PB级别的数据分析,比如利用ElasticSearch提供的聚合搜索功能来从海量的日志数据中统计分析一些系统指标信息。
2.站内搜索引擎,这个应该使用最广最常用的地方。可以快速搭建站内搜索。比如维基百科,github都使用ElasticSearch做站内搜索。
3.数据仓库,可以利用ElasticSearch强大的分布式存储能力作为数据仓库是使用,为其他系统提供数据。
ElasticSearch基本概念
1.、ElasticSearch集群,ElasticSearch集群是由一个或者多个节点组成的集合。每一个集群都有一个唯一的名称,默认是elasticsearch,当然也可以自定义去设置cluster_name的值,cluster_name的值非常重要,一个节点就是通过集群的名称加入集群的。然后每一个节点都有自己的名称。节点是可以存储数据,参与集群索引数据,以及搜索数据的独立服务。
2. 索引,是含有相同属性的文档集合。
3. 类型,一个索引可以定义一个或者多个类型,文档必须属于一个类型。通常我们会定义有相同字段的文档作为一个类型。
4. 文档,文档是可以被索引的基本数据单位,比如一个用户的基本信息或者一篇文章的数据。索引在elasticsearch中是通过一个名称来识别的,必须是英文字母小写的,且不含中划线的,我们通过这个索引(名称)来对文档进行增删查改的操作。
5. 索引、类型、文档之间的关系,索引相当于数据库里面的database即数据库,类型相当于数据库里面的table即数据表,文档相当于数据库SQL里面的一行记录。
6. 分片,每个索引都有多个分片,每个分片是一个Lucene索引。
7. 备份,拷贝一份分片就完成了分片的备份。
注意:elasticsearch在创建索引的时候,默认创建5个分片,一份备份,这个数据可以进行修改。分片的数量只能在创建索引的时候进行指定,不能在后期进行修改,备份可以进行动态修改的。
ElasticSearch安装
ElasticSearch是基于java语言开发的,对jdk的版本是最低需要jdk1.8。
ElasticSearch官网:https://www.elastic.co/
安装前查看下java版本
songguojundeMBP:elasticsearch-5.5.2 songguojun$ java -version
java version "1.8.0_211"
Java(TM) SE Runtime Environment (build 1.8.0_211-b12)
Java HotSpot(TM) 64-Bit Server VM (build 25.211-b12, mixed mode)
使用的是华为云的镜像
songguojundeMBP:src songguojun$ wget https://mirrors.huaweicloud.com/elasticsearch/5.5.2/elasticsearch-5.5.2.tar.gz   #下载
--2020-03-07 14:29:01--  https://mirrors.huaweicloud.com/elasticsearch/5.5.2/elasticsearch-5.5.2.tar.gz
正在解析主机 mirrors.huaweicloud.com (mirrors.huaweicloud.com)... 117.78.24.36, 117.78.24.34, 117.78.24.32
正在连接 mirrors.huaweicloud.com (mirrors.huaweicloud.com)|117.78.24.36|:443... 已连接。
已发出 HTTP 请求,正在等待回应... 200 OK
长度:33485703 (32M) [application/octet-stream]
正在保存至: “elasticsearch-5.5.2.tar.gz”

elasticsearch-5.5.2.tar.gz   100%[===========================================>]  31.93M  1.80MB/s  用时 18s

2020-03-07 14:29:19 (1.82 MB/s) - 已保存 “elasticsearch-5.5.2.tar.gz” [33485703/33485703])
tar -vxf elasticsearch-5.5.2.tar.gz       #解压
cd elasticsearch-5.5.2                    #进入目录
songguojundeMBP:elasticsearch-5.5.2 songguojun$ ll
total 432
-rw-r--r--   1 songguojun  wheel   11358  8 14  2017 LICENSE.txt
-rw-r--r--   1 songguojun  wheel  194187  8 14  2017 NOTICE.txt
-rw-r--r--   1 songguojun  wheel    9549  8 14  2017 README.textile
drwxr-xr-x  17 songguojun  wheel     544  8 14  2017 bin/
drwxr-xr-x   5 songguojun  wheel     160  8 14  2017 config/             #ES配置目录
drwxr-xr-x  37 songguojun  wheel    1184  8 14  2017 lib/          #ES依赖的第三方库的目录
drwxr-xr-x  13 songguojun  wheel     416  8 14  2017 modules/       #ES模块目录
drwxr-xr-x   2 songguojun  wheel      64  8 14  2017 plugins/            #ES存放第三方插件目录
启动ES
启动后会有很多日志输出,如何判断ES启动成功呢,下面有starting ...和started字样说明就已经启动成功。
songguojundeMBP:elasticsearch-5.5.2 songguojun$ sh ./bin/elasticsearch
[2020-03-07T14:36:55,119][INFO ][o.e.n.Node               ] [] initializing ...
[2020-03-07T14:36:55,230][INFO ][o.e.e.NodeEnvironment    ] [Gwhirj3] using [1] data paths, mounts [[/ (/dev/disk1s1)]], net usable_space [21.9gb], net total_space [233.4gb], spins? [unknown], types [apfs]
[2020-03-07T14:36:55,231][INFO ][o.e.e.NodeEnvironment    ] [Gwhirj3] heap size [1.9gb], compressed ordinary object pointers [true]
[2020-03-07T14:36:55,232][INFO ][o.e.n.Node               ] node name [Gwhirj3] derived from node ID [Gwhirj31TU-KY1kyIQDgPw]; set [node.name] to override
[2020-03-07T14:36:55,234][INFO ][o.e.n.Node               ] version[5.5.2], pid[2724], build[b2f0c09/2017-08-14T12:33:14.154Z], OS[Mac OS X/10.14.6/x86_64], JVM[Oracle Corporation/Java HotSpot(TM) 64-Bit Server VM/1.8.0_211/25.211-b12]
[2020-03-07T14:36:55,235][INFO ][o.e.n.Node               ] JVM arguments [-Xms2g, -Xmx2g, -XX:+UseConcMarkSweepGC, -XX:CMSInitiatingOccupancyFraction=75, -XX:+UseCMSInitiatingOccupancyOnly, -XX:+AlwaysPreTouch, -Xss1m, -Djava.awt.headless=true, -Dfile.encoding=UTF-8, -Djna.nosys=true, -Djdk.io.permissionsUseCanonicalPath=true, -Dio.netty.noUnsafe=true, -Dio.netty.noKeySetOptimization=true, -Dio.netty.recycler.maxCapacityPerThread=0, -Dlog4j.shutdownHookEnabled=false, -Dlog4j2.disable.jmx=true, -Dlog4j.skipJansi=true, -XX:+HeapDumpOnOutOfMemoryError, -Des.path.home=/usr/local/src/elasticsearch-5.5.2]
[2020-03-07T14:36:56,430][INFO ][o.e.p.PluginsService     ] [Gwhirj3] loaded module [aggs-matrix-stats]
[2020-03-07T14:36:56,430][INFO ][o.e.p.PluginsService     ] [Gwhirj3] loaded module [ingest-common]
[2020-03-07T14:36:56,430][INFO ][o.e.p.PluginsService     ] [Gwhirj3] loaded module [lang-expression]
[2020-03-07T14:36:56,430][INFO ][o.e.p.PluginsService     ] [Gwhirj3] loaded module [lang-groovy]
[2020-03-07T14:36:56,430][INFO ][o.e.p.PluginsService     ] [Gwhirj3] loaded module [lang-mustache]
[2020-03-07T14:36:56,431][INFO ][o.e.p.PluginsService     ] [Gwhirj3] loaded module [lang-painless]
[2020-03-07T14:36:56,431][INFO ][o.e.p.PluginsService     ] [Gwhirj3] loaded module [parent-join]
[2020-03-07T14:36:56,431][INFO ][o.e.p.PluginsService     ] [Gwhirj3] loaded module [percolator]
[2020-03-07T14:36:56,431][INFO ][o.e.p.PluginsService     ] [Gwhirj3] loaded module [reindex]
[2020-03-07T14:36:56,431][INFO ][o.e.p.PluginsService     ] [Gwhirj3] loaded module [transport-netty3]
[2020-03-07T14:36:56,431][INFO ][o.e.p.PluginsService     ] [Gwhirj3] loaded module [transport-netty4]
[2020-03-07T14:36:56,432][INFO ][o.e.p.PluginsService     ] [Gwhirj3] no plugins loaded
[2020-03-07T14:36:58,165][INFO ][o.e.d.DiscoveryModule    ] [Gwhirj3] using discovery type [zen]
[2020-03-07T14:36:58,934][INFO ][o.e.n.Node               ] initialized
[2020-03-07T14:36:58,934][INFO ][o.e.n.Node               ] [Gwhirj3] starting ...
[2020-03-07T14:36:59,216][INFO ][o.e.t.TransportService   ] [Gwhirj3] publish_address {127.0.0.1:9300}, bound_addresses {[fe80::1]:9300}, {[::1]:9300}, {127.0.0.1:9300}
[2020-03-07T14:37:02,289][INFO ][o.e.c.s.ClusterService   ] [Gwhirj3] new_master {Gwhirj3}{Gwhirj31TU-KY1kyIQDgPw}{ahIQ9EbuRYWrO1wJZcg1nw}{127.0.0.1}{127.0.0.1:9300}, reason: zen-disco-elected-as-master ([0] nodes joined)
[2020-03-07T14:37:02,312][INFO ][o.e.h.n.Netty4HttpServerTransport] [Gwhirj3] publish_address {127.0.0.1:9200}, bound_addresses {[fe80::1]:9200}, {[::1]:9200}, {127.0.0.1:9200}   #ES监听端口
[2020-03-07T14:37:02,313][INFO ][o.e.n.Node               ] [Gwhirj3] started
[2020-03-07T14:37:02,318][INFO ][o.e.g.GatewayService     ] [Gwhirj3] recovered [0] indices into cluster_state
验证是否启动成功,ES默认端口是9200,在浏览器输入127.0.0.1:9200

注意说明:
Mac系统下安装会比较顺利,Centos下安装会有些问题。
ElasticSearch插件安装
1.单实例安装
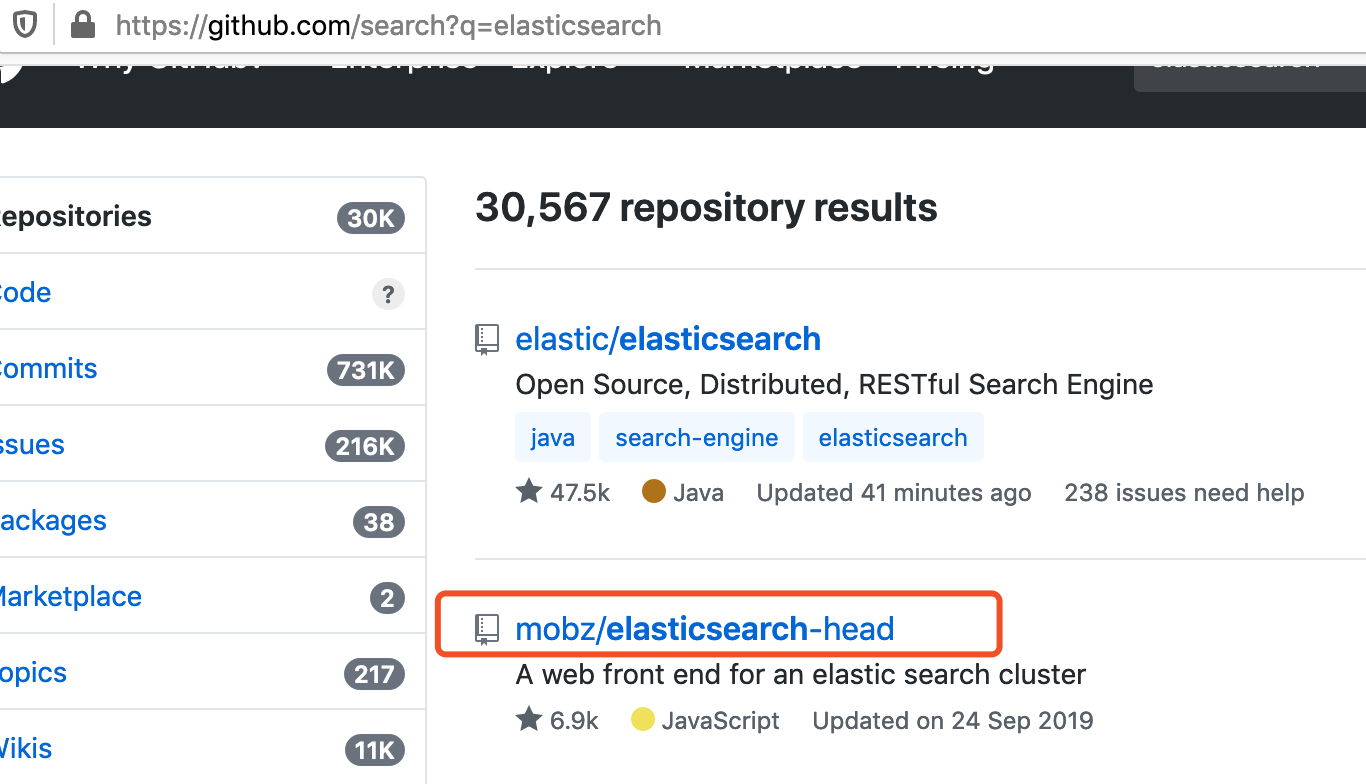
elasticsearch-head插件提供了友好的web界面,同时也可以实现基本信息的查看。去github官网搜索head插件。地址:https://github.com/mobz/elasticsearch-head
使用git下载
git clone https://github.com/mobz/elasticsearch-head.git
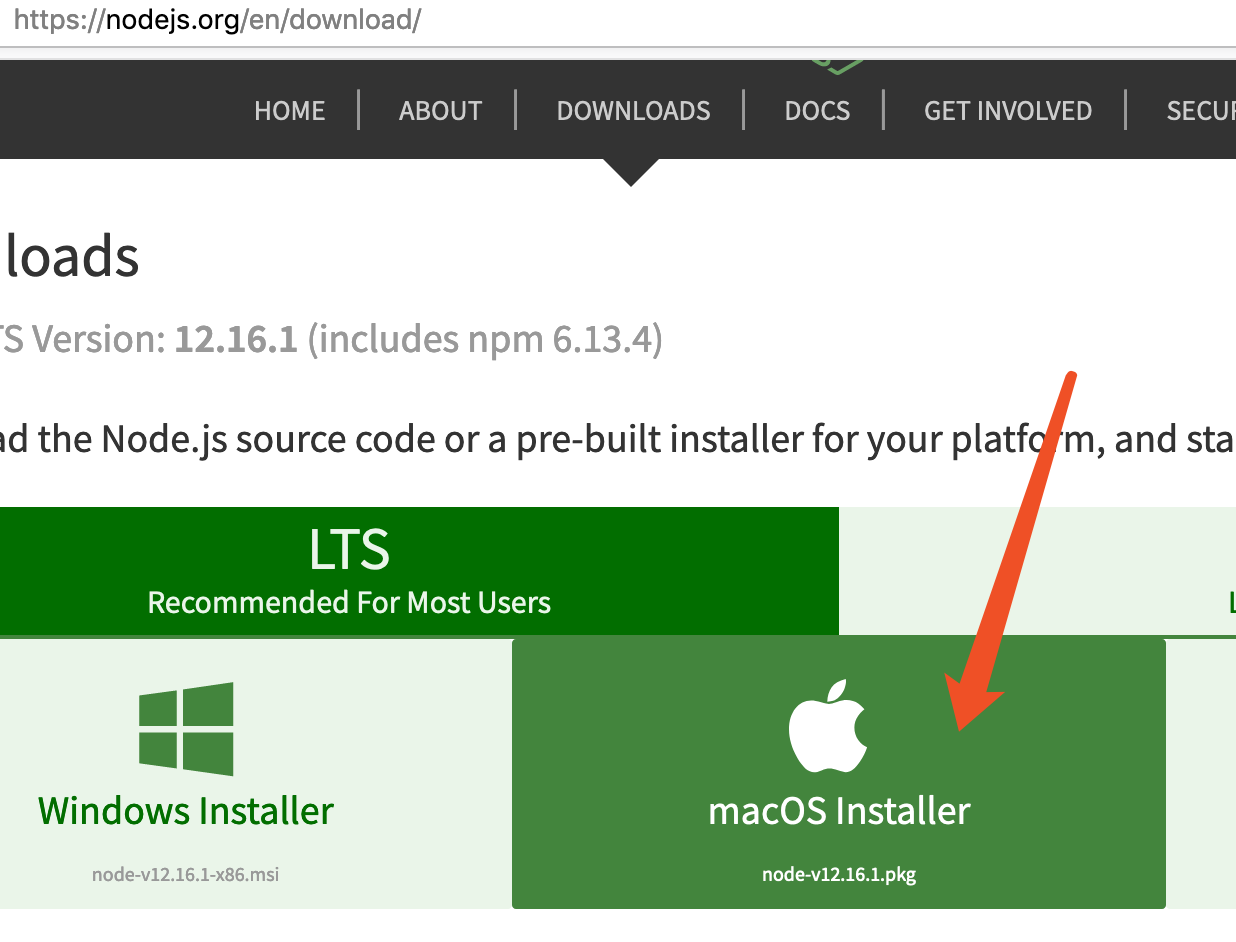
还得下载node,去node官网下载即可,我的是mac系统。node版本要大于6.0。
安装很简单,直接下一步下一步就好。
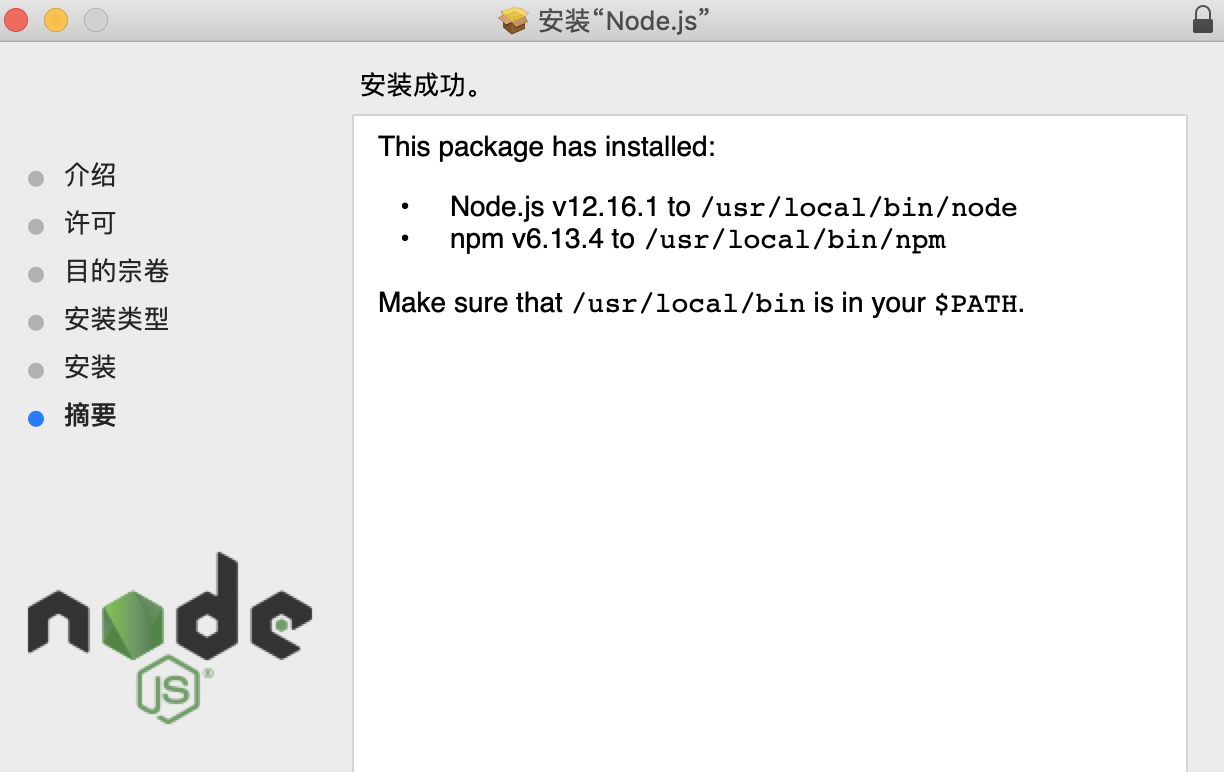
安装完毕后查看node是否安装好,使用node -v查看

然后在npm install,不过由于npm install会被墙,要换成淘宝的仓库。
songguojundeMBP:elasticsearch-head songguojun$ npm config get registry    #查看本地原始仓库地址
https://registry.npmjs.org/
songguojundeMBP:elasticsearch-head songguojun$ npm config set registry https://registry.npm.taobao.org   #切换淘宝仓库
songguojundeMBP:elasticsearch-head songguojun$ npm config get registry    #查看本地修改后仓库地址  已经切换位淘宝的
https://registry.npm.taobao.org/
接着继续安装
npm install
npm run start

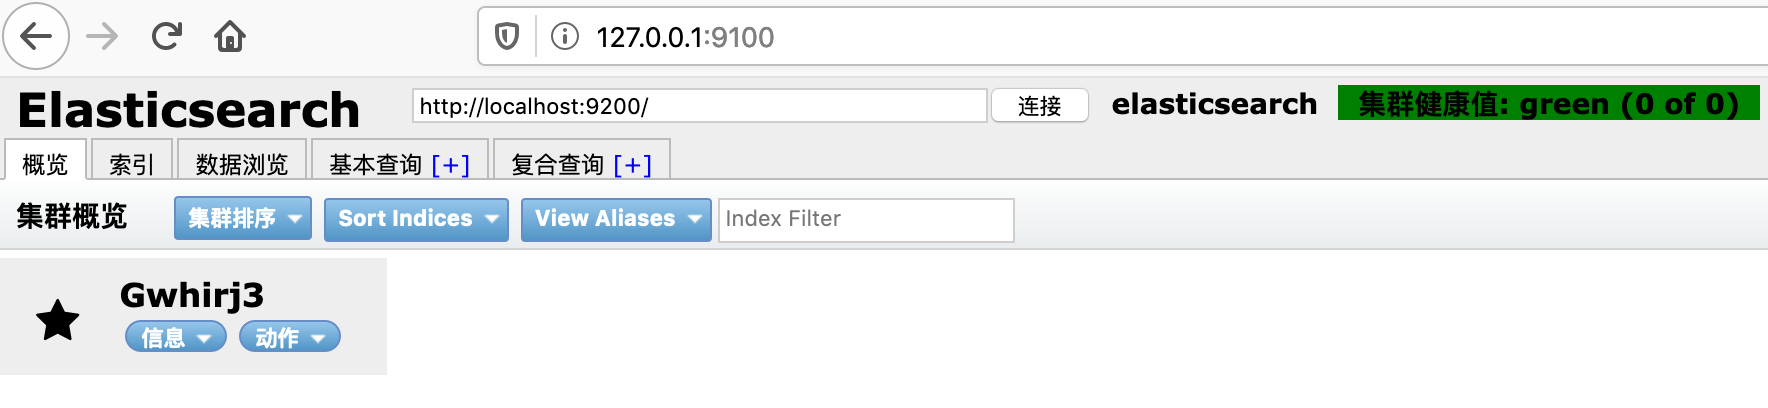
提示打开127.0.0.1:9100
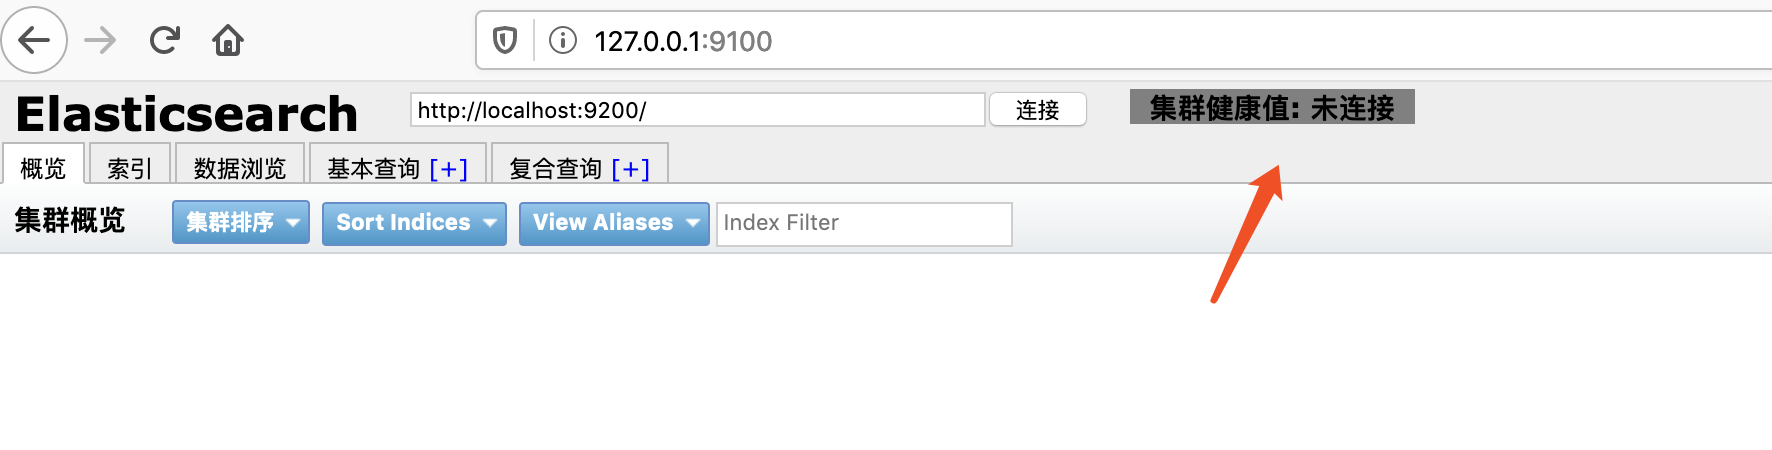
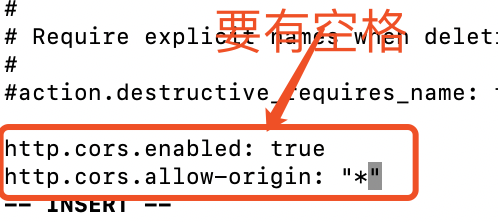
web页面可以打开,不过提示未连接状态。那么将elasticsearch-head插件服务先停掉,因为ES和head插件是两个独立的服务,它们之间的访问存在跨域的问题,所以需要修改跨域配置。
修改ES配置文件
vi config/elasticsearch.yml
修改完毕并保存后,启动ES及elasticsearch-head插件。
./bin/elasticsearch -d #后台方式启动
这时候在刷新页面,显示已经连接。
集群健康的几种状态说明:
绿色,最健康的状态,表示所有的分片包括备份都可用。
黄色,基本的分片可用,但是备份不可用(也可能是没有备份)黄色,基本的分片可用,但是备份不可用(也可能是没有备份)。
红色,部分的分片可用,表明分片有一部分损坏。此时执行查询部分数据仍然可以查到,遇到这种情况,还是赶快解决比较好红色,部分的分片可用,表明分片有一部分损坏。此时执行查询部分数据仍然可以查到,遇到这种情况,还是赶快解决比较好。
灰色,表示未连接到elasticsearch服务 .
2.分布式安装
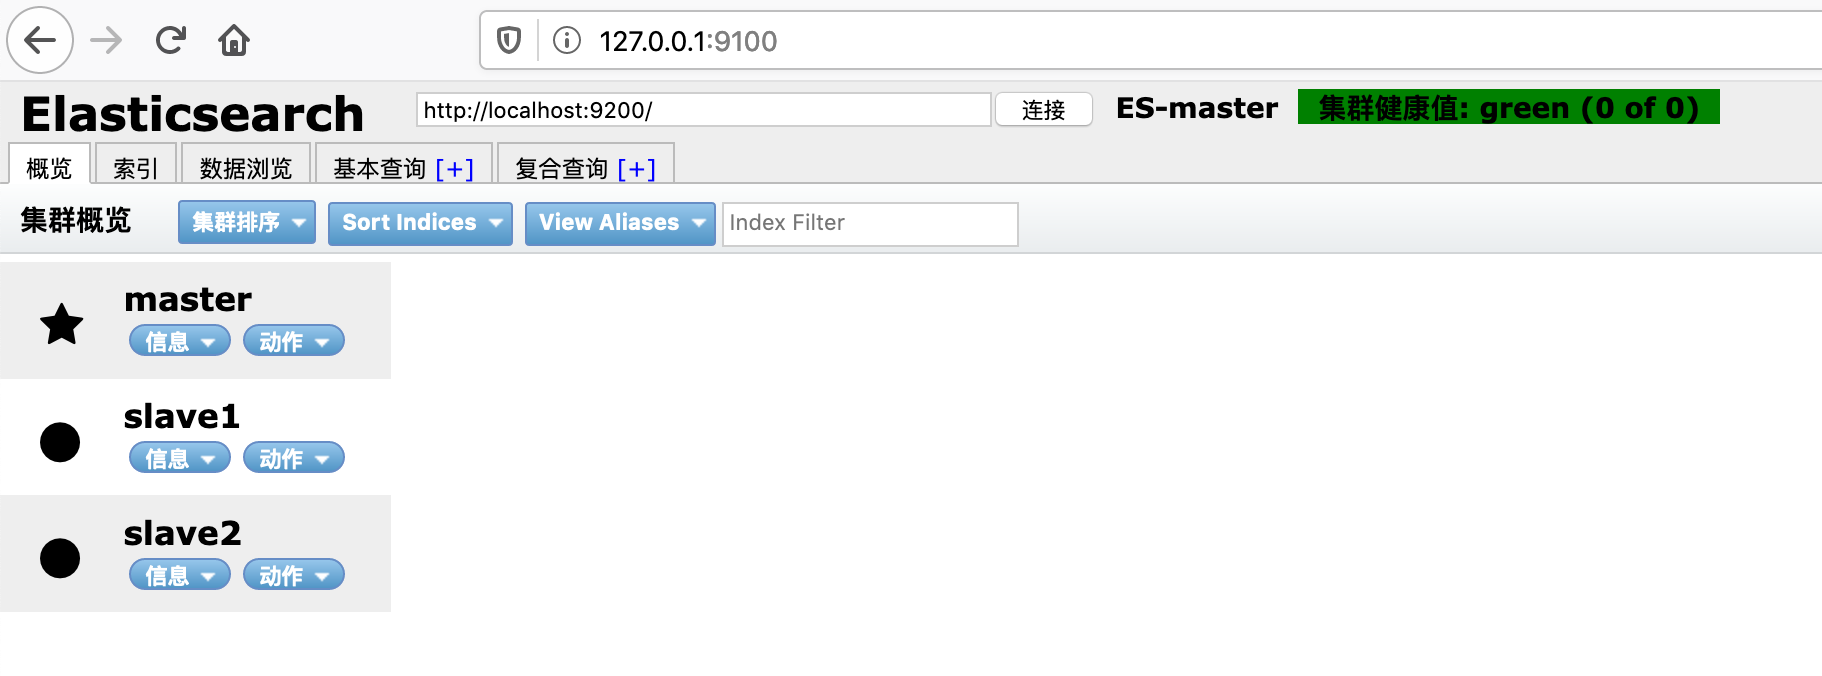
分布式安装会建立一个集群,包含三个节点,一个master(主节点)和两个slave(从节点)。
先修改ES配置文件 config/elasticsearch.yml
cluster.name: ES-master    #指定集群的名字,名字自定义
node.name: master          #指定节点的名字
node.master: true      #指定节点上master
network.host: 127.0.0.1    #指定绑定的ip  端口默认9200
接着重启ES和head插件服务,如果遇到下面问题

说明是端口占用,关闭就好。通过lsof -i:9100 和 netstat -an | grep 9100定位到对应的进程,然后kill掉,在重启就好。或者pkill -9 npm。
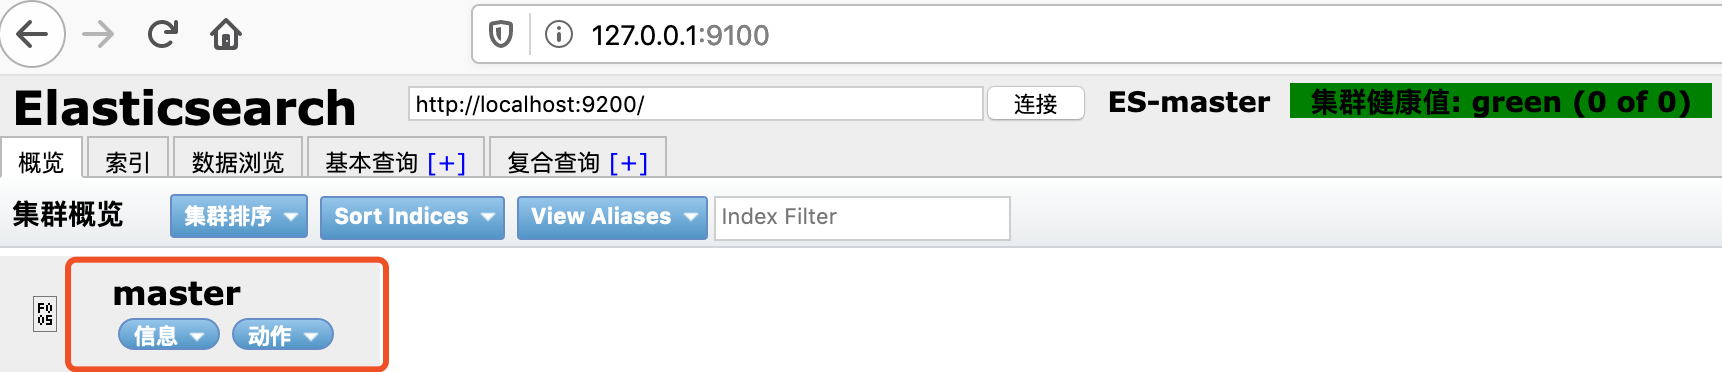
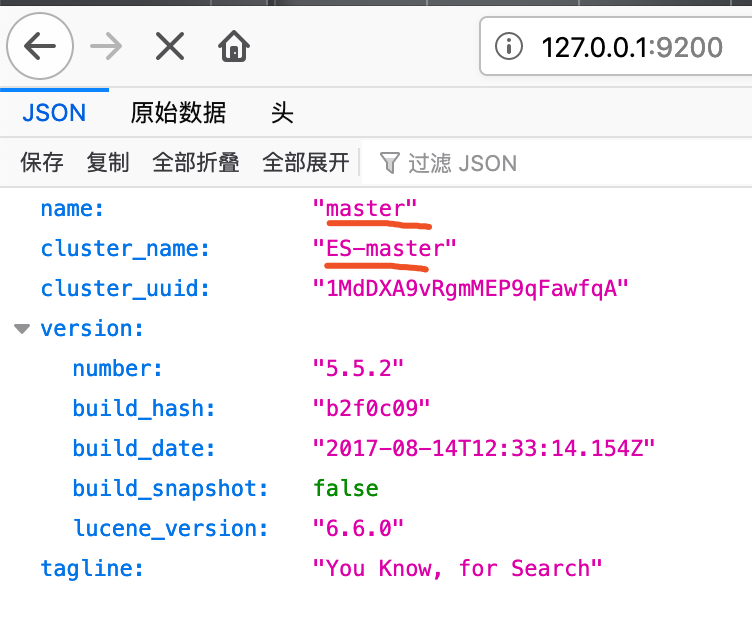
在通过原生ES信息查看,配置信息已经修改成功了。
slave节点的操作
songguojundeMBP:elasticsearch-5.5.2 songguojun$ cd ..
songguojundeMBP:src songguojun$ ls
consul_1.2.0_linux_amd64.zip    lua-5.3.0            php-7.2.21.tar.bz2        redis-5.0.5.tar.gz
elasticsearch-5.5.2        lua-5.3.0.tar.gz        php7                swoole
elasticsearch-5.5.2.tar.gz    php-7.2.21            redis-5.0.5            xhprof
songguojundeMBP:src songguojun$ mkdir es_slave
songguojundeMBP:src songguojun$ cp elasticsearch-5.5.2.tar.gz es_slave/
songguojundeMBP:src songguojun$ cd es_slave/
songguojundeMBP:es_slave songguojun$ tar zxf elasticsearch-5.5.2.tar.gz  #不想看到解压过程就不要加v参数
songguojundeMBP:es_slave songguojun$ cp -r elasticsearch-5.5.2 es_slave1
songguojundeMBP:es_slave songguojun$ cp -r elasticsearch-5.5.2 es_slave2
songguojundeMBP:es_slave songguojun$ ls
elasticsearch-5.5.2        elasticsearch-5.5.2.tar.gz    es_slave1            es_slave2
分别进入目录es_slave1 和 es_slave2目录 并修改对应配置文件 并启动
es_slave2配置文件,修改完毕启动./bin/elasticsearch -d
cluster.name: ES-master
node.name: slave1
network.host: 127.0.0.1
node.master: false
http.port: 8200
discovery.zen.ping.unicast.hosts: ["127.0.0.1"]
es_slave2配置文件,修改完毕启动./bin/elasticsearch -d
cluster.name: ES-master
node.name: slave2
network.host: 127.0.0.1
node.master: false
http.port: 8000    #端口不能重复
discovery.zen.ping.unicast.hosts: ["127.0.0.1"]
异常情况
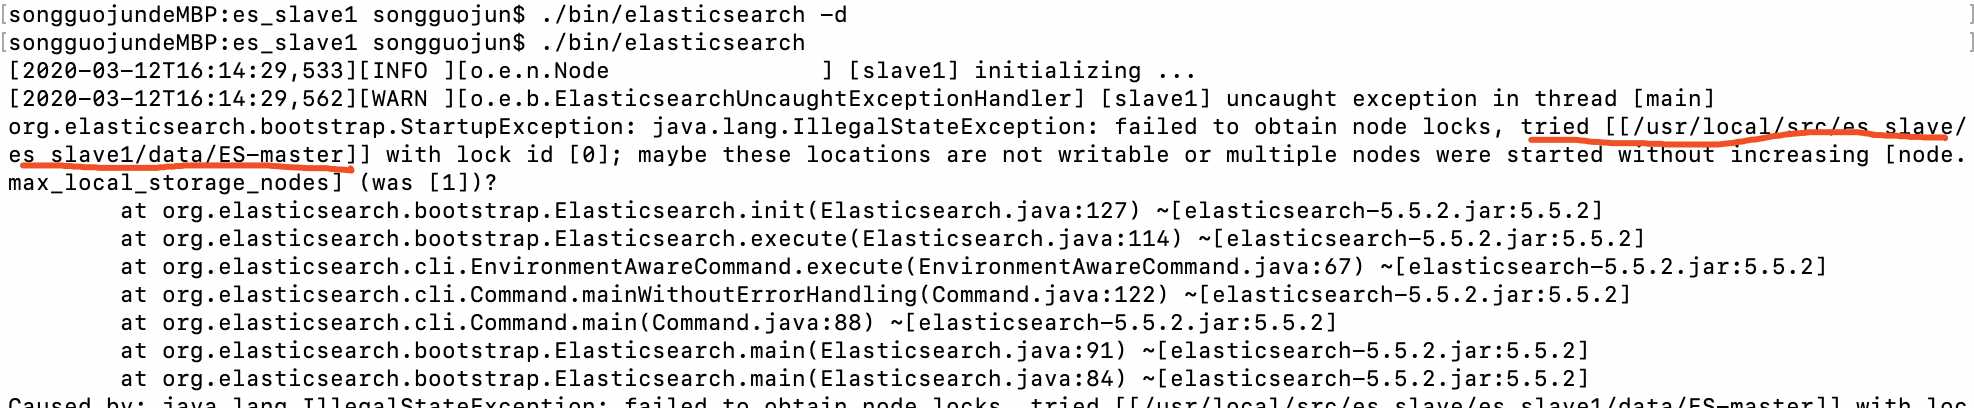
解决方法:https://stackoverflow.com/questions/28932178/elasticsearch-failed-to-obtain-node-lock-is-the-following-location-writable
ElasticSearch基本操作
ES的Api是基于Restful风格。
ES的Api基本格式:http://<ip>:<port>/<索引>/<类型>/<文档id>
ES的Api操作支持http动词:GET/POST/PUT/DELETE
1. 索引创建
非结构化创建:
通过ES head插件来创建
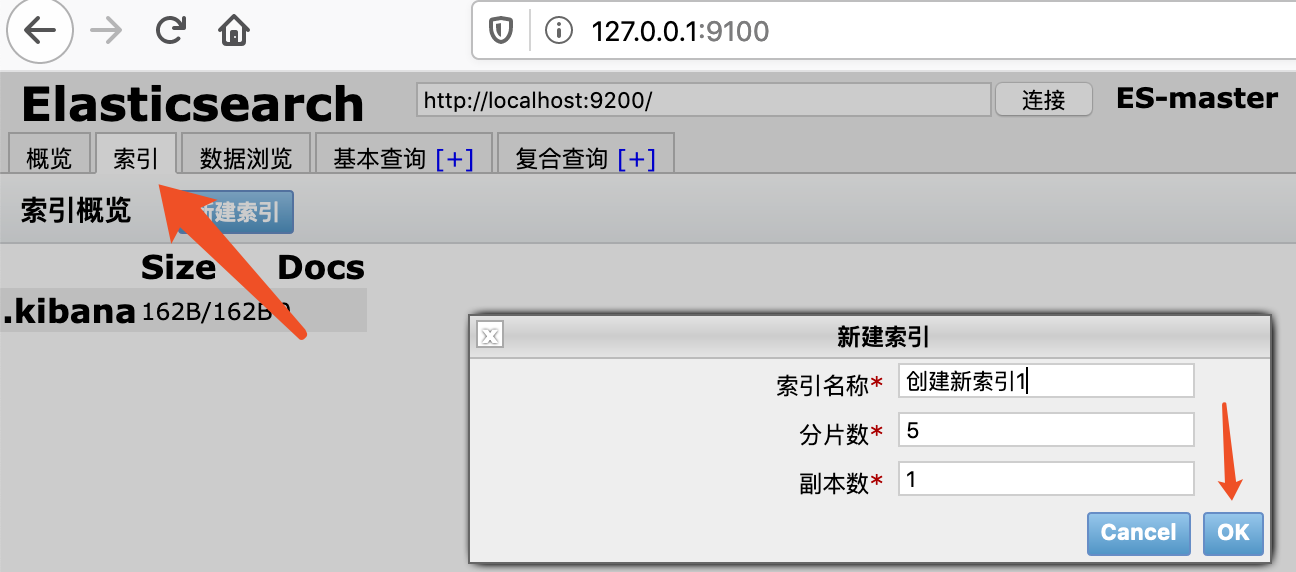
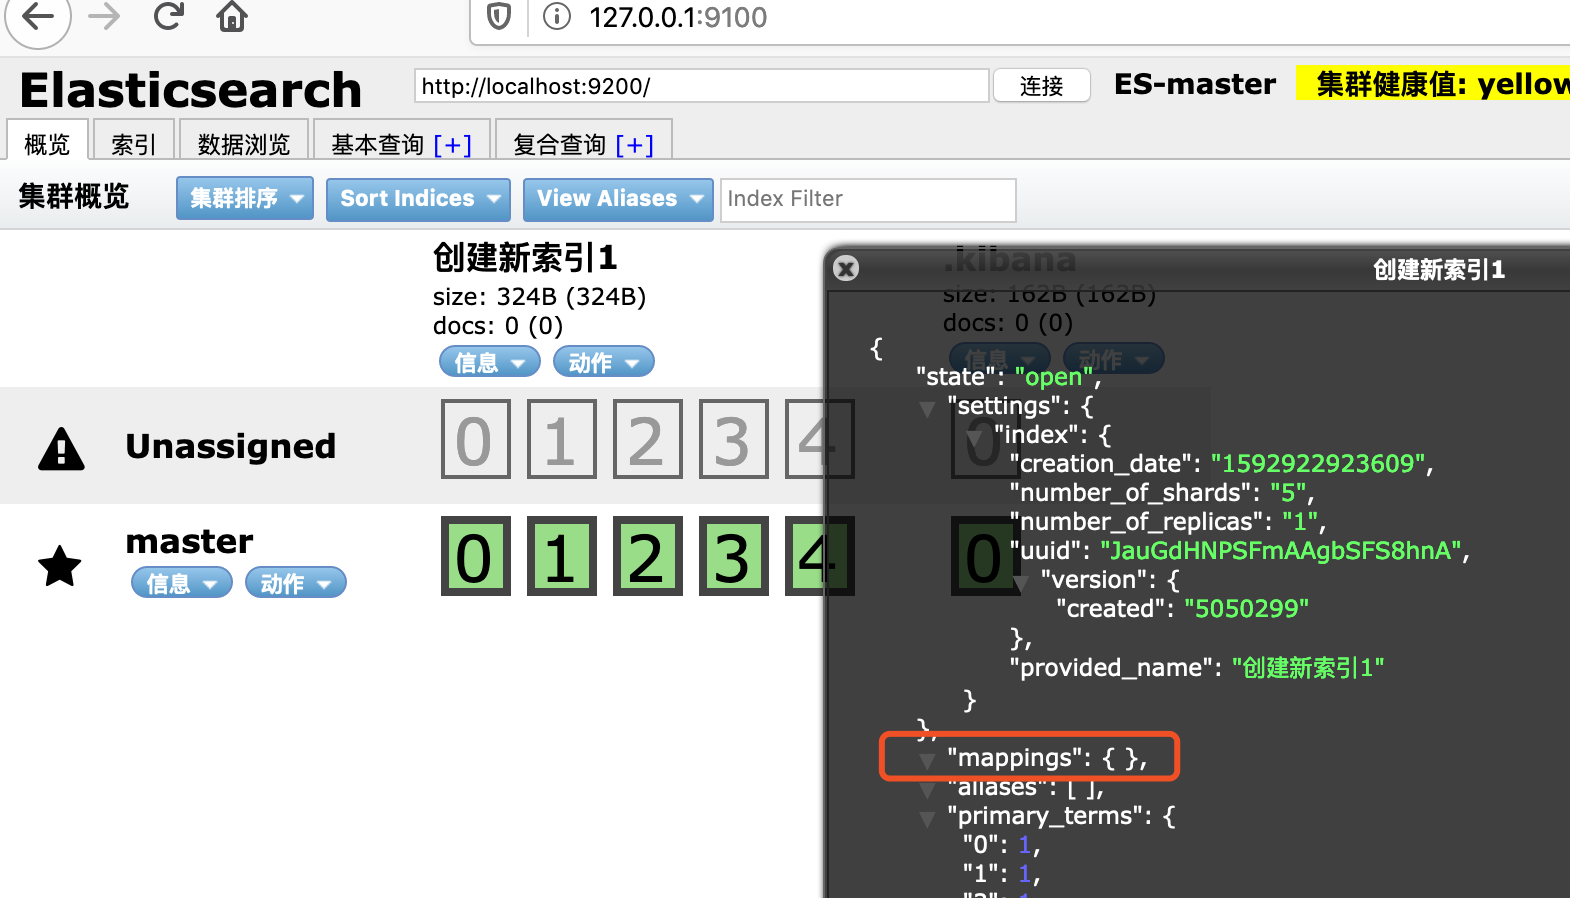
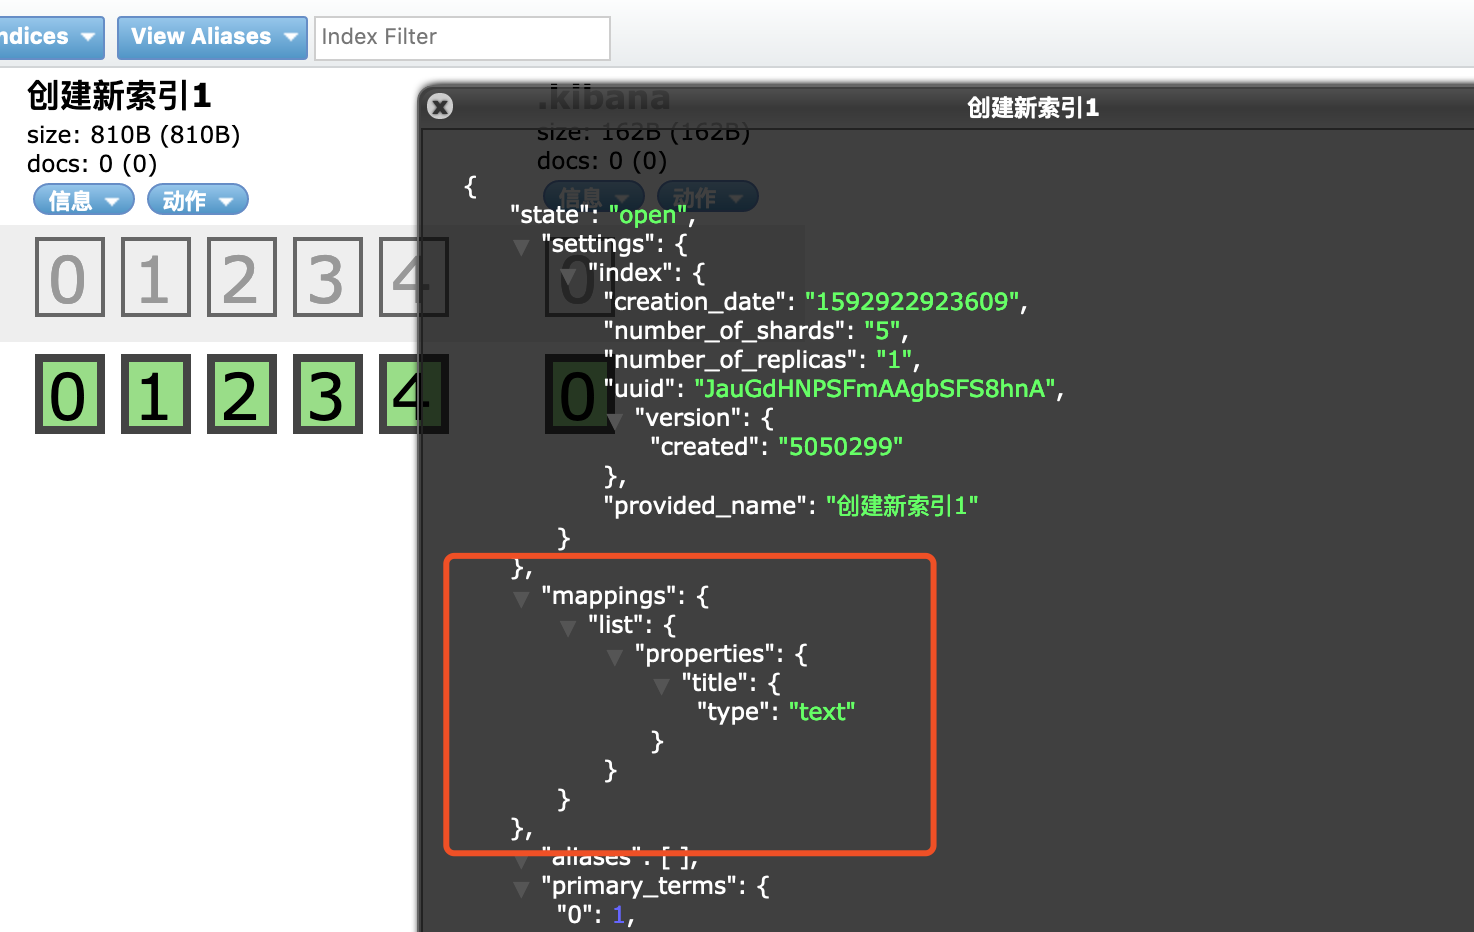
如何查看是结构化还是非结构化索引,点击信息->查看索引信息,如下mappings后面是空的就是非结构化索引。
结构化索引创建:
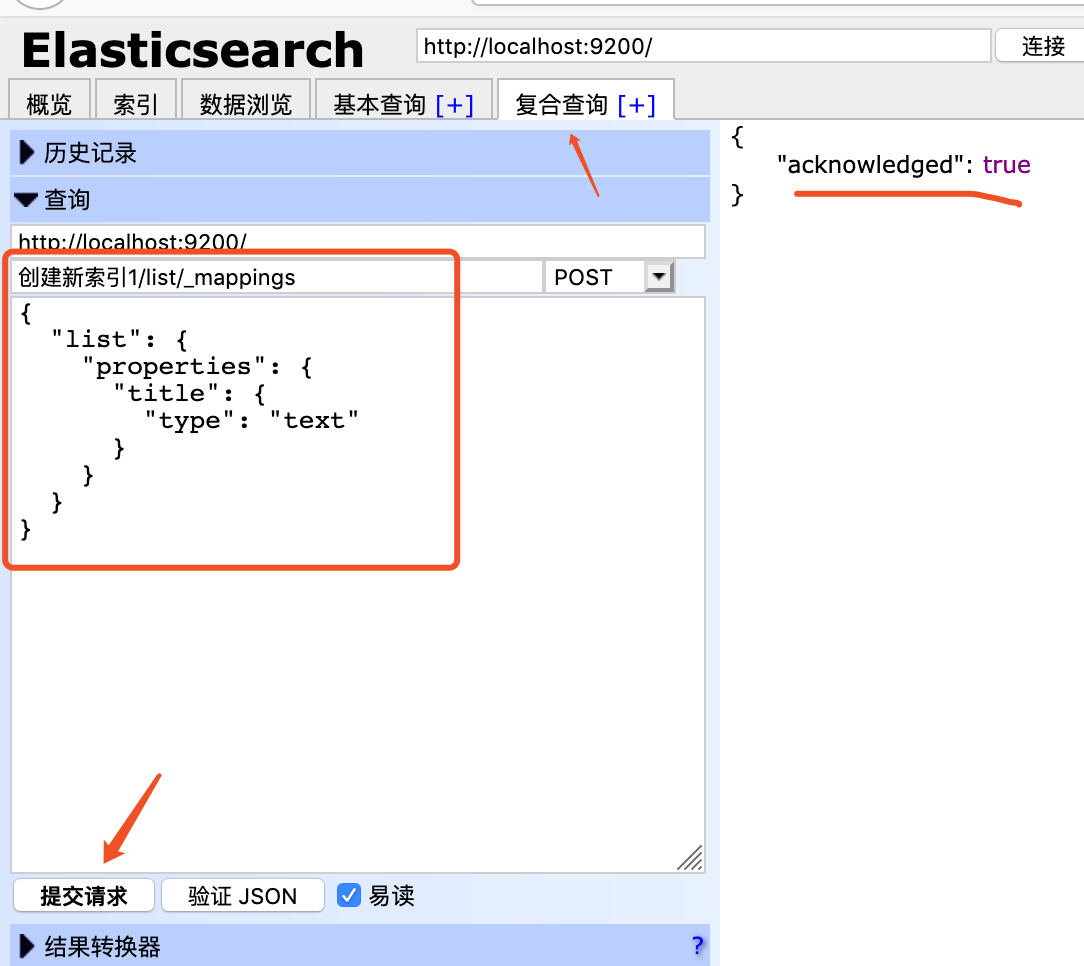
提交请求,右侧出现acknowledged: true,然后再次查看mappings的值。
使用Postman来创建索引
使用postman创建索引127.0.0.1:9200/users,在body体中填写json格式数据,如下
{
    "settings":{
        "number_of_shards":3,
        "number_of_replicas":1
    },
    "mappings": {
        "man": {
            "properties": {
                "name": {
                    "type": "text"
                },
                "country": {
                    "type":"keyword"
                },
                "age":{
                    "type":"integer"
                },
                "date":{
                    "type":"date",
                    "format":"yyyy-MM-dd HH:mm:ss||yyyy-MM-dd||epoch_millis"
                }
            }
        }
    }
}
编辑好之后点击提交按钮,如下

2. 数据插入
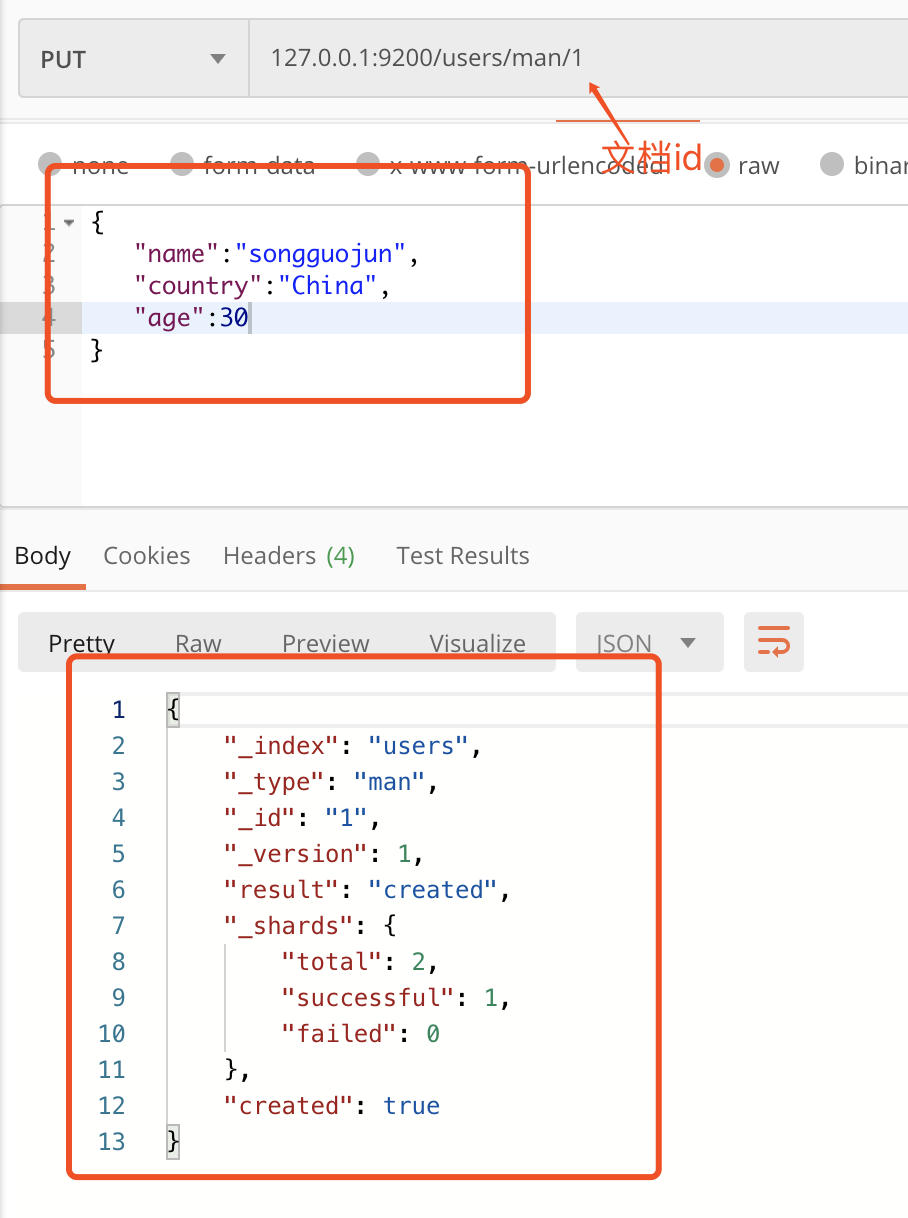
ES中插入分为指定文档id插入和自动产生文档id插入。文档id是一个唯一索引值来指向数据。
在postman中输入如下,这里我们指定了文档id为1,下面man后面那个1,然后点击发送。
查看head插件显示索引的信息变化
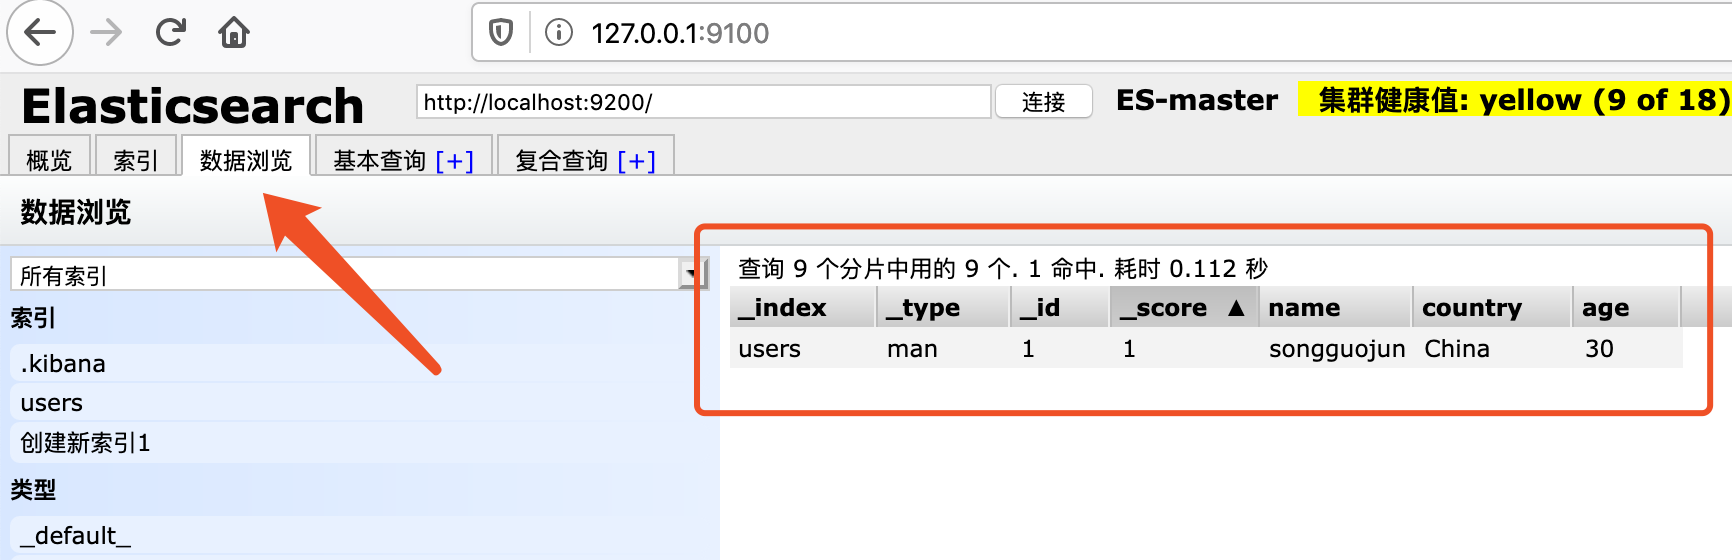
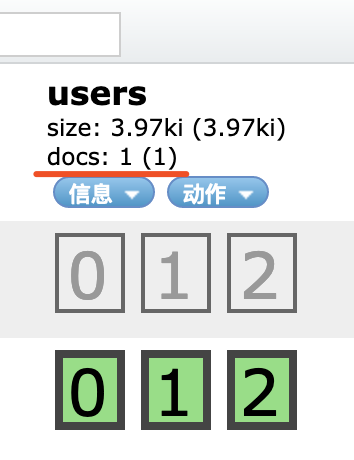 这里多了一个doc,doc表示该索引下所有文档的数量,刚刚插入一条数据,这里就显示1。点击数据浏览可以查看刚刚插入数据的详细信息。
上面我们是自己指定文档id,那么下面我们使用自动产生文档id的方式,就是让ES帮我们自动产生文档id。

浏览文档数据

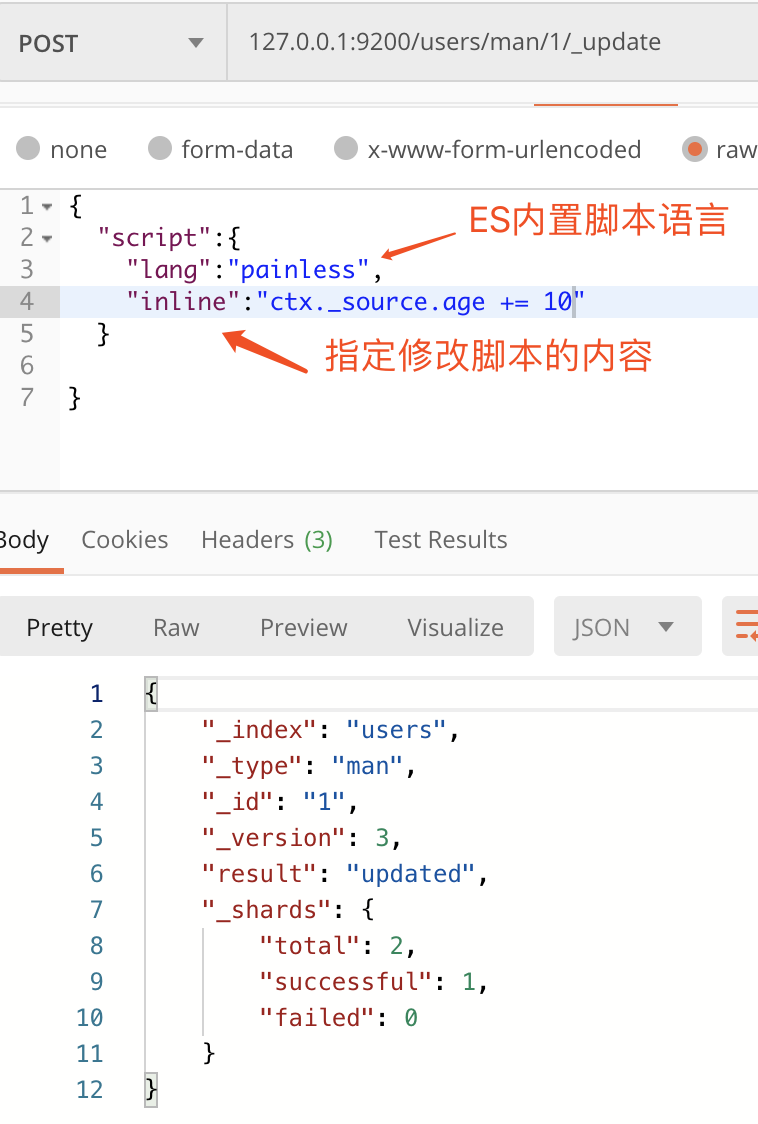
3. 数据修改
文档数据分为直接修改文档和脚本修改文档。
下面修改id为1的文档数据
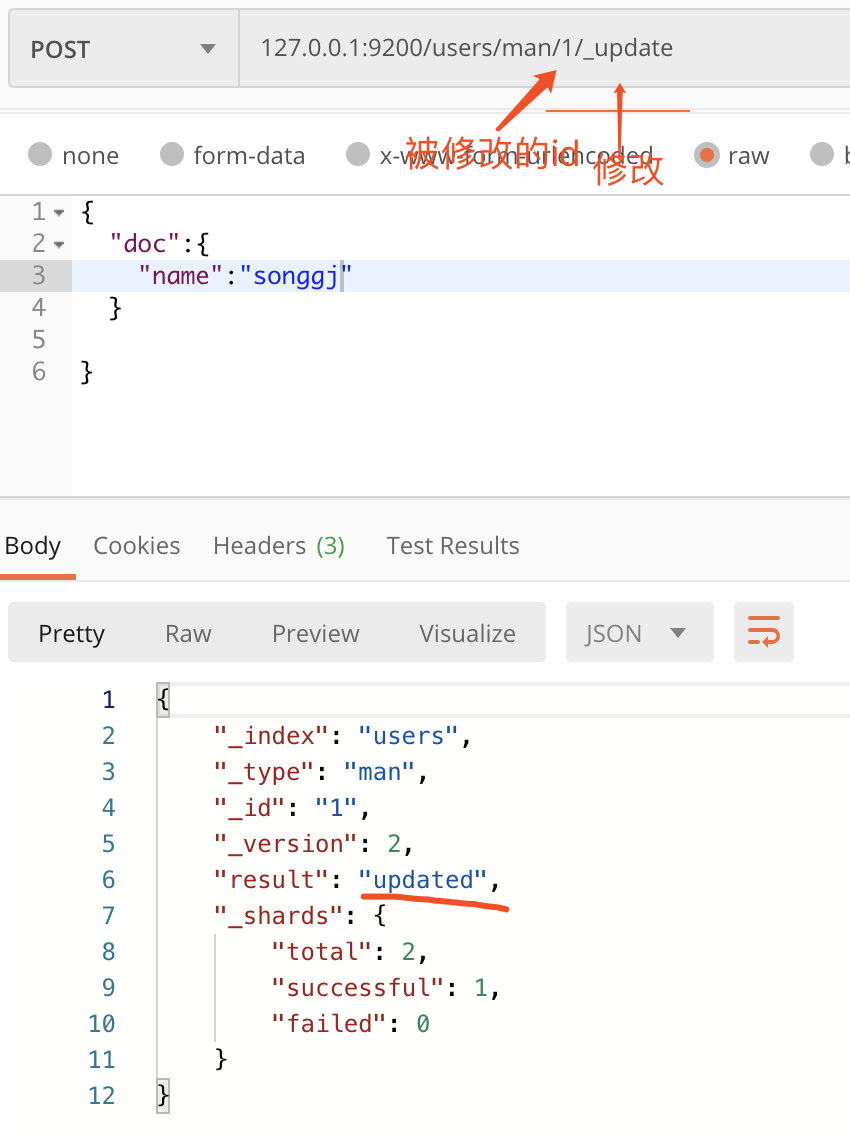
这种属于直接修改的方式。
下面是使用脚本修改的方式。
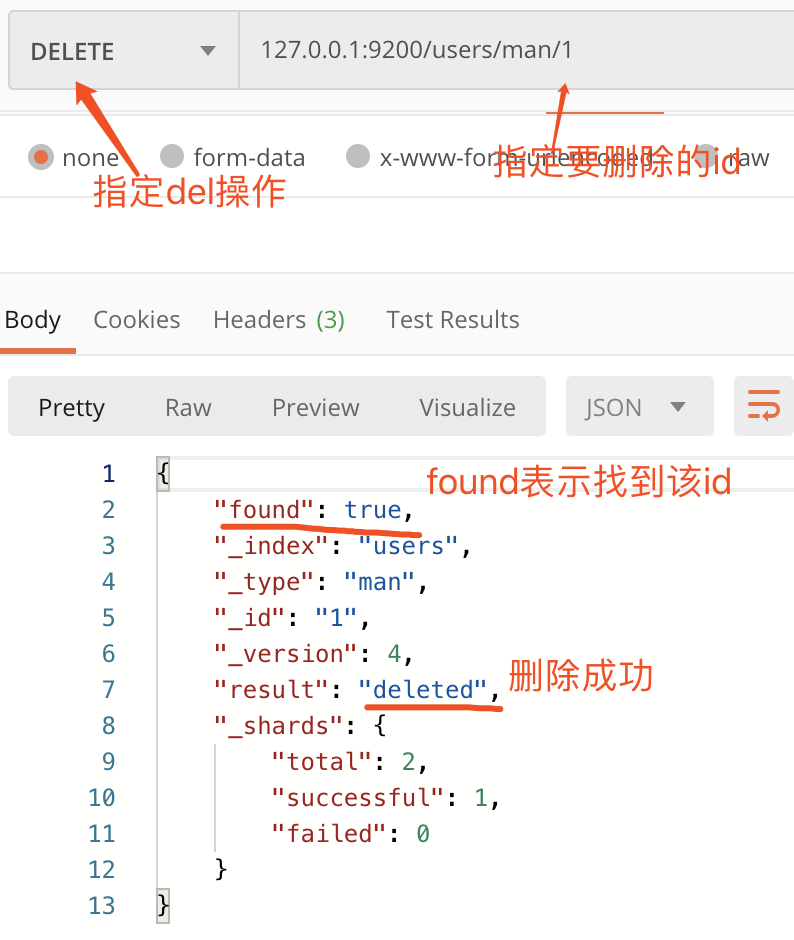
4. 数据删除
删除文档操作
删除索引操作

5. 数据查询
查询分为简单查询,条件查询,聚合查询。
先创建一个索引book,使用put方法,127.0.0.1:9200/book
{
    "mappings": {
        "novel": {
            "properties": {
                "word_count": {
                    "type": "integer"
                },
                "author": {
                    "type":"keyword"
                },
                "title":{
                    "type":"text"
                },
                "publish_date":{
                    "type":"date",
                    "format":"yyyy-MM-dd HH:mm:ss||yyyy-MM-dd||epoch_millis"
                }
            }
        }
    }
}
ES提供了一个叫 bulk 的 API 来进行批量操作
它用来在一个API调用中进行大量的索引更新或删除操作,这极大的提升了操作效率。
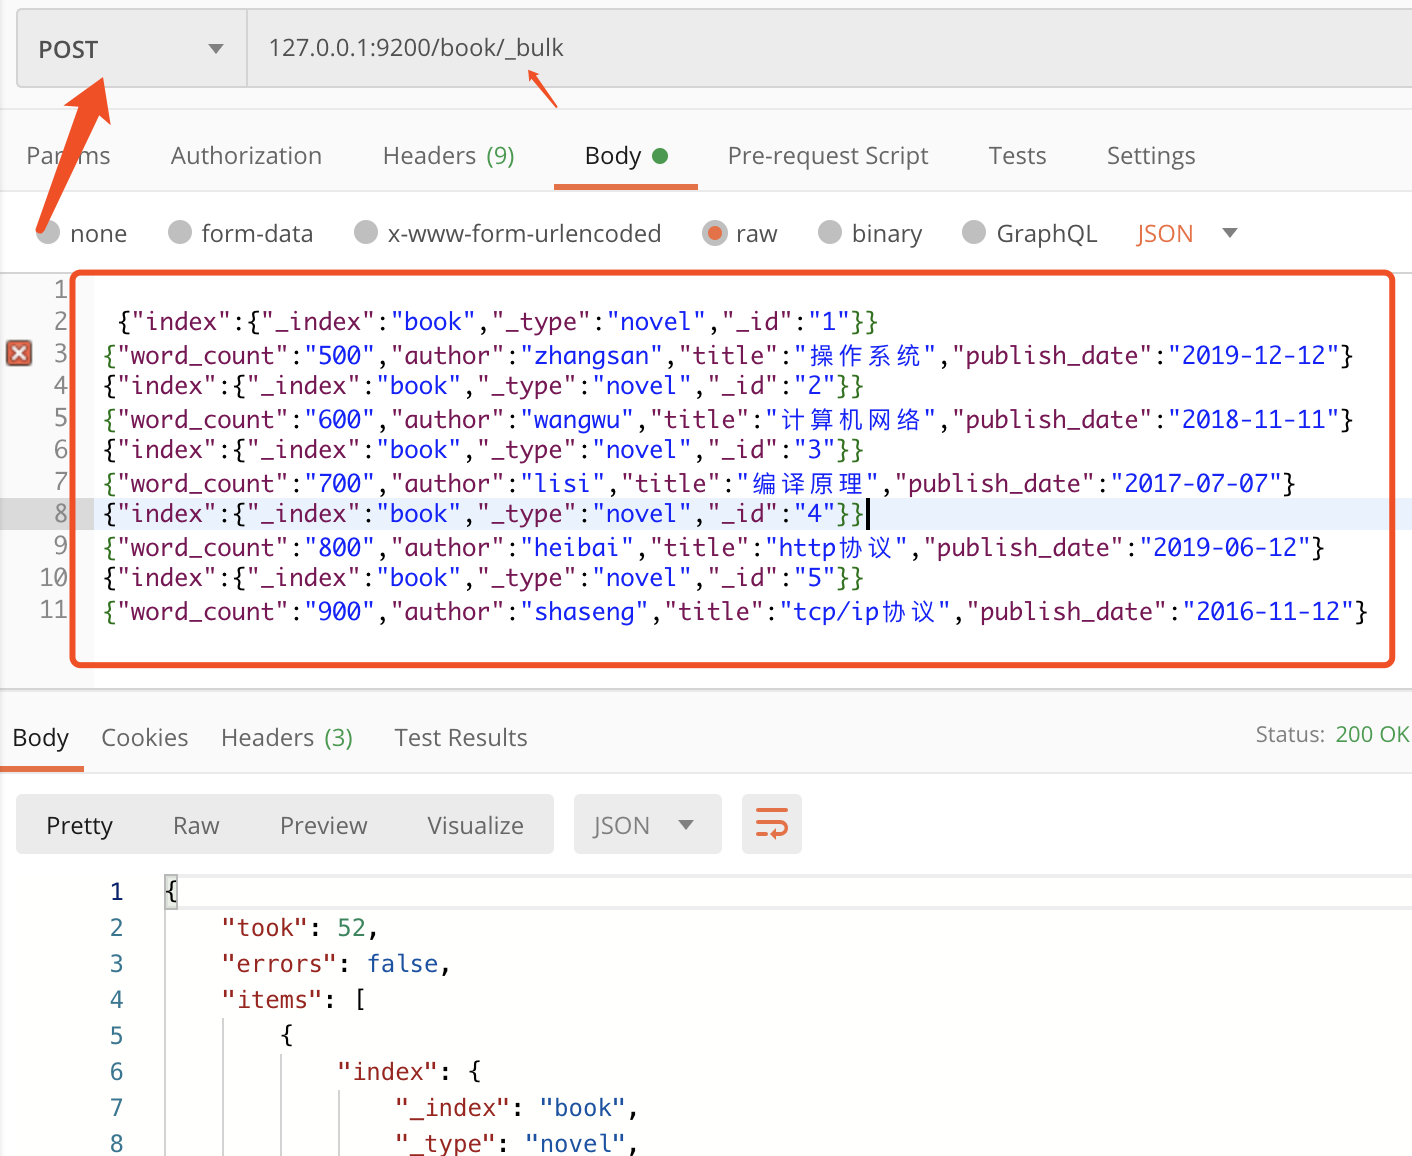 注意最后一行要敲两次回车。
 {"index":{"_index":"book","_type":"novel","_id":"1"}}
{"word_count":"500","author":"zhangsan","title":"操作系统","publish_date":"2019-12-12"}
{"index":{"_index":"book","_type":"novel","_id":"2"}}
{"word_count":"600","author":"wangwu","title":"计算机网络","publish_date":"2018-11-11"}
{"index":{"_index":"book","_type":"novel","_id":"3"}}
{"word_count":"700","author":"lisi","title":"编译原理","publish_date":"2017-07-07"}
{"index":{"_index":"book","_type":"novel","_id":"4"}}
{"word_count":"800","author":"heibai","title":"http协议","publish_date":"2019-06-12"}
{"index":{"_index":"book","_type":"novel","_id":"5"}}
{"word_count":"900","author":"shaseng","title":"tcp/ip协议","publish_date":"2016-11-12"}
查看插入后的数据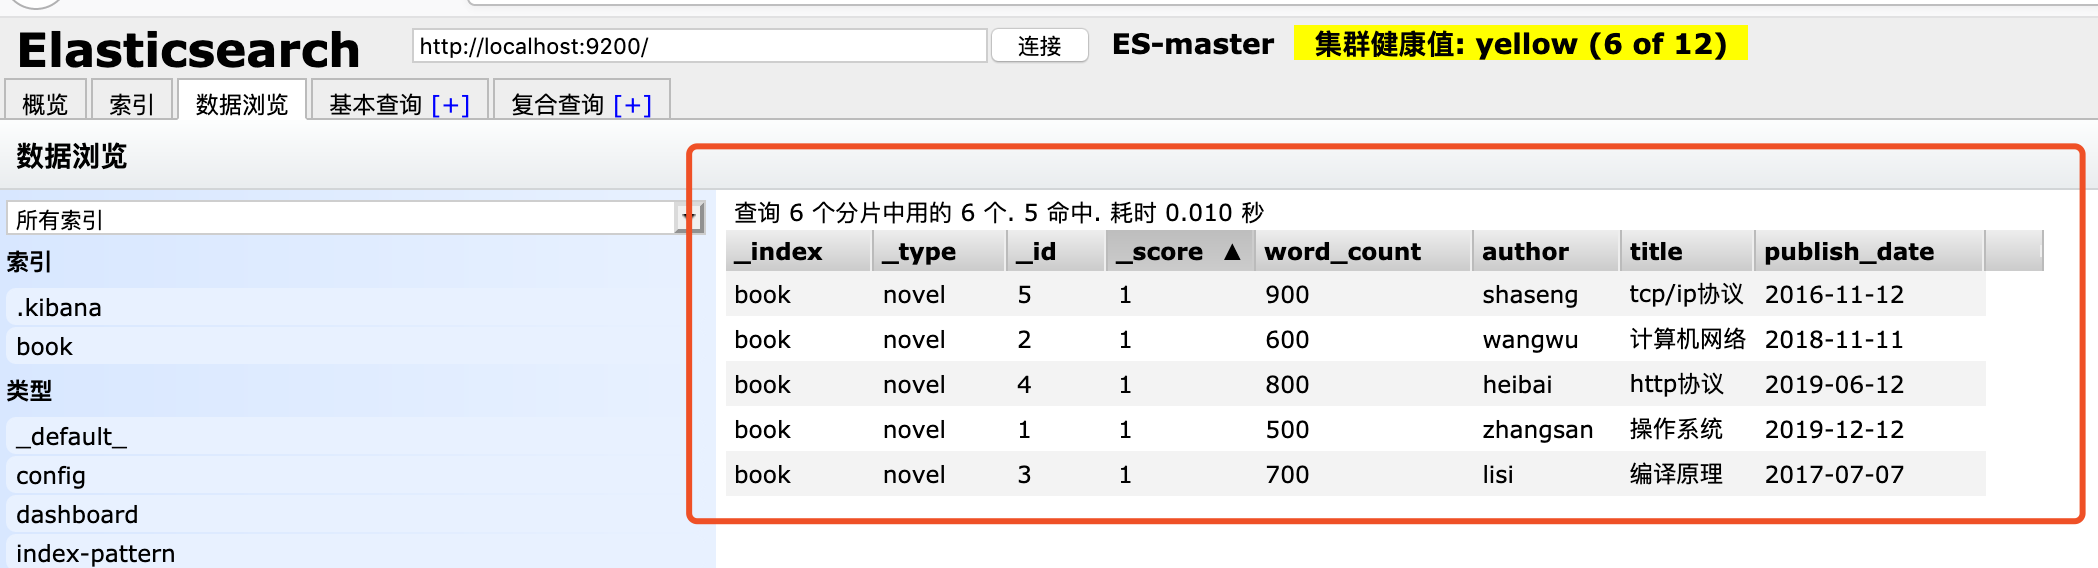
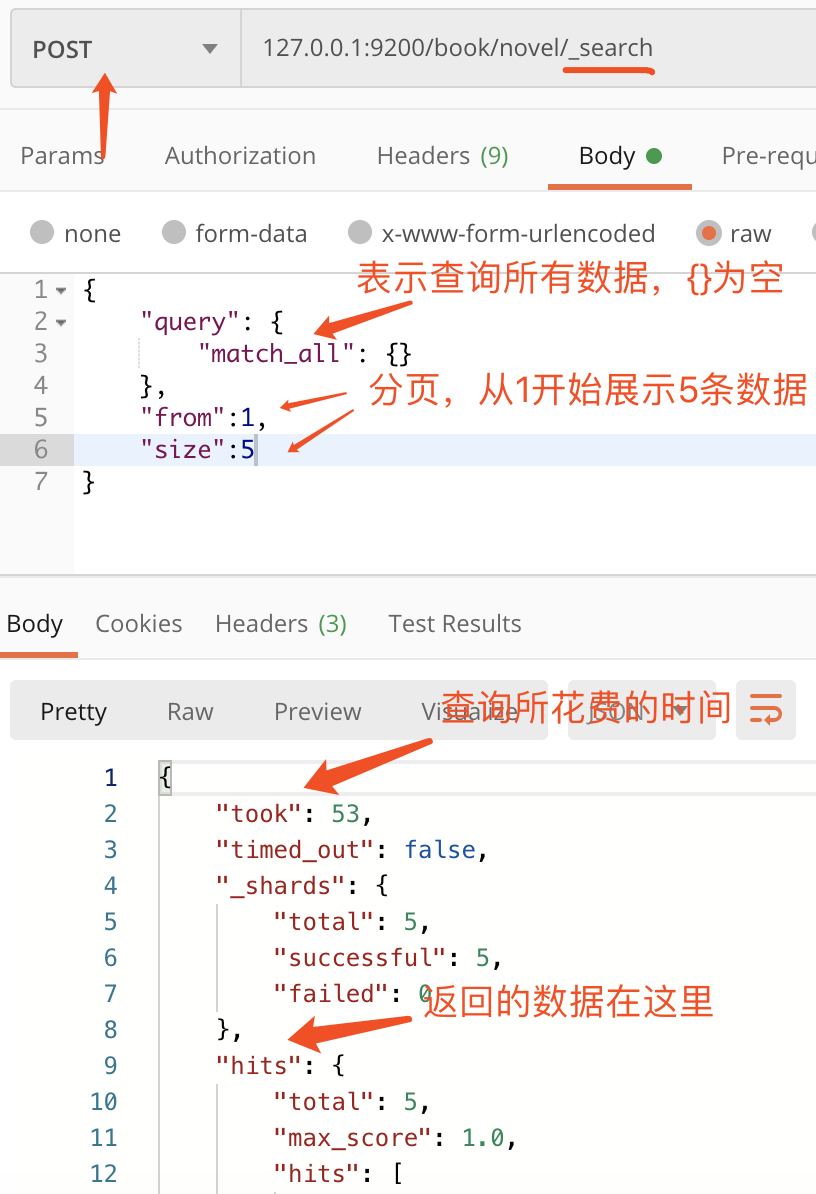
简单查询
查询文档id为1的数据

条件查询
所有的查询要指定query关键词
如果要进行关键词模糊搜索并且排序如下
{
    "query": {
        "match": {
            "title": "tcp"
        }
    },
    "sort":[
       {"publish_date":{"order":"desc"}}
    ]
}
聚合查询
聚合查询和Mysql中group by很像,聚合查询使用关键字aggs
下面是根据word_count字段来聚合查询
{
    "aggs": {
        "group_by_word_count": {
            "terms": {
                "field": "word_count"
            }
        }
    }
}
上面是单个字段聚合查询,也可多个字段进行聚合查询
{
    "aggs": {
        "group_by_word_count": {
            "terms": {
                "field": "word_count"
            }
        },
        "group_by_publish_date": {
            "terms": {
                "field": "publish_date"
            }
        }
    }
}
6. 数据高级查询
ES数据高级查询分为:
1)子条件查询:特定字段所指特定值。子条件查询分为Query Context和
Query Context:在查询过程中,除了判断文档是否满足查询条件外,ES还会计算出一个score值来标示匹配的程度,用来判断目标文档和查询条件匹配温和度有多高。Query Context常用的查询有全文本查询(针对文本类型的数据)和字段级别的查询(针对结构化的数据,如日期,数字等)。
2)复合条件查询:以一定的逻辑组合子条件查询。
7. elasticsearch curl操作
我们还可以在命令行用使用curl命令来和elasticsearch交互。
curl命令交互格式:curl -X指定http请求的方法(如HEAD GET POST PUT DELETE)-d '指定要传输的数据'
下面一些案例:
curl -XGET localhost:9200
{
  "name" : "SHLW10NH3523",
  "cluster_name" : "elasticsearch",
  "cluster_uuid" : "IQS8p7-vRJqh227z70V8Ag",
  "version" : {
    "number" : "7.8.0",
    "build_flavor" : "default",
    "build_type" : "zip",
    "build_hash" : "757314695644ea9a1dc2fecd26d1a43856725e65",
    "build_date" : "2020-06-14T19:35:50.234439Z",
    "build_snapshot" : false,
    "lucene_version" : "8.5.1",
    "minimum_wire_compatibility_version" : "6.8.0",
    "minimum_index_compatibility_version" : "6.0.0-beta1"
  },
  "tagline" : "You Know, for Search"
}