最近公司培训EasyUI,就做下总结吧,给有需要的人,源码在文章最后。
1、最常用的表格
|
1
2
3
|
<div class="easyui-panel" data-options="region:'center'" style="padding: 20px"> <table id="dg"></table> </div> |
注意<table>标签,我们将利用这个标签进行表格加载
|
1
2
3
4
5
6
7
8
9
10
11
12
13
14
15
16
17
18
19
20
21
22
23
24
25
26
27
28
29
30
31
32
33
34
35
36
37
38
39
40
41
42
43
44
45
46
47
48
49
50
51
52
53
54
55
56
57
58
59
60
61
62
63
64
65
66
67
68
|
$("#dg").datagrid({ //---------------------------- 属性 Properties ---------------------------- //请求类型 默认post method: "get", //请求url地址 默认null url: "../../../json/grid.json", toolbar: [{ iconCls: 'icon-add', handler: function () { alert("add"); } }, { iconCls: 'icon-edit', handler: function () { //alert("edit"); console.log($("#dg").datagrid("getChecked"), $("#dg").datagrid("getSelected")); } }, { iconCls: 'icon-remove', handler: function () { alert("remove"); } }], //是否分页 默认false pagination: true, //分页的位置 默认bottom ['top','bottom','both'] pagePosition: "bottom", //每页数量 默认10 pageSize: 50, //每页页数控制 默认[10,20,30,40,50] pageList: [50, 100, 200, 500], //当前页 默认1 pageNumber: 1, //列配置 columns: [ [{ field: 'DHOrderNo', title: "订货单编号", 100, halign: "center", align: "left", resizable: false }, { field: 'TotalQty', title: "订单总数", 100, sortable: true, editor: "text" }, { field: 'SupplierName', title: "供应商", 100, sortable: true, //格式化对象 formatter: function (value, row, index) { if (value) { return value.Name; } }, //注意:如果该列数据源是Object需按以下方式排序 //不一定要用显示的属性,也可以使用其他属性,看情况而定。 sorter: function (a, b) { return a.Name == b.Name ? 0 : a.Name > b.Name ? 1 : -1; } }, { field: 'CreateDate', title: "创建日期", 100, editor: "datebox" }, { field: 'action', title: '操作', 70, align: 'center', formatter: function (value, row, index) { if (row.editing) {//编辑中 var s = '<a href="#" onclick="saverow(this)">保存</a> '; var c = '<a href="#" onclick="cancelrow(this)">取消</a>'; return s + c; } else { var e = '<a href="#" onclick="editrow(this)">修改</a> '; var d = '<a href="#" onclick="deleterow(this)">删除</a>'; return e + d; } } } ]] }); |
那么页面的效果是:

感觉easyui的界面还是蛮清爽的
这边的nav.json是一个json格式文件内容是
|
1
2
3
4
5
6
7
8
9
10
11
12
|
{ "total":360, "rows":[ { "DHOrderNo":1, "Funding": "资金方1","Number":2,"Unit":50,"TotalQty":100,"SupplierName":{ "Id":1, "Name":"供应商1" },"CreateDate":"2015-05-21","Flag":1 }, { "DHOrderNo":2, "Funding": "资金方2","Number":5,"Unit":50.01,"TotalQty":250.05,"SupplierName":{ "Id":2, "Name":"供应商2" },"CreateDate":"2015-05-21","Flag":0 }, { "DHOrderNo":3, "Funding": "资金方3","Number":10,"Unit":60, "TotalQty":600,"SupplierName":{ "Id":3, "Name":"供应商3" },"CreateDate":"2015-05-21","Flag":1 } ], "footer":[ { "Funding":"平均","TotalQty": 316.68 }, { "Funding":"总和","TotalQty": 950.05 } ] } |
2、表格扩展,下面是扩展的写法
|
1
2
3
4
5
6
7
8
9
10
11
12
13
14
15
16
17
18
19
20
21
22
23
24
25
26
27
28
29
30
31
32
33
34
35
36
|
$.fn.ProductGrid = function(options, param) { var me = this; //判断options是否是string类型 if (typeof options == 'string') { //根据options从datagrid的配置中查找 var method = $(this).datagrid('options')[options]; //如果没找到,从$.fn.ProductGrid的methods中查找 if (!method) method = $.fn.ProductGrid.methods[options]; //如果存在,调用方法 if (method) return method(this, param); else alert(options + 'can not support'); } var defaults = { url : options.url, method : 'get', border : false, singleSelect : true, fit : true, fitColumns : true, //附加的公共方法 searchByPage : function(jq, id) { alert('this is public function!'); $(me).datagrid('load', {}); }, columns : [ [ {field:'DHOrderNo',title:"ID",80}, {field:'Funding',title:"资金方",100}, { field: 'TotalQty', title: "数量", 80 } ]] }; options = $.extend(defaults, options); $(me).datagrid(options); }; |
2、表单
|
1
2
3
4
5
6
7
8
9
10
11
12
13
14
15
16
17
18
19
20
21
22
23
24
25
26
27
28
29
30
31
32
33
34
35
36
37
38
|
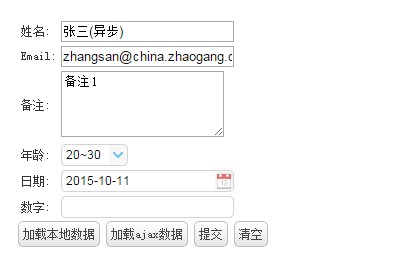
<form id="form" method="get"> <table> <tr> <td>姓名:</td> <td><input class="easyui-validatebox" type="text" name="name" data-options="required:true"></input></td> </tr> <tr> <td>Email:</td> <td><input class="easyui-validatebox" type="text" name="email" data-options="validType:'email'"></input></td> </tr> <tr> <td>备注:</td> <td> <textarea name="message" style="height:60px;"></textarea></td> </tr> <tr> <td>年龄:</td> <td><select name="age" class="easyui-combobox" > <option value="1">20~30</option> <option value="2">30~40</option> <option value="3">40以上</option> </select></td> </tr> <tr> <td>日期:</td> <td><input class="easyui-datebox" name="date" /></td> </tr> <tr> <td>数字:</td> <td><input class="easyui-numberbox" name="number" /></td> </tr> </table> <div> <a id="load" class="easyui-linkbutton" href="javascript:">加载本地数据</a> <a id="load2" class="easyui-linkbutton" href="javascript:">加载ajax数据</a> <a id="submit" class="easyui-linkbutton" href="javascript:">提交</a> <a id="clear" class="easyui-linkbutton" href="javascript:">清空</a> </div> </form> |
对应的js
|
1
2
3
4
5
6
7
8
9
10
11
12
13
14
15
16
17
|
$("#submit").on("click",function(){ $('#form').form("submit",{ url:"../../json/submit.json", onSubmit:function(pParam){ //附加表单以外的一些验证 //通过pParam附加一些提交参数 pParam.index = 1; return $('#form').form("validate"); }, success:function(data){ alert(data); } }); }); $("#clear").on("click",function(){ $('#form').form("reset"); }); |
注意表单中的easyui属性,运行的效果如:

3、树,直接看代码吧,代码有注释
|
1
2
3
4
5
6
7
8
9
10
|
$("#tree").tree({ url:"json/nav.json", method:"get", lines:true, onClick:function(node){ if(node.url && node.url.length > 0){ _this.add(node.text,node.url,node.id,node.icon); } } }); |

数的json文件
|
1
2
3
4
5
6
7
8
9
10
11
12
13
14
15
16
17
18
19
20
21
22
23
|
[ { "id":101,"text":"2、表单", "children":[ { "id":2, "text": "2.1、简单示例", "url":"views/form/form.html" }, { "id":3, "text": "2.2、常用示例", "url":"views/form/forms.html" } ] },{ "id":102,"text":"3、表格", "children":[ { "id":4, "text": "3.1、简单示例", "url":"views/grid/grid.html" }, { "id":5, "text": "3.2、明细示例", "url":"views/grid/gridDetail.html" }, { "id":6, "text": "3.2、行编辑示例", "url":"views/grid/edit.html" }, { "id":6, "text": "3.2、表格编辑示例", "url":"views/grid/edit2.html" } ] },{ "id":103,"text":"4、树", "children":[ { "id":4, "text": "4.1、简单示例", "url":"views/tree/tree.html" }, { "id":5, "text": "4.2、示例", "url":"views/tree/treeGird.html" } ] } ] |
如果把这个文件放在vs中,运行index.html时候回报错,请在web.config中配置,才能识别.json文件
|
1
2
3
4
5
|
<system.webServer> <staticContent> <mimeMap fileExtension=".json" mimeType="application/json" /> </staticContent> </system.webServer> |
源码地址:http://pan.baidu.com/s/1gdH8CCj
EasyUI的中午文档 和学习网站
http://www.zi-han.net/case/easyui/index.html
http://www.jeasyui.net/demo/380.html