目录
版本对应的坑
关键技术点
源码解析
将jar包引入到spring boot中
@EnableAutoConfiguration原理
JasyptSpringBootAutoConfiguration
一是其@Import的StringEncryptorConfiguration.class
二是其对spring环境中包含的PropertySource对象的处理
一是AbstractApplicationContext的refresh方法
二是BeanFactoryPostProcessor接口的作用
EnableEncryptablePropertySourcesPostProcessor
具体的解密过程
补充1:查看JDK提供的Cipher算法
补充2:PBE的基础算法demo,
参考:
首先介绍一下jasypt的使用方法
可以参考下面这篇文章:
Get史上最优雅的加密方式!没有之一!
版本对应的坑
使用的时候还是遇到一个坑,就是jasypt的版本与spring boot版本存在对应情况。可以看到jasypt是区分java7和java8的,也存在依赖spring版本的情况。
自己尝试了一下
在使用jasypt-spring-boot-starter的前提下
| jasypt版本 | springboot版本 |
| 2.1.0 | 2.1.0 |
| 1.5 | 1.4.2 |
| 1.5 | 1.5.3 |
| 1.8 | 1.4.2 |
关键技术点
下面说一下jasypt的两个关键的技术实现点
一是如何实现对spring环境中包含的PropertySource对象实现加密感知的
二是其默认的PBEWITHMD5ANDDES算法是如何工作的,并澄清一下在使用jasypt的时候最常遇到的一个疑问:既然你的password也配置在properties文件中,那么我拿到了加密的密文和password,不是可以直接解密吗?
源码解析
总结来说:其通过BeanFactoryPostProcessor#postProcessBeanFactory方法,获取所有的propertySource对象,将所有propertySource都会重新包装成新的EncryptablePropertySourceWrapper
解密的时候,也是使用EncryptablePropertySourceWrapper#getProperty方法,如果通过 prefixes/suffixes 包裹的属性,那么返回解密后的值;如果没有被包裹,那么返回原生的值。从源头开始走起:
将jar包引入到spring boot中
spring.factories
org.springframework.boot.autoconfigure.EnableAutoConfiguration=com.ulisesbocchio.jasyptspringboot.JasyptSpringBootAutoConfiguration
这里补充一下spring boot @EnableAutoConfiguration的原理。
@EnableAutoConfiguration原理
@EnableAutoConfiguration注解@Import(AutoConfigurationImportSelector.class)
这个配置类实现了ImportSelector接口,重写其selectImports方法
List<String> configurations = getCandidateConfigurations(annotationMetadata,
attributes);
getCandidateConfigurations方法,会从classpath中搜索所有META-INF/spring.factories配置文件,然后,将其中org.springframework.boot.autoconfigure.EnableAutoConfiguration key对应的配置项加载到spring容器中。这样就实现了在spring boot中加载外部项目的bean或者第三方jar中的bean。
protected List<String> getCandidateConfigurations(AnnotationMetadata metadata,
AnnotationAttributes attributes) {
List<String> configurations = SpringFactoriesLoader.loadFactoryNames(
getSpringFactoriesLoaderFactoryClass(), getBeanClassLoader());
Assert.notEmpty(configurations,
"No auto configuration classes found in META-INF/spring.factories. If you "
+ "are using a custom packaging, make sure that file is correct.");
return configurations;
}
其内部实现的关键点有:
1. ImportSelector 该接口的方法的返回值都会被纳入到spring容器的管理中
2. SpringFactoriesLoader 该类可以从classpath中搜索所有META-INF/spring.factories配置文件,读取配置
@EnableAutoConfiguration注解中有spring.boot.enableautoconfiguration=true就开启,默认为true,可以在application.properties中设置此开关项
exclude()方法是根据类排除,excludeName是根据类名排除
在spring-boot-autoconfigure jar中,META-INF中有一个spring.factories文件,其中配置了spring-boot所有的自动配置参数,如GsonAutoConfiguration,配合@ConditionalOnClass(Gson.class),可以实现如果Gson bean存在,就启动自动注入,否则就不启用此注入的灵活配置
好了,有了上面的基础知识,我们就关心JasyptSpringBootAutoConfiguration
JasyptSpringBootAutoConfiguration
其@Import EnableEncryptablePropertySourcesConfiguration
关注两个地方
一是其@Import的StringEncryptorConfiguration.class
如果没有自定义的EncryptorBean,即jasyptStringEncryptor bean,那么就注册默认的jasyptStringEncryptor bean
@Conditional(OnMissingEncryptorBean.class)
@Bean(name = ENCRYPTOR_BEAN_PLACEHOLDER)
public StringEncryptor stringEncryptor(Environment environment) {
String encryptorBeanName = environment.resolveRequiredPlaceholders(ENCRYPTOR_BEAN_PLACEHOLDER);
LOG.info("String Encryptor custom Bean not found with name '{}'. Initializing String Encryptor based on properties with name '{}'",
encryptorBeanName, encryptorBeanName);
return new LazyStringEncryptor(() -> {
PooledPBEStringEncryptor encryptor = new PooledPBEStringEncryptor();
SimpleStringPBEConfig config = new SimpleStringPBEConfig();
config.setPassword(getRequiredProperty(environment, "jasypt.encryptor.password"));
config.setAlgorithm(getProperty(environment, "jasypt.encryptor.algorithm", "PBEWithMD5AndDES"));
config.setKeyObtentionIterations(getProperty(environment, "jasypt.encryptor.keyObtentionIterations", "1000"));
config.setPoolSize(getProperty(environment, "jasypt.encryptor.poolSize", "1"));
config.setProviderName(getProperty(environment, "jasypt.encryptor.providerName", "SunJCE"));
config.setSaltGeneratorClassName(getProperty(environment, "jasypt.encryptor.saltGeneratorClassname", "org.jasypt.salt.RandomSaltGenerator"));
config.setStringOutputType(getProperty(environment, "jasypt.encryptor.stringOutputType", "base64"));
encryptor.setConfig(config);
return encryptor;
});
}
StringEncryptor接口提供了加密和解密的方法
我们可以自定义StringEncryptor,如
@Configuration
public class JasyptConfig {
@Bean(name = "jasypt.encryptor.bean:jasyptStringEncryptor")
public StringEncryptor stringEncryptor() {
PooledPBEStringEncryptor encryptor = new PooledPBEStringEncryptor();
SimpleStringPBEConfig config = new SimpleStringPBEConfig();
config.setPassword("password");
config.setAlgorithm("PBEWithMD5AndDES");
config.setKeyObtentionIterations("1000");
config.setPoolSize("1");
config.setProviderName("SunJCE");
config.setSaltGeneratorClassName("org.jasypt.salt.RandomSaltGenerator");
config.setStringOutputType("base64");
encryptor.setConfig(config);
return encryptor;
}
}
二是其对spring环境中包含的PropertySource对象的处理
@Configuration
@Import(StringEncryptorConfiguration.class)
public class EnableEncryptablePropertySourcesConfiguration implements EnvironmentAware {
private static final Logger LOG = LoggerFactory.getLogger(EnableEncryptablePropertySourcesConfiguration.class);
private ConfigurableEnvironment environment;
@Bean
public EnableEncryptablePropertySourcesPostProcessor enableEncryptablePropertySourcesPostProcessor() {
boolean proxyPropertySources = environment.getProperty("jasypt.encryptor.proxyPropertySources", Boolean.TYPE, false);
InterceptionMode interceptionMode = proxyPropertySources ? InterceptionMode.PROXY : InterceptionMode.WRAPPER;
return new EnableEncryptablePropertySourcesPostProcessor(environment, interceptionMode);
}
@Override
public void setEnvironment(Environment environment) {
this.environment = (ConfigurableEnvironment) environment;
}
}
其提供了两种模式来创建 分别为proxy和wrapper 默认情况下interceptionMode为wrapper
下面就是关键了,new了一个EnableEncryptablePropertySourcesPostProcessor
其implements BeanFactoryPostProcessor
这里又需要两个背景知识
一是AbstractApplicationContext的refresh方法
是启动spring容器的关键方法
// Allows post-processing of the bean factory in context subclasses.
postProcessBeanFactory(beanFactory);
// Invoke factory processors registered as beans in the context.
invokeBeanFactoryPostProcessors(beanFactory);
// Register bean processors that intercept bean creation.
registerBeanPostProcessors(beanFactory);
来注册我们下面的postProcessors
二是BeanFactoryPostProcessor接口的作用
BeanFactoryPostProcessor接口提供了postProcessBeanFactory方法,在容器初始化之后执行一次
invokeBeanFactoryPostProcessors,获取的手动注册的BeanFactoryPostProcessor
/**
* Invoke the given BeanFactoryPostProcessor beans.
*/
private static void invokeBeanFactoryPostProcessors(
Collection<? extends BeanFactoryPostProcessor> postProcessors, ConfigurableListableBeanFactory beanFactory) {
for (BeanFactoryPostProcessor postProcessor : postProcessors) {
postProcessor.postProcessBeanFactory(beanFactory);
}
}
可以看到postProcessors有4个
接下来看关键的EnableEncryptablePropertySourcesPostProcessor
EnableEncryptablePropertySourcesPostProcessor
public class EnableEncryptablePropertySourcesPostProcessor implements BeanFactoryPostProcessor, ApplicationListener<ApplicationEvent>, Ordered {
其实现了BeanFactoryPostProcessor以及Ordered接口
其中getOrder方法 让这个jasypt定义的BeanFactoryPostProcessor的初始化顺序最低,即最后初始化
我们知道spring中排序分为两种PriorityOrdered 和Ordered接口,一般来说就是PriorityOrdered 优于Ordered 其次都是按照order大小来的排序
我们就知道了接下来就执行EnableEncryptablePropertySourcesPostProcessor的postProcessBeanFactory方法,
@Override
public void postProcessBeanFactory(ConfigurableListableBeanFactory beanFactory) throws BeansException {
LOG.info("Post-processing PropertySource instances");
MutablePropertySources propSources = environment.getPropertySources();
StreamSupport.stream(propSources.spliterator(), false)
.filter(ps -> !(ps instanceof EncryptablePropertySource))
.map(s -> makeEncryptable(s, beanFactory))
.collect(toList())
.forEach(ps -> propSources.replace(ps.getName(), ps));
}
接下来,获取所有的propertySource对象
然后用stream方式遍历,如果是通过jasypt加密的,那么来执行方法makeEncryptable,使得propertySource对象具备加密解密的能力
private <T> PropertySource<T> makeEncryptable(PropertySource<T> propertySource, ConfigurableListableBeanFactory registry) {
StringEncryptor encryptor = registry.getBean(environment.resolveRequiredPlaceholders(ENCRYPTOR_BEAN_PLACEHOLDER), StringEncryptor.class);
PropertySource<T> encryptablePropertySource = interceptionMode == InterceptionMode.PROXY
? proxyPropertySource(propertySource, encryptor) : instantiatePropertySource(propertySource, encryptor);
LOG.info("Converting PropertySource {} [{}] to {}", propertySource.getName(), propertySource.getClass().getName(),
AopUtils.isAopProxy(encryptablePropertySource) ? "AOP Proxy" : encryptablePropertySource.getClass().getSimpleName());
return encryptablePropertySource;
}
首先获取StringEncrypt Bean,然后执行instantiatePropertySource方法。
private <T> PropertySource<T> instantiatePropertySource(PropertySource<T> propertySource, StringEncryptor encryptor) {
PropertySource<T> encryptablePropertySource;
if (propertySource instanceof MapPropertySource) {
encryptablePropertySource = (PropertySource<T>) new EncryptableMapPropertySourceWrapper((MapPropertySource) propertySource, encryptor);
} else if (propertySource.getClass().getName().equals("org.springframework.boot.context.config.ConfigFileApplicationListener$ConfigurationPropertySources")) {
//Some Spring Boot code actually casts property sources to this specific type so must be proxied.
encryptablePropertySource = proxyPropertySource(propertySource, encryptor);
} else if (propertySource instanceof EnumerablePropertySource) {
encryptablePropertySource = new EncryptableEnumerablePropertySourceWrapper<>((EnumerablePropertySource) propertySource, encryptor);
} else {
encryptablePropertySource = new EncryptablePropertySourceWrapper<>(propertySource, encryptor);
}
return encryptablePropertySource;
}
可以看到将所有propertySource都会重新包装成新的EncryptablePropertySourceWrapper
log日志:将上面的6个对象包装一下
最后的application.properties中的配置项结果
完整的转换完成后的EncryptablePropertySourceWrapper
到这里就注册postProcessor完成了,而且每个PropertySource warpped,具备了加密解密的能力,然后继续回到AbstractApplicationContext的流程
// Instantiate all remaining (non-lazy-init) singletons.
finishBeanFactoryInitialization(beanFactory);
具体的解密过程
当spring boot项目启动的时候,需要用到属性值的时候,就是将原本spring中的propertySource的getProperty()方法委托给其自定义的实现EncryptablePropertySourceWrapper,调用其getProperty()方法,在这个方法的自定义实现中。判断是否是已经加密的value,如果是,则进行解密。如果不是,那就返回原值。
调用EncryptablePropertySourceWrapper的getProperty方法,其extends PropertySource,override了getProperty方法
public class EncryptablePropertySourceWrapper<T> extends PropertySource<T> implements EncryptablePropertySource<T> {
private final PropertySource<T> delegate;
private final StringEncryptor encryptor;
public EncryptablePropertySourceWrapper(PropertySource<T> delegate, StringEncryptor encryptor) {
super(delegate.getName(), delegate.getSource());
Assert.notNull(delegate, "PropertySource delegate cannot be null");
Assert.notNull(encryptor, "StringEncryptor cannot be null");
this.delegate = delegate;
this.encryptor = encryptor;
}
@Override
public Object getProperty(String name) {
return getProperty(encryptor, delegate, name);
}
}
其getProperty就去调用其implements的EncryptablePropertySource的getProperty方法,于是执行下面
public interface EncryptablePropertySource<T> {
public default Object getProperty(StringEncryptor encryptor, PropertySource<T> source, String name) {
Object value = source.getProperty(name);
if(value instanceof String) {
String stringValue = String.valueOf(value);
if(PropertyValueEncryptionUtils.isEncryptedValue(stringValue)) {
value = PropertyValueEncryptionUtils.decrypt(stringValue, encryptor);
}
}
return value;
}
}
isEncryptedValue方法
private static final String ENCRYPTED_VALUE_PREFIX = "ENC(";
private static final String ENCRYPTED_VALUE_SUFFIX = ")";
public static boolean isEncryptedValue(final String value) {
if (value == null) {
return false;
}
final String trimmedValue = value.trim();
return (trimmedValue.startsWith(ENCRYPTED_VALUE_PREFIX) &&
trimmedValue.endsWith(ENCRYPTED_VALUE_SUFFIX));
}
如果通过 prefixes/suffixes 包裹的属性,那么返回解密后的值;
如果没有被包裹,那么返回原生的值;
如果是加密的值,那么就去解密
StandardPBEByteEncryptor
public byte[] decrypt(final byte[] encryptedMessage)
throws EncryptionOperationNotPossibleException {
if (encryptedMessage == null) {
return null;
}
// Check initialization
if (!isInitialized()) {
initialize();
}
if (this.saltGenerator.includePlainSaltInEncryptionResults()) {
// Check that the received message is bigger than the salt
if (encryptedMessage.length <= this.saltSizeBytes) {
throw new EncryptionOperationNotPossibleException();
}
}
try {
// If we are using a salt generator which specifies the salt
// to be included into the encrypted message itself, get it from
// there. If not, the salt is supposed to be fixed and thus the
// salt generator can be safely asked for it again.
byte[] salt = null;
byte[] encryptedMessageKernel = null;
if (this.saltGenerator.includePlainSaltInEncryptionResults()) {
final int saltStart = 0;
final int saltSize =
(this.saltSizeBytes < encryptedMessage.length? this.saltSizeBytes : encryptedMessage.length);
final int encMesKernelStart =
(this.saltSizeBytes < encryptedMessage.length? this.saltSizeBytes : encryptedMessage.length);
final int encMesKernelSize =
(this.saltSizeBytes < encryptedMessage.length? (encryptedMessage.length - this.saltSizeBytes) : 0);
salt = new byte[saltSize];
encryptedMessageKernel = new byte[encMesKernelSize];
System.arraycopy(encryptedMessage, saltStart, salt, 0, saltSize);
System.arraycopy(encryptedMessage, encMesKernelStart, encryptedMessageKernel, 0, encMesKernelSize);
} else if (!this.usingFixedSalt){
salt = this.saltGenerator.generateSalt(this.saltSizeBytes);
encryptedMessageKernel = encryptedMessage;
} else {
// this.usingFixedSalt == true
salt = this.fixedSaltInUse;
encryptedMessageKernel = encryptedMessage;
}
final byte[] decryptedMessage;
if (this.usingFixedSalt) {
/*
* Fixed salt is being used, therefore no initialization supposedly needed
*/
synchronized (this.decryptCipher) {
decryptedMessage =
this.decryptCipher.doFinal(encryptedMessageKernel);
}
} else {
/*
* Perform decryption using the Cipher
*/
final PBEParameterSpec parameterSpec =
new PBEParameterSpec(salt, this.keyObtentionIterations);
synchronized (this.decryptCipher) {
this.decryptCipher.init(
Cipher.DECRYPT_MODE, this.key, parameterSpec);
decryptedMessage =
this.decryptCipher.doFinal(encryptedMessageKernel);
}
}
// Return the results
return decryptedMessage;
} catch (final InvalidKeyException e) {
// The problem could be not having the unlimited strength policies
// installed, so better give a usefull error message.
handleInvalidKeyException(e);
throw new EncryptionOperationNotPossibleException();
} catch (final Exception e) {
// If decryption fails, it is more secure not to return any
// information about the cause in nested exceptions. Simply fail.
throw new EncryptionOperationNotPossibleException();
}
}
以spring.datasource.username为例:
明文是root
密文是ENC(X4OZ4csEAWqPCEvWf+aRPA==)
可以看到其salt是encryptedMessage的
System.arraycopy(encryptedMessage, saltStart, salt, 0, saltSize);
System.arraycopy(encryptedMessage, encMesKernelStart, encryptedMessageKernel, 0, encMesKernelSize);
0-7byte解析为salt,8-15byte解析为密文
然后就通过基本的PBE解析方式,来解析出来
ASCII码对应的结果就是root
PBE解析原理图:
加密过程:每一次随机产生新的salt,所以每一次加密后生成的密文是不同的
解密过程:
所以我们就可以知道,如果我获得了jasypt的password,那么由于其salt是放在encryptedMessage中的,那么我是没什么压力就可以解密的。
所以应该java -jar –Djasypt.encryptor.password=xxx abc.jar方式来启动服务。这样只要在运维端不泄露password,那么只拿到配置文件的密文,还是安全的。
补充1:查看JDK提供的Cipher算法
jasypt默认使用的是PBEWITHMD5ANDDES,其实JDK中由SunJCE所提供的。
可以通过下面的代码来查看JDK中提供了哪些Cipher算法
@Test
public void listJdkAlgorithm() {
/* Provider[] providers = Security.getProviders();
for (Provider provider :
providers) {
LOGGER.info("security provider: {} , version: {}", provider.getName(), provider.getVersion());
LOGGER.info("security provider info: {}", provider.getInfo());
}*/
Set<String> messageDigest = Security.getAlgorithms("Cipher");
for (String s :
messageDigest) {
LOGGER.info("MessageDigest: {}",s);
}
}
更全面的安全方面的算法,如摘要算法、签名算法等,参考:
Standard Algorithm Name Documentation
补充2:PBE的基础算法demo,
而且可以看出来,jasypt中使用了几乎相同的代码来进行加解密的
public class PBECipher {
static final String CIPHER_NAME = "PBEwithMD5AndDES";
public static byte[] encrypt(String password, byte[] salt, byte[] input) throws NoSuchAlgorithmException, InvalidKeySpecException, NoSuchPaddingException, InvalidAlgorithmParameterException, InvalidKeyException, BadPaddingException, IllegalBlockSizeException {
PBEKeySpec keySpec = new PBEKeySpec(password.toCharArray());
SecretKeyFactory secretKeyFactory = SecretKeyFactory.getInstance(CIPHER_NAME);
// 这个secretKey 就是我们将来要使用的加密的密钥
SecretKey secretKey = secretKeyFactory.generateSecret(keySpec);
// 传入1000,表示用户输入的口令,会与这个salt进行1000次的循环
PBEParameterSpec pbeParameterSpec = new PBEParameterSpec(salt, 1000);
Cipher cipher = Cipher.getInstance(CIPHER_NAME);
cipher.init(Cipher.ENCRYPT_MODE, secretKey, pbeParameterSpec);
return cipher.doFinal(input);
}
public static byte[] decrypt(String password, byte[] salt, byte[] input) throws NoSuchAlgorithmException,
InvalidKeySpecException, NoSuchPaddingException, InvalidAlgorithmParameterException, InvalidKeyException, BadPaddingException, IllegalBlockSizeException {
PBEKeySpec keySpec = new PBEKeySpec(password.toCharArray());
SecretKeyFactory secretKeyFactory = SecretKeyFactory.getInstance(CIPHER_NAME);
SecretKey secretKey = secretKeyFactory.generateSecret(keySpec);
PBEParameterSpec pbeParameterSpec = new PBEParameterSpec(salt, 1000);
Cipher cipher = Cipher.getInstance(CIPHER_NAME);
cipher.init(Cipher.DECRYPT_MODE, secretKey, pbeParameterSpec);
return cipher.doFinal(input);
}
}
测试
@Test
public void testPBE() throws NoSuchAlgorithmException, UnsupportedEncodingException, NoSuchPaddingException,
InvalidKeyException, IllegalBlockSizeException, BadPaddingException, InvalidAlgorithmParameterException, InvalidKeySpecException {
String message = "constfafa";
String password = "ydbs";
byte[] salt = SecureRandom.getInstanceStrong().generateSeed(8);
System.out.printf("salt: %032x
", new BigInteger(1, salt));
//加密和解密的salt是一样的
byte[] data = message.getBytes("UTF-8");
byte[] encrypt = PBECipher.encrypt(password, salt, data);
LOGGER.info("encrypted data: {}", Base64.getEncoder().encodeToString(encrypt));
byte[] decrypt = PBECipher.decrypt(password, salt, encrypt);
LOGGER.info("decrypted data: {}", new String(decrypt,"UTF-8"));
}
参考:
Jasypt之源码解析
官方github
8.Java 加解密技术系列之 PBE - crazyYong - 博客园
————————————————
版权声明:本文为CSDN博主「const伐伐」的原创文章,遵循CC 4.0 BY-SA版权协议,转载请附上原文出处链接及本声明。
原文链接:https://blog.csdn.net/u013905744/article/details/86508236
@Import注解的应用和扩展
将一个对象交给Spring来管理,有三种做法:
1、@Bean
2、@Componet(@Service等归为一类)
3、@Import
这里主要讲第三种做法,打开Spring源码
@Target(ElementType.TYPE)
@Retention(RetentionPolicy.RUNTIME)
@Documented
public @interface Import {
    Class<?>[] value();
}
@Import注解只有一个value方法,注释中指明该注解必须作用于@Configuration定义的类上,value可以为想要交给Spring管理的类文件数组、ImportSelector或ImportBeanDefinitionRegistrar,接下来我们依次执行三种做法
- 1、指定class数组
首先定义两个类public class Apple { } public class Banana { }
然后定义配置类,并用@Import注解装饰,输入两个自定义类
import com.lwl.entity.Apple;
import com.lwl.entity.Banana;
import org.springframework.context.annotation.Configuration;
import org.springframework.context.annotation.Import;

@Configuration
@Import({Apple.class, Banana.class})
public class AppConfig {
}
测试类中打印容器中类的名称
public class Test {
    public static void main(String[] args) {
        AnnotationConfigApplicationContext applicationContext = new AnnotationConfigApplicationContext(AppConfig.class);
        for (String s : applicationContext.getBeanDefinitionNames()) {
            System.out.println(s);
        }
    }
}
输出结果中可以看到Apple和Banana都被成功注入:

- 2、实现ImportSelector接口
定义一个新的实体,需求是通过ImportSelector将其注入Spring容器public class Berry { }
自定义selector实现ImportSelector接口,在方法中返回自定义的类路径,Spring会自动将该路径下的类注入到容器中
import org.springframework.context.annotation.ImportSelector;
import org.springframework.core.type.AnnotationMetadata;

public class BerryImportSelector implements ImportSelector {
    public String[] selectImports(AnnotationMetadata annotationMetadata) {
        return new String[]{"com.lwl.entity.Berry"};
    }
}
修改配置代码,在@Import中加入BerryImportSelector :
@Configuration
@Import({Apple.class, Banana.class, BerryImportSelector.class})
public class AppConfig {
}
测试代码不变,打印结果:

Berry确实被注入进来了
- 3、实现ImportBeanDefinitionRegistrar接口
再定义一个新的实体:public class Tomato { }
创建TomatoRegistrar实现ImportBeanDefinitionRegistrar接口,在方法当中将类注册到容器里,并将beanName修改为MyTomato:
import org.springframework.beans.factory.support.BeanDefinitionRegistry;
import org.springframework.beans.factory.support.RootBeanDefinition;
import org.springframework.context.annotation.ImportBeanDefinitionRegistrar;
import org.springframework.core.type.AnnotationMetadata;

public class TomatoRegistrar implements ImportBeanDefinitionRegistrar {
    public void registerBeanDefinitions(AnnotationMetadata annotationMetadata, BeanDefinitionRegistry beanDefinitionRegistry) {
        RootBeanDefinition beanDefinition = new RootBeanDefinition(Tomato.class);
        beanDefinitionRegistry.registerBeanDefinition("MyTomato", beanDefinition);
    }
}
修改AppConfig代码,将TomatoRegistrar放入@Import中:
@Configuration
@Import({Apple.class, Banana.class, BerryImportSelector.class, TomatoRegistrar.class})
public class AppConfig {
}
测试结果:

总结
在平时的业务开发当中,将对象放入容器,使用@Bean和@Compont基本就能够满足需求,但是@Import注解能够方便扩展功能,举例:
- 1、控制类注入时机
我希望能够通过一个简单的开关来控制是否注入Berry类,我们可以定义一个注解import org.springframework.context.annotation.Import; import java.lang.annotation.Retention; import java.lang.annotation.RetentionPolicy; @Retention(RetentionPolicy.RUNTIME) @Import({BerryImportSelector.class}) public @interface EnableBerry { }
修改@AppConfig,删除@Import中的BerryImportSelector.class,
import org.springframework.context.annotation.Configuration;
import org.springframework.context.annotation.Import;

@Configuration
@Import({Apple.class, Banana.class, TomatoRegistrar.class})
public class AppConfig {
}
这时候运行测试,发现Berry没有被注入到容器中:

如果在AppConfig类加上@EnableBerry注解
@Configuration
@Import({Apple.class, Banana.class, TomatoRegistrar.class})
@EnableBerry
public class AppConfig {
}
再次执行测试,Berry成功注入:

SpringCloud中的@EnableEureka、@EnableDiscoveryClient就是利用这个原理
- 2、通过代理来改变bean定义
Spring-Mybatis的@MapperScan注解,是由@Import注解所修饰,并注入了MapperScannerRegistrar类:@Retention(RetentionPolicy.RUNTIME) @Target({ElementType.TYPE}) @Documented @Import({MapperScannerRegistrar.class}) public @interface MapperScan {
它在registerBeanDefinitions方法中扫描了基础包,
public class MapperScannerRegistrar implements ImportBeanDefinitionRegistrar, ResourceLoaderAware {
public void registerBeanDefinitions(AnnotationMetadata importingClassMetadata, BeanDefinitionRegistry registry) {
 scanner.doScan(StringUtils.toStringArray(basePackages));
}
然后提取mapper产生代理类,最后注册到容器当中
作者:挡不住的柳Willow
链接:https://www.jianshu.com/p/e6b44d8cec5a
来源:简书
著作权归作者所有。商业转载请联系作者获得授权,非商业转载请注明出处。
@Repeatable 注解用于指示它注解声明的注解类型是可重复的。@Repeatable 的值用于指示一个注解类型,这个注解类型用来存放可重复的注解类型。
初次看这段文字时,觉得比较难以理解,经过思考,我认为 用户-角色场景可以通俗的解释 @Repeatable 注解。
功能描述
一个系统中可以设定多个角色,每个角色我们称之为 Role,系统定义的角色如下:
系统管理员:system_admin
业务管理员:biz_admin
客户:custom
一个用户(User)可以拥有其中的一个或者多个角色,用户拥有的角色列表我们称之为 Roles,假设有两个用户 User1、User2 ,他们的权限分别如下:
User1:system_admin
User2 :biz_admin、custom
通过 @Repeatable 注解来实现以上功能
定义角色注解 Role
package org.learn.annotation;


import java.lang.annotation.Documented;
import java.lang.annotation.ElementType;
import java.lang.annotation.Repeatable;
import java.lang.annotation.Retention;
import java.lang.annotation.RetentionPolicy;
import java.lang.annotation.Target;

@Target(ElementType.TYPE)
@Retention(RetentionPolicy.RUNTIME)
@Documented
@Repeatable(Roles.class)
public @interface Role {
    String value() default "";
}
这里需要说明 @Repeatable(Roles.class),它指示在同一个类中 @Role 注解是可以重复使用的,重复的注解被存放至 @Roles 注解中。
定义角色列表注解 Roles
package org.learn.annotation;


import java.lang.annotation.Documented;
import java.lang.annotation.ElementType;
import java.lang.annotation.Retention;
import java.lang.annotation.RetentionPolicy;
import java.lang.annotation.Target;

@Target(ElementType.TYPE)
@Retention(RetentionPolicy.RUNTIME)
@Documented
public @interface Roles {
    Role[] value();
}
@Roles 注解是如何存放 @Role 注解的呢?它定义了 Role[] value(); 用来存放可重复的注解。
这里提出一个问题,如果在同一个类中只有一个可重复的 @Role 注解,那这个值会被存入 @Roles 注解中吗?
定义 User1
package org.learn.annotation;

/**
 * @author zhibo
 * @date 2019/5/31 15:03
 */

@Role("system_admin")
public class User1 {
    private String name;

    public String getName() {
        return name;
    }

    public void setName(String name) {
        this.name = name;
    }
}
定义 User2
package org.learn.annotation;

/**
 * @author zhibo
 * @date 2019/5/31 15:03
 */

@Role("biz_admin")
@Role("custom")
public class User2 {
    private String name;

    public String getName() {
        return name;
    }

    public void setName(String name) {
        this.name = name;
    }
}
进行测试
package org.learn.annotation;

/**
 * @author zhibo
 * @date 2019/5/31 15:00
 */
public class RepeatableDemo {

    public static void main(String[] args) {
        if(User1.class.isAnnotationPresent(Roles.class)){
            Roles roles = User1.class.getAnnotation(Roles.class);
            System.out.println("User1的角色如下:");
            for (Role role : roles.value()){
                System.out.println(role.value());
            }
        }

        if(User2.class.isAnnotationPresent(Roles.class)){
            Roles roles = User2.class.getAnnotation(Roles.class);
            System.out.println("User2的角色如下:");
            for (Role role : roles.value()){
                System.out.println(role.value());
            }
        }
    }
}
执行 main 方法,输出如下: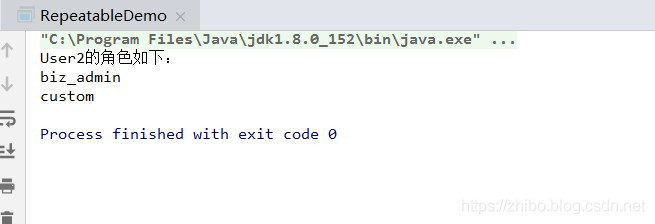
从执行结果中可以看到 User2 的角色列表,通过注解的值我们可以进行用户角色判定。
同时可以看到 User1 的角色是@Role("system_admin"),但是 User1 的角色没有被输出,在加上一个 Role 的话,就可以输出角色了。由此可见,如果只声明了一个注解 Role(被 @Repeatable 声明的注解),那么注解值是不会被存放至 Roles 注解中的,测试类中不会存在 Roles 注解。
解惑
修改 User1 的代码,为其增加 @Role("custom") 角色:
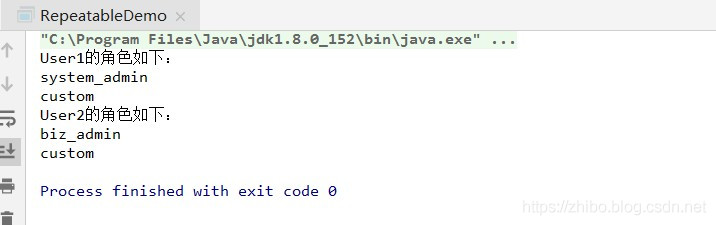
package org.learn.annotation;

/**
 * @author zhibo
 * @date 2019/5/31 15:03
 */

@Role("system_admin")
@Role("custom")
public class User1 {
    private String name;

    public String getName() {
        return name;
    }

    public void setName(String name) {
        this.name = name;
    }
}
再次执行 main 方法,结果如下:
https://blog.csdn.net/claram/article/details/90717270