1、什么是Rsync
Rsync(remote synchronize)是一个远程数据同步工具,可通过LAN/WAN快速同步多台主机间的文件。Rsync使用所谓的“Rsync算法”来使本地和远 程两个主机之间的文件达到同步,这个算法只传送两个文件的不同部分,而不是每次都整份传送,因此速度相当快。
Rsync本来是用于替代rcp的一个工具,目前由rsync.samba.org维护,所以rsync.conf文件的格式类似于samba的主配 置文件。Rsync可以通过rsh或ssh使用,也能以daemon模式去运行,在以daemon方式运行时Rsync server会打开一个873端口,等待客户端去连接。连接时,Rsync server会检查口令是否相符,若通过口令查核,则可以开始进行文件传输。第一次连通完成时,会把整份文件传输一次,以后则就只需进行增量备份。
Rsync支持大多数的类Unix系统,无论是Linux、Solaris还是BSD上都经过了良好的测试。此外,它在windows平台下也有相应的版本,如cwRsync和Sync2NAS等工具。
Rsync的特点/优点:
- 支持增量备份。
- 选择性的保持:符号链接,硬链接,文件属性,权限及时间等;
- 传输前执行压缩。适用于异地备份,镜像服务器等应用;
- 可以镜像保存整个目录树和文件系统;
- 无须特殊权限即可安装;
- 优化的流程,文件传输效率高;
- 使用rsh、ssh等方式来传输文件,当然也可以通过直接的socket连接;
rsync和scp的区别:
当文件数据很大时候: scp 无法备份大量数据,特点: 先统计信息,像windows复制。rsync 边复制,边比较,边统计。
2、Rsync安装
端口: 873(TCP)
模式:C/S 。 如果直接使用命令rsync,就是点到点传输。
在远程同步任务中,负责发起rsync同步操作的客户机称为发起端,而负责响应来自客机的rsync同步操作的服务器称为备份源。
首先认识同步数据的方式:
- 推: 一台主机负责把数据传给其它主机,服务器开销大,适合后端服务器比较少;
- 拉: 所有主机定时去找一主机拉数据,可能会导致数据同步缓慢;
设计数据同步模式
安装方式一:rsync安装-rpm包安装(建议)
1,安装rsync的rpm包
[root@cdncenter yum.repos.d]# rpm -qf `which rsync`
rsync-2.6.8-3.1
2,启动rsync服务-使用xinetd服务来管理rsync服务
-
yum安装xinetd的rpm包即可;
[root@cdncenter yum.repos.d]# rpm -qa|grep xinet
xinetd-2.3.14-10.el5
- 使用xinetd启动rsync服务;
[root@cdncenter yum.repos.d]#vim /etc/xinetd.d/rsync
#将disable=yes 改为 disable=no
[root@cdncenter yum.repos.d]# service xinetd restart
#验证rsync是否启动成功
[root@cdncenter yum.repos.d]# netstat -antup | grep 873
-
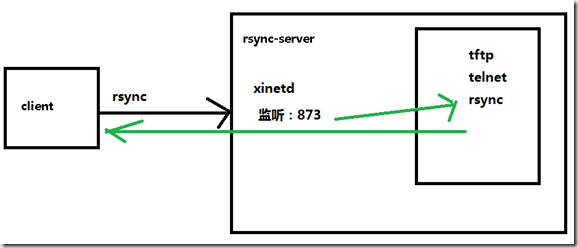
xinetd管理rsync服务,工作原理;
3,启动rsync服务-使用deamon方式启动rsync,此种方式将在“RSYNC03-搭建rsync服务器,不使用系统用户实现数据备份”详细描述。
安装方式二:rsync安装-源码包安装(不建议)
下载地址:https://download.samba.org/pub/rsync/
- 安装rsync
[root@localhost ~]# tar zxf rsync-3.1.1.tar.gz
[root@localhost ~]# cd rsync-3.1.1
[root@localhost rsync-3.1.1]# ./configure --prefix=/usr/local/rsync && make clean && make && make install
- 修改配置文件
[root@localhost rsync-3.1.1]# cd /usr/local/rsync/
[root@localhost rsync-3.1.1]# mkdir etc
[root@localhost rsync-3.1.1]# cd etc
[root@localhost etc]# vi rsyncd.conf
注:配置文件修改方法将在“RSYNC03-搭建rsync服务器,不使用系统用户实现数据备份”详细描述,只需注意配置文件路径即可,此处步骤-略。
- 启动rsync服务-使用xinetd服务来管理rsync服务
修改/etc/xinetd.d/rsync文件,将disable = yes 改为 disable = no,并修改server路径,改为源码安装后的rsync路径.
[root@cdncenter yumwarehouse]# vim /etc/xinetd.d/rsync

# default: off
# description: The rsync server is a good addition to an ftp server, as it
#       allows crc checksumming etc.
service rsync
{
        disable = yes
        socket_type     = stream
        wait            = no
        user            = root
        server          = /usr/local/rsync/bin/rsync
        server_args     = --daemon
        log_on_failure  += USERID
}
[root@cdncenter yum.repos.d]# service xinetd restart
#验证rsync是否启动成功
[root@cdncenter yum.repos.d]# netstat -antup | grep 873
- 启动rsync服务-使用deamon方式启动rsync
[root@localhost etc]# /usr/local/rsync/bin/rsync --daemon --config=/usr/local/rsync/etc/rsyncd.conf
3、Rsync命令
格式:rsync 【选项】源文件 目标文件
常见的选项:
-a,--archive(存档) 归档模式,表示以递归的方式传输文件,并且保持文件属性,等同于加了参数-rlptgoD
-r,–recursive 对子目录以递归模式处理
-l,--links 表示拷贝链接文件
-p , --perms 表示保持文件原有权限
-t , --times 表示保持文件原有时间
-g , --group 表示保持文件原有属用户组
-o , --owner 表示保持文件原有属主
-D , --devices 表示块设备文件信息
-z , --compress 表示压缩传输
-H 表示硬连接文件
-A 保留ACL属性信息
-P same as --partial –progress,显示传输进度,并保留那些因故没有完全传输的文件,以便加快随后的再次传输
-u, --update 仅仅进行更新,也就是跳过所有已经存在于目标位置,并且文件时间晚于要备份的文件。(不覆盖更新的文件)
--port=PORT 指定其他的rsync服务端口 873
--delete 删除那些目标位置有而原始位置没有的文件
--password-file=FILE 从本地FILE中读取密码
--bwlimit=KBPS 限制I/O带宽,Kbytes /second
--filter “- 文件名”需要过滤的文件
--exclude= :需要过滤的文件
--progress 显示传输进度
-v 显示同步过程的详细信息
4、Rsync实战一:使用rsync命令同步数据
实战1:
src服务器和目录:10.80.0.162:/home/rpmpackage/saltmaster/
dst服务器和目录:10.80.0.1:/mpeg/mirrors/yumwarehouse/rhel6/
- 拉:在10.80.0.1执行
[root@cdncenter rhel6]# rsync -avP root@10.80.0.162:/home/rpmpackage/saltmaster/ /mpeg/mirrors/yumwarehouse/rhel6/
- 推:在10.80.0.162执行
[root@svn rpmpackage]# rsync -avP /home/rpmpackage/saltmaster/ root@10.80.0.1:/mpeg/mirrors/yumwarehouse/rhel6/
5、延伸(使用普通用户,设置目录acl)
备份10.80.0.1的/var/www/html 目录到10.80.0.161的/web-back。
创建用户rget1用于下载,读;创建用户rput1 用于上传,写。
10.80.0.1 (服务器)
10.80.0.161 (客户端)
在10.80.0.1上创建用户:
[root@10.80.0.1 Desktop]# useradd  rget1
[root@10.80.0.1 Desktop]# useradd rput1
[root@10.80.0.1 Desktop]# echo '123456'  | passwd --stdin rget1
[root@10.80.0.1 Desktop]# echo '123456'  | passwd --stdin rput1
[root@10.80.0.1 Desktop]# setfacl -R -m user:rput1:rwx /var/www/html/
#指定rput1用户可以对目录/var/www/html/拥有读写权限
[root@10.80.0.1 Desktop]# setfacl -R -m default:user:rput1:rwx /var/www/html/
#设置默认情况下rput1用户可以对/var/www/html/下,所有文件拥有可读写权限
[root@10.80.0.1 Desktop]# getfacl /var/www/html/
getfacl: Removing leading '/' from absolute path names
# file: var/www/html/
# owner: root
# group: root
user::rwx
user:rput1:rwx
group::r-x
mask::rwx
other::r-x
default:user::rwx
default:user:rput1:rwx
default:group::r-x
default:mask::rwx
default:other::r-x
[root@10.80.0.1 ~]# setfacl -R -m user:rget1:rwx /var/www/html/
[root@10.80.0.1 ~]# setfacl -R -m default:rget1:rwx /var/www/html/
开始备份测试:
#10.80.0.1: 创建用于测试的数据
[root@10.80.0.1 ~]# cp -r /boot/grub/ /var/www/html/
在10.80.0.161上:同步数据
[root@10.80.0.161 ~]# mkdir /web-back/
[root@10.80.0.161 ~]# rsync -azP --delete  rget1@10.80.0.1:/var/www/html/ /web-back/报错:
sent 306 bytes  received 148230 bytes  27006.55 bytes/sec
total size is 255182  speedup is 1.72
rsync: send_files failed to open "/var/www/html/grub/grub.conf": Permission denied (13)
解决:这是因为,对这个文件没有读权限的原因,在10.80.0.1执行:
[root@10.80.0.1 html]# ll /var/www/html/grub/grub.conf
-rw-------+ 1 root root 787 Apr  9 19:17 /var/www/html/grub/grub.conf
[root@10.80.0.1 html]# chmod 744 /var/www/html/grub/grub.conf
10.80.0.161执行:
[root@10.80.0.161 ~]#  rsync -azP --delete rget1@10.80.0.1:/var/www/html/ /web-back
rget1@10.80.0.1's password:
receiving incremental file list
grub/grub.conf
         787 100%  768.55kB/s    0:00:00 (xfer#1, to-check=11/18)

sent 31 bytes  received 886 bytes  366.80 bytes/sec
total size is 255182  speedup is 278.28
------未完待续


