CentOS下安装XAMPP详细教程
现在php的集成运行环境越来越多,个人比较喜欢XAMPP,更新速度快,好用,安装便捷。windows下面的安装,就是下一步、下一步,没什么好说的,详细说一下linux下面的安装,这里以CentOS为例进行说明。
一、 下载XAMPP
如果直接使用wget从xampp的官网上下载,由于各种墙,不能下载成功,可以在 该链接 中选择自己需要的版本。我选择的linux下,64位,5.6.14这个版本。
使用以下命令进行下载:
# wget http://sourceforge.net/projects/xampp/files/XAMPP%20Linux/5.6.14/xampp-linux-x64-5.6.14-0-installer.run
- 1
下载成功后,会在目录中看到名为:xampp-linux-x64-5.6.14-0-installer.run 的文件。
二、 安装
安装前,需要先给xampp安装包可执行的权限
# chmod 777 xampp-linux-x64-5.6.14-0-installer.run
- 1
运行 ./xampp-linux-x64-5.6.14-0-installer.run 进行安装操作。根据提示进行选择需要安装的部分即可:
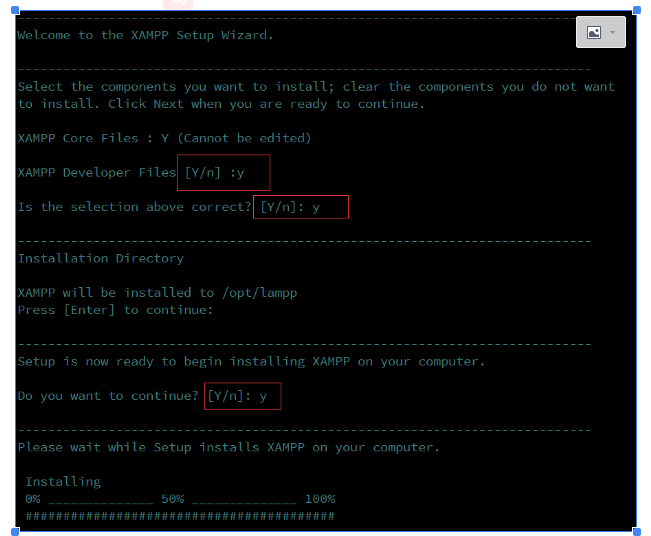
至此,安装步骤就已经完成了
启动xampp:
# /opt/lampp/lampp start
- 1
停止xampp:
# /opt/lampp/lampp stop
- 1
卸载xampp:
# /opt/lampp/lampp stop # rm -rf /opt/lampp
- 1
- 2
三、 让局域网均可访问
安装完成后,很多时候用locahost来访问时,是没有问题的,但是同一局域网里其它主机用域名访问时,常常不能访问,这里情况大概分为两种:
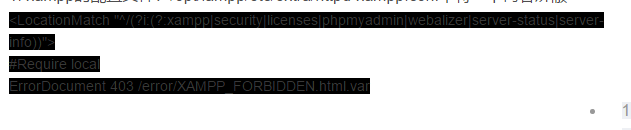
1. xampp的配置文件:/opt/lampp/etc/extra/httpd-xampp.conf中将一下内容屏蔽
<LocationMatch "^/(?i:(?:xampp|security|licenses|phpmyadmin|webalizer|server-status|server-info))"> #Require local ErrorDocument 403 /error/XAMPP_FORBIDDEN.html.var
2. 如果按照以上修改后,还是不能访问,则可能是防火墙把80端口给干掉了,要么把防火墙关闭,要么配置一下80端口允许访问。
四、 安装设置
在默认的安装过程中,xampp所有均是没有密码的,为了安全,我们应该为xampp设置密码。该如何操作呢?
# /opt/lampp/lampp security
- 1
设置xampp的密码:
XAMPP: Quick security check…
XAMPP: Your XAMPP pages are NOT secured by a password.
XAMPP: Do you want to set a password? [yes] yew
XAMPP: Do you want to set a password? [yes] yes
XAMPP: Password:
XAMPP: Password (again):
用户名默认是:xampp
设置phpMyAdmin的密码:
XAMPP: The MySQL/phpMyAdmin user pma has no password set!!!
XAMPP: Do you want to set a password? [yes] yes
XAMPP: Password:
XAMPP: Password (again):
XAMPP: Setting new MySQL pma password.
XAMPP: Setting phpMyAdmin’s pma password to the new one.
设置mysql的root账户:
XAMPP: MySQL has no root passwort set!!!
XAMPP: Do you want to set a password? [yes] yes
XAMPP: Write the password somewhere down to make sure you won’t forget it!!!
XAMPP: Password:
XAMPP: Password (again):
XAMPP: Setting new MySQL root password.
XAMPP: Change phpMyAdmin’s authentication method.
设置ftp密码:
XAMPP: The FTP password for user ‘daemon’ is still set to ‘xampp’.
XAMPP: Do you want to change the password? [yes] yes
XAMPP: Password:
XAMPP: Password (again):
通过以上步骤,基本的设置就搞定了,已经达到可用的程度。想要了解更多的,可用google啦!