RabbitMQ队列
rabbitMQ是消息队列;想想之前的我们学过队列queue:threading queue(线程queue,多个线程之间进行数据交互)、进程queue(父进程与子进程进行交互或者同属于同一父进程下的多个子进程进行交互);如果两个独立的程序,那么之间是不能通过queue进行交互的,这时候我们就需要一个中间代理即rabbitMQ
消息队列:
- RabbitMQ
- ZeroMQ
- ActiveMQ
- ...........
一. 安装
1. ubuntu下安装rabbitMQ:
1.1 安装: sudo apt-get install rabbitmq-server
1.2 启动rabbitmq web服务:
sudo invoke-rc.d rabbitmq-server stop
sudo invoke-rc.d rabbitmq-server start
启动web管理:sudo rabbitmq-plugins enable rabbitmq_management
1.3 远程访问rabbitmq,自己增加一个用户,步骤如下:
- 创建一个admin用户:sudo rabbitmqctl add_user admin 123123
- 设置该用户为administrator角色:sudo rabbitmqctl set_user_tags admin administrator
- 设置权限:sudo rabbitmqctl set_permissions -p '/' admin '.' '.' '.'
- 重启rabbitmq服务:sudo service rabbitmq-server restart
之后就能用admin用户远程连接rabbitmq server了。
2. 安装python rabbitMQ modul:
- 管理员打开cmd,切换到python的安装路径,进入到Scripts目录下(如:C:UsersAdministratorAppDataLocalProgramsPythonPython35Scripts);
- 执行以下命令:pip install pika
- 校验是否安装成功:进入到python命令行模式,输入import pika,无报错代表成功;
二. 代码实现
1. 实现最简单的队列通信

produce


 1 import pika
 2 connection = pika.BlockingConnection(pika.ConnectionParameters("192.168.244.130",15672))
 3 channel = connection.channel()
 4 #声明queue
 5 channel.queue_declare(queue='hello')
 6 channel.basic_publish(exchange="",
 7                       routing_key='hello',
 8                       body = 'Hello World!')
 9 print("[x] Sent 'Hello World!")
10 connection.close()
consume
 1 import pika
 2
 3 connection = pika.BlockingConnection(pika.ConnectionParameters("192.168.16.23"))
 4 channel = connection.channel()
 5 channel.queue_declare(queue="holle",durable=True)
 6 def callback(ch,method,properties,body):
 7     print(ch,method,properties)
 8     print("[x] Received %r" %body)
 9     ch.basic_ack(delivery_tag=method.delivery_tag)
10 channel.basic_qos(prefetch_count=1)
11 channel.basic_consume(callback,
12                       queue="holle",
13                       no_ack=True)
14
15
16 print('[*] waiting for messages. to exit press ctrl+c')
17 channel.start_consuming()
2. RabbitMQ消息分发轮询
先启动消息生产者,然后再分别启动3个消费者,通过生产者多发送几条消息,你会发现,这几条消息会被依次分配到各个消费者身上
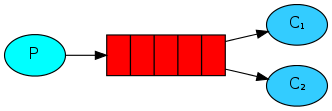
在这种模式下,RabbitMQ会默认把p发的消息公平的依次分发给各个消费者(c),跟负载均衡差不多
publishconsume通过执行pubulish.py和consume.py可以实现上面的消息公平分发,那假如c1收到消息之后宕机了,会出现什么情况呢?rabbitMQ是如何处理的?现在我们模拟一下:
 1 import pika
 2
 3 credentials = pika.PlainCredentials('admin', '123123')
 4 connection = pika.BlockingConnection(pika.ConnectionParameters(
 5     '192.168.16.82', 5672, '/', credentials))
 6
 7 channel = connection.channel()      #声明一个管道(管道内发消息)
 8
 9 channel.queue_declare(queue='cc')    #声明queue队列
10
11 channel.basic_publish(exchange='',
12                       routing_key='cc',  #routing_key 就是queue名
13                       body='Hello World!'
14 )
15 print("Sent 'Hello,World!'")
16 connection.close()      #关闭
17
18 publish.py
 1 import pika,time
 2
 3 credentials = pika.PlainCredentials('admin', '123123')
 4 connection = pika.BlockingConnection(pika.ConnectionParameters(
 5     '192.168.16.82', 5672, '/', credentials))
 6
 7 channel = connection.channel()
 8
 9 channel.queue_declare(queue='cc')
10
11 def callback(ch,method,properties,body):
12     print("->>",ch,method,properties)
13     time.sleep(15)              # 模拟处理时间
14     print("Received %r"%body)
15
16 channel.basic_consume(callback,     #如果收到消息,就调用callback函数处理消息
17                       queue="cc",
18                       no_ack=True)
19 print(' [*] Waiting for messages. To exit press CTRL+C')
20 channel.start_consuming()   #开始收消息
21
22 consume.py
在consume.py的callback函数里增加了time.sleep模拟函数处理,通过上面程序进行模拟发现,c1接收到消息后没有处理完突然宕机,消息就从队列上消失了,rabbitMQ把消息删除掉了;如果程序要求消息必须要处理完才能从队列里删除,那我们就需要对程序进行处理一下:
 1 import pika
 2
 3 credentials = pika.PlainCredentials('admin', '123123')
 4 connection = pika.BlockingConnection(pika.ConnectionParameters(
 5     '192.168.16.82', 5672, '/', credentials))
 6
 7 channel = connection.channel()      #声明一个管道(管道内发消息)
 8
 9 channel.queue_declare(queue='cc')    #声明queue队列
10
11 channel.basic_publish(exchange='',
12                       routing_key='cc',  #routing_key 就是queue名
13                       body='Hello World!'
14 )
15 print("Sent 'Hello,World!'")
16 connection.close()      #关闭
17
18 publish.py
 1 import pika,time
 2
 3 credentials = pika.PlainCredentials('admin', '123123')
 4 connection = pika.BlockingConnection(pika.ConnectionParameters(
 5     '192.168.16.82', 5672, '/', credentials))
 6
 7 channel = connection.channel()
 8
 9 channel.queue_declare(queue='cc')
10
11 def callback(ch,method,properties,body):
12     print("->>",ch,method,properties)
13     #time.sleep(15)              # 模拟处理时间
14     print("Received %r"%body)
15     ch.basic_ack(delivery_tag=method.delivery_tag)
16
17 channel.basic_consume(callback,     #如果收到消息,就调用callback函数处理消息
18                       queue="cc",
19                       )
20 print(' [*] Waiting for messages. To exit press CTRL+C')
21 channel.start_consuming()   #开始收消息
22
23 consume.py
通过把consume.py接收端里的no_ack=True去掉之后并在callback函数里面添加ch.basic_ack(delivery_tag = method.delivery_tag,就可以实现消息不被处理完不能在队列里清除。
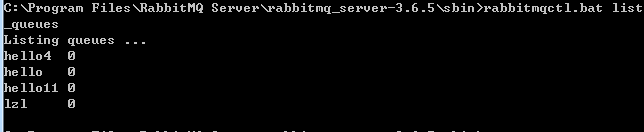
查看消息队列数:
3. 消息持久化
如果消息在传输过程中rabbitMQ服务器宕机了,会发现之前的消息队列就不存在了,这时我们就要用到消息持久化,消息持久化会让队列不随着服务器宕机而消失,会永久的保存下去
发送端:
 1 import pika
 2
 3 credentials = pika.PlainCredentials('admin', '123123')
 4 connection = pika.BlockingConnection(pika.ConnectionParameters(
 5     '192.168.16.82', 5672, '/', credentials))
 6
 7 channel = connection.channel()      #声明一个管道(管道内发消息)
 8
 9 channel.queue_declare(queue='cc',durable=True)    #队列持久化
10
11 channel.basic_publish(exchange='',
12                       routing_key='cc',  #routing_key 就是queue名
13                       body='Hello World!',
14                       properties=pika.BasicProperties(
15                           delivery_mode = 2     #消息持久化
16                       )
17 )
18 print("Sent 'Hello,World!'")
19 connection.close()      #关闭
 1 import pika,time
 2
 3 credentials = pika.PlainCredentials('admin', '123123')
 4 connection = pika.BlockingConnection(pika.ConnectionParameters(
 5     '192.168.16.82', 5672, '/', credentials))
 6
 7 channel = connection.channel()
 8
 9 channel.queue_declare(queue='cc',durable=True)
10
11 def callback(ch,method,properties,body):
12     print("->>",ch,method,properties)
13     time.sleep(15)              # 模拟处理时间
14     print("Received %r"%body)
15     ch.basic_ack(delivery_tag=method.delivery_tag)
16
17 channel.basic_consume(callback,     #如果收到消息,就调用callback函数处理消息
18                       queue="cc",
19                       )
20 print(' [*] Waiting for messages. To exit press CTRL+C')
21 channel.start_consuming()   #开始收消息
4. 消息公平分发
如果Rabbit只管按顺序把消息发到各个消费者身上,不考虑消费者负载的话,很可能出现,一个机器配置不高的消费者那里堆积了很多消息处理不完,同时配置高的消费者却一直很轻松。为解决此问题,可以在各个消费者端,配置perfetch=1,意思就是告诉RabbitMQ在我这个消费者当前消息还没处理完的时候就不要再给我发新消息了
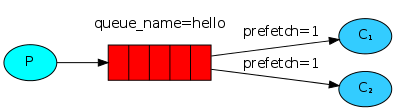
channel.basic_qos(prefetch_count=1)
带消息持久化+公平分发:
 1 import pika
 2
 3 credentials = pika.PlainCredentials('admin', '123123')
 4 connection = pika.BlockingConnection(pika.ConnectionParameters(
 5     '192.168.16.82', 5672, '/', credentials))
 6
 7 channel = connection.channel()      #声明一个管道(管道内发消息)
 8
 9 channel.queue_declare(queue='cc',durable=True)    #队列持久化
10
11 channel.basic_publish(exchange='',
12                       routing_key='cc',  #routing_key 就是queue名
13                       body='Hello World!',
14                       properties=pika.BasicProperties(
15                           delivery_mode = 2     #消息持久化
16                       )
17 )
18 print("Sent 'Hello,World!'")
19 connection.close()      #关闭
20
21 publish.py
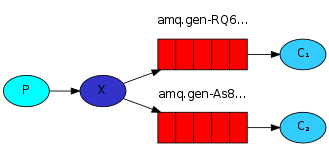
5. PublishSubscribe(消息发布订阅)
之前的例子都基本都是1对1的消息发送和接收,即消息只能发送到指定的queue里,但有些时候你想让你的消息被所有的Queue收到,类似广播的效果,这时候就要用到exchange了,
Exchange在定义的时候是有类型的,以决定到底是哪些Queue符合条件,可以接收消息:
- fanout: 所有bind到此exchange的queue都可以接收消息
- direct: 通过routingKey和exchange决定的那个唯一的queue可以接收消息
- topic:所有符合routingKey(此时可以是一个表达式)的routingKey所bind的queue可以接收消息
表达式符号说明:#代表一个或多个字符,*代表任何字符
例:#.a会匹配a.a,aa.a,aaa.a等
*.a会匹配a.a,b.a,c.a等
注:使用RoutingKey为#,Exchange Type为topic的时候相当于使用fanout
- headers: 通过headers 来决定把消息发给哪些queue
5.1 fanout接收所有广播:
 1 import pika
 2 import sys
 3
 4 credentials = pika.PlainCredentials('admin', '123123')
 5 connection = pika.BlockingConnection(pika.ConnectionParameters(
 6     '192.168.16.82', 5672, '/', credentials))
 7
 8 channel = connection.channel()
 9
10 channel.exchange_declare(exchange='logs',
11                          type='fanout')
12
13 message = "info: Hello World!"
14 channel.basic_publish(exchange='logs',
15                       routing_key='',   #广播不用声明queue
16                       body=message)
17 print(" [x] Sent %r" % message)
18 connection.close()
19
20 publish.py
 1 import pika
 2
 3 credentials = pika.PlainCredentials('admin', '123123')
 4 connection = pika.BlockingConnection(pika.ConnectionParameters(
 5     '192.168.16.82', 5672, '/', credentials))
 6
 7 channel = connection.channel()
 8
 9 channel.exchange_declare(exchange='logs',
10                          type='fanout')
11
12 result = channel.queue_declare(exclusive=True)  # 不指定queue名字,rabbit会随机分配一个名字,
13                                                 # exclusive=True会在使用此queue的消费者断开后,自动将queue删除
14 queue_name = result.method.queue
15
16 channel.queue_bind(exchange='logs',         # 绑定转发器,收转发器上面的数据
17                    queue=queue_name)
18
19 print(' [*] Waiting for logs. To exit press CTRL+C')
20
21 def callback(ch, method, properties, body):
22     print(" [x] %r" % body)
23
24 channel.basic_consume(callback,
25                       queue=queue_name,
26                       no_ack=True)
27 channel.start_consuming()
28
29 consume.py
5.3 更细致的消息过滤 topic:

 1 import pika
 2 import sys
 3
 4 credentials = pika.PlainCredentials('admin', '123123')
 5 connection = pika.BlockingConnection(pika.ConnectionParameters(
 6     '192.168.16.82', 5672, '/', credentials))
 7
 8 channel = connection.channel()
 9
10 channel.exchange_declare(exchange='topic_logs',
11                          type='topic')
12
13 routing_key = sys.argv[1] if len(sys.argv) > 1 else 'anonymous.info'
14 message = ' '.join(sys.argv[2:]) or 'Hello World!'
15 channel.basic_publish(exchange='topic_logs',
16                       routing_key=routing_key,
17                       body=message)
18 print(" [x] Sent %r:%r" % (routing_key, message))
19 connection.close()
20
21 publish.py
22
23 publish.py
 1 import pika
 2 import sys
 3
 4 credentials = pika.PlainCredentials('admin', '123123')
 5 connection = pika.BlockingConnection(pika.ConnectionParameters(
 6     '192.168.16.82', 5672, '/', credentials))
 7
 8 channel = connection.channel()
 9
10 channel.exchange_declare(exchange='topic_logs',
11                          type='topic')
12
13 result = channel.queue_declare(exclusive=True)
14 queue_name = result.method.queue
15
16 binding_keys = sys.argv[1:]
17 if not binding_keys:
18     sys.stderr.write("Usage: %s [binding_key]...
" % sys.argv[0])
19     sys.exit(1)
20
21 for binding_key in binding_keys:
22     channel.queue_bind(exchange='topic_logs',
23                        queue=queue_name,
24                        routing_key=binding_key)
25
26 print(' [*] Waiting for logs. To exit press CTRL+C')
27
28 def callback(ch, method, properties, body):
29     print(" [x] %r:%r" % (method.routing_key, body))
30
31 channel.basic_consume(callback,
32                       queue=queue_name,
33                       no_ack=True)
34
35 channel.start_consuming()
36
37 consume.py
5.4 RPC(Remote procedure call )双向通信:
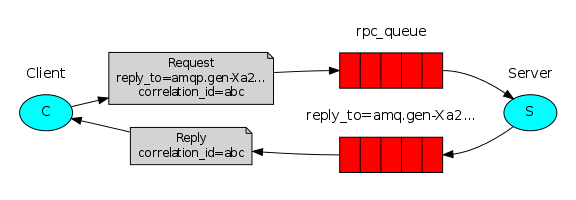
 1 import pika
 2 import time
 3
 4 credentials = pika.PlainCredentials('admin', '123123')
 5 connection = pika.BlockingConnection(pika.ConnectionParameters(
 6     '192.168.16.82', 5672, '/', credentials))
 7
 8 channel = connection.channel()
 9
10 channel.queue_declare(queue='rpc_queue')
11
12 def fib(n):
13     if n == 0:
14         return 0
15     elif n == 1:
16         return 1
17     else:
18         return fib(n-1) + fib(n-2)
19
20 def on_request(ch, method, props, body):
21     n = int(body)
22
23     print(" [.] fib(%s)" % n)
24     response = fib(n)
25
26     ch.basic_publish(exchange='',
27                      routing_key=props.reply_to,
28                      properties=pika.BasicProperties(correlation_id =
29                                                          props.correlation_id),
30                      body=str(response))
31     ch.basic_ack(delivery_tag = method.delivery_tag)
32
33 channel.basic_qos(prefetch_count=1)
34 channel.basic_consume(on_request, queue='rpc_queue')
35
36 print(" [x] Awaiting RPC requests")
37 channel.start_consuming()
38
39 rpc server
 1 import pika
 2 import uuid
 3
 4 class FibonacciRpcClient(object):
 5     def __init__(self):
 6         credentials = pika.PlainCredentials('admin', '123123')
 7         self.connection = pika.BlockingConnection(pika.ConnectionParameters(
 8     '192.168.16.82', 5672, '/', credentials))
 9
10         self.channel = self.connection.channel()
11
12         result = self.channel.queue_declare(exclusive=True)
13         self.callback_queue = result.method.queue
14
15         self.channel.basic_consume(self.on_response, no_ack=True,
16                                    queue=self.callback_queue)
17
18     def on_response(self, ch, method, props, body):
19         if self.corr_id == props.correlation_id:
20             self.response = body
21
22     def call(self, n):
23         self.response = None
24         self.corr_id = str(uuid.uuid4())
25         self.channel.basic_publish(exchange='',
26                                    routing_key='rpc_queue',
27                                    properties=pika.BasicProperties(
28                                          reply_to = self.callback_queue,
29                                          correlation_id = self.corr_id,
30                                          ),
31                                    body=str(n))
32         while self.response is None:
33             self.connection.process_data_events()
34         return int(self.response)
35
36 fibonacci_rpc = FibonacciRpcClient()
37
38 print(" [x] Requesting fib(30)")
39 response = fibonacci_rpc.call(30)
40 print(" [.] Got %r" % response)
41
42 rpc client
Redis
redis是一个key-value存储系统。和Memcached类似,它支持存储的value类型相对更多,包括string(字符串)、list(链表)、set(集合)、zset(sorted set --有序集合)和hash(哈希类型)。这些数据类型都支持push/pop、add/remove及取交集并集和差集及更丰富的操作,而且这些操作都是原子性的。在此基础上,redis支持各种不同方式的排序。与memcached一样,为了保证效率,数据都是缓存在内存中。区别的是redis会周期性的把更新的数据写入磁盘或者把修改操作写入追加的记录文件,并且在此基础上实现了master-slave(主从)同步。
一、Redis安装和基本使用
|
1
2
3
4
|
wget http://download.redis.io/releases/redis-3.0.6.tar.gztar xzf redis-3.0.6.tar.gzcd redis-3.0.6make |
启动服务端
|
1
|
src/redis-server |
启动客户端
|
1
2
3
4
5
|
src/redis-cliredis> set foo barOKredis> get foo"bar" |
二、Python操作Redis
|
1
2
3
4
5
6
7
|
sudo pip install redisorsudo easy_install redisor源码安装详见:https://github.com/WoLpH/redis-py |
1、操作模式
redis-py提供两个类Redis和StrictRedis用于实现Redis的命令,StrictRedis用于实现大部分官方的命令,并使用官方的语法和命令,Redis是StrictRedis的子类,用于向后兼容旧版本的redis-py。
|
1
2
3
4
5
6
7
8
|
#!/usr/bin/env python# -*- coding:utf-8 -*-import redisr = redis.Redis(host='10.211.55.4', port=6379)r.set('foo', 'Bar')print r.get('foo') |
2、连接池
redis-py使用connection pool来管理对一个redis server的所有连接,避免每次建立、释放连接的开销。默认,每个Redis实例都会维护一个自己的连接池。可以直接建立一个连接池,然后作为参数Redis,这样就可以实现多个Redis实例共享一个连接池。
|
1
2
3
4
5
6
7
8
9
10
|
#!/usr/bin/env python# -*- coding:utf-8 -*-import redispool = redis.ConnectionPool(host='10.211.55.4', port=6379)r = redis.Redis(connection_pool=pool)r.set('foo', 'Bar')print r.get('foo') |
3、操作
String操作,redis中的String在在内存中按照一个name对应一个value来存储。如图:

set(name, value, ex=None, px=None, nx=False, xx=False)
set name alex
    在Redis中设置值,默认,不存在则创建,存在则修改
    参数:
         ex,过期时间(秒)
         px,过期时间(毫秒)
         nx,如果设置为True,则只有name不存在时,当前set操作才执行
         xx,如果设置为True,则只有name存在时,岗前set操作才执行
setnx(name, value)
setnx aaa juck
    设置值,只有name不存在时,执行设置操作(添加)
set(name, value, time)
set ccc ccc ex 30
# 设置值
# 参数:
    # time_ms,过期时间(数字毫秒 或 timedelta对象
mset(*args, **kwargs)
批量设置值
如:
    mset(k1='v1', k2='v2')
    或
    mget({'k1': 'v1', 'k2': 'v2'})
get(name)
获取值
mget(keys, *args)
批量获取
如:
    mget('k','k2')
    或
    r.mget(['k', 'k2'])
getset(name, value)
getset k2 k2
设置新值并获取原来的值